TL;DR:
WPCode’s free Smart Conditional Logic lets you show or hide any snippet by login status, role, or page, right from Code Snippets » Add Snippet. No code required. Combine those conditions to control exactly who sees what, and where. Deeper targeting like a stored profile value, a schedule, or a device needs a paid plan.
Your website shouldn’t have to treat everyone the same.
You can set it up so that new Subscribers get a different welcome message. Perhaps customers stop seeing a “Become a Customer” banner. Or maybe only place an announcement for Editors, or for one custom role your membership plugin added.
WPCode’s Smart Conditional Logic handles this straight from the plugin’s dashboard. No PHP if statements or separate access-control plugin.
And most of the techniques below work on the free version of WPCode.
Key Takeaways
- Logged-in, User Role, and page targeting are free on the WPCode Lite plugin, no upgrade needed.
- Combine conditions with AND (one group) or OR (separate groups) to target exactly who and where at once.
- Smart Tags personalize what a snippet says, like a visitor’s name, on top of who sees it. (Pro feature.)
- User Meta, Scheduling, Device, and Location targeting all require a paid WPCode plan.
- Conditional Logic controls display only. Pair it with a membership plugin for real access control.
Prerequisites
First, to start with the free version, install WPCode from the WordPress plugin directory. If you want the Pro version, download it from the official WPCode website.
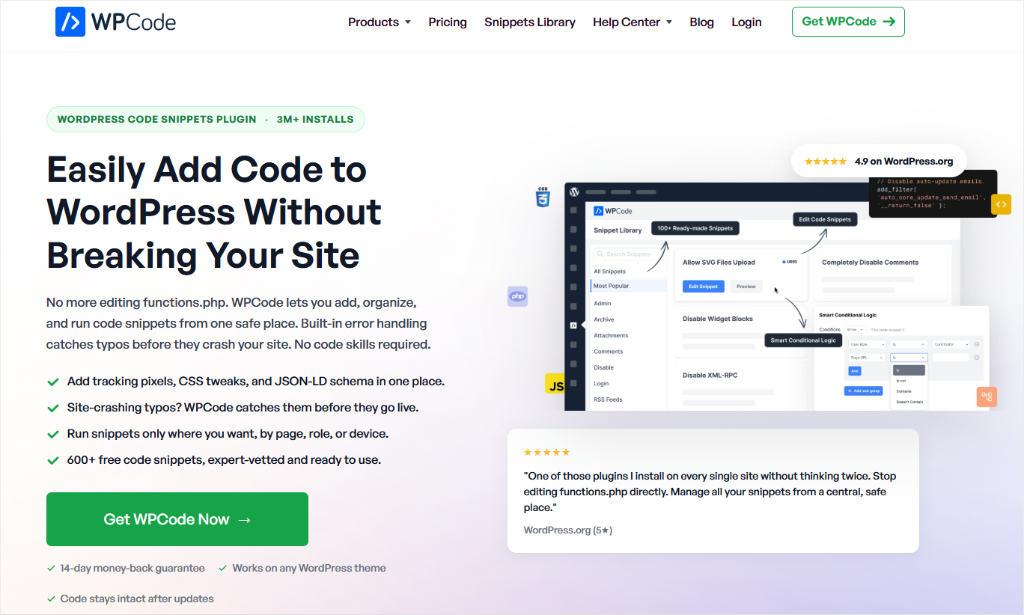
WPCode is the best code snippet manager. It lets you add custom code and control exactly where and to whom it runs, all from one dashboard instead of scattered across theme files and one-off plugins.
Check out this WPCode review to learn more about what this WordPress code snippet plugin can do.
Steps 1 through 5 below all work on the free plugin.
Go to Code Snippets » Add Snippet to start, or open a snippet you already have. Every change saves a revision you can restore, so experimenting with conditions here is safe.
How to Show Different Content to Different User Roles in WordPress
Now that you have WPCode ready, let’s begin. You can use the table of contents below to skip to any step you want to read.
- Step 1: Show Content Only to Logged-In Users
- Step 2: Show Content to a Specific User Role
- Step 3: Hide Content From a Specific Role
- Step 4: Combine Conditions With AND
- Step 5: Target Multiple Roles With OR
- Step 6: Personalize the Content With Smart Tags (Pro Feature)
- Step 7: Go Beyond Roles With User Meta (Pro Feature)
- Step 8: Add a Time Window With Scheduling (Pro Feature)
- Other Targeting Options Worth Knowing
- How WPCode Controls What Visitors See at a Glance
- It's Not Just About Content
- What WPCode Can and Can't Do
- FAQs: How to Show Different Content to Different User Roles in WordPress
- Show the Right Content to the Right Users
Step 1: Show Content Only to Logged-In Users
Start with the simplest version of this problem: showing something only to people who are logged in. For our example, we want to show a discount banner.
But it can be anything, not just a discount banner. It can be a members-only note, an announcement, or a different call to action.
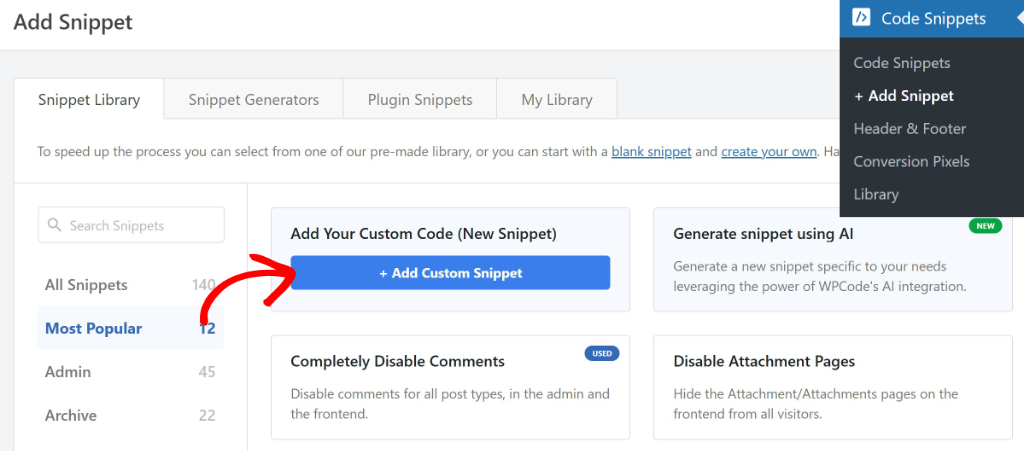
Go to Code Snippets » Add Snippet, and choose + Add Custom Snippet.
Give it a name, then add whatever you want logged-in visitors to see. For example, an HTML block, a discount message, a members-only note.
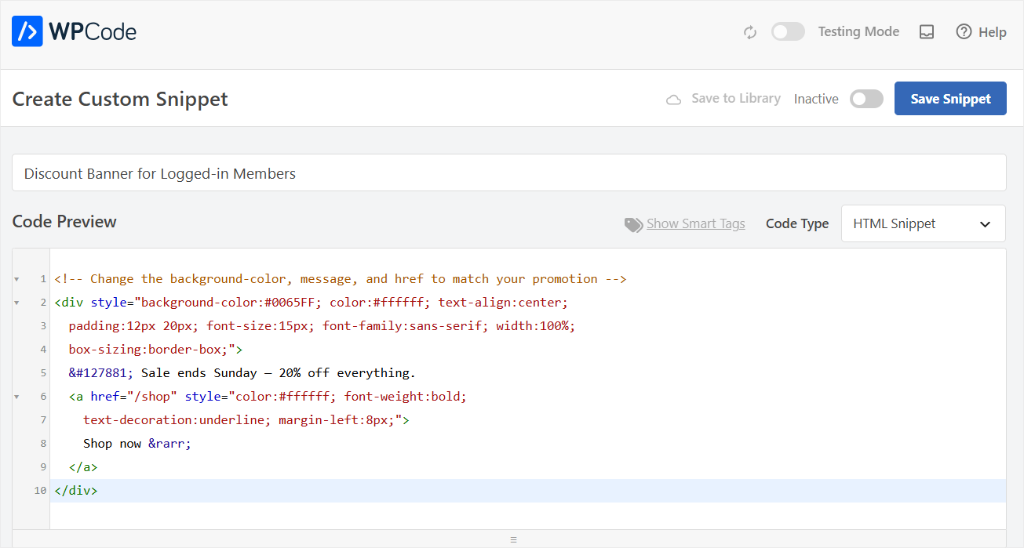
(If you need PHP instead for something more dynamic, you will use the same panel, conditions, just a different code type.)
After you add your code snippet, scroll down to Smart Conditional Logic and switch on Enable Logic. A new Conditions panel opens. Pick Logged-in as the condition type, leave the comparison on Is, and set the value to True.
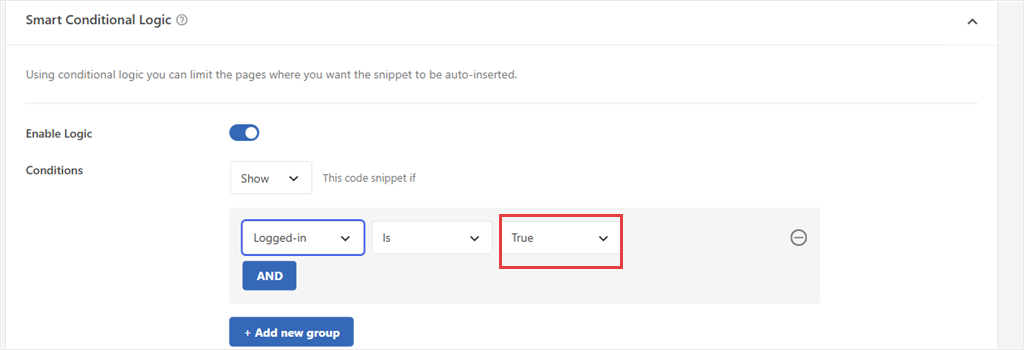
Save the snippet. Log out and check the page. You will not see the banner. Log back in, and it will appear.
Remember: Insertion controls where the snippet appears on the page. Conditional Logic controls who actually sees it.
A quick note before we continue:
The setup from Step 1, creating the snippet, naming it, and adding your content, is the same for every step below. We won’t repeat those instructions each time. From here on, we’ll walk you through what changes in the Conditional Logic panel only.
Step 2: Show Content to a Specific User Role
Using conditional logic to set up only logged-in users is broad. It doesn’t distinguish between your newest subscriber and your site admin.
For that, WPCode has a dedicated User Role condition.
With WPCode, the role dropdown reads your site’s real roles, not a generic Admin/Editor/Subscriber list. If a membership plugin adds a custom role, it shows up here too.
Say you want to show a “welcome, new member” note only to Subscribers, not to Editors or Admins browsing the same page.
In the same Conditions panel, change the condition type to User Role, then choose Subscriber from that same real-roles dropdown.
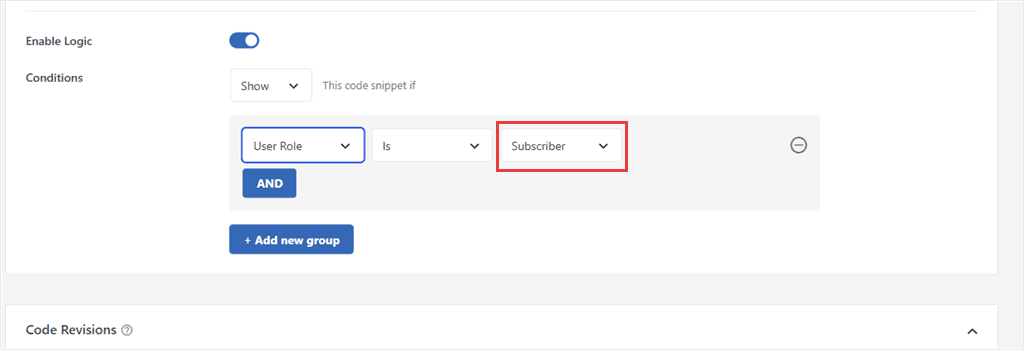
Save it. Only Subscribers see the snippet now. Everyone else, logged in or not, doesn’t.
⚠️ FYI:
A WordPress user can hold more than one role at once. If someone is both Subscriber and Customer, this condition matches on either.
Step 3: Hide Content From a Specific Role
Sometimes what you actually need is the opposite: show something to everyone except one group.
Say you’re running a “Become a Customer” promo across your site. It makes sense for visitors and Subscribers, but not for people who already bought.
In this situation, choose User Role again, this time for Editor or whichever role fits. The process is the same for any role in your dropdown.
Then switch the dropdown at the top of the Conditions panel from Show to Hide.
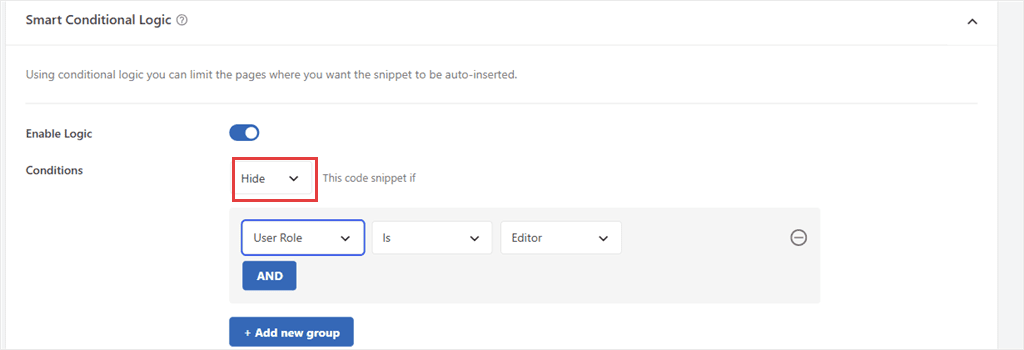
For our example, the logic reads: “Hide” this snippet if the visitor holds the “Editor” role. Everyone else still sees it.
That Show/Hide selector at the top of the panel controls the whole group of conditions underneath it. Decide whether you’re building a “show if” or a “hide if” rule before adding conditions.
Step 4: Combine Conditions With AND
One condition works for simple cases, but more complex scenarios often need more than one.
This is where Smart Conditional Logic stops being a light switch and starts being a targeting tool. Who sees it. Where they see it. Both in one rule.
Say you want to show a pricing widget only to logged-in Subscribers, and only on your dedicated pricing page, not site-wide.
To do this, add the first condition: User Role → Is → Subscriber. Then click the blue AND button inside that same rule box to add a second row underneath it.
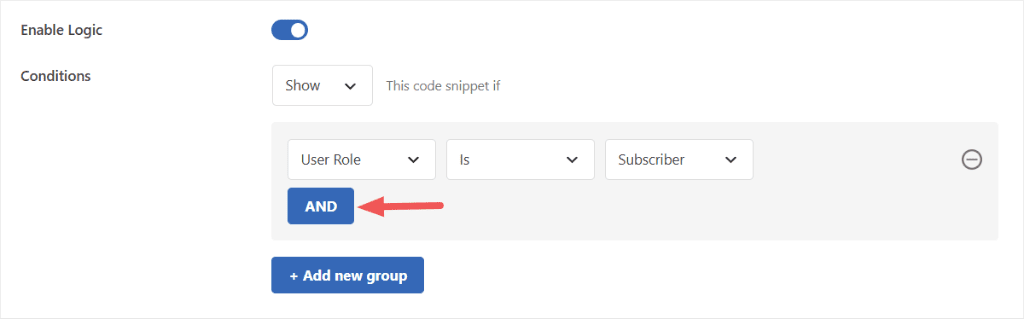
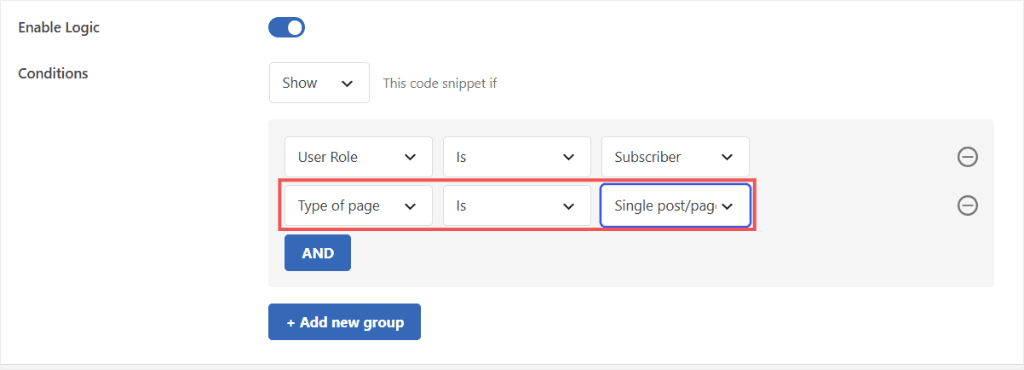
After that, set it to Type of page → Is → Single post/page.
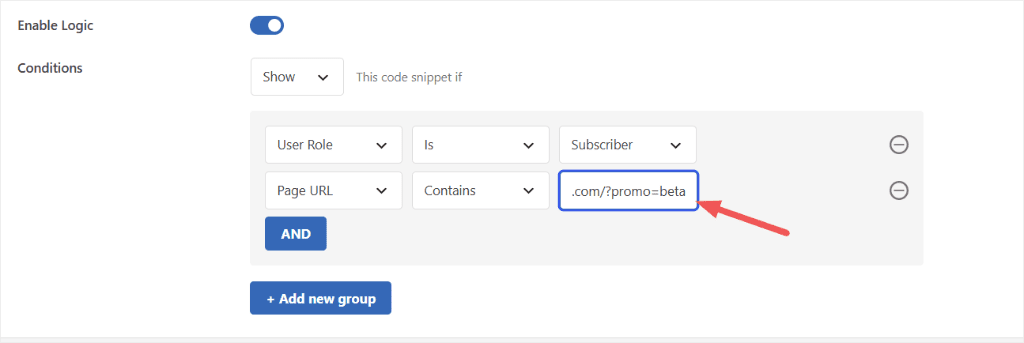
On top of that, you can use the Page URL option to match the full address, query string included. So it also covers a promo link like ?promo=beta without any extra condition type.
Both rows sit inside the same grey box, and that box is what makes them an AND group.
Every row inside one group has to be true at once: Subscriber and on that page, not Subscriber anywhere, and not everyone on that page.
Step 5: Target Multiple Roles With OR
What if two different roles should both see the same thing? Say Subscribers and Editors both need an announcement, but Contributors and Authors don’t.
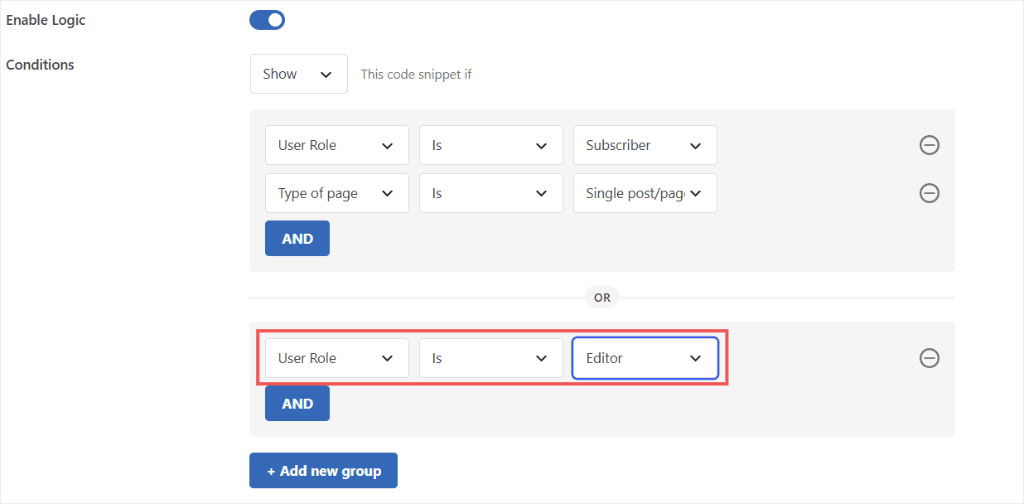
In this case, build your first group as before: User Role → Is → Subscriber. Then, instead of clicking AND, click the separate + Add new group button below the box.
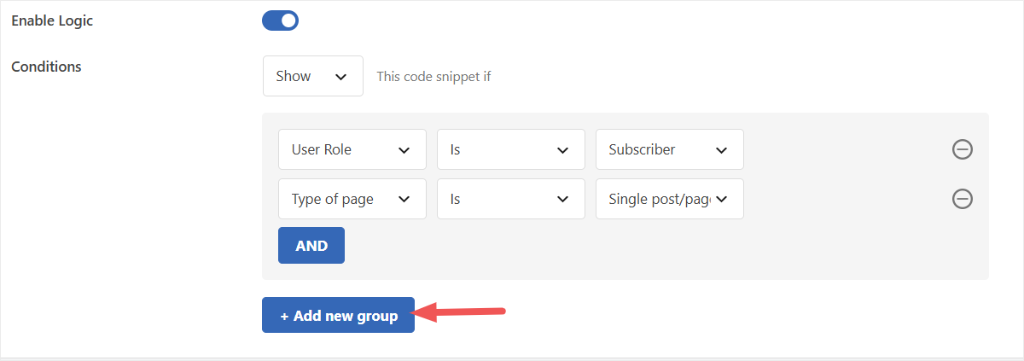
WPCode inserts a small OR label between the two groups. Set the second group’s condition to User Role → Is → Editor.
⚠️ Easy to mix up
AND adds a row to the group you’re already in. + Add new group starts a brand-new OR group. Click the wrong one and you’ll build “Subscriber AND Editor,” a rule nobody can ever match, instead of “Subscriber OR Editor.”
That’s a rule for two different audiences, built without writing a line of PHP.
Step 6: Personalize the Content With Smart Tags (Pro Feature)
Before you continue, we should make it clear that Smart Tags is a WPCode Pro feature.
So far, every example has controlled who sees a snippet. Smart Tags do something different: they change what the snippet says, not who sees it.
In the code editor, click Show Smart Tags above the code box.
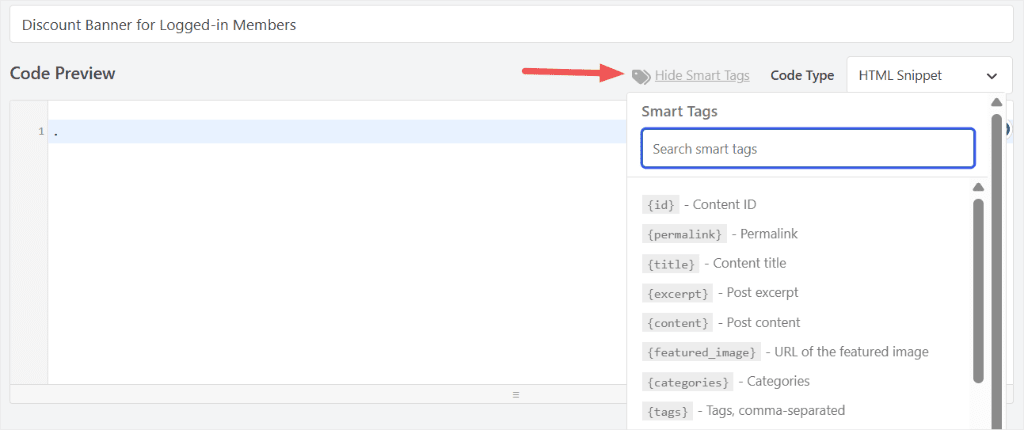
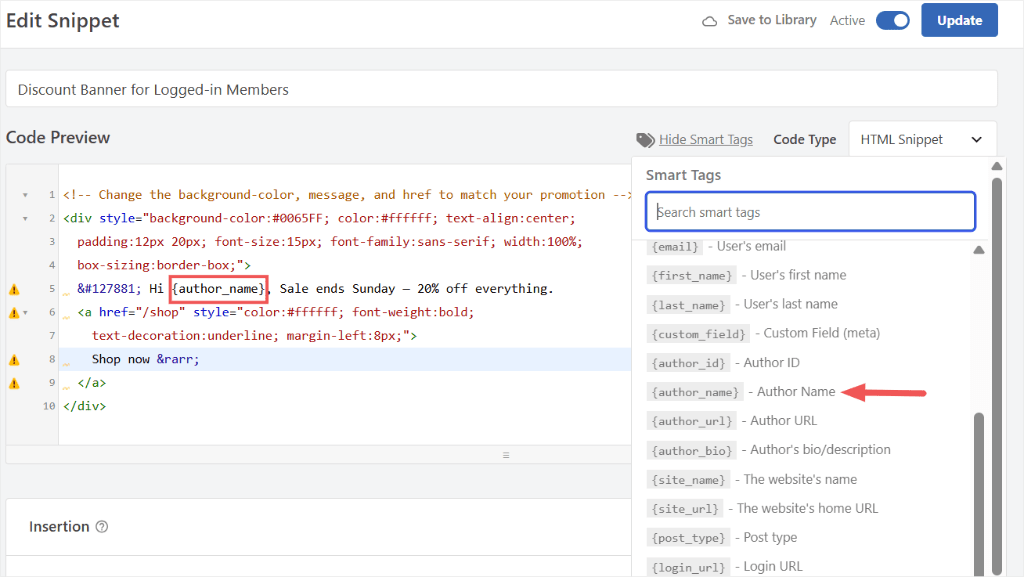
It inserts a placeholder like {author_name} wherever your cursor sits. WPCode swaps it for the logged-in visitor’s name when the page loads.
You can pair this with other rules.
For example, let us use our promotional banner example from above and see how we can make it more personalized.
<!-- Change the background-color, message, and href to match your promotion -->
<div style="background-color:#0065FF; color:#ffffff; text-align:center;
padding:12px 20px; font-size:15px; font-family:sans-serif; width:100%;
box-sizing:border-box;">
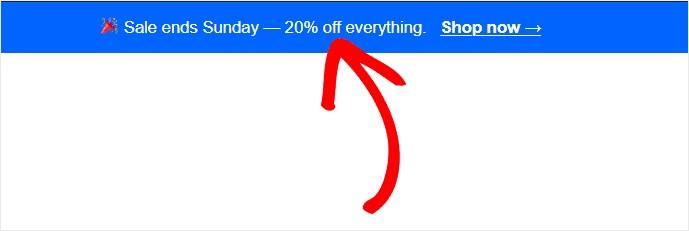
🎉 Hi {author_name}, Sale ends Sunday — 20% off everything.
<a href="/shop" style="color:#ffffff; font-weight:bold;
text-decoration:underline; margin-left:8px;">
Shop now →
</a>
</div>
We paired it with the Author Name Smart Tag. The same snippet becomes a personalized promotional message for the user specifically: their name, their content, no template system to build.
The screenshot below shows how that message appears in the front end of the website.

Smart Tags cover more than names. They cover post titles, permalinks, categories, even custom fields. Worth a look any time a snippet feels one-size-fits-all.
Here is documentation to help you get started with Smart Tags. Plus, you can browse the WPCode Snippet Library to see how others use Smart Tags in different scenarios.
Step 7: Go Beyond Roles With User Meta (Pro Feature)
A role tells WPCode which group someone belongs to. User Meta goes a level deeper: it targets a value stored on a user’s profile, a plan name, a signup date, or anything saved as custom user data.
Say you want to show your discount banner only to users on a specific plan.
If your membership plugin stores that as a membership_tier value on each user, pick User Meta from the Who (visitor) section.
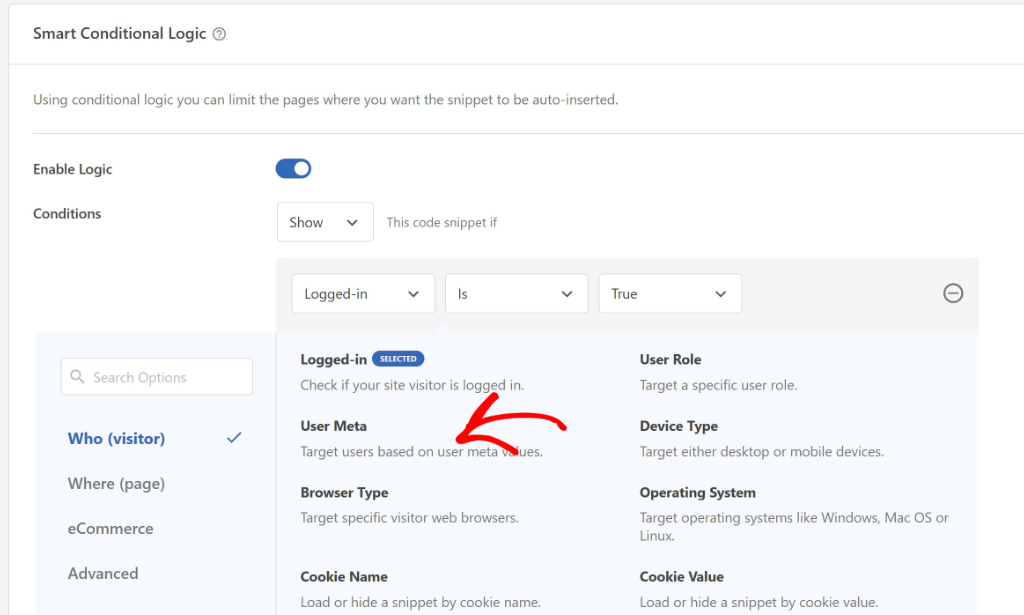
Then, enter membership_tier as the meta key, and set the value to gold. PHP snippets can reference the same condition logic directly in code when a rule needs to travel with the snippet itself.
Post Meta works the same way, but for the page instead of the visitor.
It targets a value stored on the post or page itself: a recipe’s calorie count, a listing’s price, a product’s size, anything saved as a custom field.
Say a food blog wants to show a “high protein” badge only on recipes where a protein_grams custom field is above a certain number.
Pick Post Meta from the Where (page) tab, enter protein_grams as the meta key, and set the comparison and value you need.
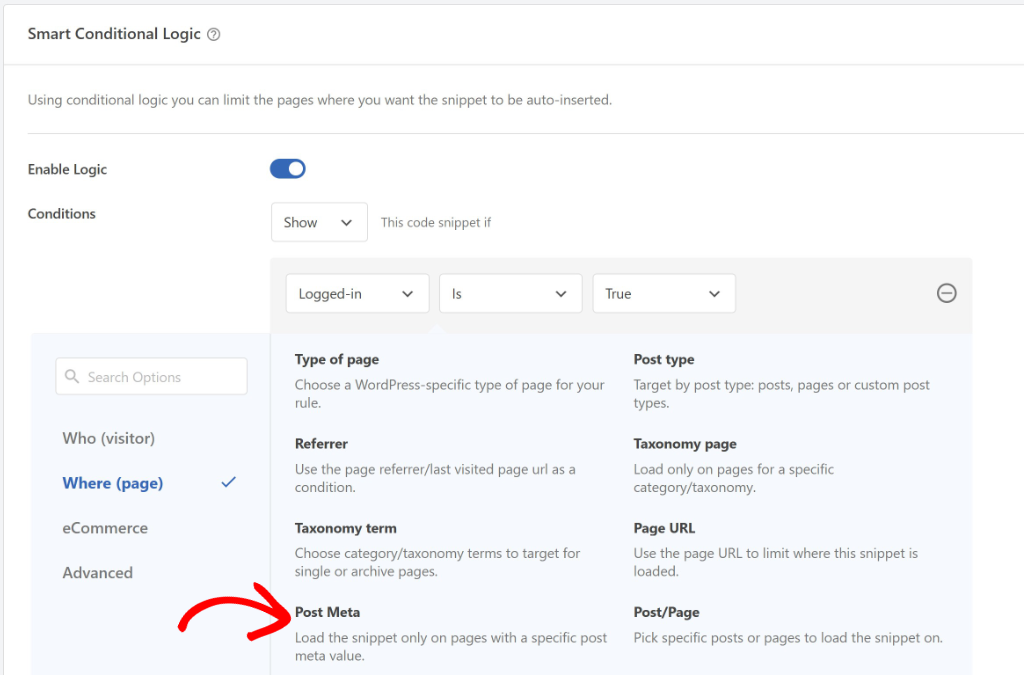
In a nutshell, User Meta targets the visitor, and Post Meta targets the page. Both require a paid WPCode plan, unlike the free conditions in Steps 1 through 5.
Step 8: Add a Time Window With Scheduling (Pro Feature)
Every condition so far answers who or where. Schedule conditions add when.
Say a Subscriber-only offer should run for exactly two weeks. Add your User Role condition as usual, then click AND and add a Date condition. Choose Is After and your start date, then add a second Date row set to Is Before your end date.
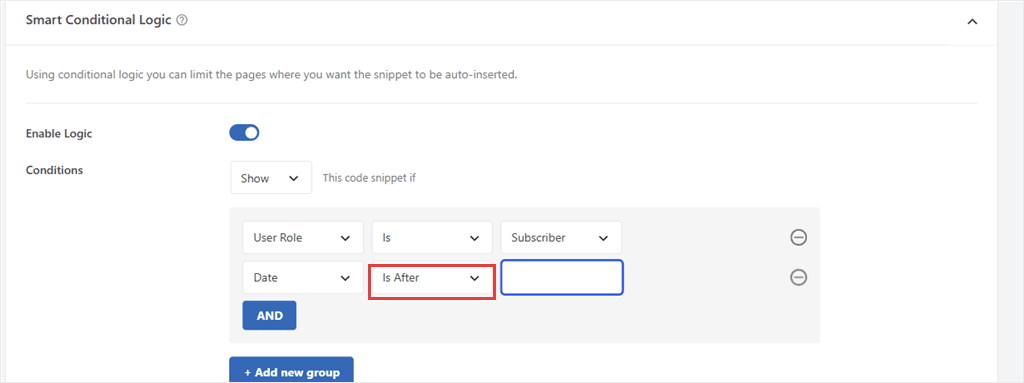
WPCode also offers Date & Time, Day of the Week, and Current time conditions, for anything from a Monday-only banner to a countdown that disappears at a set hour.
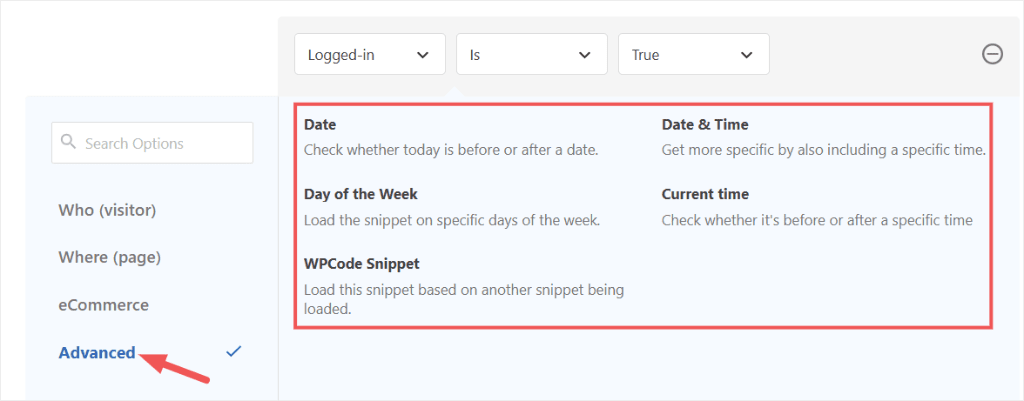
Other Targeting Options Worth Knowing
A few more conditions are worth knowing about, even if they’re not the focus here.
Referrer is free and targets visitors based on the page they arrived from: useful for showing a different message to people coming from an email campaign versus organic search.
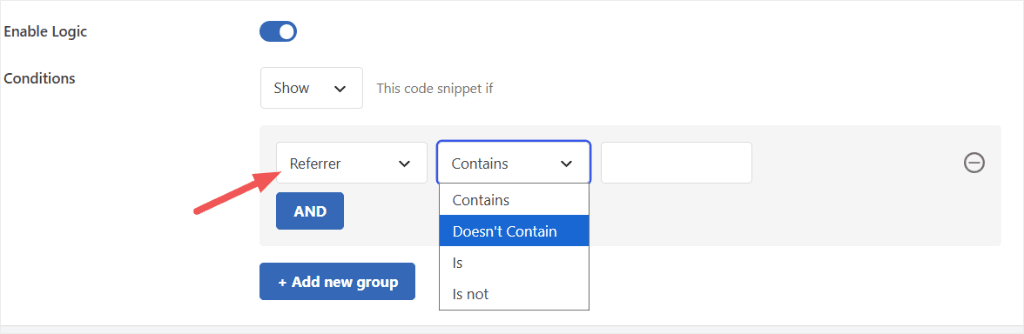
⚠️ Caching catch
A caching plugin can serve the same cached page to visitors who arrived from different referrers. Test with your cache temporarily disabled, or exclude the page from caching.
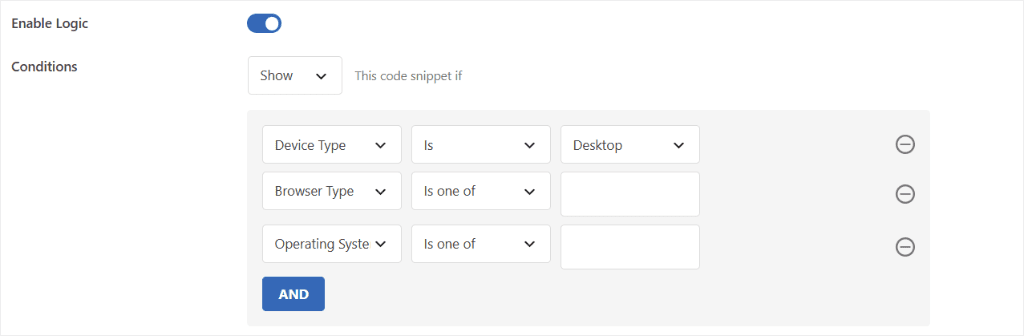
Device Type, Browser Type, and Operating System are paid-plan conditions that target what someone’s browsing on: desktop-only tips, mobile-specific CTAs.
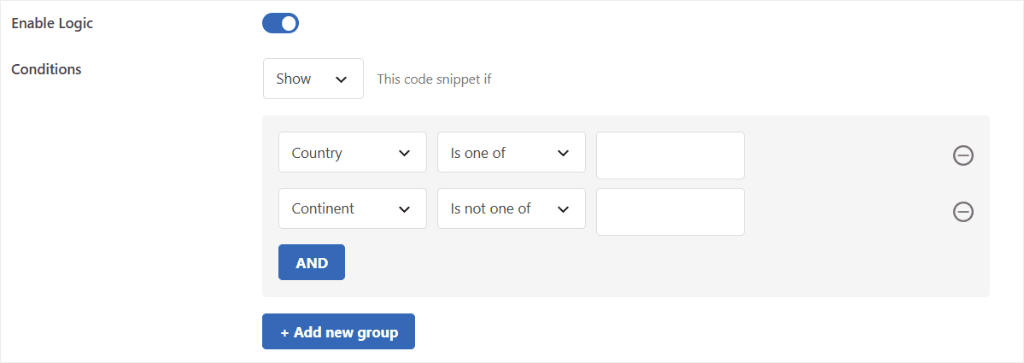
Location (country or continent) is also on the paid plan and needs the separate WPCode Location addon installed on top of a Pro or higher plan. It’s built for scenarios like region-specific compliance notices.
That’s the last of the individual conditions worth knowing by name (the full reference lives in WPCode’s docs if you want every option in one place). Here’s the bigger idea they all add up to.
How WPCode Controls What Visitors See at a Glance
Here’s every condition and feature from this guide in one place, what it does, and whether it’s free.
| Condition / Feature | Category | Free or Paid |
|---|---|---|
| Logged-in | Who | Free |
| User Role | Who | Free |
| Type of page / Page URL | Where | Free |
| Referrer | Who | Free |
| User Meta | Who | Paid |
| Post Meta | Where | Paid |
| Schedule / Date & Time / Day of Week / Current time | When | Paid |
| Device Type / Browser Type / OS | Who | Paid |
| Location (needs Location addon) | Who | Paid |
| Smart Tags* | Code editor | Paid |
*Not a Smart Conditional Logic condition. It personalizes what a snippet says (e.g. a visitor’s first name), not who sees it. Pairs with any condition above.
It’s Not Just About Content
Every example above has shown or hidden a message, a banner, or a welcome note. But Smart Conditional Logic doesn’t depend on what kind of snippet it’s attached to.
The same rules work on PHP, CSS, JavaScript, and tracking scripts, not just visible HTML.
A live chat widget that only loads for logged-in Customers, so a first-time visitor sees your pricing instead of a chat bubble aimed at existing buyers.
A CSS override that only renders on the pages your Editors are previewing. A tracking script that fires for one role, on one page, during one week.
So the question this article opened with, “How do I show different content to different roles?” turns out to be one instance of a bigger capability.
WPCode can decide when almost any piece of code runs, not just what a visitor sees, but who’s viewing, where they are, and when they arrive. Content is just the easiest place to see it working.
That capability is broad, which is exactly why it’s worth being clear about where it stops.
What WPCode Can and Can’t Do
Smart Conditional Logic controls whether a snippet displays. It’s not a page-locking or membership tool. A determined visitor who finds a direct link to a “hidden” page can often still open it; the content just won’t include your conditional snippet.
Use Smart Conditional Logic for:
- Role-based messages
- Personalized content
- Conditional scripts and tracking
- Scheduled promotions
- Page-specific targeting
Use a dedicated membership or access-control plugin instead when you need to:
- Lock an entire page or post behind a login
- Protect downloadable files
- Sell gated content
- Enforce access at the server level rather than the display level
Knowing which job you actually have avoids building something that looks secure and isn’t.
FAQs: How to Show Different Content to Different User Roles in WordPress
Can I show content only to logged-in users?
Yes. Use the Logged-in condition, set to True. It’s free on every WPCode plan.
What’s the difference between User Meta and Post Meta?
User Meta targets the visitor, a value stored on their profile, like a plan name or signup date. Post Meta targets the page, a value stored on the post or page itself, like a recipe’s calorie count or a listing’s price. Both require a paid WPCode plan.
What happens if a user has more than one role?
A WordPress user can hold more than one role at once. If someone is both Subscriber and Customer, a User Role condition matches on either, not just the one you had in mind.
Can I use Smart Conditional Logic on PHP, CSS, or JavaScript snippets, not just HTML?
Yes. The same conditions work on any snippet type: a live chat widget, a CSS override, a tracking script. Conditional Logic doesn’t care what kind of code it’s attached to.
Does hiding content with Smart Conditional Logic protect it from unauthorized users?
No. It controls whether the snippet displays, not who can access the underlying page or file. For real access control, pair it with a membership or access-control plugin.
Do I need a paid plan for any of this?
Not for the core scenarios. Logged-in, User Role, and page targeting are free. Smart Tags, User Meta, Scheduling, Device, and Location all require a paid plan. See the table above for the full breakdown.
Show the Right Content to the Right Users
With WPCode, you now have everything you need to show the right content to the right people. No PHP conditionals, separate plugin for role-based messaging, or guessing at role names.
Start with the free plugin to get conditional logic for Logged-in, User Role, and page targeting, which covers most of what’s in this guide, and they’re ready the moment you activate WPCode.
Want more than that? A stored value on a user’s profile, a scheduled window, a device, or a location. All of it unlocks with an upgrade, in the same panel you’re already using.
Install it, and start with Step 1.
Get WPCode for free →
See WPCode pricing →
Additional Resources
A few more guides to take this further:
- How to Disable Admin Bar in WordPress: the simpler, blanket version for when you don’t need it role-specific
- 9 Tips to Easily Manage Code Snippets in WordPress: more ways to keep a growing snippet library organized
- WPCode Review: the full breakdown of what WPCode does beyond conditional logic