TL;DR:
To add event schema markup in WordPress, install the free WPCode plugin, then use its Event Schema generator to fill in your event’s name, dates, venue, and tickets. Add a Page URL rule so the code only loads on that page, then test it with Google’s Rich Results Test. Valid markup makes you eligible for Google’s event results.
Your event page already includes the details people need, like the date, venue, and ticket information.
But if you want Google to understand that page specifically as an event, it helps to give those details a clearer structure.
That’s what Event Schema markup does.
It gives search engines information about your event in a format they can understand, including when it happens, where it’s held, and how people can get tickets.
WPCode’s Event Schema generator builds that markup for you, so you don’t have to create it from scratch even on the free version.
In this guide, we’ll show you how to check whether your event qualifies, generate the markup, fill out the details, and test everything before you publish.
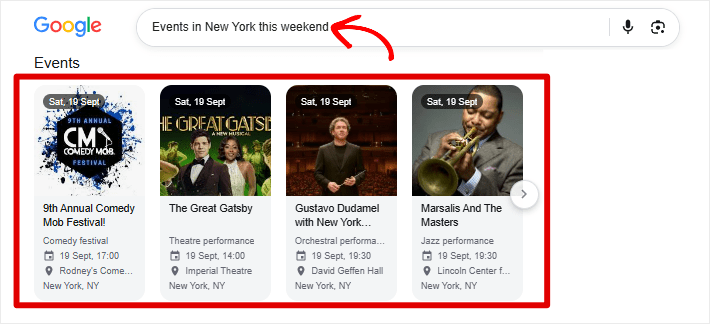
By the end, you’ll know how to give Google the information it needs to make your page eligible for Event Rich Snippets, like the example in the screenshot below, without relying on a dedicated SEO plugin.
Key Takeaways
- WPCode’s Event Schema generator is completely free to use
- Your event page needs a unique URL and a physical location to qualify
- The generator gives you the core Event Schema. You can fine-tune the generated code with WPCode’s editor.
- Google’s Rich Results Test confirms your markup works before you publish
Want to skip directly to how to add your Event Schema Markup in WordPress for free? Use this link.
You can also navigate this article with the table of contents below.
What Is Event Schema Markup?
Event Schema markup is structured data that tells search engines your page is about an event.
It follows the schema.org standard and is usually added to your page as JSON-LD.
It includes details such as the event name, dates, venue, organizer, performer, and ticket information.
Google can use those details to understand your event and make your page eligible for event rich snippets, where information like the date, location, and ticket link can appear directly in search results.
Valid markup only makes your page eligible for these results. It doesn’t guarantee that Google will show them.
Your page still needs to meet Google’s requirements and qualify for Event structured data. Here’s how to check.
Does Your Event Page Qualify?
Not every event page passes Google’s checks.
Google’s event structured data only works on pages built around one specific event, with its own URL. A page listing several events doesn’t qualify, even with the markup added.
| Qualifies | Doesn’t qualify |
|---|---|
/events/wordpress-workshop-2026/ (one event, own URL) | /events/ (a list of events) |
| A live workshop, meetup, or class | Business hours (“Open 8am to 5pm”) |
| Open to the general public | Invite-only or members-only events |
| A real, scheduled event | A sale or discount (“50% off this weekend”) |
On top of that, Google’s event experience requires a physical location.
A fully online event isn’t supported.
If your event takes place at a physical venue and is also streamed online, you can still use Event Schema. Just enter the physical venue as the event’s location.
Reasons to Consider WPCode Over Dedicated SEO Plugins
Dedicated SEO plugins can handle structured data for you, but you’re generally working within the schema types and fields available in their settings.
WPCode takes a different approach.
It’s a code management tool you can use for structured data, scripts, custom snippets, and other code across your site.
Its Schema Generators give you a simple form to create structured data without writing JSON-LD from scratch. You can then fine-tune the generated code directly when you need more control.
Here are more reasons to consider WPCode for your Event Schema:
- React to changes faster: Google regularly updates its Search features and structured data guidance. With direct access to your markup, you can make documented changes yourself instead of waiting for a plugin to add or change a setting.
- Add details your plugin doesn’t expose: If you need to add a property that your SEO plugin doesn’t offer, you can add it directly to the generated code in WPCode.
- Keep your existing SEO plugin: You don’t have to replace your current SEO plugin. Use it for the features you already rely on, then use WPCode when you need to add or customize Event Schema or other code snippets.
- Use one tool for more than SEO: WPCode isn’t limited to structured data. You can use it for custom PHP, CSS, JavaScript, tracking scripts, and other snippets, so you don’t need a separate plugin for every small customization.
Check What’s Already Adding Event Schema
Before you add anything, check whether another plugin is already generating Event Schema for this page.
You don’t want two plugins describing the same event. Duplicate markup doesn’t give Google more information and can create conflicting versions of the same event.
Some WordPress tools add Event Schema automatically:
| Tool | Event schema? |
|---|---|
| The Events Calendar | Yes, automatic |
| Rank Math (free) | Yes, built in |
| AIOSEO | Pro plans only |
| Yoast SEO | No built-in Event type; adds it through The Events Calendar |
To check if you already have an Event Schema, open your event page, view the page source, and search for "@type": "Event".
If you already have valid Event Schema, you can use that markup. If not, WPCode gives you a simple way to add and customize it.
How to Add Event Schema Markup in WordPress for Free
WPCode is the best WordPress code manager plugin.
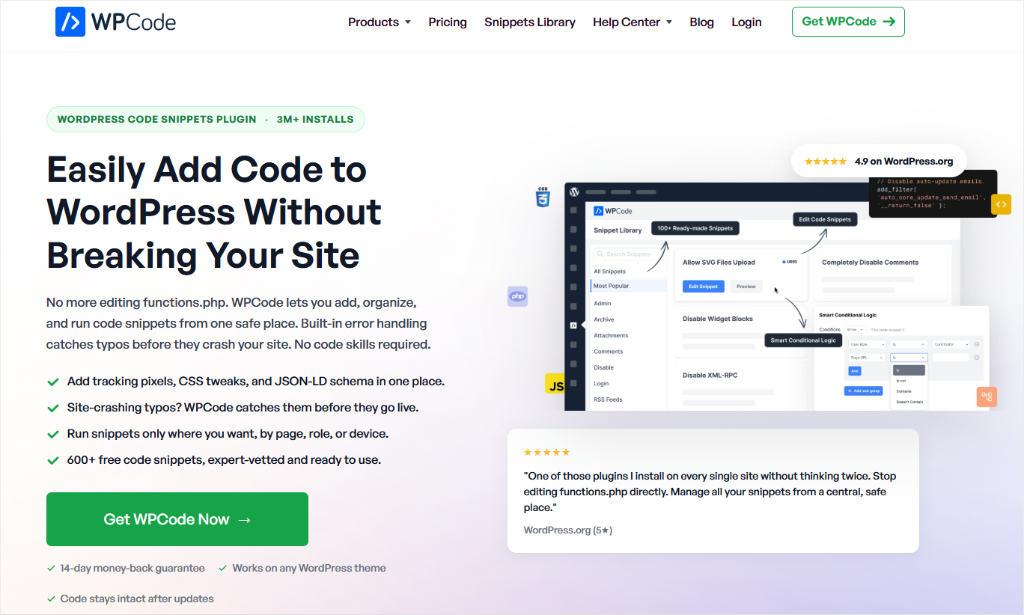
It lets you add and manage custom code without editing your theme files. You can add HTML, customize your site with CSS, and add JavaScript, PHP, tracking scripts, structured data, and other snippets from one place.
For this tutorial, we’ll use the free version of WPCode to create our Event Schema. The Pro version adds features such as Smart Tags and advanced targeting when you need more flexibility.
If you haven’t installed WPCode yet, follow our step-by-step guide to install and activate WPCode. Once it’s active, come back here and continue with the Event Schema Generator.
For a broader look at what WPCode can do, see our WPCode review.
Step 1: Open WPCode’s Event Schema Generator
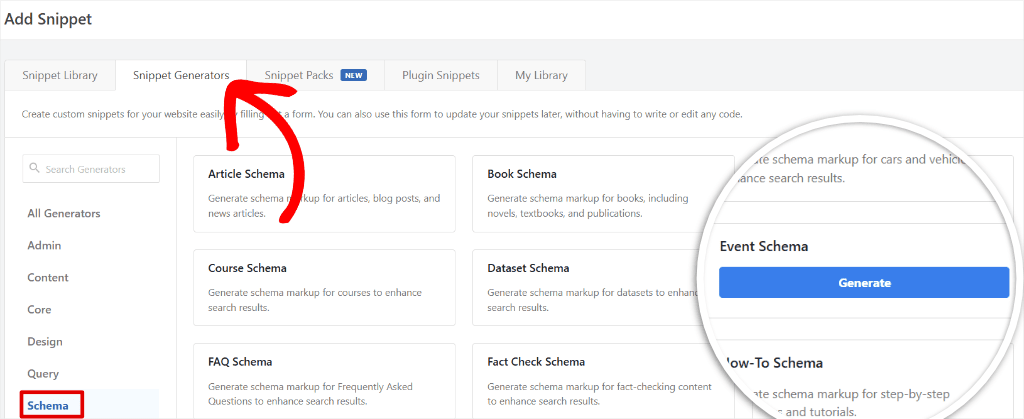
Once WPCode is installed and activated, go to Code Snippets » Add Snippet, then click the Snippet Generators tab. Use the search bar or select “Schema” from the left menu.
Then, click Generate in the “Event Schema” tab to open the generator.
Step 2: Fill In Your Event Details
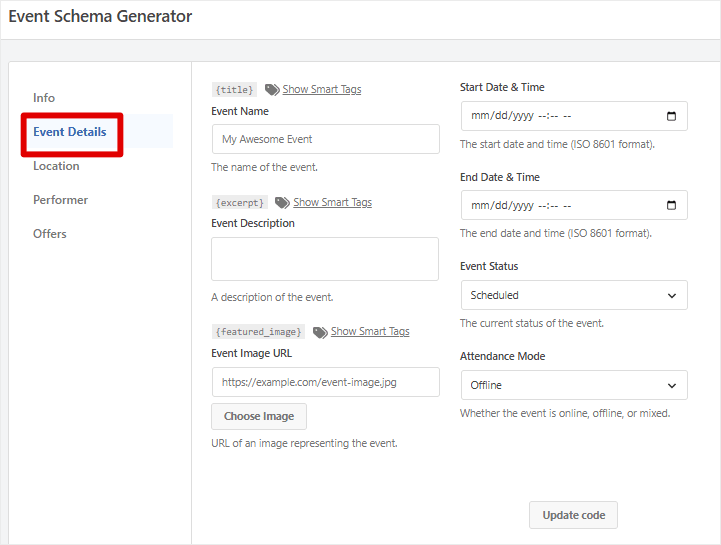
The generator opens on four tabs: Event Details, Location, Performer, and Offers. What you add here becomes the information in your Event Schema, so make sure it matches what’s shown on your page.
Let’s walk through each option.
Event Details
Click Event Details and enter the Event Name (the event itself, not the venue) and a short Event Description. Set the Start Date & Time and End Date & Time.
There’s also an Event Image URL field. Google treats the image as optional, but it’s worth filling in because Google can use it to make your result more useful. Paste the URL of an image that represents your event.
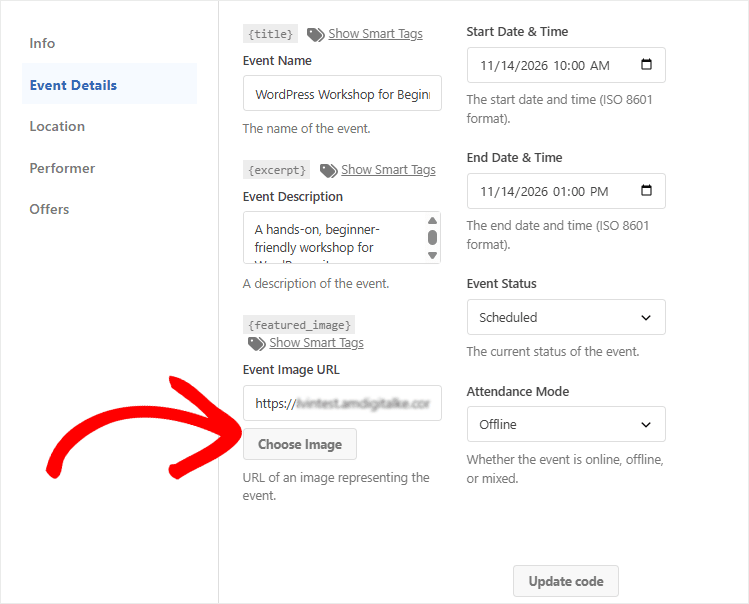
Event Status is set to Scheduled by default, which is what you want for a normal upcoming event. Attendance Mode is set to Offline, which works for in-person events.
Leave both as they are unless your event has a different status or format.
Location
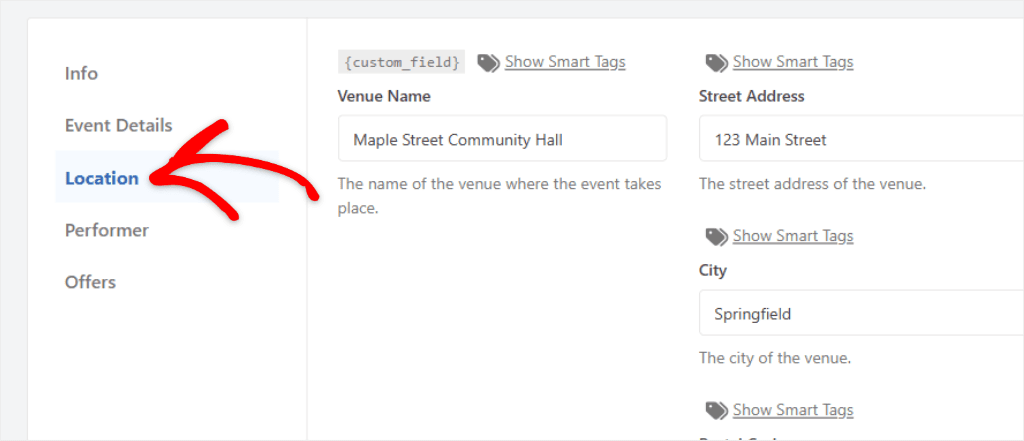
Switch to the Location tab next.
Google requires an event location, so you can’t skip this tab. Start with the Venue Name, then add the Street Address, City, Postal Code, and Country Code (a two-letter ISO code such as US, GB, or CA).
You don’t need to type a time zone. Google falls back to the time zone of the venue you just entered.
Performer and Offers
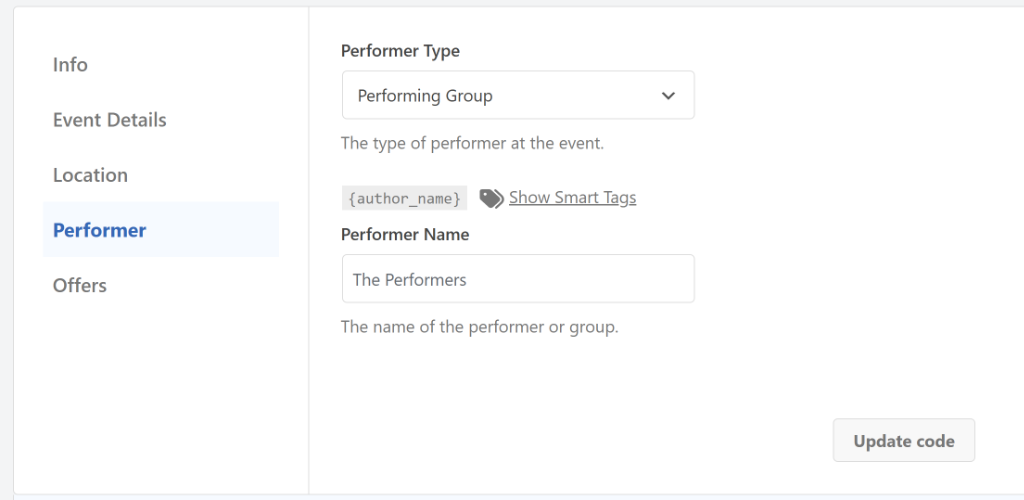
If someone is performing at your event, open Performer, choose the Performer Type, and enter their name. If there isn’t a performer, leave it set to No Performer.
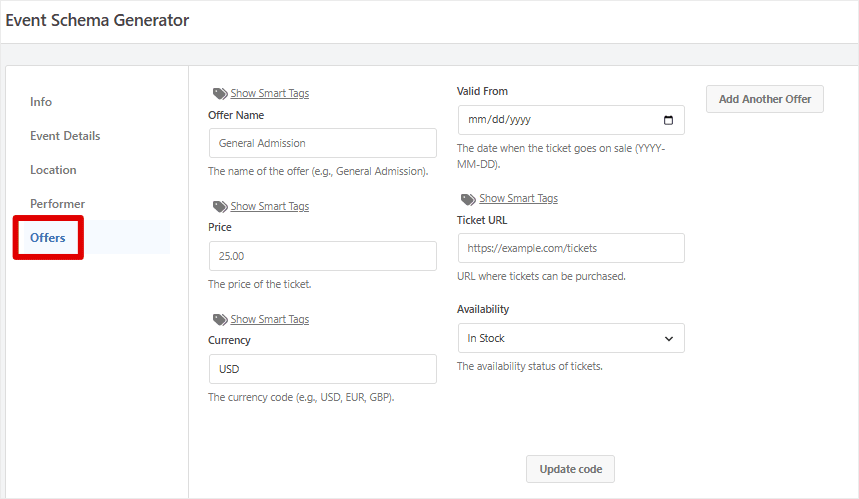
Next, open Offers and add your ticket details, including the Offer Name, Price, Currency, and Ticket URL where people can buy or register. If you have different ticket types, click Add Another Offer to add each one.
The same tab has a Valid From field. That’s the date your tickets go on sale. This is optional and won’t fail Google’s verification, though you will get a warning.
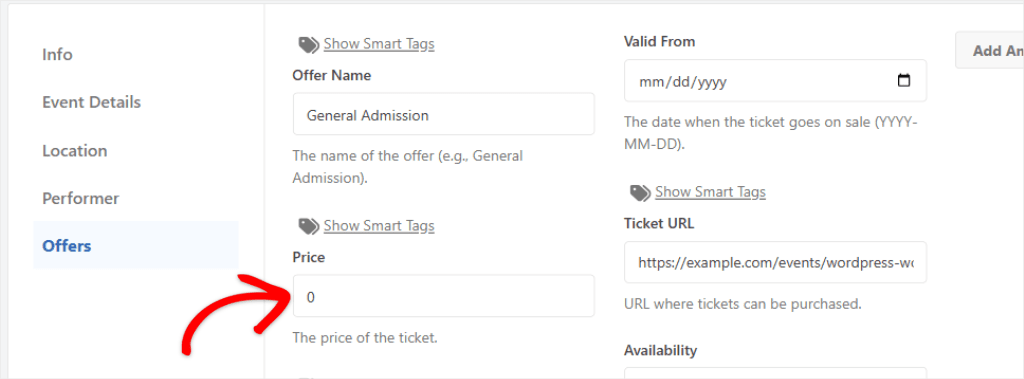
For a free event, Google recommends setting the ticket price to 0. If this is the case, enter 0 in the Price field under Offers.
Use Smart Tags for Details That Already Exist on Your Site
WPCode Pro’s Smart Tags can pull information from your WordPress site into your schema automatically.
For example, {title} can use your page title as the event name, so you don’t have to enter it manually.
To use one, click Show Smart Tags next to a supported field and choose the tag you need. This is useful when the same information may change later because the schema updates with it.
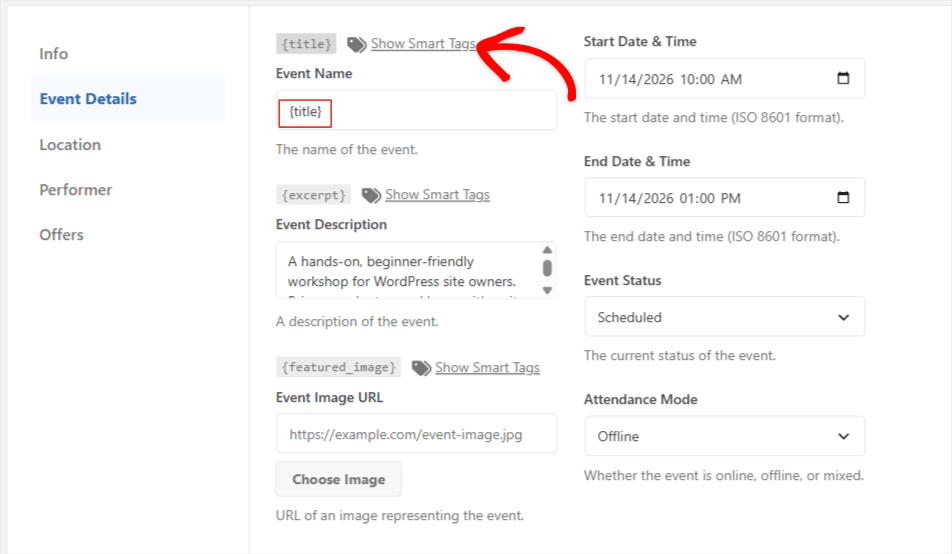
Smart Tags are a Pro feature. The free version shows the picker, but selecting a tag prompts you to upgrade.
Learn more in our Smart Tags guide.
Step 3: Add What the Form Leaves Out
Click Update code below the input form and preview the JSON-LD.
Then look closely at the generated code for the event you created. In our case, we’re using the same free event we set up above.
If your event is free and you entered 0, look at the offers block. The price and currency are gone. WPCode treats a 0 the same as an empty field, so it leaves both out.
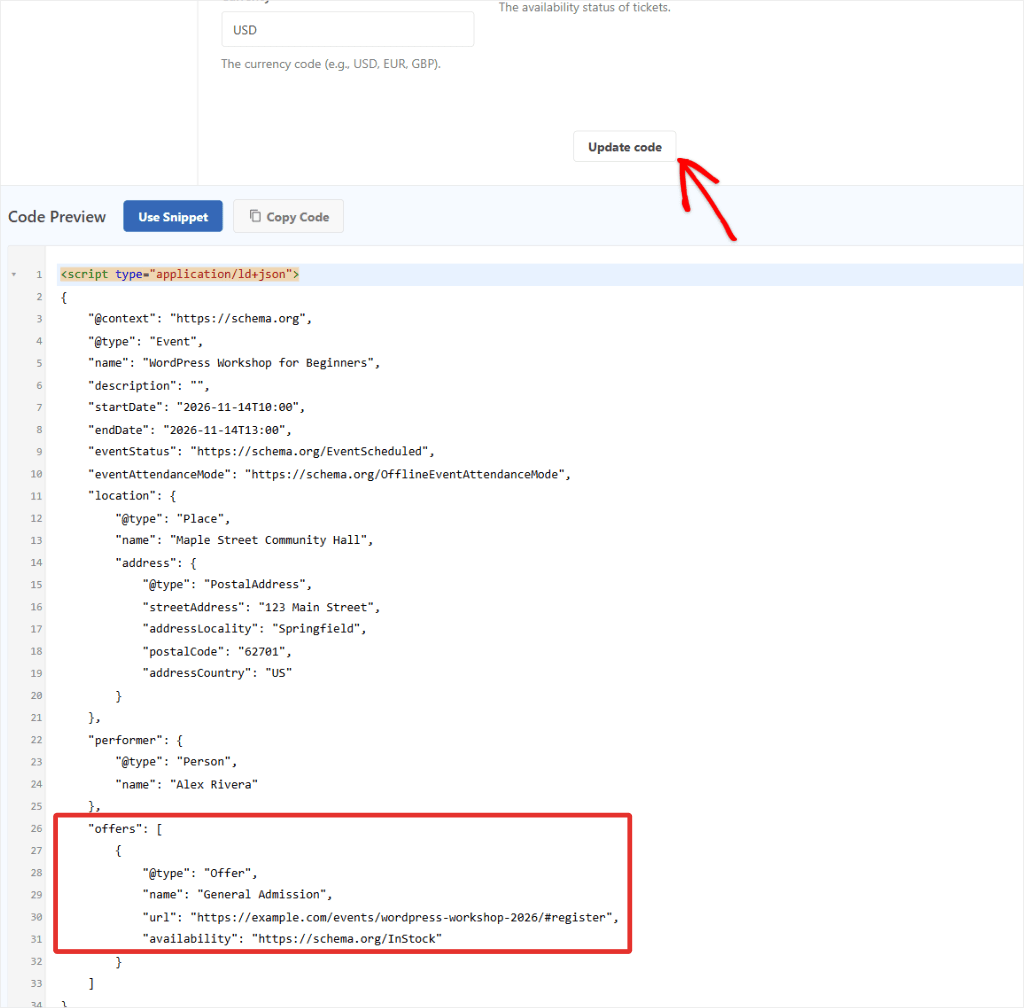
This only happens with a free event. If your ticket has a price, enter it in Price, and the generator includes it.
In the example below, we set the price at $10.
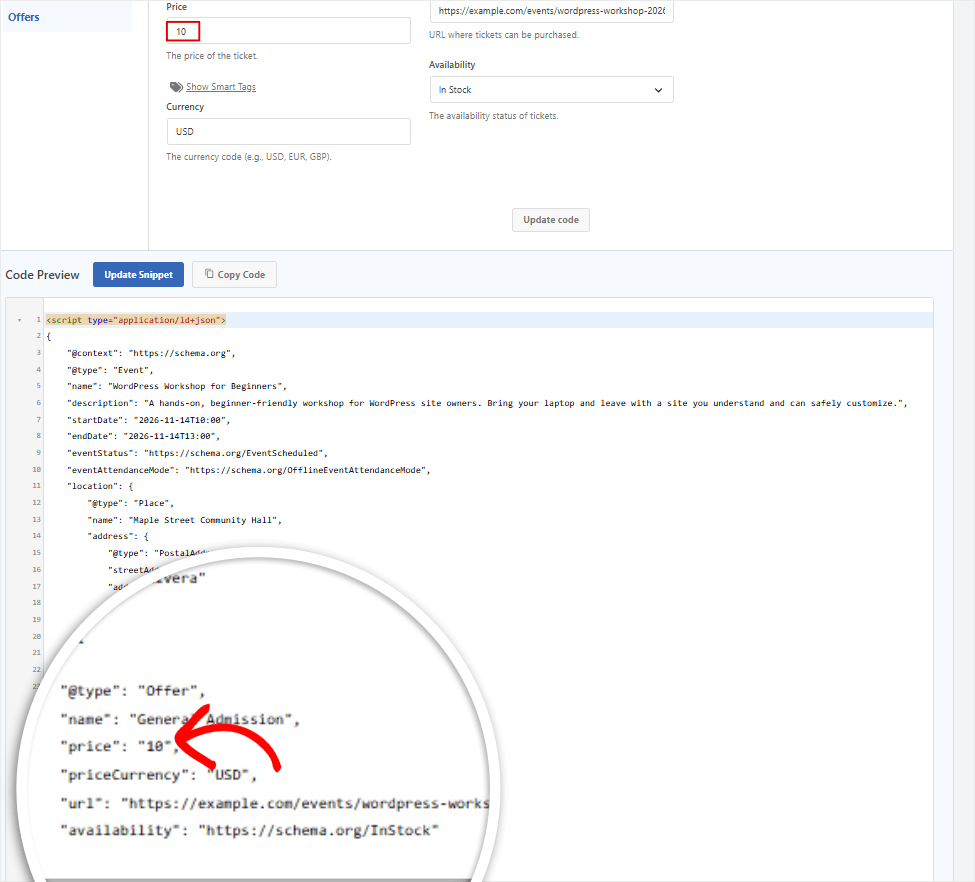
But WPCode allows you to customize your event schema further, not just the price.
It gives you the core of what the schema requires, then lets you fine-tune the generated code for your specific event.
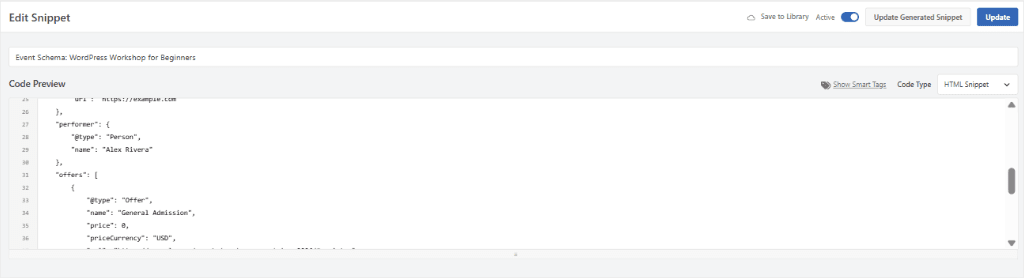
Click Use Snippet to open the generated JSON-LD in WPCode’s code editor.
This is the same editor you’ll use for any other custom snippet, so you can work with the generated code in the same place instead of learning a separate tool.
From here, you can customize the markup to fit your event. For example, if your event is free, you can add "price": 0 and "priceCurrency" to make the ticket information explicit.
Use the code below for this:
"price": 0,
"priceCurrency": "USD",
You can also add an organizer, which Google recommends when you can provide one, along with any other supported properties your event needs.
For this, use the code below:
"organizer": {
  "@type": "Organization",
  "name": "Your Organization Name",
  "url": "https://example.com"
},
One optional addition:
If your organizer or performer has a public profile, add a sameAs property linking to it. That helps Google connect the event to the people behind it, though it won’t move your rankings.
"sameAs": [
"https://www.example.com/organizer-profile",
"https://www.example.com/organizer-linkedin"
]
Use the actual public URLs for your organizer or performer, such as their website, LinkedIn profile, or another official profile.
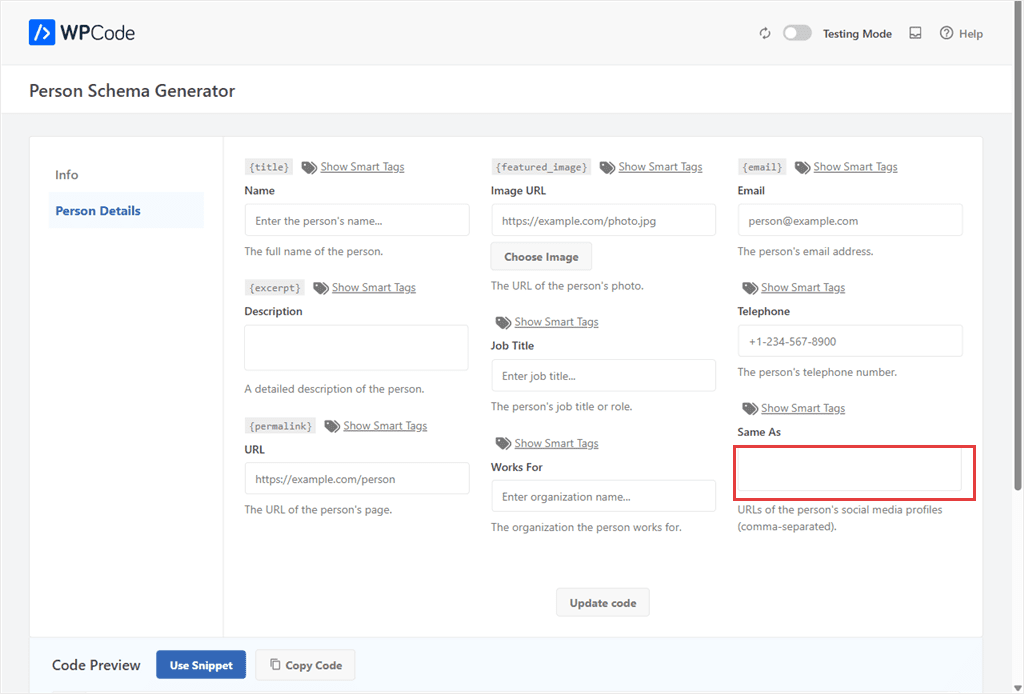
WPCode also has a Person Schema Generator that lets you add the sameAs property from a form.
You add structured data for people and include details such as their profile links.
Curious what else WPCode can do? Here are 19 WordPress tasks that used to need a developer.
Step 4: Show the Schema Only on Your Event Page
As it stands, this snippet will run in your site’s header everywhere by default. But you want it to run on just the event page before you activate it.
Scroll to Smart Conditional Logic, turn on Enable Logic, leave the dropdown on Show, and click Add new group.
Set the rule to Page URL, choose Contains, and enter your event’s path, like /events/your-event/.
Make sure you use Contains, not Is. This way, it will still match your event page when a tracking parameter like ?utm_source= is added to the URL.

⚠️ Check This First
A new group defaults to “Logged-in / Is / True.” That rule doesn’t target your event page, so your schema won’t show for normal visitors. Change it to Page URL before you save. Post/Page does the same job in one click, but it’s a Pro feature. If you are on WPCode Lite, upgrade to use it.
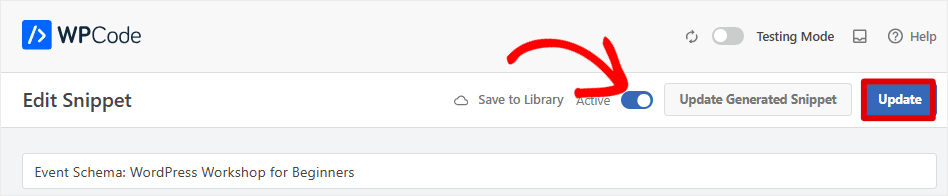
Once done, switch the toggle from Inactive to Active, then click Update.
WPCode Pro gives you two faster ways to target the page
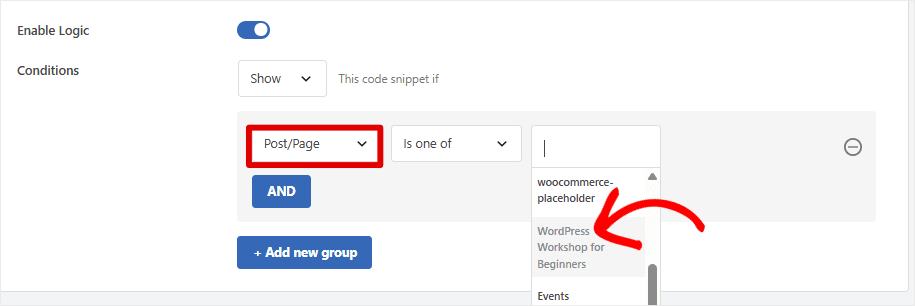
Instead of entering the page URL manually, you can use WPCode Pro to select the page directly or add the snippet from the page editor.
Select the Post/Page rule under “Smart Conditional Logic.” Then, pick your event page from a list.
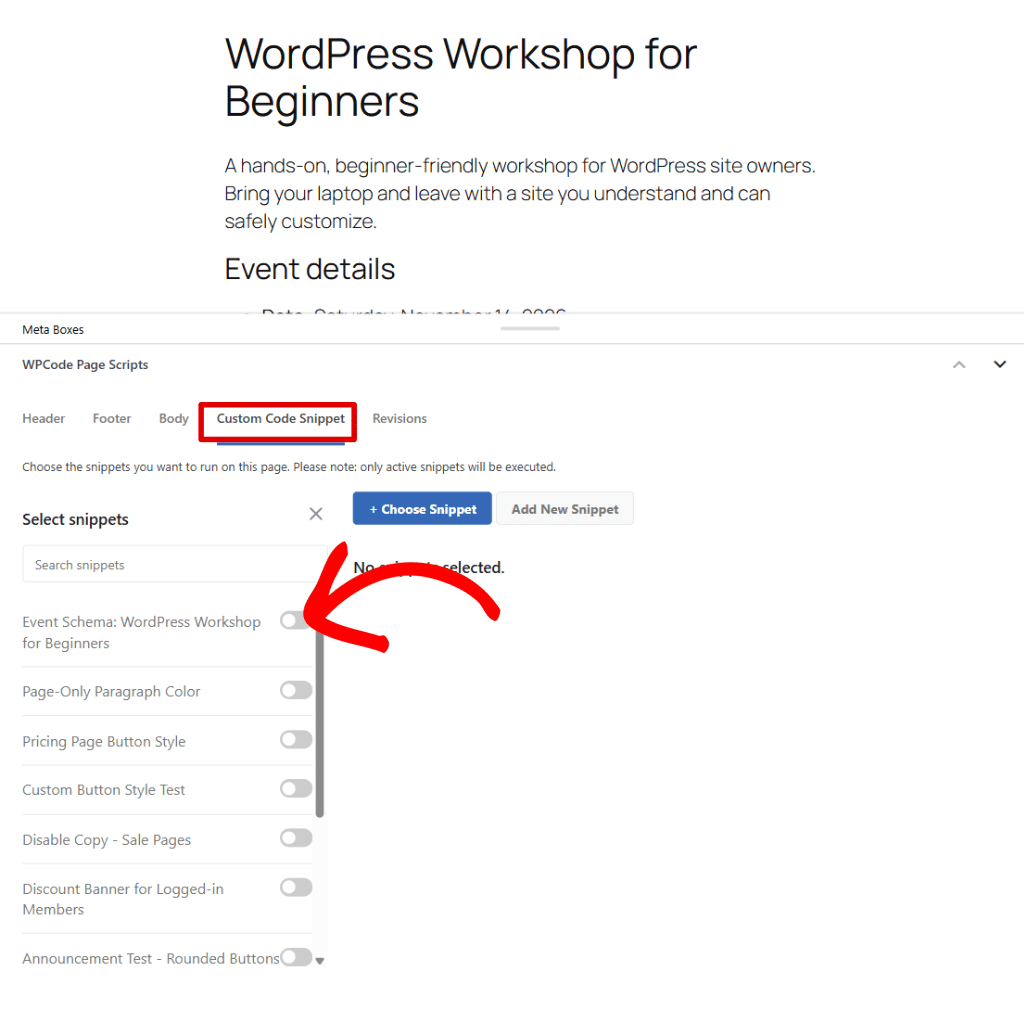
On the other hand, Page Scripts lets you add the snippet directly from that page’s editor. Go directly to your event page and scroll down to Custom Code Snippet.
Then, in the Select Snippet dropdown, activate the Event Schema with a toggle button.
Both options save you from setting up the URL rule manually.
Step 5: Test It With Google’s Rich Results Test
Now that your Event Schema is live, you need to confirm that Google can read it.
To do this, open Google’s Rich Results Test, paste in your event page’s URL, and click Test URL.
A clean pass looks like this: “1 valid item detected” under Events, with nothing flagged underneath.
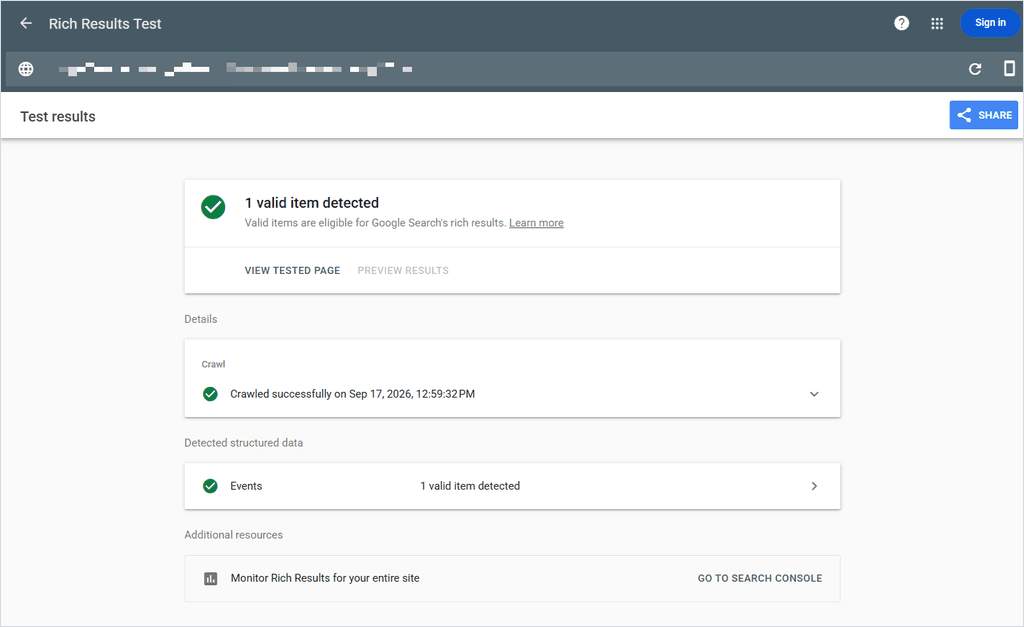
Click into Events to see the item the test found.
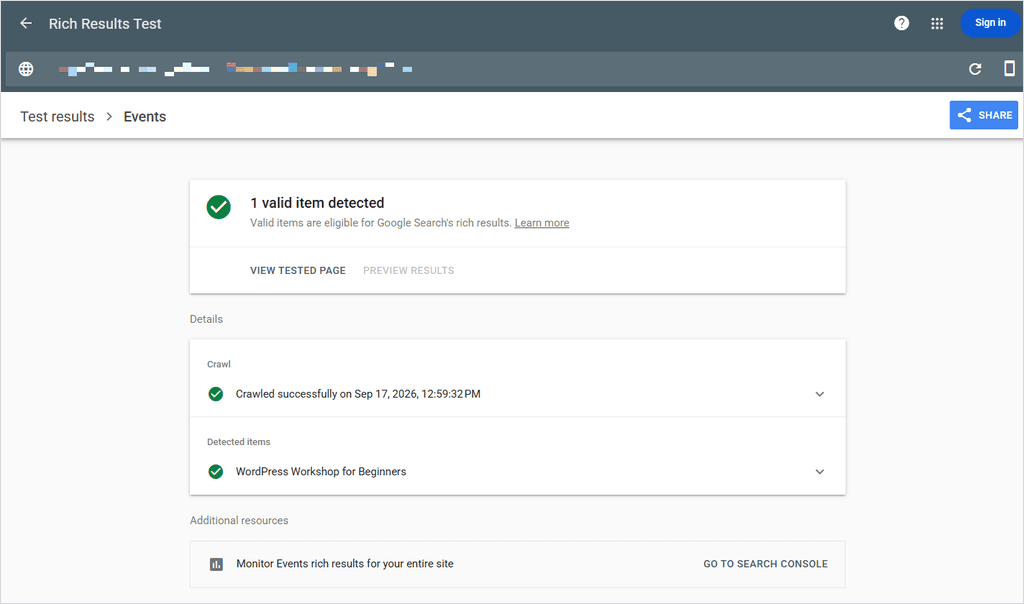
Your report doesn’t look like the screenshot above?
If you skipped the optional fields in Step 2, the test still passes, but it lists them as non-critical issues. The two you’ll usually see are a missing image and a missing validFrom date.
An image is still worth adding, since Google can use it to make your result more useful.
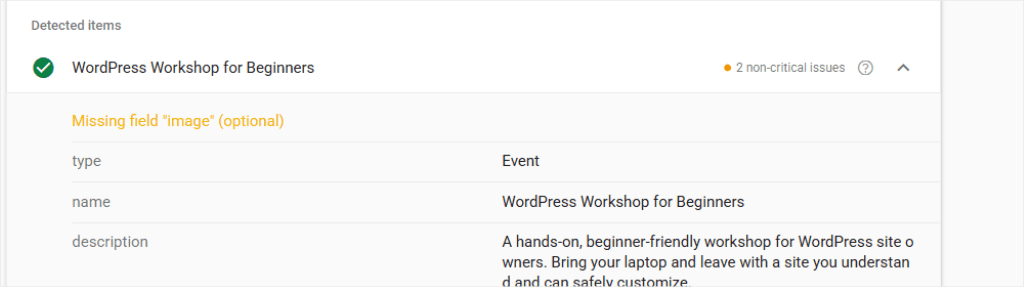
You can add both in the generator. They sit on two different tabs:
- Event Image URL is on the Event Details tab. Go to the Event Details step above to see how to set it up.
- Valid From is on the Offers tab, where it sets the date your tickets go on sale. Go to the Performer and Offers step above to see how to set it up.
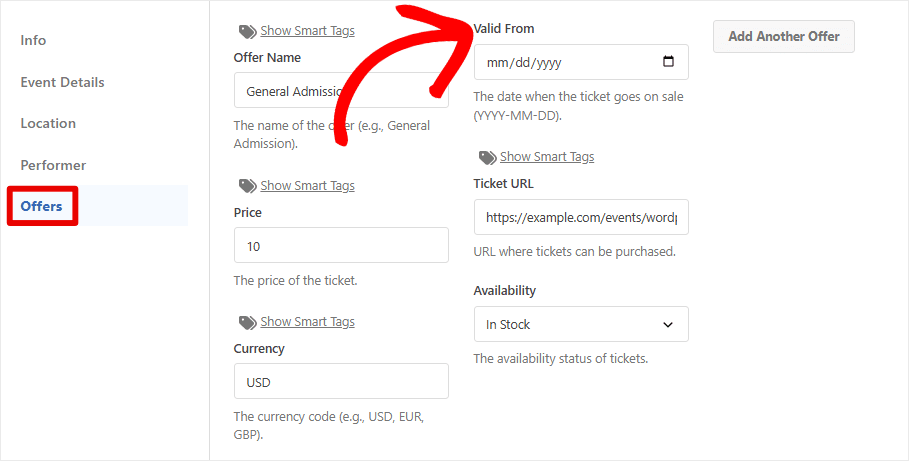
Update the snippet and run the test again. Both should be gone.
If you already added the organizer and price by hand, put those two lines back in the code editor afterwards.
Once Google has recrawled the page, you can use Search Console to monitor how Google is handling your Event structured data.
Google doesn’t publish a timeline for when, or whether, an event actually appears. Treat a clean test result as the finish line for this setup, not a guarantee of a date.
Keep Your Event Schema Accurate
Events change. If yours is canceled or postponed, update Event Status in the code editor, but don’t delete the original startDate or location.
Google’s own guidance is to keep those in place so it can still identify which event you mean, just with an updated status.
Rescheduled instead?
Update startDate and endDate to the new date and set Event Status to Rescheduled.
Google also recommends keeping the old date in previousStartDate, a field only available in the code editor.
One thing worth knowing is that clicking Update Generated Snippet reopens the form.
But it won’t remember the organizer or price fix you added by hand. Regenerate, and you’ll need to re-add both before the event goes live again.
You can now set up your Event Schema with WPCode. You have more control and customization options without reliance on an SEO plugin.
If anything is unclear, check out the commonly asked questions below.
FAQs: How to Add Event Schema Markup in WordPress
Does event schema guarantee my event shows up in Google’s event results?
No. Google’s own documentation is explicit about this: valid markup makes your page eligible for its event experience, but Google decides whether and where to actually display it.
Does every event need its own page?
For Google’s Event structured data, yes. Each event should have its own unique URL, and the page should focus on that one event rather than a list of events.
Can I add event schema without writing code?
Yes. WPCode’s free Event Schema generator builds the JSON-LD from a form. You’ll open the code editor once, to add the organizer and fix a free ticket’s price, but neither means writing code from scratch.
Can I use event schema for an online-only event?
No. Google’s event experience needs a real-world location. If yours is hybrid, happening at a venue and streamed online, the markup still works, just skip the online-only framing and describe the physical venue.
How do I mark up an event that runs over several days?
Set Start Date & Time to the first day and End Date & Time to the last. For separate ticketed performances on different days, create a separate snippet for each.
Add Event Schema to Your Next Event Page
You now have Event Schema that matches your event, runs only where you need it, and has been tested before going live.
The useful part is that you’re not locked into the fields in a form. WPCode gives you a simple starting point, then lets you edit the generated code when your event or structured data needs change.
Want to add Event Schema and manage other custom code from the same place?
Get WPCode for free→
Want more control with Smart Tags, advanced targeting, and other features that help you manage dynamic snippets across your site?
Explore WPCode Pro→
Additional Resources
Three more schema types to try, a broader look at schema markup, and a closer look at WPCode itself:
- How to Add Video Schema Markup in WordPress: for marking up a promo video on your event page
- How to Add SEO-Friendly ‘How-to’ Schema in WordPress: mark up a workshop agenda the same way
- How to Add Schema Markup in WordPress: a complete guide if you’re setting up other schema types too
- WPCode Review: see what else the plugin does beyond schema generators
- How to Add FAQ Schema in WordPress: add answers to common questions about your event