
TL;DR:
The easiest way to add custom CSS to WordPress is with WPCode. Go to Code Snippets » Add Snippet, choose CSS Snippet, paste your code, and activate it. WPCode also lets you preview the change live and limit it to a single page. You can also use the Full Site Editor, the Theme Customizer, or the Theme File Editor, all covered below.
A WordPress theme shapes how your site looks. Someone else designed it, tested it, and made it easy to use, so you’re not starting from a blank canvas.
The catch is that thousands of other sites are running that exact same theme. Custom CSS is one of the best ways to make your WordPress site look unique.
Maybe you want a button that actually stands out, a heading in your brand color, or one distracting element gone for good. Custom CSS gets you there.
Today, we will go beyond “paste this code here” and show you what the code actually does.
Every method below comes with a real before and after, so you can see the change happen instead of just taking our word for it.
What Can You Do With Custom CSS?
CSS (Cascading Style Sheets) is the code that controls how your site looks: colors, spacing, fonts, borders, what’s visible and what’s hidden.
WordPress themes ship with their own CSS built in. Custom CSS is simply CSS you add yourself to change how specific parts of your site look.
With custom CSS, you can make all kinds of small changes to your site’s appearance. Here are some of the most common ones:
| CSS Change | Difficulty | Covered Below? |
|---|---|---|
| Change a button’s color | Easy | Yes |
| Style a heading | Easy | Yes |
| Hide an element | Easy | Yes |
| Restyle one page only | Medium | Yes |
| Override site-wide CSS on one page | Medium | Yes |
| Make a change on mobile only | Medium | In the FAQ |
| Change your font | Easy | Linked guide |
What You’ll Need
Method 1 uses WPCode:
WPCode is one of the best code snippet plugins for WordPress. It gives you a safe place to add CSS, PHP, and other code types to your site without touching your theme’s files directly.
WPCode Lite, the free version, is all you need to follow every example in this article, including Live Preview and the one-page targeting demo later on.
WPCode Pro adds things like SCSS support and advanced insertion options, neither of which this guide requires.
That said, if you’re managing multiple sites or using WPCode for more than a few CSS tweaks, Pro is worth a look. You get AI snippet generation for PHP, code revisions for rolling back changes, and more insertion options beyond the Site Wide Header.
If you don’t have WPCode installed yet, grab it for free from the WordPress plugin directory or get the pro version.
If you face any issues, follow our step-by-step install guide.
If you’re curious about what else WPCode can do, our full WPCode review covers this in detail.
What You’ll Need for The Other Methods
The other three methods don’t need a plugin, but they do have their own requirements.
- Method 2 (Full Site Editor) needs a block theme, which most current themes are.
- Method 3 (Theme Customizer) is built for classic themes. Block themes hide it from the menu, but you can still reach it.
- Method 4 (Theme File Editor) doesn’t need anything extra to open, but we’d only recommend it if you’re comfortable editing raw code and have a backup ready.
How to Find the CSS Selector You Need
It’s important to understand what a CSS selector is because every example below uses one.
A selector is how code points to a specific item it should act on. In CSS, that means pointing at an HTML element on your page so you can style it.
In this tutorial, .wp-block-button__link targets the clickable link element inside a Button block, and h2 targets every H2 heading on the page.
On your site, you’ll need to find the right one for the element you want to change, whether that’s a different button, a sidebar widget, or anything else.
Right-click the element on your live site and choose Inspect.
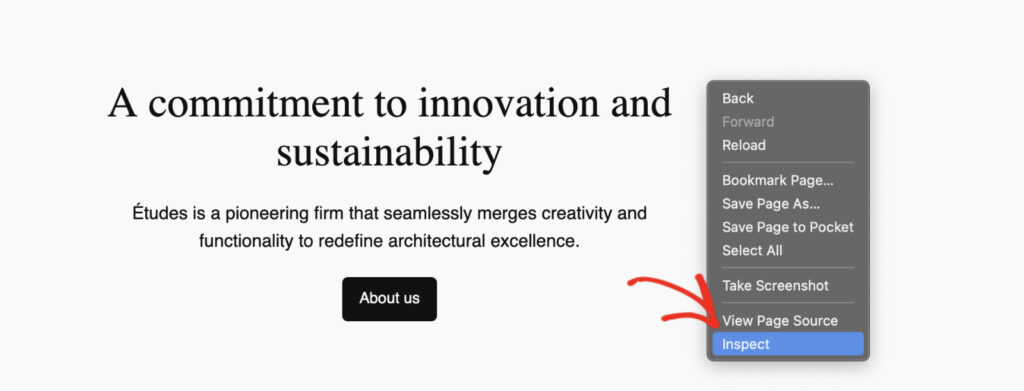
This opens your browser’s built-in developer tools and highlights the exact HTML behind whatever you clicked, class names and all.
Find the class name in the highlighted code, for example class="wp-block-button__link". Put a period in front of it, .wp-block-button__link, and that’s your selector.
We cover this in more depth, including how to read the rest of what developer tools show you, in our full guide on using developer tools to inspect a page.
How to Add Custom CSS in WordPress
Now that you have everything ready, you can use the table of contents below to skip to any method you want to read.
Method 1: Using WPCode (Recommended)
We’ll walk you through four examples of adding CSS to your site with WPCode.
The first covers the full process, from start to finish. The second shows a faster, more visual way to do it using Live Preview.
The other two build on both, so we’ll move quickly and focus on what’s new each time.
Once WPCode is active, head to Code Snippets » Add Snippet in your dashboard. From there, click + Add Your Custom Code to start from scratch.

In Code Type, choose CSS Snippet. Then, give your snippet a name so you remember what it does later.
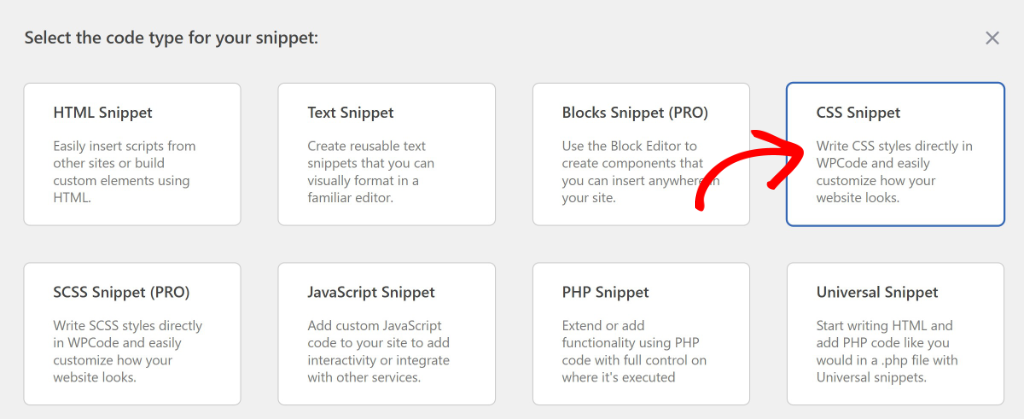
This opens the editor where you place the code snippets below.
Example 1: Change a Button’s Color (The Full Process)
Say your theme’s buttons are a plain black like the example below, and you want something with more personality by making it orange.

Paste this CSS code snippet into the code editor:
.wp-block-button__link {
    background-color: #ff6b35;
    border-radius: 4px;
}
The screenshot below is of the WPCode editor with the button styling CSS code already added. Regardless of the type of code you add, you will use this editor.
You can change your code type with the dropdown.

After that, switch the toggle at the top right to Active, then click Save Snippet to make it live.
When you edit a snippet later, the same button says Update.

Then, check your page to see if the styled buttons appear.

The entire workflow takes just a few minutes.
Example 2: Style a Heading (With Live Preview)
The example above works for any CSS snippet, not just button styling.
But every time you update or add new CSS, you have to leave the editor and view the live page to confirm it is working.
WPCode offers a better way.
Live Preview skips that back-and-forth. You could add this next CSS rule as a new snippet to keep everything well organized, but you don’t have to. A single snippet can hold as many CSS rules as you want.
To show you this, we’ll add the heading style right into the one you already have.
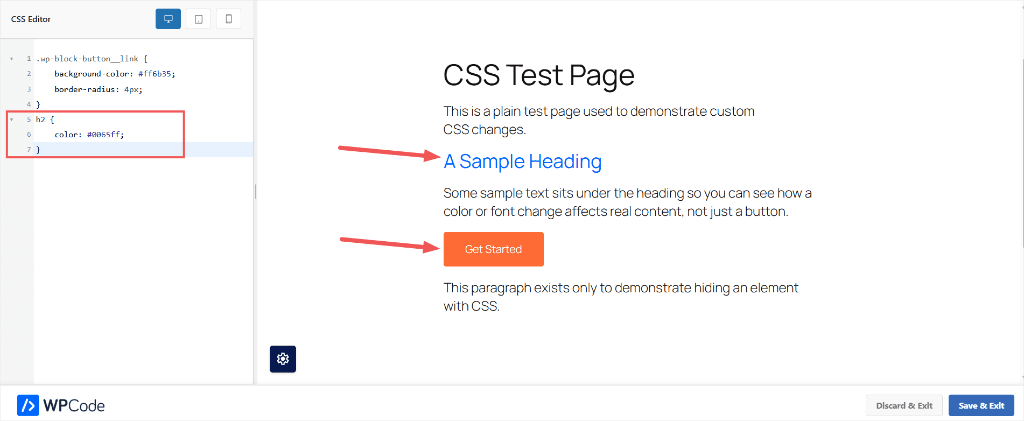
Open your button snippet, then click Live Preview, just above the code editor. WPCode splits your screen in two. Your code on the left, your actual site on the right.
You can drag the divider to adjust the size of the split screens.
You can also click links inside the preview, just like on your live site, to check your CSS on other pages.

As you can see, our H2 headings are still the theme’s default color (black). Paste the code below and watch them turn blue in real time.
h2 {
    color: #0065ff;
}
Every H2 heading on your site turns blue as you type it. That’s the same idea as the button change: one selector, one property, one color.
Now preview the page in both mobile and tablet to make sure the changes look great on both devices then click Save & Exit.
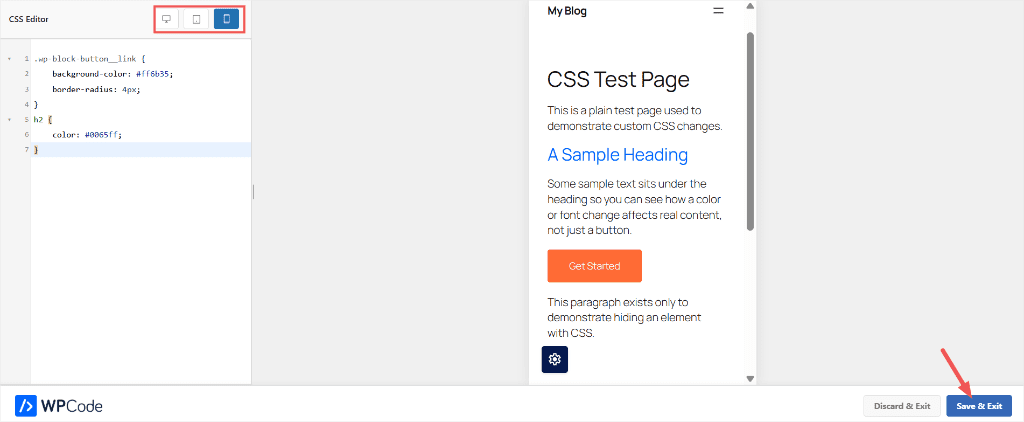
You just added site styling with CSS in a visual way, seeing the changes live as you make them.
Want to change the font instead of just the color? We have a dedicated guide for that, using the same snippet approach.
Example 3: Hide an Element
This time, let us use a CSS snippet to make something disappear from the site.
This can be a leftover widget, a plugin badge you didn’t ask for, a line of text that doesn’t belong, and more.
For our example, we will remove content from a page with CSS. You can add it to a new snippet or to the one you’ve already created.
Use the WPCode code editor and add this:
.test-hide-me {
    display: none;
}</pre>
Swap .test-hide-me for whatever class the actual element uses. The element doesn’t just go invisible. It stops taking up space, so the gap it leaves closes too. It’s still in your page’s HTML, just not displayed.
This only affects elements with that exact class and nothing else on the page changes. That’s the same targeting principle from earlier where we explained a selector points at one specific thing, not the whole page.
Once you’re happy with your CSS, scroll down your WPCode editor to the Insertion section.
By default, WPCode auto-inserts your snippet in the Site Wide Header. That’s exactly what you want for CSS, since it needs to load on every page.

Like before, scroll back to the top, switch the toggle to Active, and click Save Snippet (or Update if you added it to your existing snippet).
Go to your site and check the content you removed to confirm it.

Example 4: Restyle CSS on Just One Page
So far, every snippet you’ve added has applied to the whole site.
What if you only want a style change on one page, like a pricing page or a sales page, without touching anything else?
WPCode’s Smart Conditional Logic handles this.
Instead of loading a snippet everywhere, you set a rule that tells WPCode which page to check for before it runs.
Say you want to color just the paragraph text on one page. Start a new CSS snippet and paste this in:
p {
    color: #6d28d9;
}
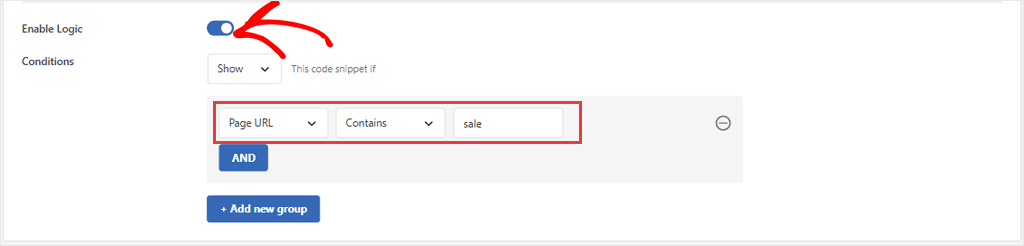
Then scroll to Smart Conditional Logic, switch Enable Logic on, set the dropdown to Page URL, leave the relation as Contains, and type the part of the URL that identifies your page, like sale.
⚠️ Use Page URL, Not Post/Page
Don’t confuse Page URL with the similarly-named “Post/Page” option lower in the same list. Page URL is free on every WPCode plan. Post/Page (picking an exact post by name), Page Template, and Author-based targeting are Pro features.
The same Page URL condition works beyond CSS. See our guide on adding scripts to specific pages in WordPress if you ever need to scope JavaScript the same way.
Save, activate, and check the matching page. The paragraph text is purple. Every other page on the site is untouched.

Nothing extra to configure here. It works immediately because nothing else on the site is targeting that paragraph.
What If That CSS Already Exists Site-Wide?
A common situation we see on many sites is that you already have CSS set site-wide. So it’s already on every page, including the one you want to restyle.
Let’s use the orange button from Example 1 for this demonstration. This time, we’ll turn that same button green, but only on one page.
Start a second CSS snippet and paste this in:
.wp-block-button__link {
    background-color: #00a878;
}
Scope it with the same Page URL condition as before. Save it, activate it, and check the matching page.

Nothing changed. This trips people up because the condition is firing correctly, the CSS is valid, and the button still doesn’t move.
Here’s why:
Both snippets target the same selector, so it comes down to which one loads last.
By default, every WPCode snippet has the same Priority(10), and your original site-wide snippet happened to load after the new one.
So it won, even on the page where it shouldn’t have.
The fix is Priority:
You’ll find the Priority field in the Basic Info panel at the bottom of the snippet editor. Lower numbers load first, higher numbers load last.
Raise your new snippet’s Priority above 10, say, to 20, so it prints after the site-wide one and wins the tie.

Check the matching page again.

And check any other page.

The site-wide snippet still works everywhere it’s supposed to.
You only changed the outcome on the one page your new snippet targets because you gave it a higher Priority.
💡 Two Features You Might Notice
You’ll notice two other options in the snippet editor that this guide doesn’t use: SCSS (a more advanced version of CSS) and “Load as file” under Insertion. Both are Pro features aimed at more advanced use cases. Plain CSS on the free plan covers everything in this article.
Curious what SCSS support actually adds? See our announcement on SCSS snippets and PHP debugging in WPCode.
Now that you understand how to use WPCode to add CSS, let us look at other methods.
The CSS from Method 1 works in any of the methods below. What doesn’t carry over is the page targeting and Priority from Example 4. Those are WPCode features.
If you want ready-made snippets instead of writing your own, the WPCode library has thousands of them. Install with one click if you’re using WPCode.
With the other three methods, copy the code in by hand instead.
Method 2: Using the Full Site Editor
If your theme supports full site editing, which most modern block themes do, you can add CSS without a plugin. Go to Appearance » Editor, then click Styles in the left panel.
Click the three-dot More menu at the top of the Styles panel, then choose Additional CSS.

Paste your CSS into the box that appears, then save your changes from the top of the screen.

View the live page, and the changes should have taken effect.
The Catch:
CSS added through the full site editor doesn’t have an on/off switch.
If something looks wrong, you’ll need to edit or delete code to undo it. If you’d rather have that safety net, WPCode gives you a toggle button to activate and deactivate your snippets.
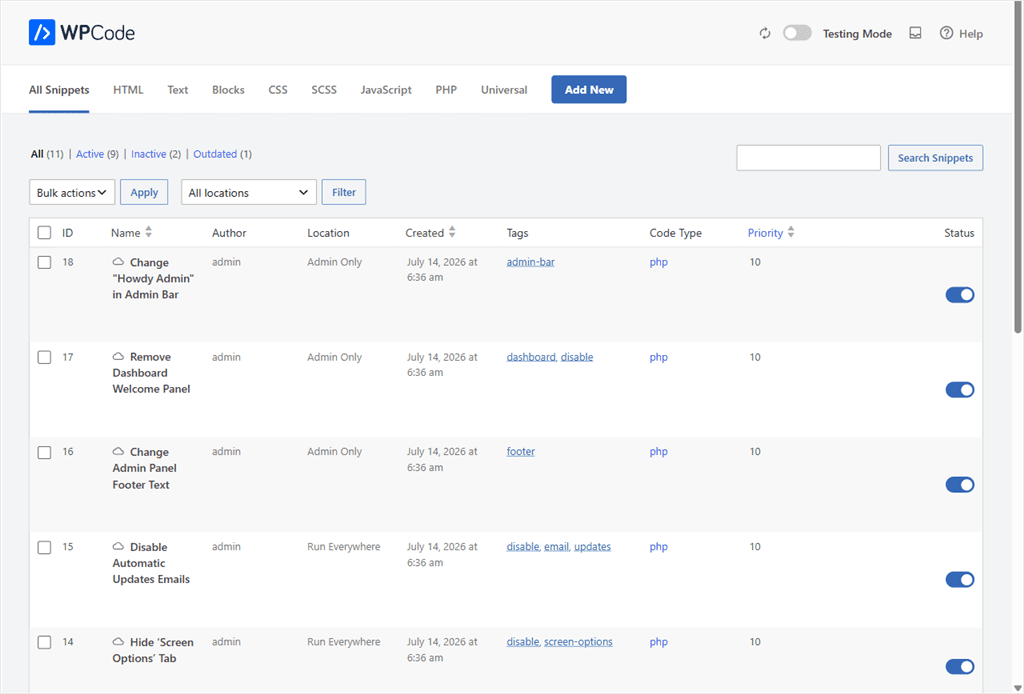
You can do this on the editor screen or under the snippet list under the “Status” column.
Method 3: Using the Theme Customizer
On a classic theme, go to Appearance » Customize, then click Additional CSS in the panel on the left.
On a block theme, WordPress hides the Customize menu item. You can still open it by adding /wp-admin/customize.php to the end of your site’s address.
Type your CSS into the box, and watch the live preview on the right update as you type. It’s the same instant feedback as WPCode’s Live Preview, just for a different method.

Click Publish when you’re happy with it.
The Catch:
Remember that CSS lives inside your active theme’s settings.
So if you switch themes while using methods two and three, you will lose your CSS changes. WPCode snippets aren’t tied to your theme at all. They live in the plugin, so they survive a theme switch untouched.
Method 4: Using the Theme File Editor
This is the method we recommend the least, and WordPress agrees.
There’s no undo and no backup. A single typo can break your site’s styling, with no built-in way to get the old version back. Any changes you make here also vanish the next time your theme updates.
Go to Tools » Theme File Editor, and before you can edit anything, you’ll hit a warning screen. WordPress tells you that editing theme files directly isn’t recommended, and your changes may be lost in future updates.
Above the editor, it even points you to its built-in CSS editor instead.
If you want to proceed, click I understand to continue.

You’ll land on style.css by default, with every other theme file listed on the right if you need a different one.
Scroll to the bottom of the file, paste your CSS, and click Update File.

There’s no activation step, but that doesn’t guarantee your change will show up.
We tested this on Twenty Twenty-Five, and its own stylesheet says visitors are served a separate minified file, style.min.css, instead of this one.
An edit here may never reach your live site. Check your own theme’s files for the same pattern before you assume an edit failed.
⚠️ Before You Edit a Theme File
Back up your site first, and consider building a child theme so your changes survive a theme update. If none of that means much to you yet, that’s a sign to use one of the first three methods instead.
How to Safely Manage Custom CSS
Whichever method you pick, a few habits keep custom CSS from turning into a headache.
You’ve already seen the simplest safety net: WPCode’s on/off toggle, which undoes a change instantly. It also helps to try a new rule on a low-traffic page first.
Here are a few more ways WPCode keeps your changes safe.
Duplicate your Snippets(Free)
Before you edit a snippet that’s already working, duplicate it first.
Every snippet has a Duplicate action in the snippet list, free on every WPCode plan.
The copy is saved as inactive, so it doesn’t affect your site.
Keep it as your backup and edit the original. If the change breaks something, switch the original off and the copy on, and you’re back to working code without rebuilding it from memory.
Testing Mode (Basic Plan and Up)
On any paid WPCode plan, Testing Mode goes further.
Turn it on, and every change you make, editing a snippet, adding a new one, switching one on or off, stays visible only to you and other users who can manage WPCode.
Your actual site visitors see the current live version.
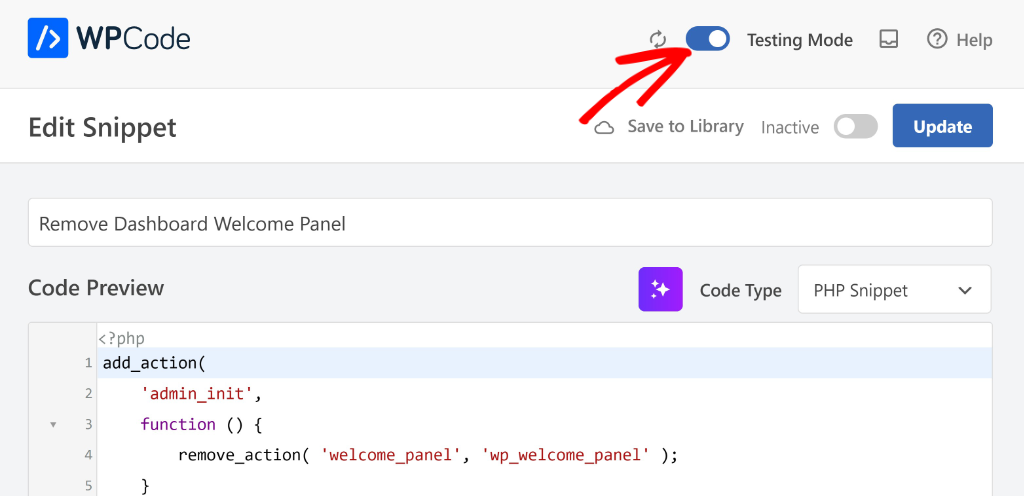
When you’re happy with the result, publish the changes for everyone.
If you’re not, discard them, and it’s as if you never touched anything. If you want to see it in action, check out our walkthrough of WPCode’s Testing Mode feature.
Code Revisions (Basic Plan and Up)
Paid plans also keep Code Revisions, a saved history of every version of a snippet.
If something goes wrong days later and you can’t remember what the original code looked like, you can compare versions or restore an older one directly.
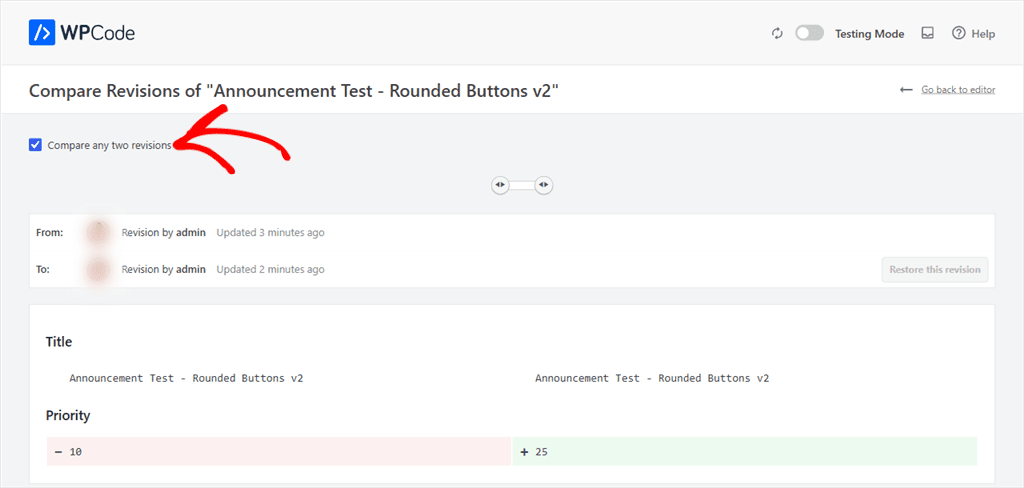
See our guide on tracking code snippet changes and revisions if you want the full walkthrough.
None of this is required for the CSS in this guide. The low-traffic-page test and the on/off toggle are enough on their own.
But if you’re managing CSS across a bigger site, Duplicate is a free habit worth building. Testing Mode plus Code Revisions simplify code safety when you upgrade.
Comparing the Four Methods
With the Full Site Editor, the Customizer, or a theme file, any CSS you add applies to your whole site. None of the three can limit a change to one page. WPCode’s Smart Conditional Logic can, as you saw in Example 4.
| Method | Difficulty | Setup | Survives Theme Switch | One Page Only | On/Off Toggle | Best For |
|---|---|---|---|---|---|---|
| WPCode | Easy | Free plugin | ✓ | ✓ | ✓ | Most users, especially anyone who might switch themes |
| Full Site Editor | Easy | Built in | ✕ | ✕ | ✕ | A quick, one-off tweak on a block theme |
| Theme Customizer | Easy | Built in | ✕ | ✕ | ✕ | Classic themes (hidden from the menu on block themes) |
| Theme File Editor | Advanced | Built in | ✕ | ✕ | ✕ | Developers working in a child theme, since edits to a regular theme are lost on updates |
If anything is unclear, check out the commonly asked questions below.
FAQs: Add Custom CSS to Your WordPress Site
Why isn’t my custom CSS showing up on my site?
Check caching first. If you’re using a caching plugin or your host caches pages automatically, clear the cache and reload with a hard refresh (Ctrl+Shift+R or Cmd+Shift+R). This is the single most common reason a correct CSS change appears to do nothing.
I added CSS but it’s being overridden. What’s going on?
Another CSS rule, yours, your theme’s, or a plugin’s, is targeting the same element. When two rules conflict, the more specific selector wins, and if specificity is tied, whichever rule loads later on the page wins. Adding a more specific selector or moving your snippet’s priority usually fixes it. As a last resort, adding !important after the property value forces that rule to win, though it’s worth reaching for a more specific selector first.
Why doesn’t my CSS work after I saved it?
Double check the snippet is actually active, not just saved. WPCode snippets need their status toggle switched on separately from saving the code itself.
I have a typo somewhere and can’t find it. Any tips?
Count your opening and closing curly braces. A single missing } can silently break every rule that follows it in the same stylesheet, which makes the actual error look like it’s somewhere else entirely.
Can I target just mobile devices with my CSS?
Yes, with a media query, like @media (max-width: 768px) { }, wrapped around your existing rule. Anything inside only applies below that screen width.
Does it matter which of the four methods I use for the same change?
Not for how the CSS looks, all four render identically. It matters where the CSS lives. WPCode snippets survive a theme switch. CSS added through the Full Site Editor, the Customizer, or a theme file doesn’t. A child theme protects your edits from theme updates, but not from switching to a different theme.
Start Customizing Your Site Today
Your theme’s defaults were never the whole story. A button, a heading, one stray element you want gone: it’s all one snippet away from looking the way you actually want.
WPCode is the one that keeps your work safe through theme changes, lets you preview before you commit, and scopes a change to one page in a few clicks.
If you’ve been putting off a small design fix because editing code felt risky, this is about as low-risk as it gets.
Get WPCode for free →
See WPCode pricing →
Additional Resources
Once your CSS is in place, these guides help with what comes next:
- How to Add Code to the Functions.php File Safely: for when you need PHP, not just CSS
- How to Add Header and Footer Code in WordPress: for scripts and tracking codes that go outside the CSS editor
- How to Add Scripts to Specific Pages in WordPress: the same page-targeting trick from this guide, applied to JavaScript instead of CSS