
TL;DR: Schema markup is code that describes your content to search engines in a standard vocabulary they all understand. It matters because it makes your pages eligible for rich results: star ratings, FAQ dropdowns, event dates, and recipe cards that earn far more clicks than plain listings.
Schema markup is one of those things that quietly work in the background of your website. You don’t see it on your pages, but search engines like Google absolutely love it.
It’s the reason some websites show up in search results with star ratings, cooking times, event dates, and FAQ dropdowns, while others just show a plain blue link.
I’ve spent a lot of time working with WordPress sites, and one pattern I keep seeing is this: website owners put so much effort into writing great content, but then miss out on extra visibility in search simply because their pages lack structured data.
It’s a bit like throwing a great party but forgetting to send out the invitations. The good news is that adding schema markup to WordPress doesn’t require you to be a developer. You don’t need to touch your theme files or write complex code from scratch.
In this guide, I’ll show you how to add schema markup in WordPress using WPCode.
Check out the table of contents below to see all the steps at a glance or skip to the part of the article you want to read.
- What Is Schema Markup?
- Why Your WordPress Site Needs Schema Markup?
- Types of Schema Markup You Can Add in WordPress
- Adding Schema Markup in WordPress
- FAQs about Schema Markup in WordPress
What Is Schema Markup?
Schema markup is a type of code that you add to your website to help search engines understand your content better. It’s based on a shared vocabulary created by Schema.org, which is a collaboration between Google, Bing, Yahoo, and Yandex.
Think of it like adding labels to everything in your kitchen. Without labels, someone going through your cupboards has to open every container to figure out what’s inside. With labels, they know exactly what they’re looking at instantly.
Schema markup does the same thing for search engines.
Without a schema, Google has to read through all your content and make its best guess about what type of information you’re sharing. With schema, you’re telling Google directly: this is a recipe, or this is an event happening on this date at this location.
The code itself is written in a format called JSON-LD, which stands for JavaScript Object Notation for Linked Data. Don’t let that intimidate you, though. You won’t need to write any of it by hand in this tutorial.
Schema markup covers a huge range of content types. You can use it for blog posts, recipes, events, products, local businesses, reviews, and more.
Each type has its own set of properties that tell search engines the specific details they need to know about your content.
Why Your WordPress Site Needs Schema Markup?
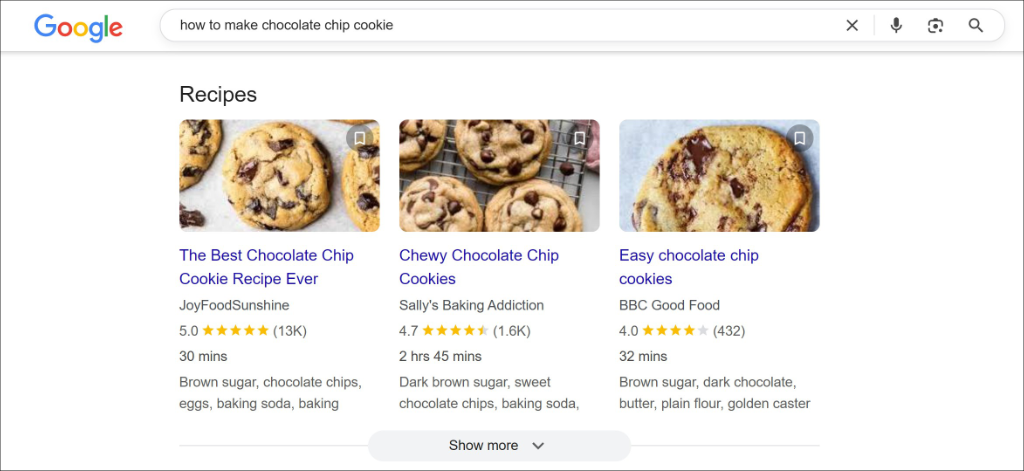
Imagine you’ve just published a detailed recipe post with beautiful photos and clear instructions. You search for it on Google, and it shows up as a plain blue link.
Meanwhile, another food blog with a similar recipe is showing up with star ratings, cooking times, and calorie counts right in the search results. That other blog is getting all the clicks.
This is one of the most frustrating things I see WordPress site owners deal with. They put in all the hard work of creating great content, but their search listings look bare compared to competitors who have schema markup set up.
Here are some of the common problems that schema markup can solve for you:
- Your search listings look plain and boring: Without schema, your pages show up as basic text links. Competitors with schema markup get eye-catching rich snippets that stand out and attract more clicks.
- Google is guessing what your content is about: Search engines are smart, but they still struggle to understand the specific details of your content without structured data to guide them.
- Your events, recipes, and FAQs are invisible in Google’s special features: Google has dedicated search features for events, recipes, and FAQs. Without schema markup, your content won’t show up in any of them.
- You’re afraid to add code to your WordPress site: A lot of WordPress users avoid schema markup because they think it requires editing theme files or writing complex code. It doesn’t have to be that way.
- You don’t know where to start: There are dozens of schema types out there, and it can be overwhelming to figure out which ones apply to your content and how to add them correctly.
If any of these sound familiar, you’re in the right place. Adding schema markup solves these issues, helps search engines better understand your content, and displays it in rich snippets.
Types of Schema Markup You Can Add in WordPress
There are many different types of schema markup you can add to your WordPress site. Each one is designed for a specific type of content and tells search engines something different about your pages.
Here are the most common and useful schema types for WordPress sites:
- Article / Blog Post: This is great for news articles and blog posts. It helps Google understand your content is an article and can display things like the author name, publish date, and featured image in search results.
- FAQ: This is one of my personal favorites. The FAQ schema lets Google display your questions and answers directly in search results as expandable dropdowns. It’s a great way to take up more real estate on the search results page.
- Recipe: If you run a food blog, recipe schema is a must. It tells Google about your ingredients, cooking time, nutritional information, and more. This can get your recipes showing up with rich snippets that include star ratings and cooking details.
- Event: Event schema is perfect for businesses or organizations that host events. It helps your events show up in Google’s dedicated event listings with dates, locations, and ticket information.
- Product: If you run an eCommerce store, product schema helps Google display your product details in search results. This includes pricing, availability, and customer ratings.
- Local Business: This one is ideal for brick-and-mortar businesses. It tells Google your business name, address, phone number, opening hours, and more.
- Review / Rating: Review schema lets you display star ratings in search results for products, services, or any other content you review on your site.
- How-To: How-to schema is perfect for tutorial content like this one. It breaks down your content into steps that Google can display directly in search results.
To go through the types of schemas quickly, use the table below.
| Schema Type | When to Use It | What You Get in Search |
|---|---|---|
| Article | Blog posts and news content | Headline, image, and date in results and Google Discover |
| FAQ | Pages with a question and answer section | Expandable Q&A dropdowns under your listing |
| How-To | Step-by-step tutorials and guides | Helps search engines and AI tools understand your steps |
| Event | Concerts, webinars, meetups, and workshops | Event date, venue, and ticket info in results |
| Recipe | Food blogs and cooking sites | Recipe cards with ratings, cook time, and calories |
| Product | Ecommerce and product pages | Price, availability, and review stars in results |
| Review | Pages reviewing products, books, or services | Star ratings under your listing |
| Local Business | Businesses with a physical location | Hours, address, and map info in local results |
WPCode supports all of these schema types through its built-in snippet generator. That said, let’s look at how you can generate schema markups for your WordPress site.
Adding Schema Markup in WordPress
The easiest way to add schema markup in WordPress is by using WPCode. It’s by far the most straightforward way to manage custom code snippets, including schema markup.
WPCode has a built-in schema generator that creates the correct JSON-LD code for you automatically.
You just fill in your details, and it handles all the technical formatting. It also lets you add schema to specific pages and posts without touching your theme files.
Note: For this tutorial, I’ll be using WPCode Pro because it includes Smart Tags and the Page Scripts feature, which make adding schema to specific pages much easier. However, you can also follow along with the free version of WPCode for basic schema markup needs.
Step 1: Install and Activate WPCode
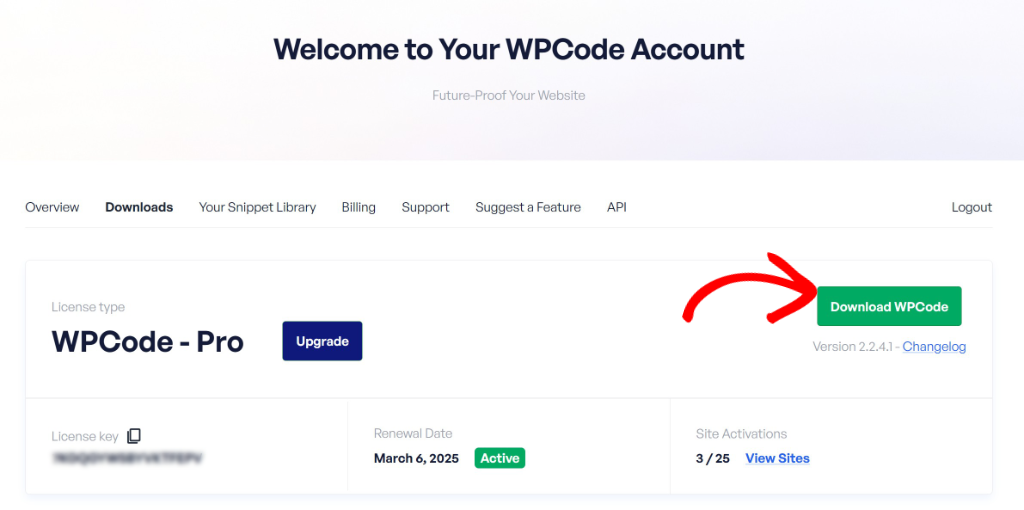
First, you’ll need to visit the WPCode website and sign up for a new account. Once you’ve signed up, log in to your account and head to the ‘Downloads’ tab.
From here, click the ‘Download WPCode’ button and save the plugin file somewhere easy to find on your computer.
Next, you’ll need to install and activate the plugin on your WordPress site. If you’ve never done this before, just follow our guide on how to install a WordPress plugin.
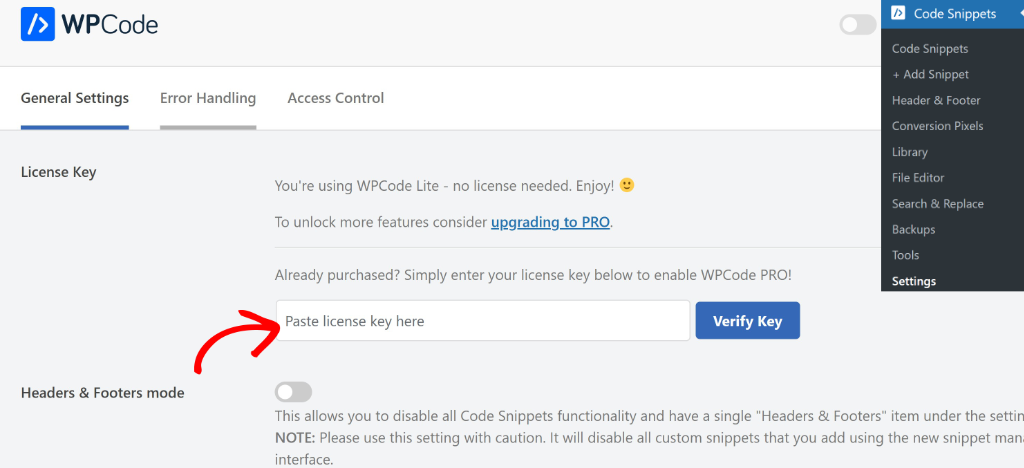
Once the plugin is active, go to Code Snippets » Settings from your WordPress dashboard. You’ll see a field where you can paste your license key, which you’ll find in your WPCode account area. Go ahead and enter it there and save your settings.
Step 2: Go to the Snippet Generator
Now that WPCode is installed and activated, it’s time to create your first schema snippet. From your WordPress dashboard, navigate to Code Snippets » Add Snippet. This will take you to a page where you can create a new code snippet from scratch or choose from WPCode’s library of pre-built snippets.
Once you’re there, click on the ‘Snippet Generators’ tab at the top of the page. This is where WPCode keeps all its built-in generators, including the schema markup generators.
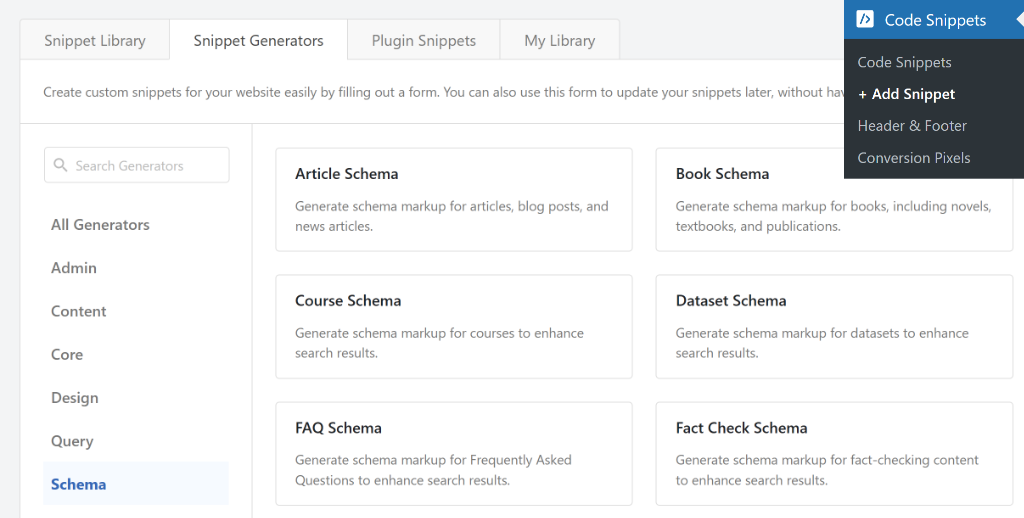
On the left side of the screen, you’ll see a filter menu. Click on the ‘Schema’ tab to narrow down the list and see only the schema-related generators. You can also use the search box to find a specific schema type quickly.
WPCode supports a wide range of schema types here, including FAQ, Recipe, Event, Article, How-To, video, and more.
Step 3: Fill Out Your Schema Details
For this tutorial, I’ll walk you through the general process that applies to all schema types. But let’s say you want to add an article schema to your WordPress site.
When you open the schema generator, you’ll land on the ‘Info’ tab first. This tab gives you a quick overview of what the generator does and what details you’ll need to have ready. It’s worth taking a moment to read through it before jumping in.

Once you’re ready, click over to the next tab to start entering your details. The tabs you see will depend on the schema type you chose. For example, the Event schema generator has tabs for Event Details, Location, Performer, and Offers.
The Recipe schema generator has tabs for General and Instructions.
Similarly, for the article schema, you can enter the article title, description, type, URL, published date, modified date, and featured image.
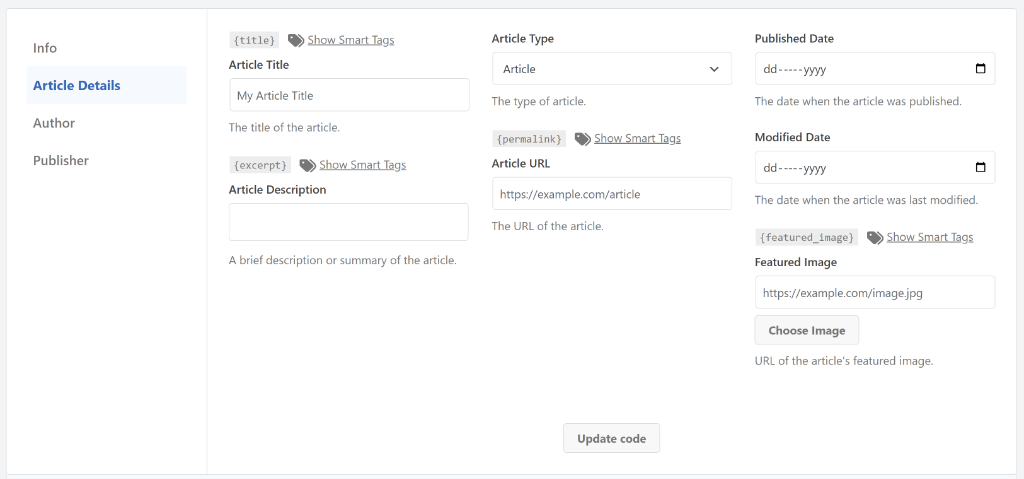
Go through each tab carefully and fill in as much information as you can. The more details you provide, the better chance you have of Google displaying a rich snippet for your content.
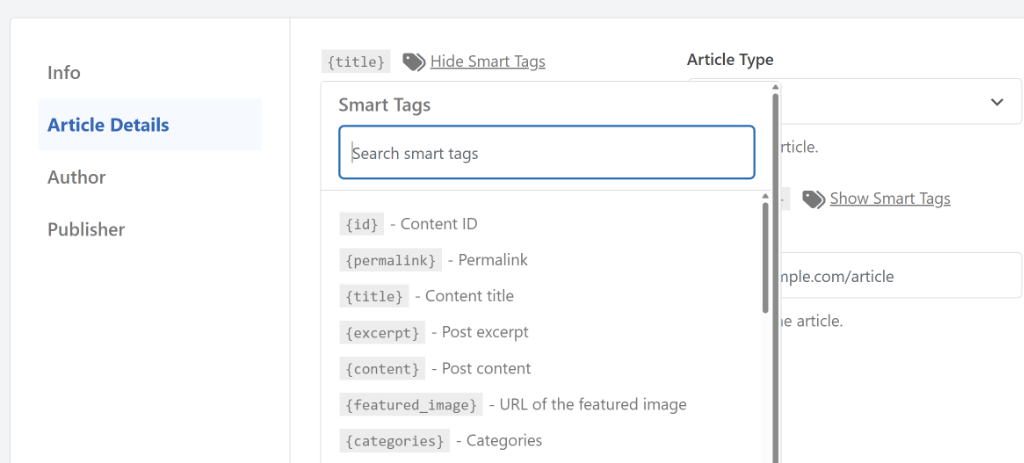
One of my favorite features in WPCode is Smart Tags. Instead of manually typing out information that already exists on your page, Smart Tags can pull it in automatically.
For example, if your event name is the same as your post title, you can use the {title} tag instead of typing it out.
To use a Smart Tag, click the ‘Show Smart Tags’ option next to any field. A dropdown menu will appear with all the available tags. Just select the one you need, and WPCode will automatically pull that information from your page when the schema runs.
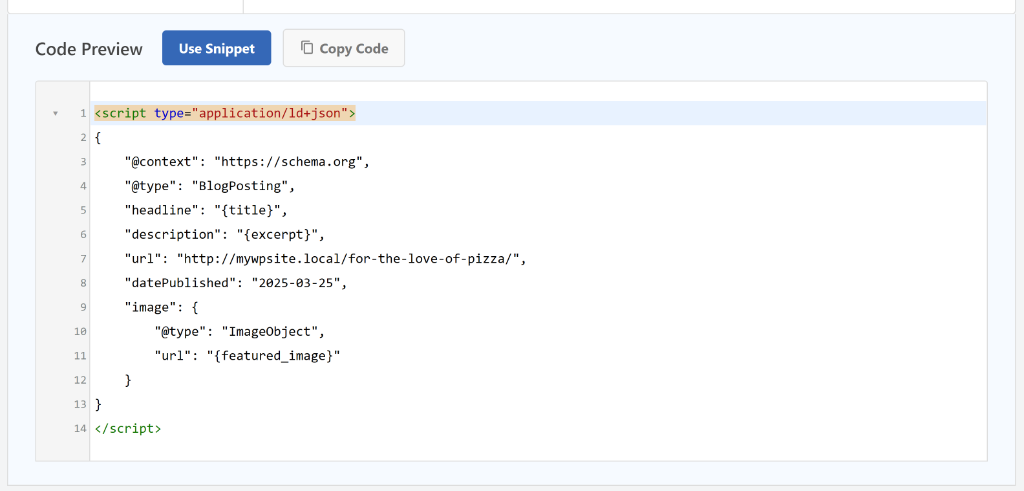
Once you’ve filled in all the details across every tab, click the ‘Update Code’ button at the bottom of the page.
WPCode will generate your schema markup and display a preview of it in the ‘Code Preview’ section below. Take a moment to look it over, and when you’re happy with it, click the ‘Use Snippet’ button to move forward.
Step 4: Review and Activate Your Schema Snippet
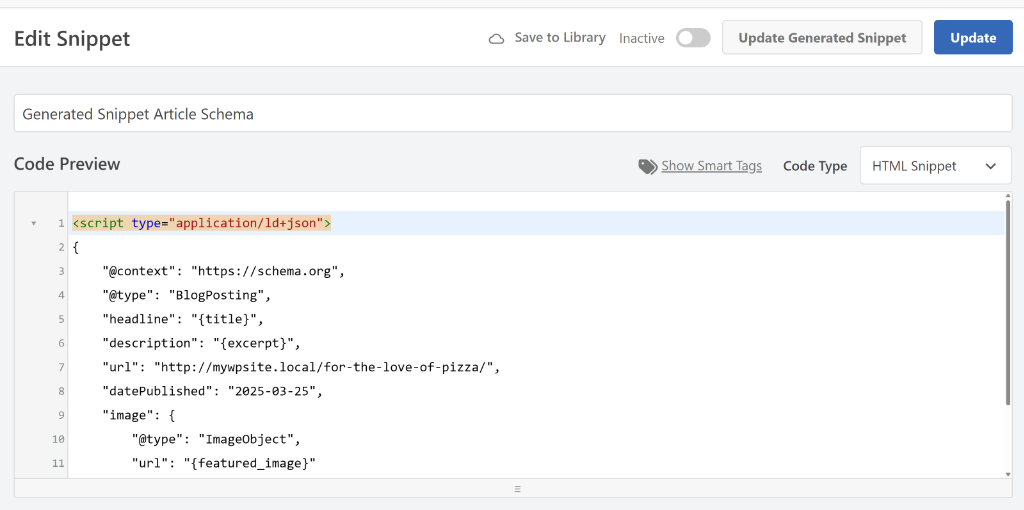
After clicking ‘Use Snippet’, you’ll be taken to the code editor screen. Here you’ll see your generated schema markup already loaded and ready to go.
This is where you can review everything before it goes live. I always take a few minutes here to read through the code and make sure all the details look correct.
It’s much easier to catch a mistake here than to discover it later in Google’s testing tool.
If you spot something small that needs fixing, you can edit the code directly in the editor. You can also add or adjust Smart Tags here if you need to ensure dynamic values work correctly.
If you need to make bigger changes to your schema details, don’t worry. Just click the ‘Update Generated Snippet’ button, and WPCode will take you straight back to the schema generator page. From there, you can update any of your details and regenerate the code.
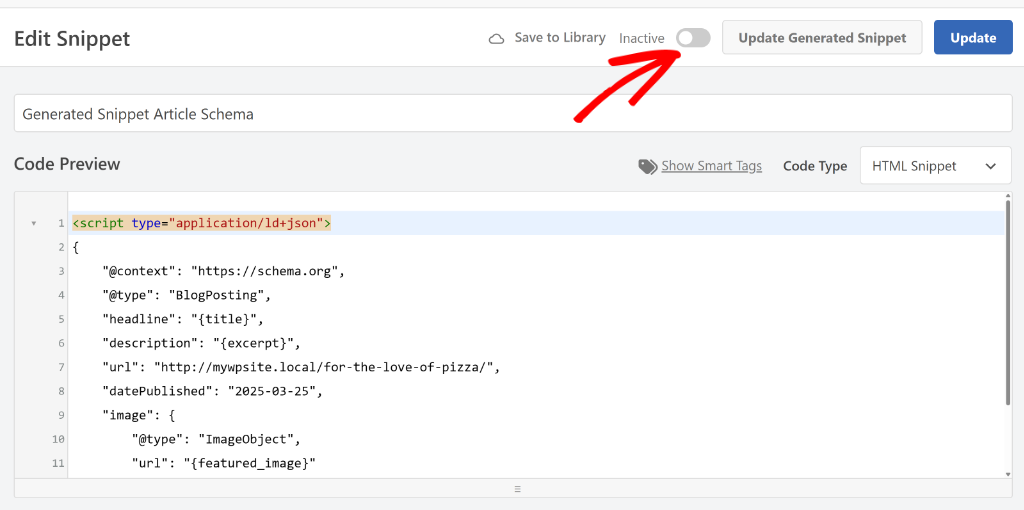
When everything looks good, find the toggle switch at the top of the page next to where it says ‘Inactive’. Click it to switch your snippet to ‘Active’. Then click the Update button to save your changes.
Your schema snippet is now active and saved in WPCode. The next step is to tell WPCode exactly which pages or posts on your site should use this snippet, which is what we’ll cover next.
Step 5: Add the Schema to the Right Page or Post
Having your schema snippet active is great, but you still need to tell WPCode where to use it. You probably don’t want your recipe schema showing up on your contact page, for example.
WPCode gives you two ways to do this. Let’s walk through both so you can pick the one that works best for you.
Method 1: Add Schema Using WPCode Page Scripts
This is my preferred method when I need to add schema to a single specific page or post. It keeps things simple and gives you direct control over exactly where your schema appears.
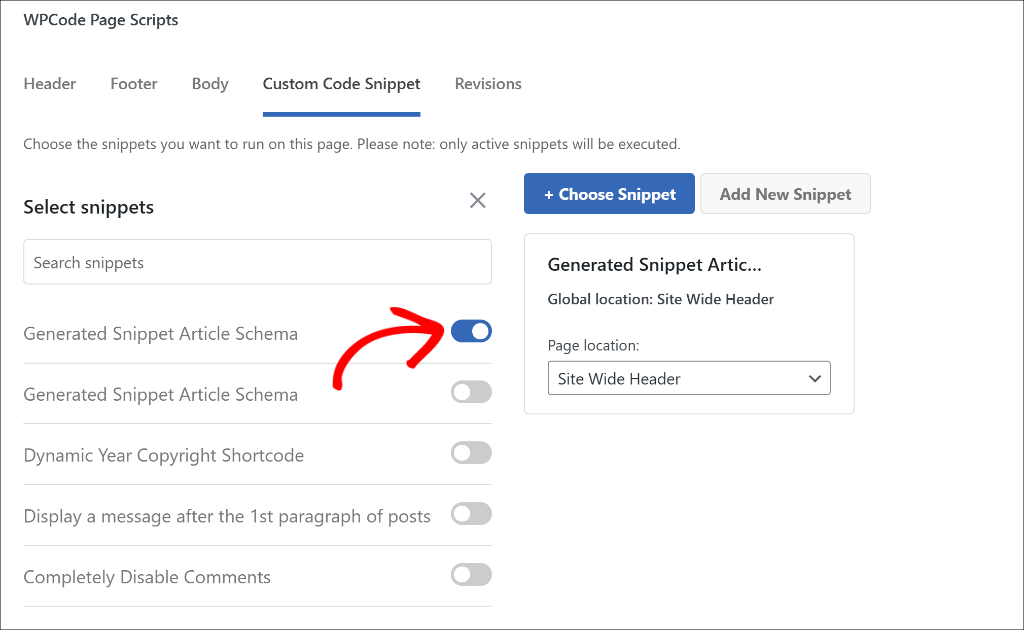
First, open the post or page where you want to add your schema markup. Once you’re inside the WordPress block editor, scroll down below your content area until you see the ‘WPCode Page Scripts’ section.
From here, click on the ‘Custom Code Snippet’ tab inside that section and then click the ‘Choose Snippet’ button. A list of all your saved WPCode snippets will appear on your screen.
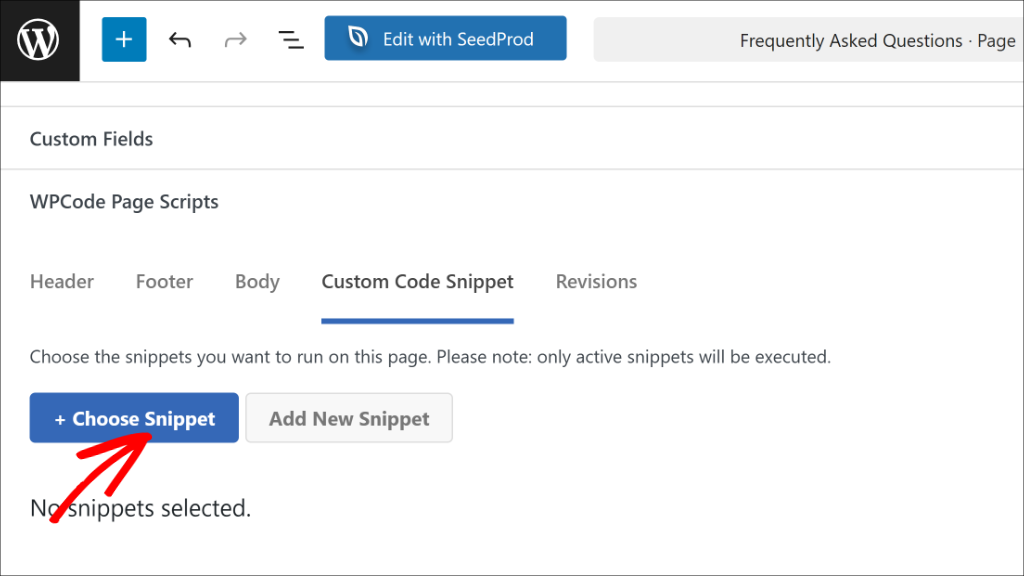
Next, you will need to find your schema snippet in the list and click the toggle next to it to activate it for this specific page.
Then simply publish or update your post or page, and the schema will be live on that page only.
Method 2: Add Schema Using Conditional Logic
This method is great when you want to apply the same schema snippet to multiple pages automatically. I use this approach a lot when working with sites that have large amounts of similar content, like a food blog with dozens of recipe posts.
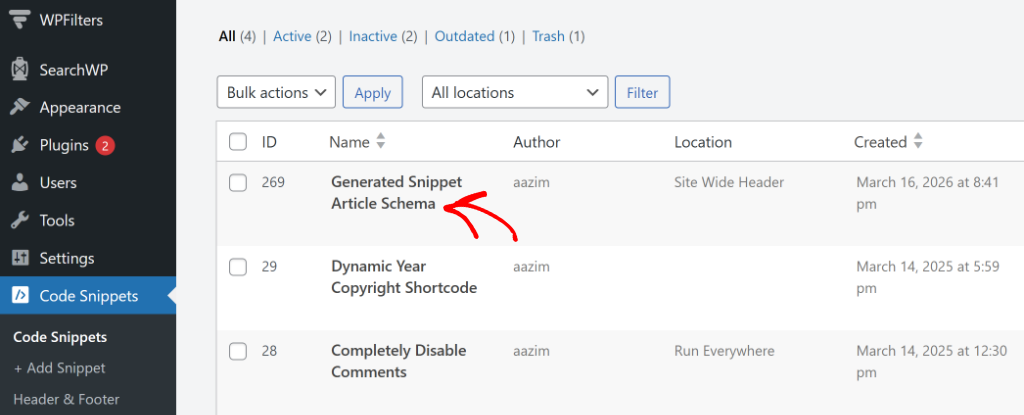
To get started, go to Code Snippets from your WordPress dashboard and click on your schema snippet to open it.
Next, you can scroll down until you find the ‘Smart Conditional Logic’ section. Go ahead and click the toggle to enable it.
WPCode will then ask whether you want to ‘Hide’ or ‘Show’ the snippet. Select the ‘Show’ option and then click the ‘Add New Group’ button.
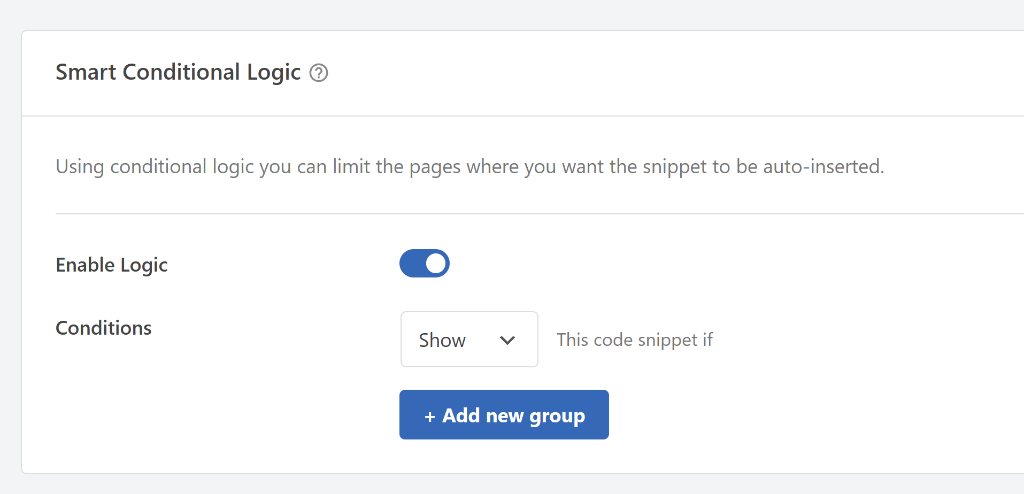
By default, WPCode sets a condition for logged-in users, but you’ll need to change this.
You can click on the condition dropdown to open the menu and switch to the Where (page) tab on the left side, and then select ‘Post/Page’ from the options.
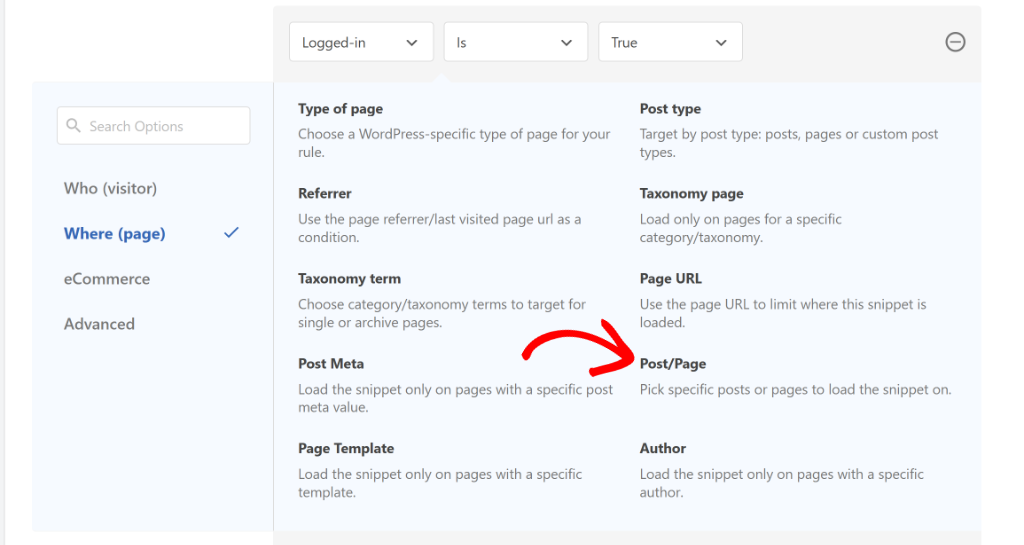
Next, change the condition to Is one of and click the last field to choose the specific page or post where you want the schema to appear.
You can select multiple pages here if needed. Simply click the AND button and add more pages or posts.
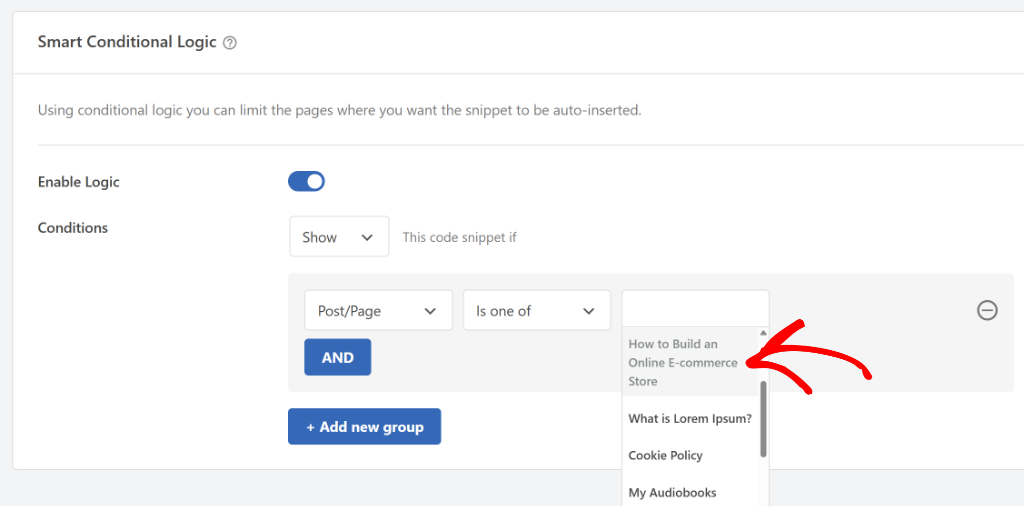
When you’re done setting up your conditions, scroll back to the top and click ‘Update’ to save everything.
And if you need more help with this, check out our guide on how to add scripts to specific pages in WordPress.
Step 6: Test Your Schema Markup
Now that your schema snippet is live on your page, it’s important to check that everything is working correctly.
I always do this right after adding schema to any page because it’s much easier to fix issues straight away than to discover them weeks later.
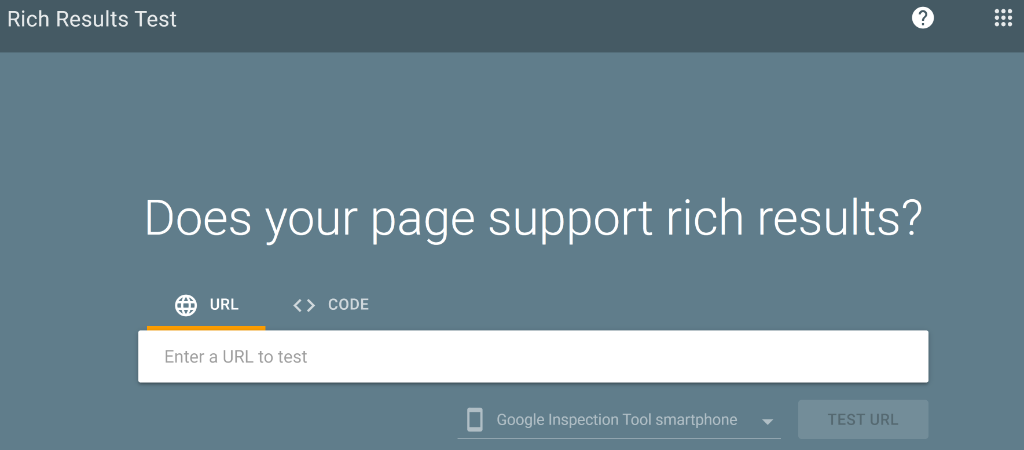
The best free tool for this is Google’s Rich Results Test. It shows you exactly what structured data Google can see on your page and flags any errors or warnings that need your attention.
To get started, visit the Rich Results Test tool in your browser. You’ll see a field where you can enter the URL of the page where you added your schema markup.
Go ahead and paste your page URL in there and click the ‘Test URL’ button. Give Google a moment to analyze your page.
Once the scan is complete, you’ll see a section called ‘Detected Structured Data’. This lists all the schema markup Google found on your page.
Look through the list for your schema type, for example, Events, Recipes, Articles, or FAQs.
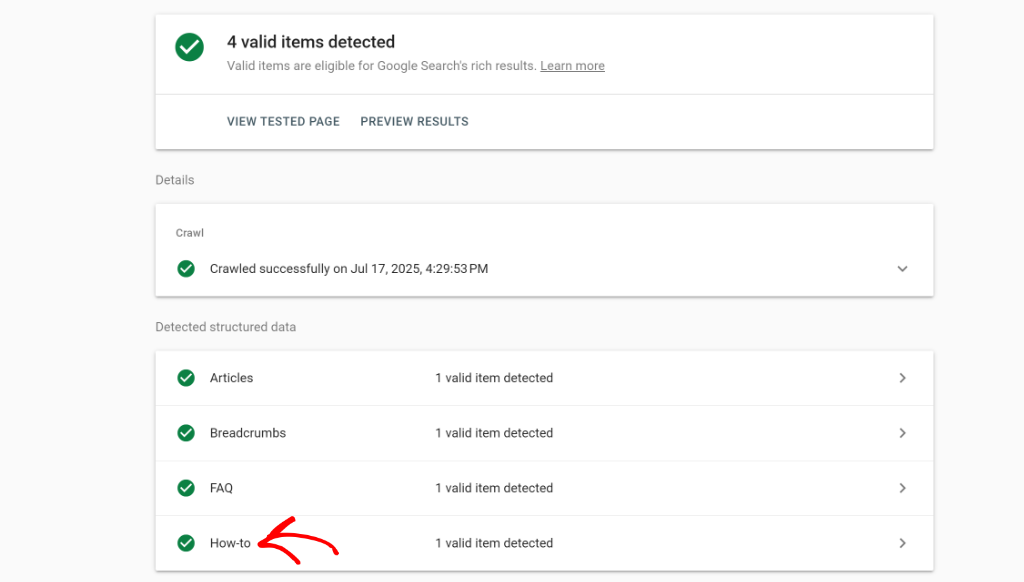
If your schema type appears in the list without any error messages next to it, then you’ve successfully added schema markup to your WordPress site. Your page is now eligible to appear as a rich result in Google search.
If you do see any errors or warnings, don’t panic. Simply click on the schema type in the list to see exactly what’s missing or incorrect. Then head back to your WPCode snippet, make the necessary adjustments, and run the test again. You can test as many times as you need until everything comes back clean.
Note: Keep in mind that even after your schema passes the Rich Results Test, it can take Google a few weeks to start displaying rich snippets for your pages in actual search results. This is completely normal, so just be patient after your test comes back clean.
FAQs about Schema Markup in WordPress
1. Does WordPress add schema markup automatically?
WordPress does add some basic structured data by default, but it’s very limited. It won’t cover specific schema types like recipes, events, or FAQs. That’s why using a tool like WPCode to add your own schema markup is so important.
2. Is schema markup a ranking factor?
Schema markup is not a direct ranking factor, meaning it won’t automatically push your pages higher in search results. However, it can improve your click-through rates by making your listings more attractive in search results, which can indirectly help your overall search performance.
3. How long before rich snippets appear in Google?
Google typically takes anywhere from a few days to a few weeks to start displaying rich snippets after you add schema markup. The exact time depends on how often Google crawls your site and your site’s overall authority. Just be patient after your Rich Results Test comes back clean.
4. Do I need coding knowledge to add schema markup in WordPress?
Not at all. WPCode’s built-in schema generator handles all the code for you. You just fill in your details, and the plugin generates the correct JSON-LD markup automatically. No coding experience is needed.
5. Can I add multiple schema types to the same page?
Yes, you can add multiple schema types to a single page. For example, a recipe post could have both Recipe schema and FAQ schema at the same time. Just create separate snippets in WPCode for each schema type and add them both to the same page using either the Page Scripts or conditional logic method.
I hope this article helped you learn how to add schema markup in WordPress. You may also want to see our guides on how to set up custom event tracking for Facebook Pixel in WordPress and how to add a scroll to the top button in WordPress.
If you need help, then feel free to leave a comment below. And don’t forget to follow us on X (formerly known as Twitter) and subscribe to our newsletter for all the latest updates.

