
TL;DR:
WPCode Lite’s snippet library includes a ready-made countdown timer. Install WPCode, open Code Snippets » Library, and add the Simple Countdown Timer snippet. Set your end date on the snippet’s first line, and switch the snippet to Active. Then place it with a shortcode or auto-insert, and limit it to your sale page with a Page URL rule.
Most people search for a countdown timer plugin when they need one.
It pairs well with pages that have a deadline, like a sale or webinar, so you can build anticipation and FOMO.
Installing a countdown plugin is a reasonable way to solve it. It’s also one more plugin, with its own settings and updates, for a single timer.
If you’re looking for ways to reduce the number of plugins on your site or are already running WPCode as a snippet manager, you don’t need a second tool.
Key Takeaways
- WPCode Lite’s Simple Countdown Timer snippet adds a countdown without a dedicated countdown plugin.
- Page URL, post type and user role rules control which pages show it.
- Place it with a shortcode, or auto-insert it after an exact paragraph.
- Need a pop-up campaign or a full landing page? OptinMonster and SeedProd handle those.
- Countdown Timer Ultimate was permanently closed on WordPress.org for a security issue. Skip it if you see it named elsewhere.
To help you navigate this article, use the table of contents below.
- Method 1: Add a Countdown Timer With WPCode (No Extra Plugin)
- Method 2: Add a Countdown Timer Using SeedProd
- Method 3: Add a Countdown Timer Using OptinMonster
- Why Your WPCode Countdown Might Show EXPIRED or Not Show Up at All
- WPCode vs. a Dedicated Plugin vs. Elementor: What Actually Differs
- Looking for the Best Countdown Timer Plugin for WordPress?
- FAQs: How to Add a Countdown Timer in WordPress
- Set Up Your Countdown Timer, Then Get Back to the Sale
Method 1: Add a Countdown Timer With WPCode (No Extra Plugin)
WPCode is a code management plugin that helps you add functionality to your WordPress site, like a countdown, without editing your theme files.
It does this by letting you add small pieces of code, like HTML snippets, JavaScript, PHP, or custom CSS.
You can also use the snippet library to access more than 3,000 ready-made snippets. The countdown timer is one of them.
Check out the WPCode review for more information on what else you can do with it.
Every step in this method works on the free version of WPCode.
WPCode Pro adds features like scheduled snippets and more advanced targeting, which can be useful if you want a countdown to have more functionality, like turning on and off automatically.
Step 1: Install WPCode
First, search for WPCode from Plugins » Add Plugin in your WordPress dashboard.
Install and activate it the same way as any other plugin.
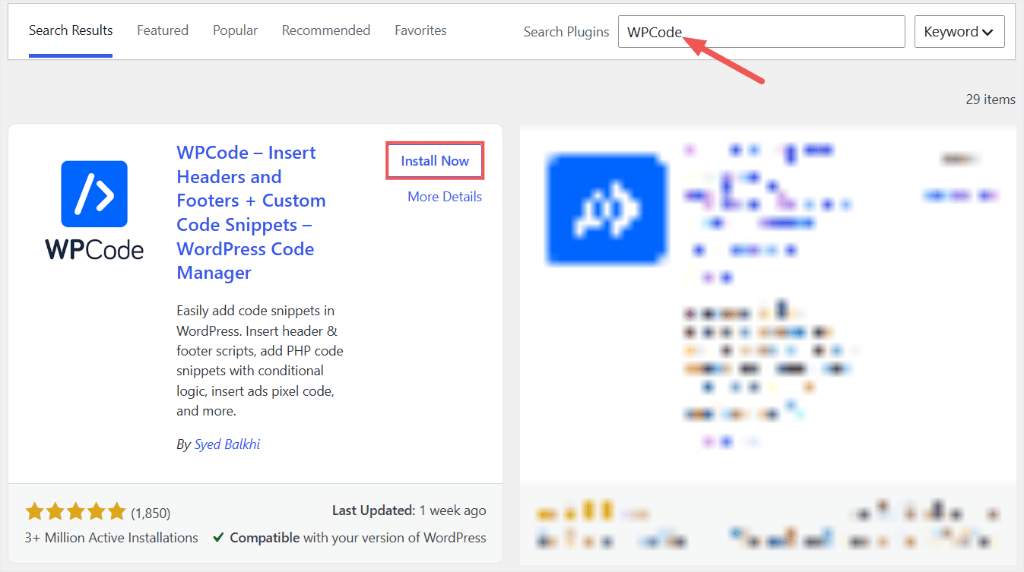
See how to install the free version here.
Step 2: Find the Countdown Timer in the Snippet Library
Once WPCode is active, go to Code Snippets » Library. Type “countdown” into the search box.
Look for Simple Countdown Timer.

⚠️ Connect to the WPCode Library
To use this snippet, connect your site to the WPCode Library. Click Connect to library to unlock (Free) and follow the prompts. You only need to do this once.
Hover over the card and click Preview if you want to see what the snippet looks like and make sure it’s the one you need.
Then click Use snippet to open it in the code editor.

The editor opens with the countdown code already loaded. You won’t be writing anything from scratch.
WPCode sets the Code Type to HTML Snippet for you, so there’s nothing to pick here.
Step 3: Set Your End Date
The snippet’s first line holds the date your countdown runs to:
<div id="wpcode-countdown-1" data-end="December 31, 2026 23:59:59"></div>
Required: set your end date. Change the date inside data-end="..." to when you want the countdown to hit zero.
Keep the same pattern, month name first: "November 28, 2026 09:00:00". Formats like 28/11/2026 won’t be read, and the countdown shows NaNd NaNh NaNm NaNs instead.
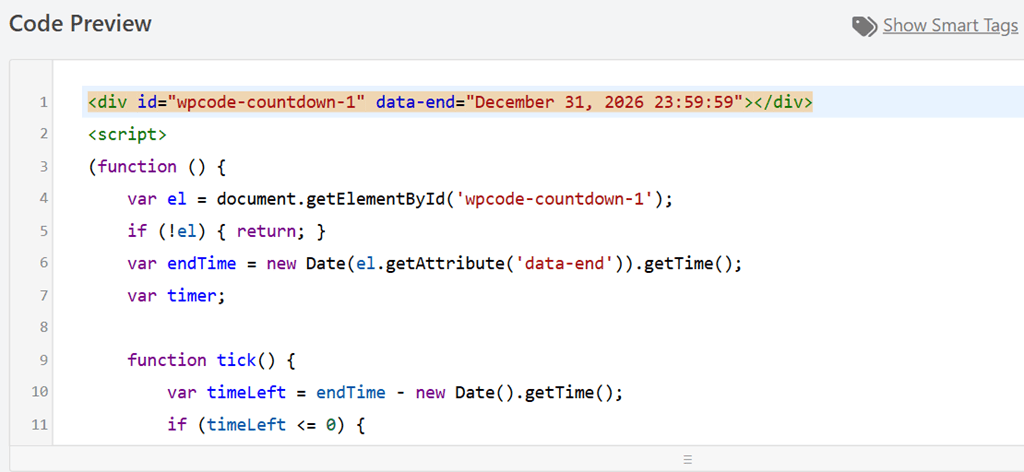
If the code in your editor looks different from the screenshot, select everything in the code box and paste this in its place:
<div id="wpcode-countdown-1" data-end="December 31, 2026 23:59:59"></div>
<script>
(function () {
    var el = document.getElementById('wpcode-countdown-1');
    if (!el) { return; }
    var endTime = new Date(el.getAttribute('data-end')).getTime();
    var timer;

    function tick() {
        var timeLeft = endTime - new Date().getTime();
        if (timeLeft <= 0) {
            clearInterval(timer);
            el.innerHTML = 'EXPIRED';
            return;
        }
        var days = Math.floor(timeLeft / 86400000);
        var hours = Math.floor((timeLeft % 86400000) / 3600000);
        var minutes = Math.floor((timeLeft % 3600000) / 60000);
        var seconds = Math.floor((timeLeft % 60000) / 1000);
        el.innerHTML = days + 'd ' + hours + 'h ' + minutes + 'm ' + seconds + 's';
    }

    tick();
    timer = setInterval(tick, 1000);
})();
</script>
⚠️ One catch
A new snippet saves as Inactive by default. Flip the toggle near the top of the editor to Active. Skip this and none of the next steps will show anything on your site.
Step 4: Place It Where You Want It
Scroll down to the Insertion panel. You have two choices here.
Shortcode gives you a code like [wpcode id="191"] (yours will carry a different number).
Paste it into a Shortcode block on your sale page. It also works in a widget or a normal paragraph.
The countdown appears in that spot.
Auto Insert places it for you, without touching the page content at all.
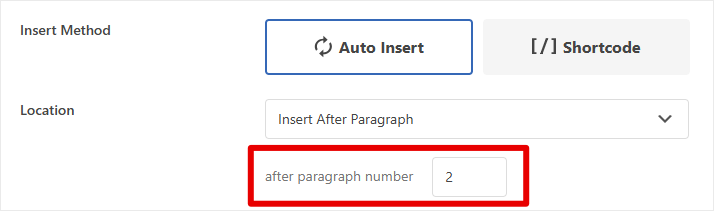
Switch to Auto Insert and open the Location dropdown, then choose the Page-Specific tab.
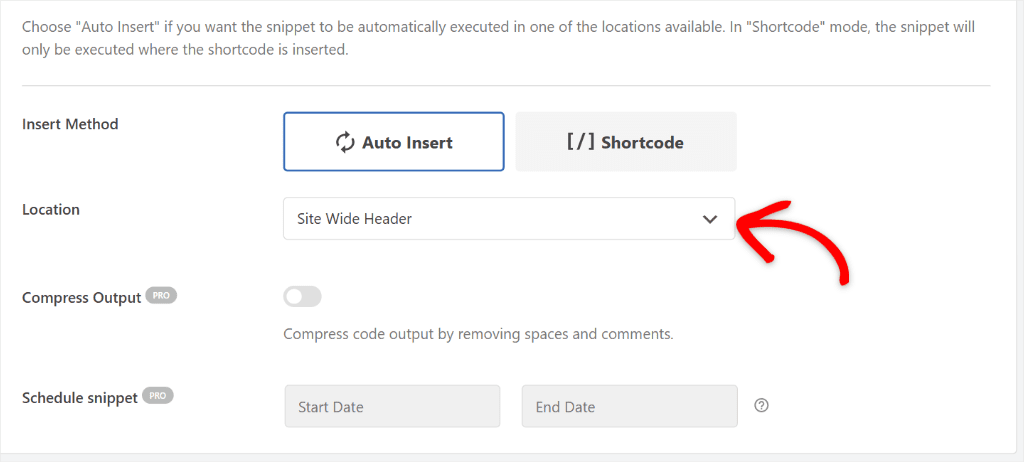
Say your sale page opens with two short paragraphs, and you want the countdown right after them.
Choose Insert After Paragraph.
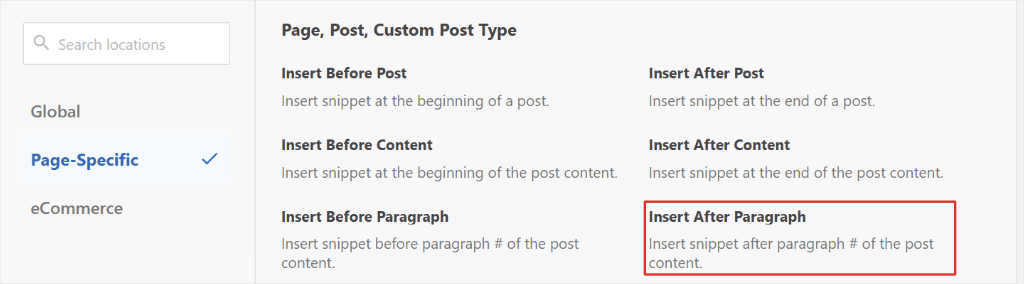
Then, type 2 into the number field. That puts the timer after the second paragraph of every post and page, for now. Step 5 narrows it to your sale page.
Step 5: Show It Only on the Pages That Need It
Used the shortcode? The countdown already shows only where you pasted it, so skip to the Update button at the end of this step.
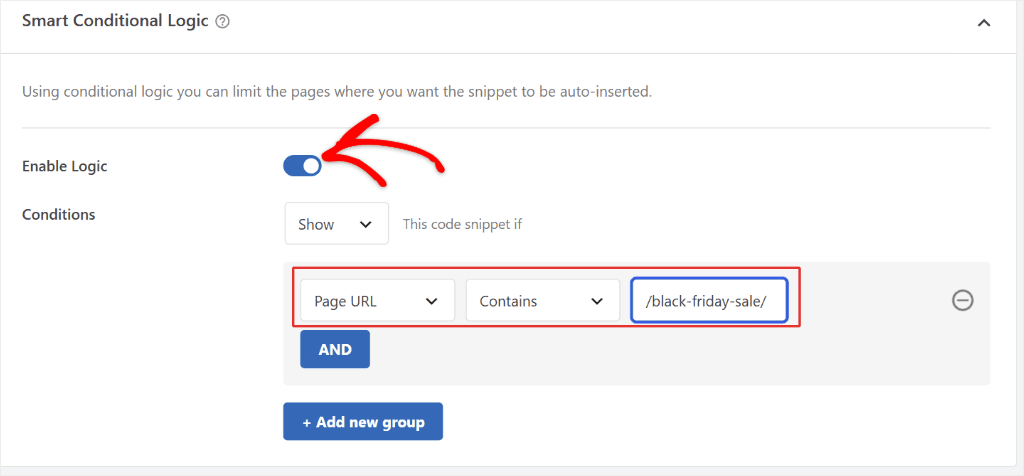
Scroll to Smart Conditional Logic and turn on Enable Logic. We will use this to ensure the countdown for one sale doesn’t show up on every page of your site.
Click + Add new group.
The new rule starts on Logged-in, so change that first dropdown to Page URL, set the next one to Contains, and type in a piece of your sale page’s URL, something like /black-friday-sale/.
Now the countdown only loads where that URL rule matches.
Page URL is one of several rules you can use in WPCode Lite. Others include post type, user role, and whether a visitor is logged in.
WPCode Pro adds more, like picking an exact page by name, showing the countdown only on certain devices, or scheduling it to turn on and off by date.
To see when each rule makes sense, check out our guides on adding scripts to specific pages and showing different content to different user roles.
Click Update to save everything you’ve set up.
Then open your sale page in a private browser window to check what a logged-out visitor sees.
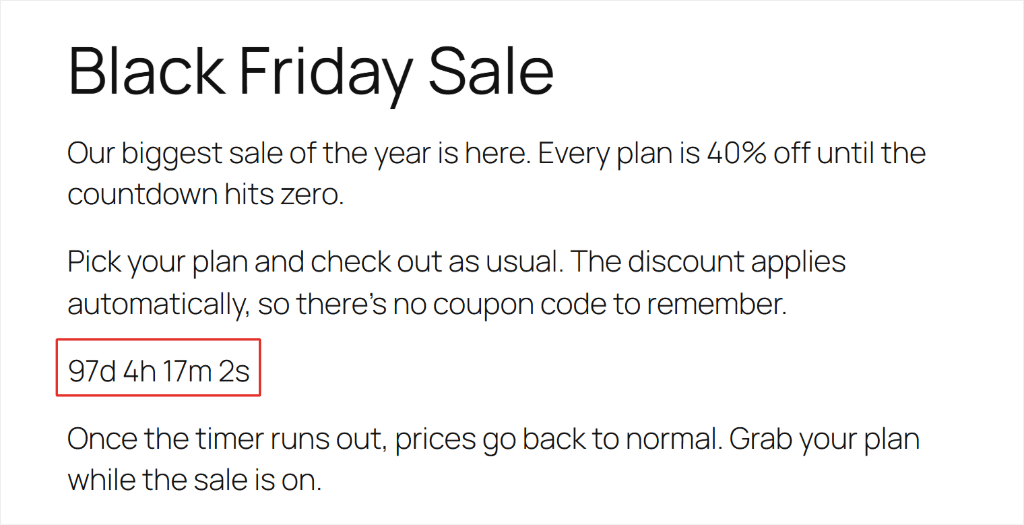
You’ll see the countdown as a line of text right after your second paragraph, ticking down every second:
Step 6 (Optional): Customize Your Countdown
The WPCode snippet gives you a starting point, but you can change the code to customize it. Here are a few quick ways to make the countdown your own. Skip these if the default works for you.
Change the wording at zero. When time runs out, the countdown shows EXPIRED. Replace that word in the code with something like This sale has ended.
Put it in a box. As it stands, the countdown renders as plain text. Open your snippet again from Code Snippets » Code Snippets, and paste these lines at the very bottom of the code box, under </script>:
<style>
#wpcode-countdown-1 {
    box-sizing: border-box;
    padding: 12px 20px;
    background: #11293E;
    color: #ffffff;
    font-size: 20px;
    border-radius: 6px;
    text-align: center;
}
</style>
Click Update, then refresh your sale page. The countdown now sits in its own box, lined up with your text:
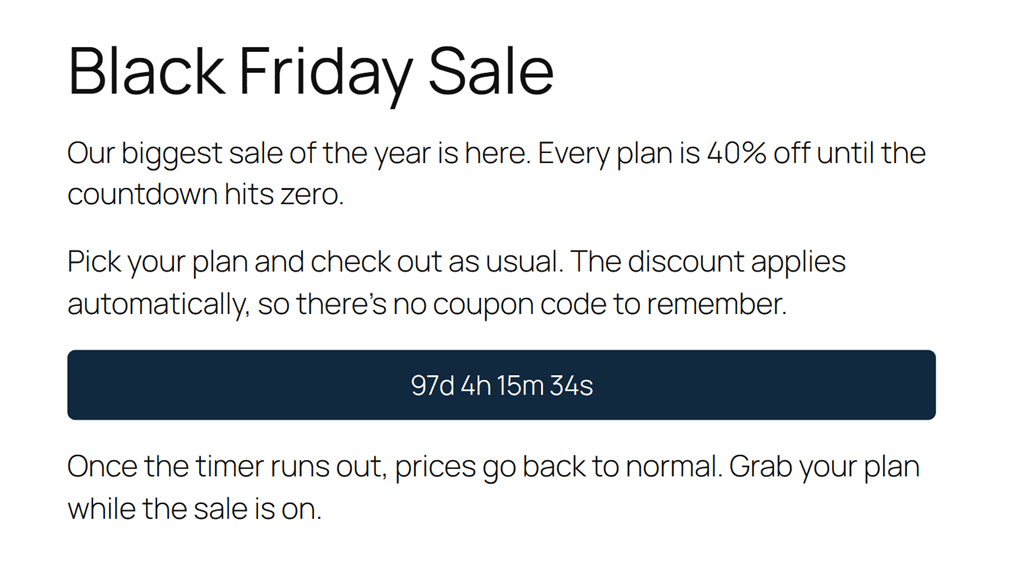
Because the styling lives in the same snippet, it only loads where the countdown does. For more styling options, see our guide on how to add custom CSS to your WordPress site.
Method 2: Add a Countdown Timer Using SeedProd
SeedProd’s page builder is free, but the Countdown block itself needs a paid plan.
SeedProd is a landing page and theme builder plugin.
Its Countdown block is a good fit if you’re already building a dedicated landing page, rather than adding a timer to an existing post.
After installing SeedProd, open the page you’re building in its builder and drag the Countdown block onto the layout.

From the block’s settings panel, you can change the countdown type and set an end date and time.
You can also choose a timezone and pick from several visual styles.
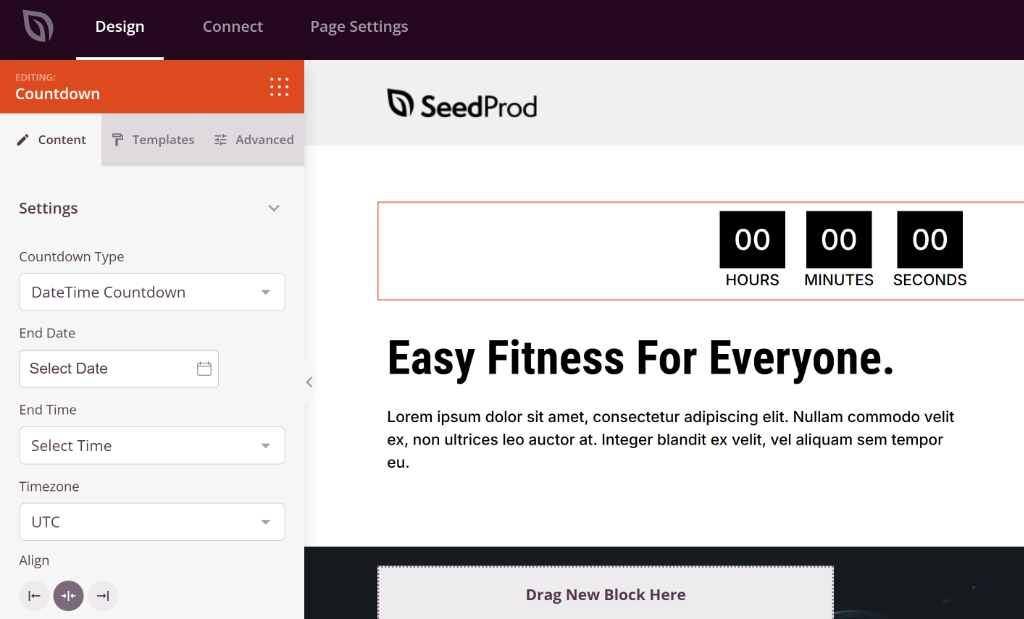
If your goal is a fully designed landing page with a countdown, this might be the solution for you.
If you just need a timer, it’s a heavier tool than the job requires.
Method 3: Add a Countdown Timer Using OptinMonster
OptinMonster is built for popups, floating bars, and other on-page campaigns. It includes countdown timers in the Pro plan or higher.
You get a 14-day money-back guarantee, so you can test it out before you decide.
Its countdown block works inside any of those campaign types. This makes it a good match if you want the timer inside a popup or slide-in, rather than sitting directly in your page content.
Once you set up OptinMonster, create a new campaign, choose a template, and drag the Countdown block into it.

Choose Static for a fixed end date, or Dynamic for an evergreen timer that restarts for each new visitor.
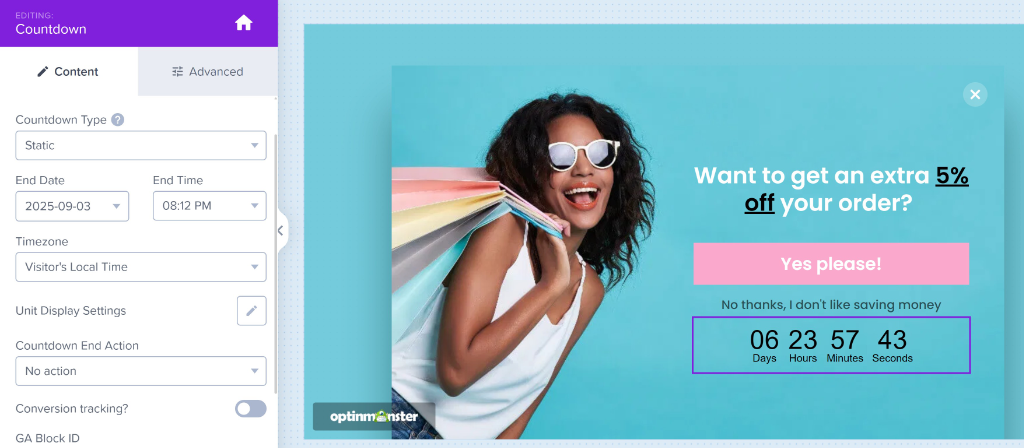
Then set display rules for which pages the campaign shows on.
This makes sense if you want the popup and countdown working together.
Why Your WPCode Countdown Might Show EXPIRED or Not Show Up at All
“My countdown says EXPIRED”
The end date has passed, so the timer stopped. Sale over? Switch the snippet back to Inactive, and the countdown disappears from the page. It stays saved in Code Snippets, so for the next sale you change the date and switch it back on.
“My page doesn’t show anything where I expected”
Check three things. The snippet’s toggle needs to say Active, and you need to have clicked Update. If you chose Auto Insert, the Location and any Conditional Logic rule need to match the page you’re viewing. If you used the shortcode, it needs to sit in a Shortcode block or a normal paragraph. Inside a Code block, WordPress shows it as plain text instead of running it.
“I updated the date, but visitors still see the old one”
This is usually caching. If your host or a caching plugin serves a saved version of the page, visitors get the old end date, still counting down. Clear your page cache after changing the end date, and the update will show up.
“The countdown ends at a different time for some visitors”
Without an offset in the date, the countdown treats the time as local time in each visitor’s browser, so it hits zero at 23:59 wherever they are. If everyone needs to reach zero at the same moment, add the GMT offset that applies on your end date. For New York in winter, that looks like "December 31, 2026 23:59:59 GMT-0500".
If daylight saving is in effect on your end date, the offset is different, for example GMT-0400 for New York in summer.
WPCode vs. a Dedicated Plugin vs. Elementor: What Actually Differs
Here’s what each option is best at:
- WPCode snippet. Included in WPCode Lite, and the countdown only appears where you place it or target it. It also covers other small jobs from the same library, like a maintenance mode snippet. The trade-off: no visual editor, and no evergreen timers that restart for each visitor.
- Dedicated countdown plugin (like HurryTimer). Free to start, with a settings screen instead of code, and HurryTimer’s free version does evergreen timers too.
- Elementor’s Countdown widget. The most visual option, if you already pay for Elementor Pro. The free version of Elementor doesn’t include it.
Here’s how they compare:
| WPCode Snippet | Dedicated Plugin | Elementor Widget | |
|---|---|---|---|
| Fixed-date countdown | Yes | Yes | Yes (Pro) |
| Evergreen countdown | No | Some (HurryTimer free) | Yes (Pro) |
| Set up without touching code | No, copy and paste | Yes | Yes |
| Adds another plugin | No, if you run WPCode | Yes | Needs Elementor Pro |
| Best for | Simple fixed-date timers | More timer features | Pages built in Elementor |
The trade-off is simple. WPCode keeps the setup light, but it isn’t a visual countdown builder, and its snippet only counts down to a fixed date. If either of those matters, a dedicated timer tool may fit better.
If you want the lightest option, and one tool instead of several, the snippet is the one to use.
Looking for the Best Countdown Timer Plugin for WordPress?
Each of these fits a specific job. Pick the one that matches yours:
- WPCode: Pick this if you want a fixed-date countdown without adding a single-purpose plugin. The same plugin handles your other code snippets too, so it’s one tool doing several jobs. The trade-off: you paste a few lines of code instead of using a visual editor, and it doesn’t do evergreen timers. (Setup in Method 1 above.)
- OptinMonster: Pick this if you want the countdown inside a pop-up, floating bar or slide-in campaign. The trade-off: countdowns need the Pro plan or higher, so it’s a paid tool from the start. (Setup in Method 3 above.)
- SeedProd: Pick this if you’re building a whole landing page around the timer. The trade-off: the Countdown block needs a paid plan, which is a lot of tool for a single timer. (Setup in Method 2 above.)
- HurryTimer: Pick this if you want an evergreen timer that restarts for each visitor, at no cost. The trade-off: it’s one more single-purpose plugin to keep updated.
- Finale Lite: Pick this if you want countdowns on WooCommerce product pages. The trade-off: it only works with WooCommerce, so it won’t help on a landing page or blog post.
⚠️ Skip this one
Skip Countdown Timer Ultimate if you see it recommended elsewhere. It was permanently closed on WordPress.org in April 2026 over a security issue. It can no longer be downloaded.
FAQs: How to Add a Countdown Timer in WordPress
How do I add a countdown timer to my WordPress website?
Install WPCode. Go to Code Snippets » Library, search for “countdown,” and click Use snippet on the Simple Countdown Timer. Set your end date on the snippet’s first line, and switch the snippet to Active. Then place it with a shortcode, or auto-insert it with a Page URL rule so it only shows on your sale page.
Is there a free countdown timer for WordPress?
Yes. WPCode Lite’s snippet library includes a countdown timer. Dedicated plugins like HurryTimer also have a free version with a fixed-date countdown.
What is the best free countdown timer plugin for WordPress?
For a fixed-date countdown, WPCode Lite. Its library has a ready-made countdown, you choose exactly which pages show it, and the same plugin runs the rest of your code snippets. If you need an evergreen timer that restarts for each visitor, HurryTimer’s free version does that.
Can I run more than one countdown timer on the same site?
Yes. Go to Code Snippets » Code Snippets, hover over your countdown snippet, and click Duplicate. Set the copy’s own end date and switch it to Active. If both countdowns will appear on the same page, give the second countdown a different ID. Change wpcode-countdown-1 to wpcode-countdown-2 on its first line and its getElementById line. If you added the box styling, change the ID there too.
Why does my countdown timer show the wrong time for some visitors?
Without an offset in the date, each visitor’s countdown ends at that time on their own clock. Add the GMT offset for your end date, like GMT-0500, and it ends at the same moment for everyone.
Set Up Your Countdown Timer, Then Get Back to the Sale
You now have a countdown timer running from WPCode, on the sale page you picked.
One thing it won’t do on its own is switch off when the sale ends. Set yourself a reminder to turn the snippet to Inactive that day.
Want to create a little more FOMO around the sale? There are plenty of other options in the WPCode snippet library. Search for “offer” to see what else you can add to the same sale page.
Want to manage the countdown alongside your other custom code from the same place?
Get WPCode for free →
Want the countdown to switch itself on and off on the dates you choose?
Explore WPCode Pro →
Additional Resources
Once your countdown is live, these help you get more out of the same tool.
- How to Add Custom HTML Code to WordPress Site: the same HTML Snippet type the countdown uses, for other pieces of code you want on a page
- WPCode Library website: browse more snippets, including ones shared by other WPCode users, and send any of them to your site in one click
- How to Add Scripts to Specific Pages in WordPress: more ways to target a snippet, beyond the Page URL rule from Step 5
- Tips to Easily Manage Code Snippets in WordPress: habits that keep your snippet list tidy once you’re running more than one or two