TL;DR:
You can add JavaScript to WordPress without editing theme files. With the free WPCode plugin, create a JavaScript Snippet, paste the code, choose Site Wide Footer, and activate it. These 13 tested examples cover common tasks, from reading progress bars to form validation, with free rules to limit where most snippets run.
You can add small features to WordPress with JavaScript, from tap-to-call phone numbers to reading progress bars.
WPCode lets you add these snippets without editing theme files or installing a separate plugin for each feature.
In this guide, you’ll find 13 JavaScript snippets we’ve tested on a real WordPress site, with step-by-step instructions for adding each one using WPCode’s free plugin.
You’ll also learn how to use conditional logic to load snippets only where they’re needed.
Key Takeaways
- Every snippet here goes in the same way: a JavaScript Snippet in WPCode, loaded in the Site Wide Footer.
- All 13 work with the free version of WPCode. Two mention a paid WPCode option, and neither needs it.
- You can limit most snippets to certain posts, pages, or people with WPCode’s free rules.
- Each snippet is short and loads at the end of the page, so it adds very little to your page speed.
- Some popular snippets are out of date, because WordPress, WooCommerce, or WPCode already covers the job. We list four you can skip.
Use the table of contents below to navigate this article.
- How to Add a JavaScript Snippet in WordPress
- The 13 Snippets at a Glance
- For Bloggers and Publishers
- For Local Businesses and Lead Forms
- For Marketers and Stores
- For Photographers, Teams, and Help Sites
- 4 JavaScript Snippets You Can Skip in 2026
- Which Snippet Should You Add First?
- FAQs: JavaScript Snippets
- Add Your First JavaScript Snippet Today
How to Add a JavaScript Snippet in WordPress
You add all 13 snippets the same way, so we’ll walk through it once.
We’ll use the first snippet, a reading progress bar, as the example. It’s quick to set up, and you see the result straight away.
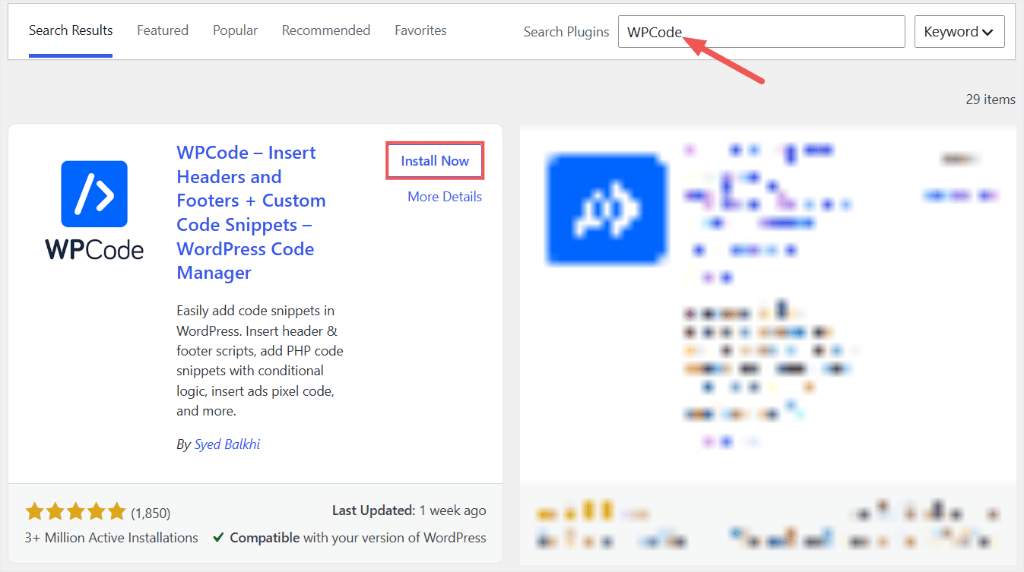
You need one thing first: the free WPCode plugin from WordPress.org. Install and activate it like any other plugin.
You don’t need to know JavaScript.
You’ll copy the code from this article and paste it in. A few snippets have one marked line you can change, like a color or a phone number, and we’ll point it out each time.
Create the snippet
Here’s the setup, using the reading progress bar.
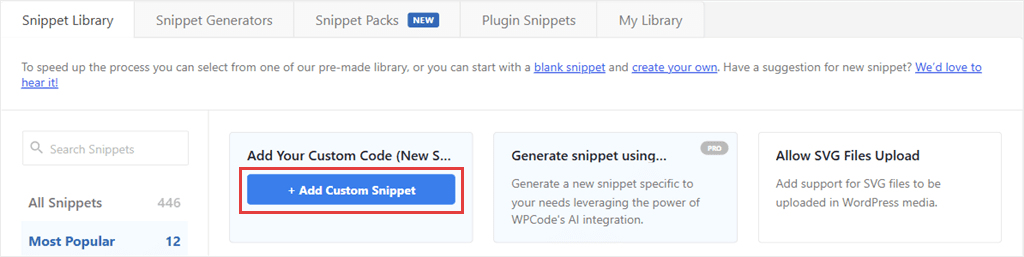
In your WordPress dashboard, with WPCode Lite installed, go to Code Snippets » + Add Snippet. This opens the WPCode snippet library first. You don’t start with a blank editor.
At the top of the library, you’ll see a card called Add Your Custom Code (New Snippet). Hover over it and click + Add Custom Snippet.
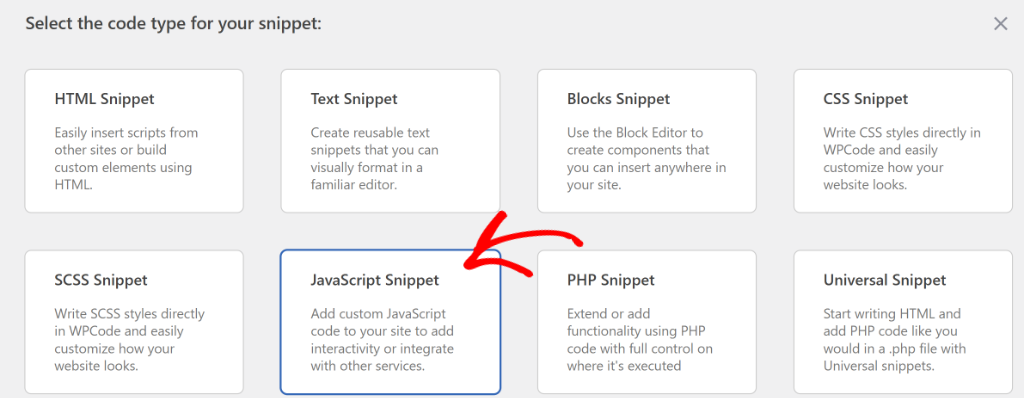
Next, WPCode asks what kind of code you’re adding. Pick JavaScript Snippet.
This tells WPCode to wrap your code in the right tags for you. So you paste the code as it is, without adding any <script> tags of your own.
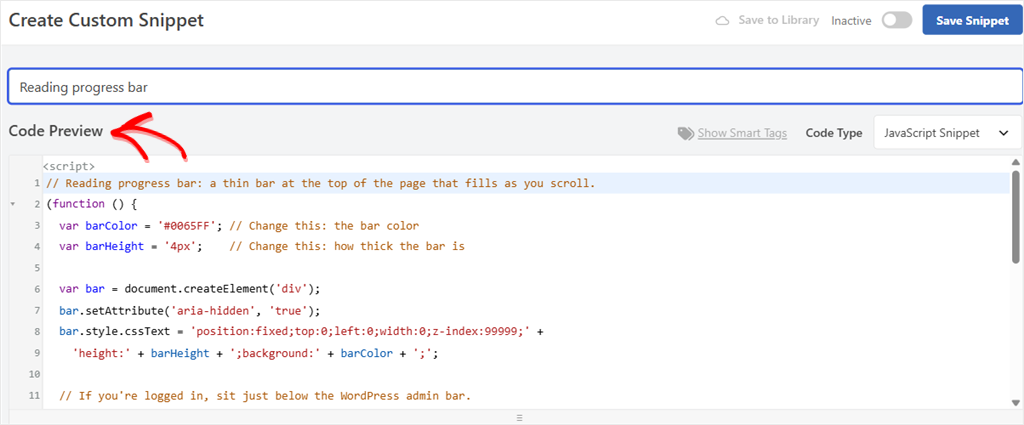
Give your snippet a name you’ll recognize later, like “Reading progress bar.”
Then paste the code into the Code Preview box.
// Reading progress bar: a thin bar at the top of the page that fills as you scroll.
(function () {
  var barColor = '#0065FF'; // Change this: the bar color
  var barHeight = '4px';    // Change this: how thick the bar is

  var bar = document.createElement('div');
  bar.setAttribute('aria-hidden', 'true');
  bar.style.cssText = 'position:fixed;top:0;left:0;width:0;z-index:99999;' +
    'height:' + barHeight + ';background:' + barColor + ';';

  // If you're logged in, sit just below the WordPress admin bar.
  var adminBar = document.getElementById('wpadminbar');
  if (adminBar && getComputedStyle(adminBar).position === 'fixed') {
    bar.style.top = adminBar.offsetHeight + 'px';
  }
  document.body.appendChild(bar);

  function updateBar() {
    var scrollable = document.documentElement.scrollHeight - window.innerHeight;
    var percent = scrollable > 0 ? (window.scrollY / scrollable) * 100 : 0;
    bar.style.width = Math.min(percent, 100) + '%';
  }
  window.addEventListener('scroll', updateBar, { passive: true });
  window.addEventListener('resize', updateBar);
  updateBar();
})();
Choose where it loads
Scroll down to the Insertion box, leave the method on Auto Insert, and choose Site Wide Footer from the Location dropdown.
We use Site Wide Footer for all 13 snippets in this article.
That’s because the footer loads last. By the time the snippet runs, the rest of the page is already there for it to work with.

Site Wide Footer means every page, by default.
A progress bar only makes sense on blog posts, though. Your pages, like Contact or About, are usually too short to need one.
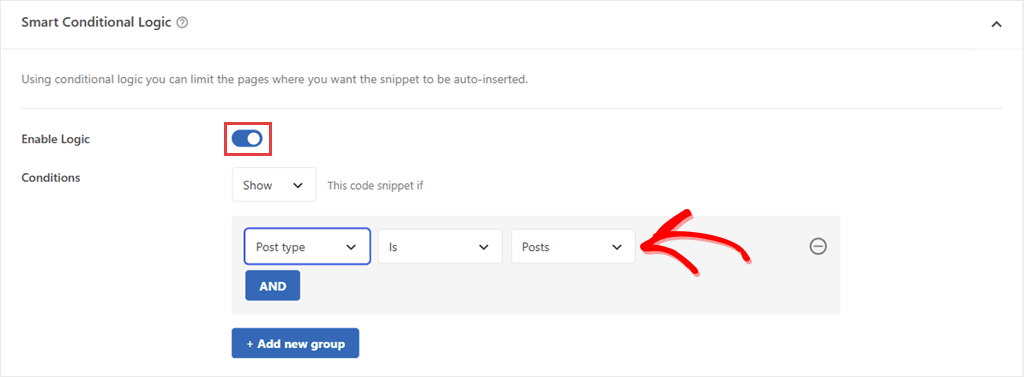
So scroll down to Smart Conditional Logic and turn on Enable Logic. Leave it set to Show this code snippet. Then click + Add new group, choose Post type in the first box, leave the middle box on Is, and pick Posts.
Now the bar only loads on your blog posts and blog listings, not your pages. This rule is free in WPCode.
Switch it on and check it
At the top right of the screen, click the toggle so it changes from Inactive to Active. Then click Save Snippet.
The snippet is now live on your site.

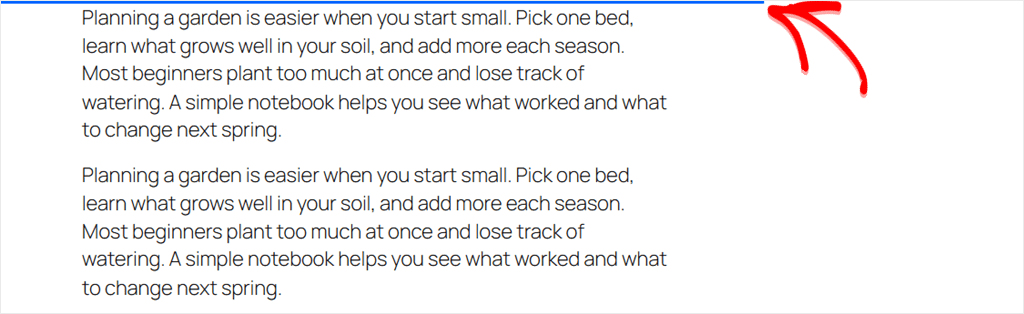
To see it, open one of your blog posts in a private browser window and scroll down. A thin blue bar fills across the top of the page as you read.
To remove the bar, switch the same toggle back to Inactive and click Update.
What if you paste the code wrong? Your site won’t crash.
A JavaScript error usually won’t take your WordPress site offline, but it can stop the snippet from working or interfere with other features on the page.
If something goes wrong, deactivate the snippet and check the browser console for errors.
The 13 Snippets at a Glance
Now that you understand how to set up JavaScript snippets in WPCode, here’s every snippet in one table, grouped by the kind of site it suits.
| Snippet | Who it’s for | Difficulty | Plan |
|---|---|---|---|
| 1. Reading progress bar | Bloggers, publishers | Easy | Free |
| 2. Open external links in a new tab | Bloggers, affiliate sites | Easy | Free |
| 3. Estimated reading time | Bloggers, publishers | Easy | Free |
| 4. Copy-link buttons on headings | Long guides, docs | Easy | Free |
| 5. Click-to-call phone numbers | Local businesses | Intermediate | Free (phone-only targeting is paid) |
| 6. Warn before leaving a half-filled form | Quote and booking forms | Easy | Free |
| 7. Block free email addresses | B2B lead forms | Easy | Free |
| 8. Keep UTM tags for hidden form fields | Agencies, lead generation | Hard | Free (needs a form with hidden fields) |
| 9. Track phone and email clicks in GA4 | Marketers | Intermediate | Free |
| 10. Click-to-copy coupon codes | Online stores, deal sites | Intermediate | Free (scheduling is paid) |
| 11. Turn off right-click on images | Photographers, artists | Easy | Free |
| 12. Press “E” to edit the page you’re on | Editors, content teams | Easy | Free |
| 13. Press “/” to jump to search | Help docs, recipe sites | Easy | Free |
Looking for a back-to-top button or a countdown timer?
Those need a bit of HTML as well, so they’re not in this list. We have separate guides on adding a scroll-to-top button and adding a countdown timer.
Want an effect with no code to copy at all?
The WPCode snippet library has Smooth Scrolling for Anchor Links and Fading Page Transitions, ready to add in one click once you connect your free library account.
For Bloggers and Publishers
These four help readers find their way through long posts, see how long a post takes to read, and share links to specific sections. Snippets 1, 3, and 4 belong on blog posts, so they use the same free Post type rule you set up above.
1. Reading Progress Bar (Free)
| Best for | Difficulty | WPCode tools used | Plan |
|---|---|---|---|
| Long blog posts | Easy | Post type rule | Free |
You’ve already added this one if you followed the walkthrough.
A reading progress bar shows readers how far they’ve moved through a post. It gives them a quick sense of how much is left.
The full code is in the walkthrough above.
💡 Change this line
The first two lines inside the code set the color and thickness. Swap #0065FF for your brand color, or change 4px to make the bar thicker.
For logged-in users, the bar sits just under the black WordPress admin bar, so it stays visible. Your visitors see it at the very top of the page.
✓ How you know it worked: Scroll halfway down a post. The bar should reach about halfway across the screen.
2. Open External Links in a New Tab (Free)
| Best for | Difficulty | WPCode tools used | Plan |
|---|---|---|---|
| Blogs, affiliate and review sites | Easy | Site Wide Footer | Free |
When a reader clicks a link to another website, they leave yours.
Want those links to open in a new tab instead? This snippet does it across your site, so your post is still there when the reader comes back. Setting that by hand on every link takes time, and it’s easy to miss one.
This snippet does it for every link to another website, across your whole site.
// Open links to other websites in a new tab, and tell screen-reader users it will.
(function () {
  // Your own address. Subdomains like shop.yoursite.com count as your site too.
  var siteDomain = location.hostname.replace(/^www\./, '');

  document.querySelectorAll('a[href^="http"]').forEach(function (link) {
    var linkDomain = link.hostname.replace(/^www\./, '');
    var isYourSite = linkDomain === siteDomain || linkDomain.endsWith('.' + siteDomain);
    if (isYourSite || link.target === '_blank') return;

    link.target = '_blank';
    link.rel = (link.rel + ' noopener').trim();

    // Hidden on screen, read aloud by screen readers.
    var note = document.createElement('span');
    note.textContent = ' (opens in a new tab)';
    note.style.cssText = 'position:absolute;width:1px;height:1px;overflow:hidden;' +
      'clip:rect(0 0 0 0);white-space:nowrap;';
    link.appendChild(note);
  });
})();
Your own links stay as they are. That includes subdomains, so a link to shop.yoursite.com still opens in the same tab.
A new tab can surprise people who use screen readers, because they can’t see the tab open.
So the snippet adds a hidden “(opens in a new tab)” note to each link. Screen readers read it out, and it doesn’t show on the page.
It also adds noopener to each link, which stops the other site from reaching back into your open tab.
✓ How you know it worked: Click a link to another website in one of your posts. It should open in a new tab, with your post still open in the first one.
3. Show an Estimated Reading Time (Free)
| Best for | Difficulty | WPCode tools used | Plan |
|---|---|---|---|
| Blogs, news and magazine sites | Easy | Post type rule | Free |
Giving readers a reading time estimate like “5 min read” at the top of a post tells them what they’re signing up for.
It helps visitors decide whether to read a post now or save it for later.
This snippet counts the words in your post and adds a line like that above the first paragraph.
// Show an estimated reading time at the top of each blog post.
(function () {
  var wordsPerMinute = 200; // Change this: a typical reader's speed

  // Only on single posts, not on your blog page or archives.
  if (!document.body.classList.contains('single')) return;

  // Classic themes use .entry-content, block themes use .wp-block-post-content.
  var content = document.querySelector('.wp-block-post-content, .entry-content');
  if (!content) return;

  var words = content.innerText.trim().split(/\s+/).length;
  var minutes = Math.max(1, Math.round(words / wordsPerMinute));

  var label = document.createElement('p');
  label.className = 'reading-time';
  label.textContent = minutes + ' min read';
  label.style.cssText = 'font-size:0.9em;opacity:0.7;';
  content.prepend(label);
})();
💡 Change this line
wordsPerMinute is set to 200, a common average for reading online. For technical posts, try 150 words per minute to give readers a little more time.
The code looks for the post content area that both block themes and most classic themes use, so you don’t need to set which kind you have. If no reading time shows up, your theme or page builder uses a different one.
Add the same Post type › Is › Posts rule from the walkthrough, so it only loads on blog posts. The snippet also checks it’s on a single post, so it stays off your blog page and archives.
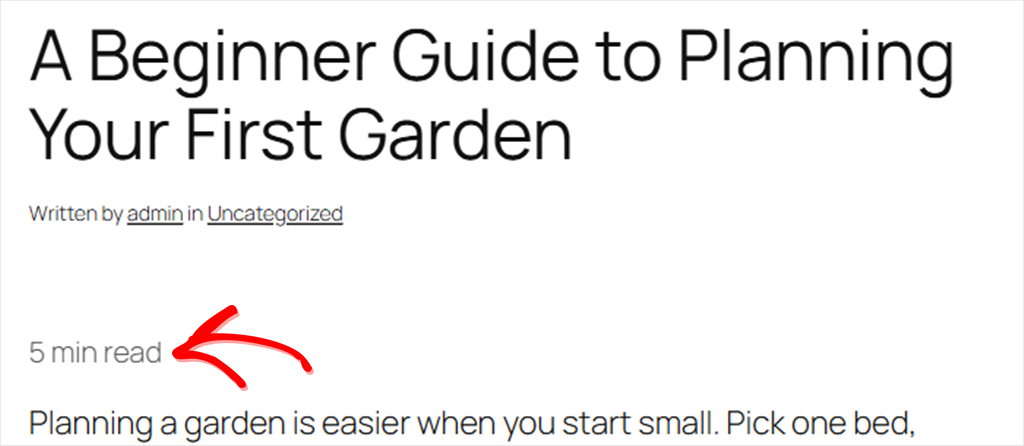
✓ How you know it worked: Open any blog post. You’ll see a line like “5 min read” just above the first paragraph.
4. Copy-Link Buttons on Headings (Free)
| Best for | Difficulty | WPCode tools used | Plan |
|---|---|---|---|
| Long guides, tutorials, documentation | Easy | Post type rule | Free |
When someone wants to share one part of a long post, they usually copy the whole post’s link. Then they tell their friend to “scroll down to the bit about soil.”
This snippet adds a small # button next to each heading. One click copies a link that jumps straight to that section.
// Add a small link button to each heading, so readers can copy a link to that section.
(function () {
  // Only on single posts, and only where the browser allows copying.
  if (!document.body.classList.contains('single') || !navigator.clipboard) return;

  var content = document.querySelector('.wp-block-post-content, .entry-content');
  if (!content) return;

  content.querySelectorAll('h2, h3').forEach(function (heading) {
    // Give the heading an ID from its text, unless it already has one.
    if (!heading.id) {
      var id = heading.textContent.trim().toLowerCase()
        .replace(/[^a-z0-9]+/g, '-').replace(/^-+|-+$/g, '');
      if (!id || document.getElementById(id)) return;
      heading.id = id;
    }

    var button = document.createElement('button');
    button.type = 'button';
    button.textContent = '#';
    button.setAttribute('aria-label', 'Copy link to this section');
    button.style.cssText = 'margin-left:0.4em;padding:0 0.3em;border:0;background:none;' +
      'font:inherit;font-size:0.8em;color:inherit;opacity:0.4;cursor:pointer;';

    button.addEventListener('click', function () {
      var link = location.href.split('#')[0] + '#' + heading.id;
      navigator.clipboard.writeText(link).then(function () {
        button.textContent = 'Link copied';
        setTimeout(function () { button.textContent = '#'; }, 2000);
      }).catch(function () {
        window.prompt('Copy this link:', link); // If the browser blocks copying.
      });
    });
    heading.appendChild(button);
  });
})();
A link can only jump to a heading that has an ID, a short name the browser can find. Most headings don’t have one.
So the snippet makes one from the heading’s text. “Prepare Your Soil” becomes #prepare-your-soil.
If a heading already has an ID, the snippet keeps it, so links from a table of contents plugin keep working.
Your site needs to load over https:// for this one. Browsers only allow copying on secure pages, so on an http:// site the buttons won’t appear.
Use the same Post type › Is › Posts rule as before.
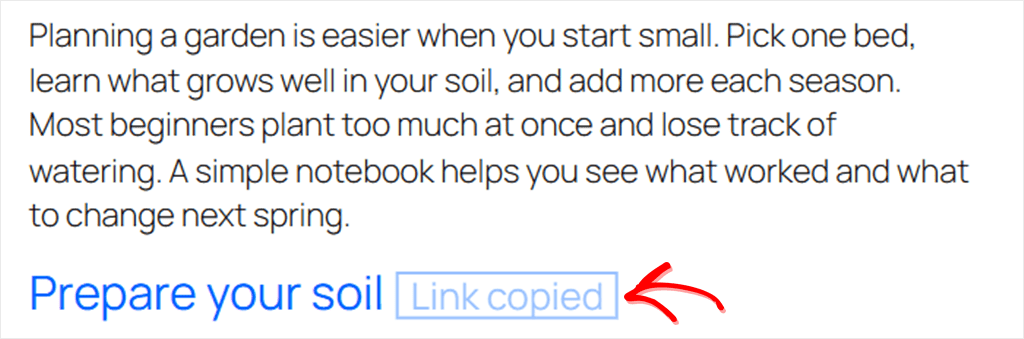
✓ How you know it worked: Click the # next to a heading, then paste into a new browser tab. The page should open and scroll straight to that heading.
For Local Businesses and Lead Forms
If your site’s main job is to get people to call you or fill in a form, these four help with that.
Two of them only need to load on your contact or quote page. For those, we’ll use a different free rule: Page URL.
5. Turn Phone Numbers Into Click-to-Call Links (Free)
| Best for | Difficulty | WPCode tools used | Plan |
|---|---|---|---|
| Plumbers, salons, clinics, any local business | Intermediate | Site Wide Footer | Free |
A lot of visitors find a local business on their phone.
Plain-text phone numbers aren’t tappable on every phone, so some visitors have to copy the number into their phone app. This can reduce the number of people who call your business.
This snippet turns your phone number into a link. On a phone, one tap starts the call.
// Turn the phone numbers you list here into tap-to-call links.
(function () {
  // Change this: each number exactly as it appears on your site, then the number to dial.
  var phoneNumbers = {
    '(555) 123-4567': '+15551234567'
  };

  var shown = Object.keys(phoneNumbers);
  var pattern = new RegExp('(' + shown.map(function (number) {
    return number.replace(/[.*+?^${}()|[\]\\]/g, '\\$&');
  }).join('|') + ')');

  // Find text containing one of your numbers, skipping anything that's already a link.
  var walker = document.createTreeWalker(document.body, NodeFilter.SHOW_TEXT);
  var found = [];
  while (walker.nextNode()) {
    var node = walker.currentNode;
    if (node.parentElement.closest('a, script, style, textarea')) continue;
    if (pattern.test(node.nodeValue)) found.push(node);
  }

  found.forEach(function (node) {
    var parts = node.nodeValue.split(pattern);
    var replacement = document.createDocumentFragment();
    parts.forEach(function (part, index) {
      if (index % 2 === 1) {
        var link = document.createElement('a');
        link.href = 'tel:' + phoneNumbers[part];
        link.textContent = part;
        replacement.appendChild(link);
      } else if (part) {
        replacement.appendChild(document.createTextNode(part));
      }
    });
    node.parentNode.replaceChild(replacement, node);
  });
})();
💡 Change this line
Replace '(555) 123-4567' with your number exactly as it’s written on your site, spaces and brackets included. Replace '+15551234567' with the number to dial, starting with your country code.
Outside the US, use your own format, like '020 7946 0958': '+442079460958'.
Got two numbers? Add a comma after the first line and put the second one under it:'(555) 123-4567': '+15551234567','(555) 765-4321': '+15557654321'
The snippet only changes the numbers you list.
For example, it won’t turn order numbers, dates, or prices into links, even if they look like phone numbers.
Listing your real numbers is safer, and it works with any country’s format. Numbers that are already links are left alone.
On a desktop, the link still works if the visitor has a calling app set up, like FaceTime on a Mac.
If you’d rather load the snippet on phones only, WPCode’s Device Type rule does that, but it’s on the paid plans. Most sites can leave it on everywhere.
✓ How you know it worked: Open your contact page on your phone and tap the number. Your phone should offer to call it.
Want to know how many people tap it? Snippet 9 below tracks those taps in Google Analytics.
6. Warn Visitors Before They Leave a Half-Filled Form (Free)
| Best for | Difficulty | WPCode tools used | Plan |
|---|---|---|---|
| Quote, booking, and application forms | Easy | Page URL rule | Free |
Some form plugins can save progress for you, like the WPForms Save and Resume addon on paid plans. Without that, if a visitor clicks away halfway through a long form, everything they typed is gone, and many won’t start again.
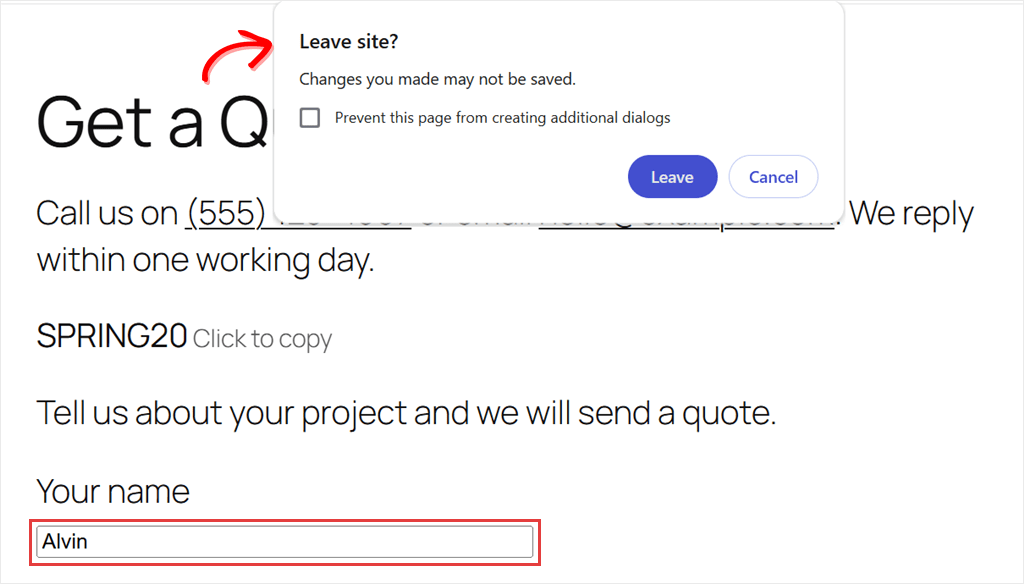
This snippet triggers the browser’s leave-page warning once a visitor starts typing in a form.
// Warn visitors before they leave a page with a form they've started but not sent.
(function () {
  var formStarted = false;

  document.addEventListener('input', function (event) {
    if (event.target.closest('form')) formStarted = true;
  });
  document.addEventListener('submit', function () {
    formStarted = false;
  });

  window.addEventListener('beforeunload', function (event) {
    if (!formStarted) return;
    event.preventDefault();
    event.returnValue = ''; // Browsers show their own message here.
  });
})();
Once someone types in a form on the page, the browser shows a “Leave site?” message if they try to close the tab or click away.
You can’t write your own wording for that message. Browsers use their own text, so websites can’t use it to trick people into staying.
Clicking send switches the warning off, so visitors who’ve sent the form aren’t asked.
It watches every form on the page, so someone typing in your search box gets the warning too. That’s why you only need this on the page with your form.
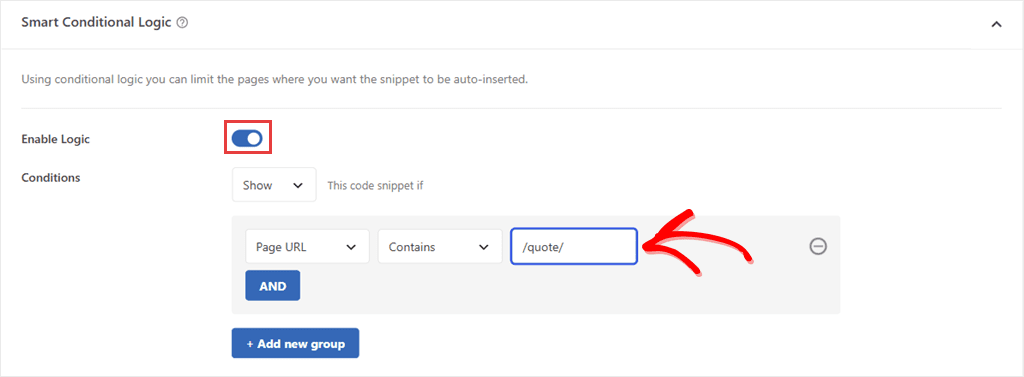
So in Smart Conditional Logic, turn on Enable Logic and add the Page URL rule.
Then, set it to Contains, and type the part of the address that’s unique to your form page, like /quote/.
✓ How you know it worked: Test it on a computer, since iPhones and iPads don’t show this warning. Type a few words into your form, then try to close the tab. Your browser should ask if you want to leave.
7. Block Free Email Addresses on B2B Forms (Free)
| Best for | Difficulty | WPCode tools used | Plan |
|---|---|---|---|
| B2B lead forms, demo and trial requests | Easy | Page URL rule | Free |
If you sell to businesses, a lead from a Gmail address is often harder to follow up. You can’t tell which company it’s from.
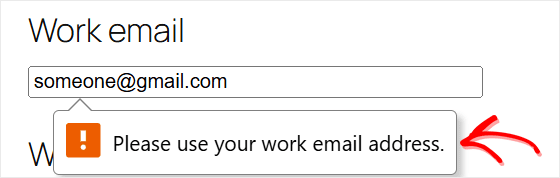
This snippet asks for a work email instead. When someone tries to submit your form with a free address, it stops the form and shows a short message on the email field.
// Ask for a work email address on business-only forms.
(function () {
  // Change this: the email providers you don't accept.
  var blockedDomains = ['gmail.com', 'yahoo.com', 'hotmail.com', 'outlook.com', 'aol.com', 'icloud.com'];
  var message = 'Please use your work email address.';

  document.addEventListener('submit', function (event) {
    var emailField = event.target.querySelector('input[type="email"]');
    if (!emailField) return;

    var domain = emailField.value.split('@').pop().trim().toLowerCase();
    if (blockedDomains.indexOf(domain) === -1) return;

    // Stop the form and show the message on the email field.
    event.preventDefault();
    event.stopImmediatePropagation();
    emailField.setCustomValidity(message);
    emailField.reportValidity();
  }, true);

  // Clear the message as soon as they start typing a new address.
  document.addEventListener('input', function (event) {
    if (event.target.type === 'email') event.target.setCustomValidity('');
  });
})();
💡 Change this line
Add or remove email providers in the blockedDomains list. Keep each one in quotes, with commas between them. You can change the message on the next line too.
We tested this with Contact Form 7. A Gmail address was stopped before the form sent anything, and a company address went through as normal.
Using WPForms? You don’t need this snippet. WPForms has its own Allowlist / Denylist setting on the Email field, and it’s in the free version too.
It’s a check in the visitor’s browser, so it filters out casual sign-ups, not determined ones. Someone who really wants in can use any email address they control.
Load it only on your business form, with the same Page URL › Contains rule from snippet 6. Use the address of your demo or contact page.
✓ How you know it worked: Fill in your form with a gmail.com address and click send. You’ll see the message, and nothing arrives in your inbox.
8. Keep UTM Tags for Your Hidden Form Fields (Free)
| Best for | Difficulty | WPCode tools used | Plan |
|---|---|---|---|
| Agencies, lead generation, paid ads | Hard | Site Wide Footer | Free |
UTM tags are the string of text you add to the end of a link to show where a visitor came from.
For example, a link in your newsletter might end in ?utm_source=newsletter&utm_medium=email.
Many forms can save those tags with each entry, using hidden fields. Then you know which campaign brought you that lead.
But the tags only sit in the address of the first page the visitor lands on. Say they land on a blog post, then click through to your contact page. The tags are gone from the address by then, so your hidden fields stay empty.
This snippet remembers the tags from the first page and fills them into your form, wherever it is.
// Remember the UTM tags a visitor arrived with, and fill them into your hidden form fields.
(function () {
  var tags = ['utm_source', 'utm_medium', 'utm_campaign', 'utm_term', 'utm_content'];
  var params = new URLSearchParams(location.search);

  // Save the tags from the first page the visitor lands on. They're kept until the tab closes.
  tags.forEach(function (tag) {
    if (params.get(tag) && !sessionStorage.getItem(tag)) sessionStorage.setItem(tag, params.get(tag));
  });

  // Fill hidden fields that have a matching CSS class, like utm_source.
  tags.forEach(function (tag) {
    var value = sessionStorage.getItem(tag);
    if (!value) return;
    document.querySelectorAll('input.' + tag).forEach(function (field) {
      field.defaultValue = value; // Survives the form clearing itself after sending.
      field.value = value;
    });
  });
})();
This one takes more setup because you need to add hidden fields to your form as well.
The snippet finds your hidden fields by their CSS class. So each hidden field needs a class with the same name as its tag: utm_source, utm_medium, and so on.
In Contact Form 7, open your form’s Form tab and add these lines anywhere above the submit button:
[hidden utm_source class:utm_source]
[hidden utm_medium class:utm_medium]
[hidden utm_campaign class:utm_campaign]
Then open the Mail tab and add [utm_source], [utm_medium] and [utm_campaign] to the message body. Contact Form 7 only emails the fields you list there, so without this step the tags never reach your inbox.
We tested this on our own site. A visitor landed on a blog post from a newsletter link, then went to the quote page. All three hidden fields were already filled in: newsletter, email, and spring.
We tested this with Contact Form 7, where the class: option puts the class on the hidden field itself. Some form plugins put the CSS class on a wrapper around the field instead, and then this snippet can’t find it.
Load this one with Site Wide Footer and no rules. It needs to run on the page the visitor lands on, which could be any page.
The tags stay in the visitor’s own browser tab, and they’re cleared when the tab closes. No cookie is set.
Whether you need to ask for consent before you save campaign data with a lead depends on your site and where your visitors are. If you’re not sure, a consent plugin like WPConsent can help you manage it.
✓ How you know it worked: Visit any page on your site with ?utm_source=test on the end of the address. Then go to your form page and send a test entry. The email you get should say “test” next to utm_source.
For Marketers and Stores
These two help you see what’s working and make it easier for shoppers to buy.
9. Track Phone and Email Clicks in GA4 (Free)
| Best for | Difficulty | WPCode tools used | Plan |
|---|---|---|---|
| Anyone running ads or measuring leads | Intermediate | Logged-in rule | Free |
A tap on your phone number or email address is often a lead.
But Google Analytics 4 doesn’t record those taps on its own. Its enhanced measurement tracks clicks to other websites and file downloads. Phone and email links aren’t either of those.
This snippet sends an event to GA4 each time someone clicks one.
⚠️ Check first
If you use MonsterInsights, it already tracks phone and email clicks for you, even on the free version. Skip this snippet so the same clicks aren’t tracked twice.
// Record phone and email link clicks as events in Google Analytics 4.
(function () {
  document.addEventListener('click', function (event) {
    var link = event.target.closest('a[href^="tel:"], a[href^="mailto:"]');
    if (!link) return;

    var eventName = link.href.indexOf('tel:') === 0 ? 'phone_click' : 'email_click';

    if (typeof gtag === 'function') {
      gtag('event', eventName);                  // Google Analytics (gtag.js)
    } else if (window.dataLayer) {
      window.dataLayer.push({ event: eventName }); // Google Tag Manager
    }
  });
})();
You need GA4 on your site already. Haven’t set it up yet? Here’s how to add Google Analytics to WordPress.
Using Google Tag Manager without the gtag.js tag? The snippet sends the same event names to Tag Manager instead.
You’ll then add a trigger for each event in Tag Manager. Our guide on adding Google Tag Manager to WordPress covers the setup.
You don’t want your own test clicks in the numbers.
So turn on Enable Logic and add a rule: Logged-in, set to False. The snippet then only loads for visitors who aren’t logged in to your site.
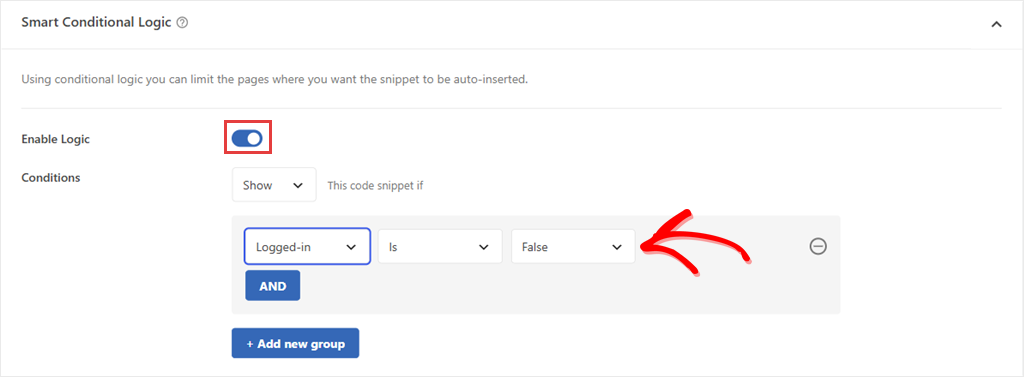
To see the clicks, open Reports in GA4 and find the Events report. Depending on your property, it’s under Engagement or View user engagement & retention.
Look for phone_click and email_click. New events can take a day or so to show in reports. The Realtime report shows them within a few minutes.
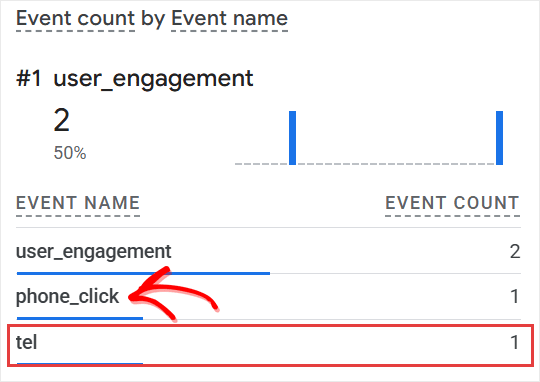
✓ How you know it worked: Log out, or open a private window. Tap your phone number, then check GA4’s Realtime report for a phone_click event.
10. Click-to-Copy Coupon Codes (Free)
| Best for | Difficulty | WPCode tools used | Plan |
|---|---|---|---|
| WooCommerce stores, deal and coupon sites | Intermediate | Site Wide Footer | Free |
When shoppers type a coupon code by hand, one wrong letter means the discount fails at checkout, and some give up on the order.
This snippet lets them copy the code with one click instead.
// Let shoppers copy a coupon code with one click.
// Put the code in its own block and give that block the CSS class: copy-coupon
(function () {
  if (!navigator.clipboard) return;

  document.querySelectorAll('.copy-coupon').forEach(function (box) {
    var code = box.textContent.trim();

    var hint = document.createElement('span');
    hint.textContent = ' Click to copy';
    hint.style.cssText = 'font-size:0.75em;opacity:0.7;';
    box.appendChild(hint);

    box.style.cursor = 'pointer';
    box.setAttribute('role', 'button');
    box.setAttribute('tabindex', '0');

    function copyCode() {
      navigator.clipboard.writeText(code).then(function () {
        hint.textContent = ' Copied!';
        setTimeout(function () { hint.textContent = ' Click to copy'; }, 2000);
      }).catch(function () {
        window.prompt('Copy this code:', code); // If the browser blocks copying.
      });
    }
    box.addEventListener('click', copyCode);
    box.addEventListener('keydown', function (event) {
      if (event.key === 'Enter' || event.key === ' ') {
        event.preventDefault();
        copyCode();
      }
    });
  });
})();
You tell the snippet which text is a coupon code by adding a CSS class to it.
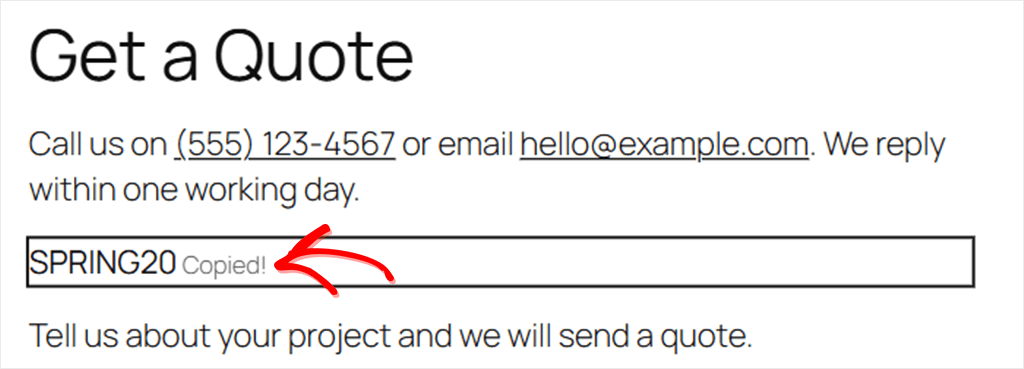
Put the code in its own Paragraph block, with nothing else in it, like SPRING20.
With the block selected, open the Advanced section in the block settings on the right. Type copy-coupon into the Additional CSS class(es) box, then update the page.
The code then shows “Click to copy” next to it. After a click, that changes to “Copied!”
It also works with the keyboard, for shoppers who don’t use a mouse.
Your site needs to load over https:// for this one. Browsers only allow copying on secure pages, so on an http:// site the hint won’t appear.
Running a sale that ends on a set date? On any paid WPCode plan, you can schedule the snippet to switch itself off when the sale ends.
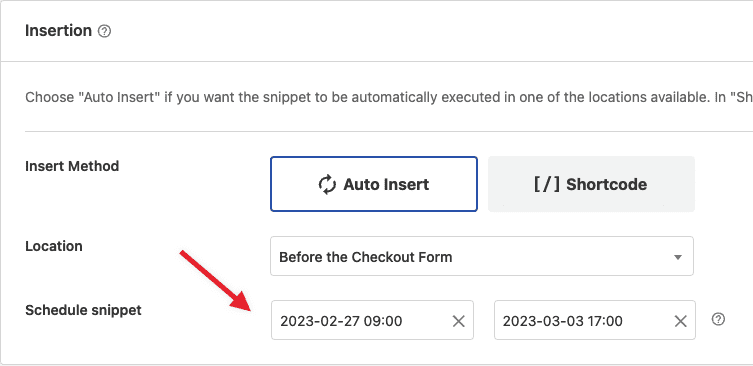
On the free version, switch it to Inactive by hand when the sale is over.
✓ How you know it worked: Click your coupon code, then paste it into your cart’s coupon box. It should paste exactly, with no extra spaces.
For Photographers, Teams, and Help Sites
The last three are for more specific jobs: discouraging image saving, speeding up editing, and helping visitors find things.
11. Turn Off Right-Click on Images (Free)
| Best for | Difficulty | WPCode tools used | Plan |
|---|---|---|---|
| Photographers, artists, portfolio sites | Easy | Page URL rule | Free |
Right-click on an image, and most browsers offer Save Image As.
This snippet turns that menu off on images and stops people from dragging an image to their desktop.
Right-click still works everywhere else on the page, so visitors can copy text and open links as normal.
// Turn off right-click and drag-to-save on images.
(function () {
  ['contextmenu', 'dragstart'].forEach(function (action) {
    document.addEventListener(action, function (event) {
      if (event.target.closest('img')) event.preventDefault();
    });
  });
})();
It stops casual saving. It doesn’t fully protect your photos.
Anyone can still take a screenshot or find the image file another way. If your images must stay safe, use watermarks or upload smaller versions.
For a portfolio section, load the snippet there only. Use the Page URL › Contains rule from snippet 6, with something like /portfolio/.
✓ How you know it worked: Right-click one of your images. No menu should appear. Then right-click some text on the same page. The normal menu should show up.
12. Press “E” to Edit the Page You’re Viewing (Free)
| Best for | Difficulty | WPCode tools used | Plan |
|---|---|---|---|
| Editors, content teams, busy site owners | Easy | User Role rule | Free |
When you spot a typo on your live site, you usually move up to the admin bar and click Edit Post.
With this snippet, you press E on your keyboard instead. The post or page opens straight in the editor.
// Press "E" on a post or page to open it in the editor.
(function () {
  var adminUrl = '/wp-admin/'; // Change this only if WordPress is in a subfolder, like '/blog/wp-admin/'

  // WordPress adds the post's ID to the page, like postid-42 or page-id-42.
  var match = document.body.className.match(/\b(?:postid|page-id)-(\d+)\b/);
  if (!match) return;

  document.addEventListener('keydown', function (event) {
    if (event.key.toLowerCase() !== 'e' || event.ctrlKey || event.metaKey || event.altKey) return;
    // Ignore the key while someone is typing in a field.
    if (event.target.closest('input, textarea, select, [contenteditable="true"]')) return;
    location.href = adminUrl + 'post.php?post=' + match[1] + '&action=edit';
  });
})();
It’s handy when you edit a lot of pages in a row. It also works on sites where the admin bar is hidden.
Typing the letter e in a search box or form doesn’t trigger it. The snippet ignores keys pressed while you’re typing in a field.
This one should only load for your team.
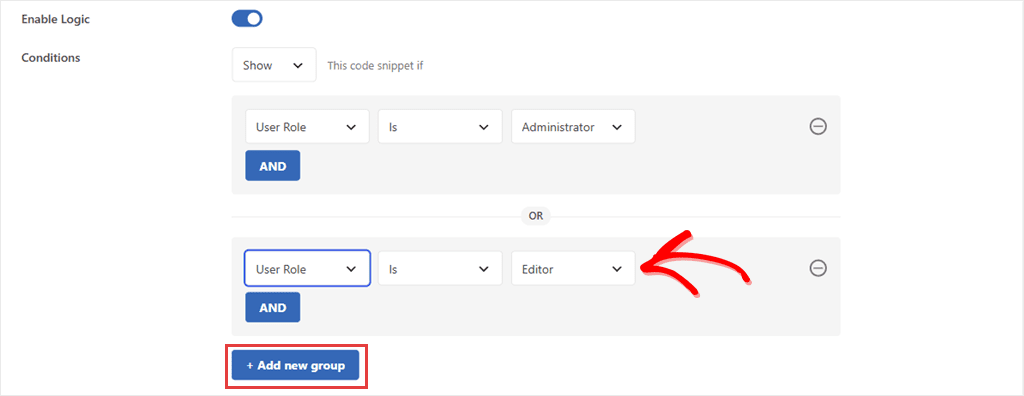
So turn on Enable Logic and add a rule: User Role › Is › Administrator. Then click + Add new group and add a second rule, User Role › Is › Editor.
The snippet loads if either one matches, and visitors never get it at all.
Even if someone did press E, WordPress still checks they’re allowed to edit before it opens anything.
If you want to go further with roles, see our guide on showing different content to different user roles.
✓ How you know it worked: While logged in, open any post on your site and press E. The post should open in the editor.
13. Press “/” to Jump to the Search Box (Free)
| Best for | Difficulty | WPCode tools used | Plan |
|---|---|---|---|
| Help docs, knowledge bases, recipe sites | Easy | Site Wide Footer | Free |
On sites like YouTube and GitHub, pressing the / key puts your cursor straight into the search box.
Regular visitors to these sites get used to it fast. It saves a scroll and a click every time they search.
This snippet adds the same shortcut to your site.
// Press "/" to jump straight to your site's search box.
(function () {
  document.addEventListener('keydown', function (event) {
    if (event.key !== '/') return;
    // Ignore the key while someone is typing in a field.
    if (event.target.closest('input, textarea, select, [contenteditable="true"]')) return;

    var searchBox = document.querySelector('input[type="search"], input[name="s"]');
    if (!searchBox) return;

    event.preventDefault();
    searchBox.focus();
  });
})();
The snippet finds the first search box on the page, whether it’s in your header, sidebar, or a menu. If that box is hidden behind a search icon, or the page has none, nothing happens.
It ignores the slash key while someone is typing in a field. So people can still type a web address or a date into your forms.
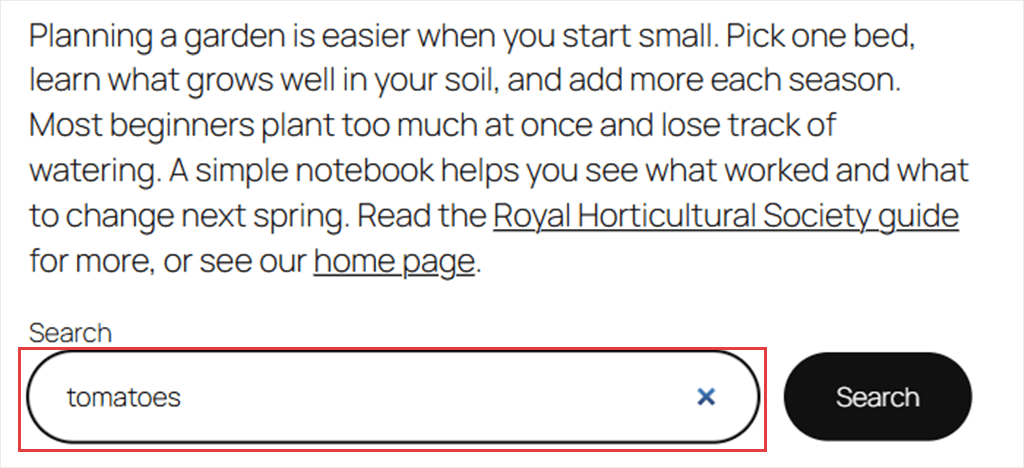
✓ How you know it worked: Open a page with a search box and press /. Your cursor should land in the search box, ready to type.
4 JavaScript Snippets You Can Skip in 2026
Some popular JavaScript snippets are no longer necessary because WordPress, WooCommerce, or WPCode already covers the same job.
Preload Pages on Hover
This snippet starts loading a page when a visitor hovers over its link. Since WordPress 6.8, WordPress already preloads a page the moment a visitor starts to click its link, in Chrome, Edge and Opera, for visitors who aren’t logged in.
A hover snippet on top mostly doubles up. You can read about it in the WordPress 6.8 speculative loading announcement.
Update the WooCommerce Cart When the Quantity Changes
These snippets remove the need to click Update cart.
But WooCommerce’s Cart block doesn’t have that button. It already updates as shoppers change the quantity.
The snippets only help with the older cart shortcode. Check your Cart page: if it still has an Update cart button, you may be on the older cart, and the snippet still helps.
A Copyright Year That Updates Itself
You don’t need JavaScript for this. WPCode can do it with a shortcode, so the right year is already in the page when it loads. Here’s how to add a dynamic copyright date.
Make Wide Tables Scroll on Phones
WordPress’s Table block already scrolls sideways on small screens. Check a table on your phone first; most themes keep this working, so you won’t need a snippet.
Which Snippet Should You Add First?
Of the 13 worth keeping, here’s where we’d start for each kind of site.
Running a blog? Start with the reading progress bar from the walkthrough. Add the reading time next, since it uses the same rule.
Running a local business? Start with click-to-call. Once you’ve listed your number, it works on every page.
Collecting leads for a business? Start with the half-filled form warning. It’s Easy, and it only loads on your form page.
Running ads or campaigns? Start with GA4 phone and email tracking, unless you use MonsterInsights. Add the UTM snippet once you’re ready to set up hidden fields.
Running a store? Start with click-to-copy coupons. Your Cart block already updates quantities on its own, so that’s one snippet from the skip list you don’t need.
Running a photography or portfolio site? Start with the right-click snippet, on your portfolio pages only.
Running a help site or a team blog? Start with the “/” search shortcut for visitors. Then add “E” to edit for your team.
FAQs: JavaScript Snippets
Why isn’t my JavaScript snippet working?
Usually it’s one of three things. The snippet isn’t set to Active, your caching plugin is still showing an old copy of the page, or a rule is hiding it from you. Switch it on, clear your cache, and test in a private window. Still nothing? Our doc on finding a script that isn’t showing on your site walks through the other causes.
Should JavaScript snippets go in the header or the footer?
For the 13 snippets in this article, the footer. Most of them need the page to be there before they run, and the footer loads last, so it’s the safe choice for all 13. The header is for code that must load before anything else, like some analytics and tracking tags.
Will these snippets slow down my site?
Each snippet is short and loads no extra files, so its effect on your page speed is very small. You can make it smaller still by loading each one only where it’s needed, with the free rules we’ve shown. A snippet that’s limited to your quote page doesn’t load anywhere else.
Can I run a snippet on one page only?
Yes. Use the Page URL rule, set to Contains, with part of that page’s address. It’s free. WPCode’s paid plans also let you pick posts and pages by name, with the Post/Page rule. For a single page, Page URL does the same job. For more ideas, see our guide on adding scripts to specific pages in WordPress.
Can I add JavaScript to WordPress without a plugin?
Yes, by adding code to your theme’s functions.php file, ideally in a child theme. But a mistake there can break your site, and switching themes loses the code. We explain both ways in our guide on how to add JavaScript to WordPress pages or posts.
Are JavaScript snippets free in WPCode?
Yes. The JavaScript Snippet type is part of the free version of WPCode, along with Auto Insert and the rules we’ve used in this article. To see everything else the plugin does, read our WPCode review.
Add Your First JavaScript Snippet Today
You now have 13 tested JavaScript snippets, and one way to add all of them.
Pick the one that fits your site from the table above. Copy the code, paste it into a new JavaScript Snippet, and set it to load in the Site Wide Footer.
Then add a rule, so it only loads where it’s needed.
Ready to add your first snippet without touching a theme file?
Get WPCode for free →
Want to schedule snippets for your sales, or load them on phones only?
See WPCode pricing →
Additional Resources
These guides help you do more with code snippets on your site.
- How to Add Custom Code in WordPress shows the safe way to add PHP, CSS, and HTML too.
- WPCode Library lets you browse ready-made snippets before you add them to your site.
- What Is a Code Snippet? explains snippets in plain English, if you’re new to them.