
Most WordPress beginners do one of two things when they need to add something small to their site. They install a plugin, or they Google “how to edit header.php” and close the tab immediately.
There’s a better path.
HTML snippets let you add tracking pixels, schema markup, maps, announcement bars, and more without touching a theme file or installing a plugin for every single function you want to add to your WordPress site.
This guide gives you 11 copy-paste HTML snippets for WordPress. Each one includes the code, what it replaces, and how you know it’s working.
Key Takeaways
- HTML snippets load in your site’s
<head>, footer, or specific page areas and they survive every theme update when managed through WPCode. - Most snippets in this list have a 1-click version in the WPCode library, which has 3,000+ community snippets with download counts and favorites to help you choose.
- You can scope any snippet to run only on specific pages, post types, or user conditions. So nothing loads where it shouldn’t.
- For snippets that output structured data (schema), always check your SEO plugin first. It may already handle it, and duplicate blocks cause errors.
- The hardest part of using HTML snippets is finding the right code. This article solves that.
How to Add an HTML Snippet in WPCode
Before you add anything, here’s how to add an HTML snippet to your site. You only need to learn this once and repeat the process each time you want to add an HTML function.
For more ways to add custom HTML to WordPress, including the block editor method, see our full guide.
First, you need to install WPCode.
You have the option to install WPCode Lite, which allows you full native support for creating, saving, and executing custom HTML snippets across your website.
But for advanced HTML snippets, you need the WPCode Pro. This allows you to add WooCommerce placements, advanced page/post placements, conditional logic, and more.
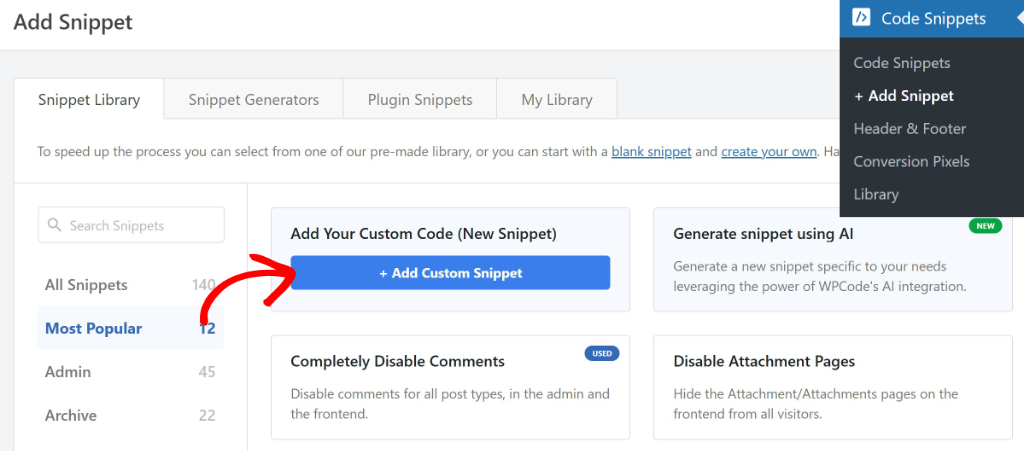
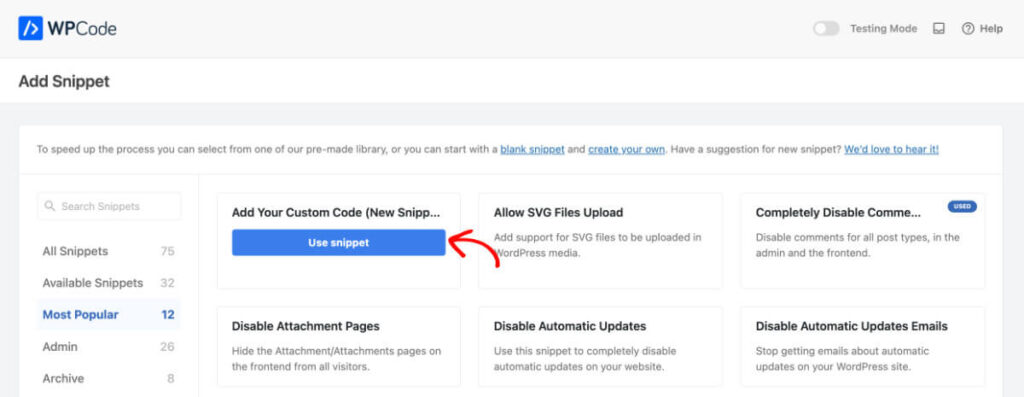
Once you have installed and activated WPCode, head to your WordPress dashboard and go to Code Snippets → Add Snippet. On the next screen, click Add Your Custom Code (New Snippet).
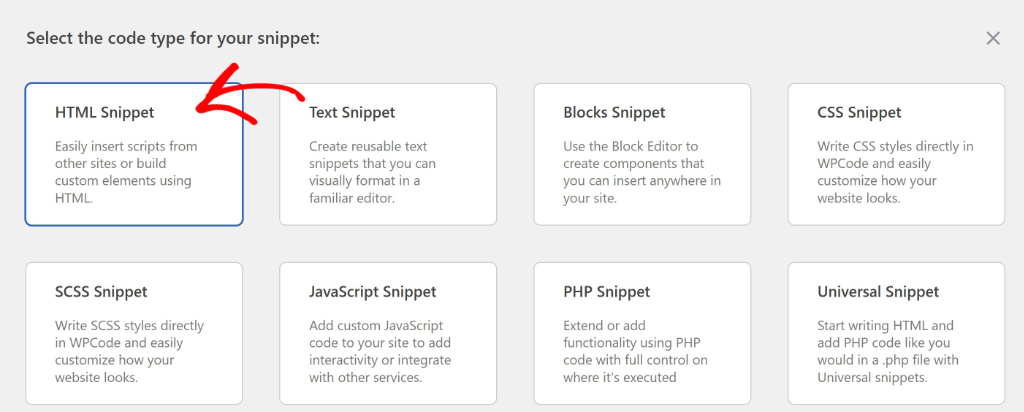
This opens the snippet editor. Give it a name at the top, anything you’ll recognise later works fine. Then look for the Code Type dropdown and set it to HTML Snippet.
From there, paste your code into the editor.

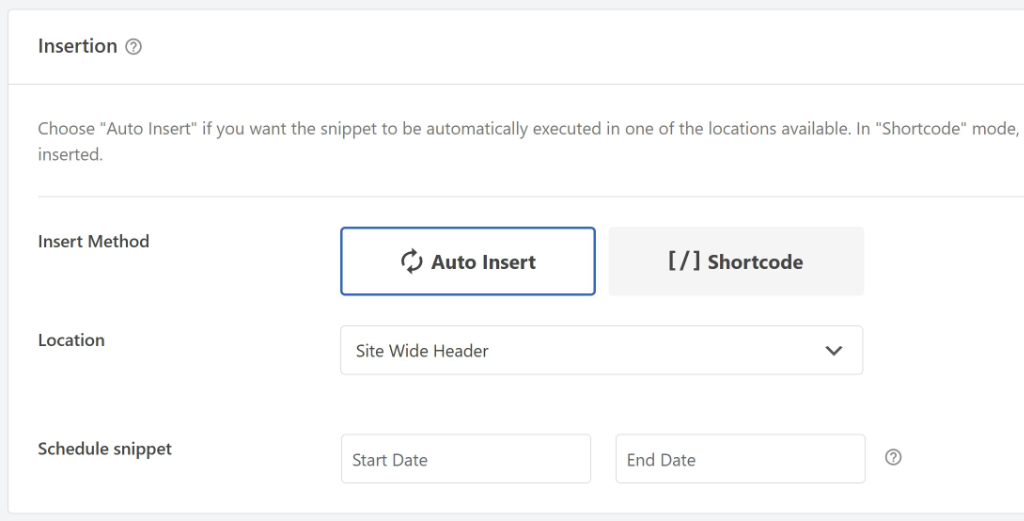
Below the code box, choose where the snippet should load using the Auto Insert location. Site Wide Header puts it inside your <head> tag on every page. Site Wide Footer loads it before </body>, and other options let you target specific areas or page types.
Once you’ve set the location, click Save Snippet and toggle it to Active.
That’s it. The snippet is live across every page it’s scoped to.
You Don’t Have to Write the Code Yourself
Before you paste anything manually, check the WPCode library.
It has over 3,000 free WordPress snippets, all written, tested, and contributed by the WPCode team and the community.
Each snippet shows how many times it’s been downloaded and how many users have favorited it. Higher numbers mean more people have tested it on real sites.
Plus, you can use the search bar to narrow down your options. Search by name or browse the category tabs like Analytics, Schema, Social, WooCommerce, and more.
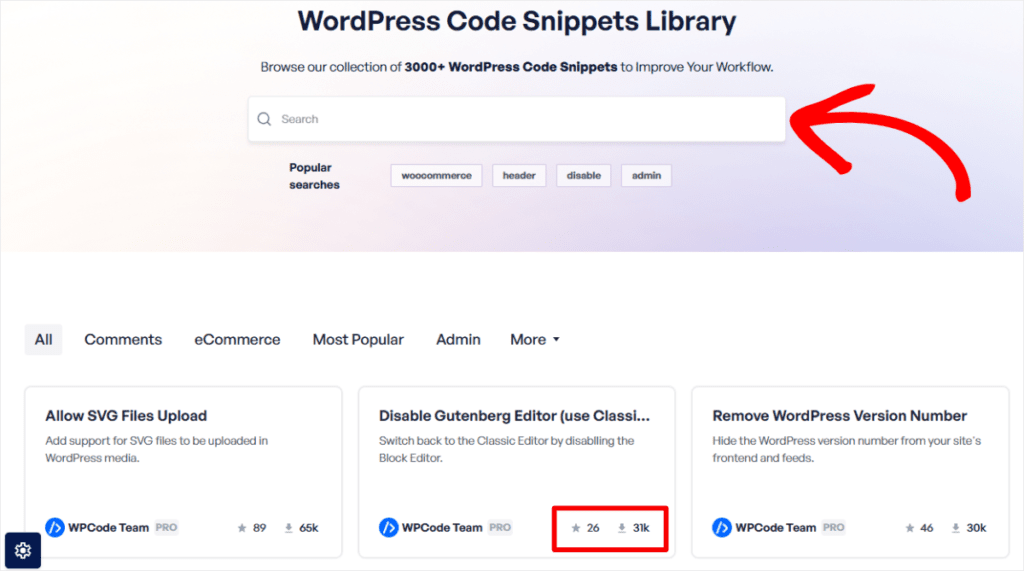
Our code snippets library covers every major use case. If the snippet you want exists there, just click Use Snippet, and it pre-fills the editor for you.
Once you know these steps, every snippet below works exactly the same way.
The Best HTML Snippets for WordPress Beginners
Now, if you do not have time to go through the entire list below, use the table of contents to quickly find what you are looking for. You can click on any link to skip to that section.
- 1. Verify Your Site With Google Search Console
- 2. Add a Tracking Pixel (Meta, GA4, Google Ads)
- 3. Add a Custom Footer (Copyright + Links)
- 4. Add an Announcement Bar to Your Site
- 5. Embed a YouTube Video on One Page
- 6. Embed Google Maps on Your Contact Page
- 7. Add Any Third-Party Tool to Your Header or Footer
- 8. Control How Your Pages Look When Shared on Social
- 9. Add FAQ Schema to Get Rich Results in Google
- 10. Add Organization Schema to Your Homepage
- 11. Replace Bloated SEO Plugin Schema With One Clean Snippet
- Start Adding HTML Snippets to Your WordPress Site
On top of that, use the table below to quickly see the HTML snippet difficulty level, what it does, and what it replaces.
| # | Snippet | Difficulty | What it does | What it replaces |
|---|---|---|---|---|
| 1 | GSC Verification Tag | Beginner | Proves site ownership to Google and Pinterest | Editing header.php |
| 2 | Tracking Pixels | Beginner | Loads Meta Pixel and GA4 on every page | Editing header.php or a dedicated analytics plugin |
| 3 | Custom Footer HTML | Beginner | Adds custom copyright text and links to every page footer | Editing footer.php or theme customizer |
| 4 | Announcement Bar | Beginner | Shows a coloured promo strip at the top of the site | A dedicated notification bar plugin |
| 5 | YouTube Embed | Beginner | Embeds a responsive YouTube video on one specific page | Gutenberg block or a video plugin |
| 6 | Google Maps Embed | Beginner | Loads an interactive map only on your Contact page | A Google Maps plugin |
| 7 | Third-Party Tool Scripts | Beginner | Adds any external tool (chat, heatmaps, fonts) to header or footer | Editing header.php or the theme customizer scripts box |
| 8 | Open Graph / Twitter Card Tags | Intermediate | Controls the title, image, and description shown when pages are shared on social | SEO plugin, Open Graph settings or header.php edits |
| 9 | FAQ Schema | Intermediate | Marks up FAQ sections so Google can show expandable Q&A in search results | SEO plugin premium addon |
| 10 | Organization Schema | Intermediate | Tells Google your business name, logo, contact, and social profiles | Local SEO plugin addon |
| 11 | Schema Cleanup | Advanced | Replaces multiple SEO plugin schema blocks with one clean snippet | Multiple SEO plugin schema addons |
With that out of the way, let’s dive in.
1. Verify Your Site With Google Search Console
Beginner
Replaces: Editing header.php directly
Google Search Console shows you what search terms bring people to your site, which pages rank, and whether Google can crawl your content. But before you can see any of that, Google needs to confirm you actually own the site.
The way it works: Google gives you a single <meta> tag and asks you to paste it into your site’s <head> section.
Without WPCode, that means opening Appearance → Theme File Editor, finding header.php, and pasting it inside the <head> tags. One typo in that file.
A misplaced bracket, a deleted character, and your entire site breaks. Plus, the next time your theme updates, the change is gone.
With WPCode, you paste the tag into an HTML snippet set to Site Wide Header. Done in 30 seconds. Survives every theme update.
<meta name="google-site-verification" content="YOUR_UNIQUE_KEY_HERE" /><br>
✓ How you know it works: Go back to Google Search Console and click Verify. The status changes from “Unverified” to “Verified” within a few minutes.
⚠ Troubleshooting: If verification fails, confirm the snippet location is set to Site Wide Header and the snippet is toggled Active. Then open your homepage, right-click, and check your page source. Search for google-site-verification. It should appear inside the <head> section.
📚 WPCode Library
Looking for more verification snippets? Search “verification” in the WPCode library. WPCode team and community versions with high download counts are available for Google, Pinterest, Bing, and others.
2. Add a Tracking Pixel (Meta, GA4, Google Ads)
Beginner
Replaces: Theme file editing or a standalone analytics plugin
Tracking pixels are small script tags that tell advertising platforms when someone visits your site. The Facebook Pixel builds retargeting audiences. Google Analytics tracks page views and user behaviour. Google Ads uses it to record conversions.
Every platform gives you the same instruction: “paste this code into the <head> of every page.”
Without WPCode, that means editing header.php or using functions.php with a wp_head hook, which requires PHP knowledge. Either way, a theme update wipes it.
With WPCode, each pixel gets its own HTML snippet set to Site Wide Header. One snippet per platform. Each one is named, toggleable, and survives updates independently.
Meta Pixel:
<!-- Replace YOUR_PIXEL_ID with your ID from Meta Events Manager -->
<script>
!function(f,b,e,v,n,t,s)
{if(f.fbq)return;n=f.fbq=function(){n.callMethod?
n.callMethod.apply(n,arguments):n.queue.push(arguments)};
if(!f._fbq)f._fbq=n;n.push=n;n.loaded=!0;n.version='2.0';
n.queue=[];t=b.createElement(e);t.async=!0;
t.src=v;s=b.getElementsByTagName(e)[0];
s.parentNode.insertBefore(t,s)}(window,document,'script',
'https://connect.facebook.net/en_US/fbevents.js');
fbq('init', 'YOUR_PIXEL_ID');
fbq('track', 'PageView');
</script>
<noscript><img height="1" width="1" style="display:none"
src="https://www.facebook.com/tr?id=YOUR_PIXEL_ID&ev=PageView&noscript=1"
/></noscript>
If you find adding your Meta Pixel via an HTML snippet challenging, you can use the Conversion Pixels option found natively in WPCode.
You will see a list of supported platforms, including Facebook, TikTok, Pinterest, Snapchat, and Google.
Simply, click on the Facebook tab and enter your Facebook Pixel ID in the field provided. This also allows you to track custom events.
For a full tutorial on this, check out our article on how to set up Facebook Pixel custom event tracking in WordPress.
GA4:
The process remains the same for Google Analytics.
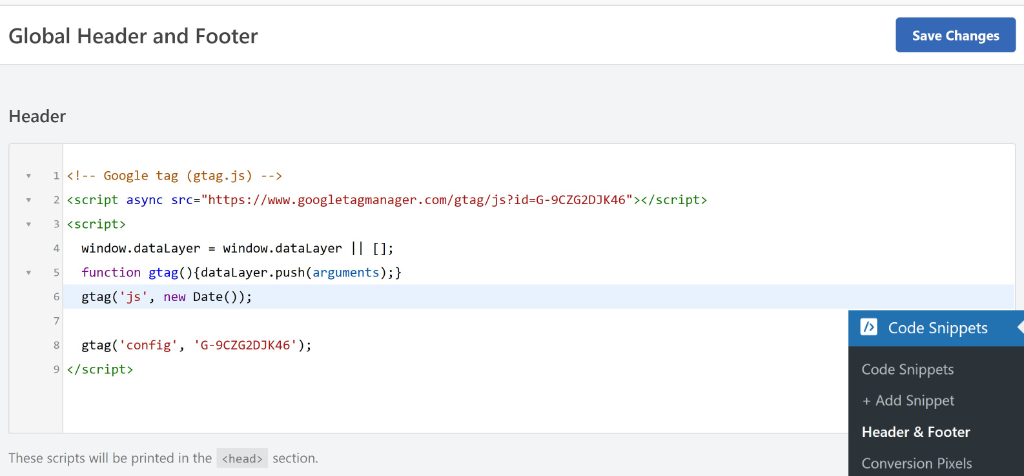
<!-- Replace G-XXXXXXXXXX with your Measurement ID from Google Analytics -->
<script async src="https://www.googletagmanager.com/gtag/js?id=G-XXXXXXXXXX"></script>
<script>
  window.dataLayer = window.dataLayer || [];
  function gtag(){dataLayer.push(arguments);}
  gtag('js', new Date());
  gtag('config', 'G-XXXXXXXXXX');
</script>
✓ How you know it works: Install the Meta Pixel Helper Chrome extension. A green tick means the pixel is firing. For GA4, open Google Analytics, go to Reports → Realtime, then visit your site in another tab. Your visit should appear within seconds.
⚠ Troubleshooting: Pixel not firing? Confirm the location is Site Wide Header, not Footer. Test in a browser without an ad blocker. Blockers prevent pixel scripts from running during testing.
📚 WPCode Library
WPCode library has ready-made Meta Pixel and Google Tag Manager snippets with thousands of downloads. Search “meta pixel” or “google tag manager” to find them. Adding a Pinterest tag to WordPress follows the same steps.
3. Add a Custom Footer (Copyright + Links)
Beginner
Replaces: Editing footer.php or hunting through theme settings
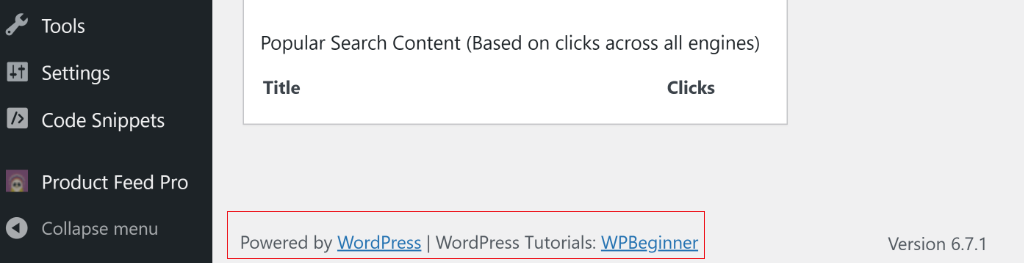
Your theme’s default footer often says something like “Powered by WordPress” or includes the theme developer’s name. Changing it should be simple. It rarely is.
Some themes bury the setting inside Appearance → Customize → Footer. Others require editing footer.php directly. A few themes make it impossible without a child theme.
With WPCode, you write the footer HTML you want and set the snippet location to Site Wide Footer. Your text, your links, your copyright year — and the year updates automatically.
<!-- Replace YOUR BUSINESS NAME and update the links to match your site -->
<p style="text-align:center; font-size:14px; color:#666; padding:10px 0; margin:0;">
© <script>document.write(new Date().getFullYear())</script>
YOUR BUSINESS NAME. All rights reserved.
· <a href="/privacy-policy" style="color:#666;">Privacy Policy</a>
· <a href="/contact" style="color:#666;">Contact</a>
</p>
Below is a screenshot showing what your footer copyright and links will look like when added with WPCode through an HTML snippet.

✓ How you know it works: Visit any page on your site and scroll to the bottom. The copyright line appears with the current year. Refresh next January. The year updates on its own.
⚠ Troubleshooting: Text not showing? Check the location is Site Wide Footer. If your theme has its own footer credit hardcoded, this snippet adds below it rather than replacing it. To replace it fully, you’d need to disable the theme’s footer credit via a PHP snippet.
This not only works for the frontend, but you can also customize your admin footer with WPCode.
4. Add an Announcement Bar to Your Site
Beginner
Replaces: A dedicated notification bar plugin
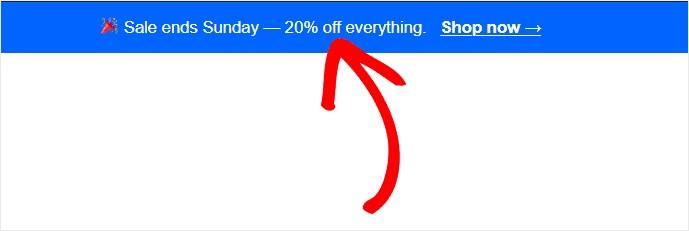
Announcement bars are the coloured strip at the top of a site. For example, “Sale ends Sunday,” “Free shipping this week,” “We’ve moved.” They’re simple. They work.
Getting one without a plugin usually means editing your theme’s template files to inject a <div> before the main content, which requires knowing which template file controls that area and how your theme structures the layout.
With WPCode, you write the HTML, add a few lines of inline CSS for colour and spacing, and set the location. Scope it to your homepage only, or run it sitewide. When the promotion ends, toggle the snippet off. No plugin to uninstall, no settings to undo.
<!-- Change the background-color, message, and href to match your promotion -->
<div style="background-color:#0065FF; color:#ffffff; text-align:center;
padding:12px 20px; font-size:15px; font-family:sans-serif; width:100%;
box-sizing:border-box;">
🎉 Sale ends Sunday — 20% off everything.
<a href="/shop" style="color:#ffffff; font-weight:bold;
text-decoration:underline; margin-left:8px;">
Shop now →
</a>
</div>
Below is a screenshot showing what your announcement banner will look like when added with WPCode through an HTML snippet.
5. Embed a YouTube Video on One Page
Beginner
Replaces: A video plugin or manually pasting iframes into page editors
YouTube gives you an embed code, a block of <iframe> HTML. When you click Share → Embed on any video. The question is where to put it safely.
Pasting it directly into the Gutenberg editor works, but it adds wrapper markup you didn’t ask for. Paste it into a Classic Editor HTML tab, and it sometimes gets stripped on save. Neither approach gives you central control.
With WPCode, you add the iframe as an HTML snippet and scope it to a specific page via conditional logic.
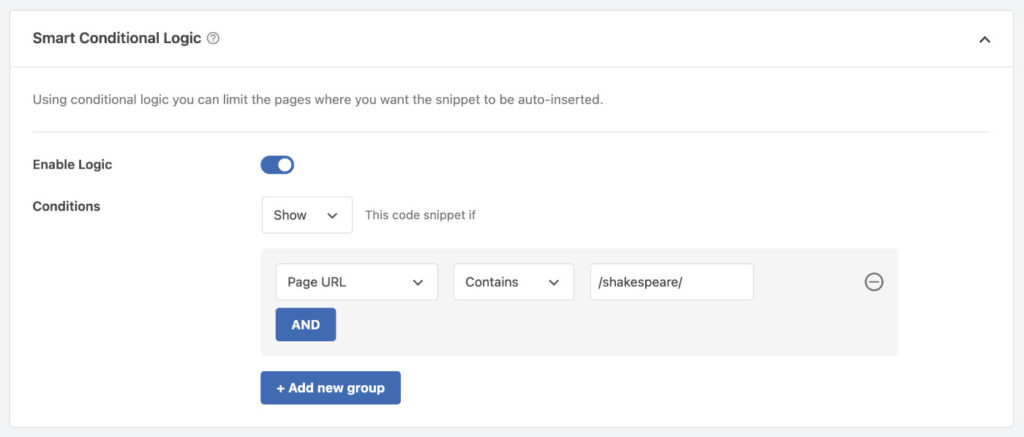
Change the video once, and it updates wherever it appears. The embed is responsive out of the box with the CSS wrapper below.
<!-- Replace YOUR_VIDEO_ID with the ID from the YouTube URL (e.g. dQw4w9WgXcQ) -->
<!-- Replace YOUR VIDEO TITLE with a descriptive title for accessibility -->
<div style="position:relative; padding-bottom:56.25%; height:0;
  overflow:hidden; max-width:100%; margin:20px 0;">
  <iframe
    style="position:absolute; top:0; left:0; width:100%; height:100%;"
    src="https://www.youtube.com/embed/YOUR_VIDEO_ID"
    title="YOUR VIDEO TITLE"
    frameborder="0"
    allow="accelerometer; autoplay; clipboard-write; encrypted-media;
      gyroscope; picture-in-picture"
    allowfullscreen>
  </iframe>
</div>
6. Embed Google Maps on Your Contact Page
Beginner
Replaces: A Google Maps plugin
If your business has a physical location, an interactive map on your Contact page helps visitors find you. Most site owners install a Maps plugin for this, one more plugin running on every page, for a feature that only appears on one.
Getting the embed code directly from Google Maps takes 30 seconds: search your location → click Share → Embed a map → copy the iframe.
With WPCode, you paste the iframe, scope it to the Contact page, and it loads only there. No plugin, or extra weight on every other page.
<!-- Get YOUR embed URL from Google Maps → Share → Embed a map → Copy HTML -->
<!-- Paste just the src URL from that iframe into the src attribute below -->
<iframe
  src="https://www.google.com/maps/embed?pb=PASTE_YOUR_EMBED_CODE_HERE"
  width="100%"
  height="400"
  style="border:0; border-radius:6px; display:block; margin:20px 0;"
  allowfullscreen=""
  loading="lazy"
  referrerpolicy="no-referrer-when-downgrade">
</iframe>
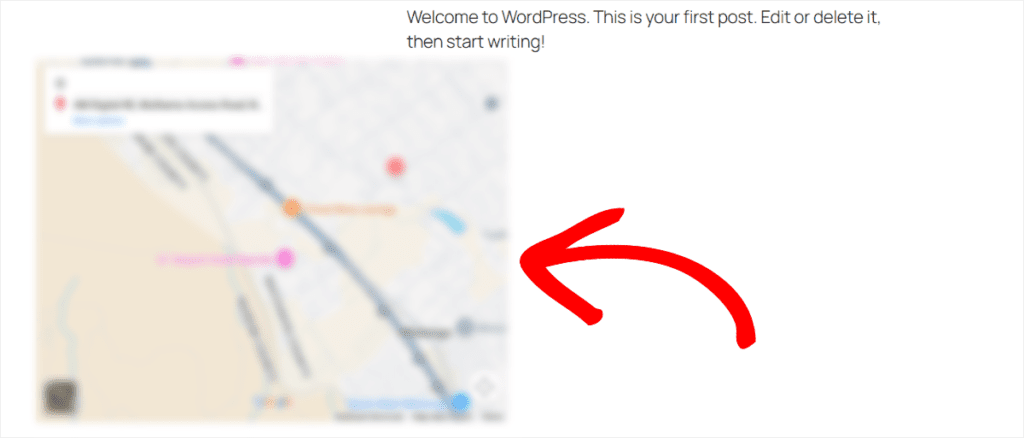
Below is a screenshot showing what your Google Maps embed will look like when added with WPCode through an HTML snippet.
7. Add Any Third-Party Tool to Your Header or Footer
Beginner
Replaces: Theme Customizer scripts box/editing header.php or footer.php
Every third-party service, live chat tools, heatmap software, A/B testing platforms, font libraries, gives you the same instruction: “paste this code into your site’s <head> or before the closing </body> tag.”
Without WPCode, you’re looking at one of two options. Edit header.php or footer.php directly, risky, wiped on updates.
Or find your theme’s Custom HTML box inside Appearance → Customize. If it even has one, and if it puts the code in the right place.
With WPCode, every third-party tool gets its own named snippet. You see them all in one place. Toggle them on or off without going near a theme file. See our full guide to adding header and footer code in WordPress for more insertion options.
<!-- Example: Tidio live chat — replace with the script from YOUR tool's dashboard -->
<script src="//code.tidio.co/YOUR_TIDIO_KEY.js" async></script>
<!-- Example: Hotjar heatmaps — replace YOUR_HOTJAR_ID with your site ID -->
<script>
  (function(h,o,t,j,a,r){
    h.hj=h.hj||function(){(h.hj.q=h.hj.q||[]).push(arguments)};
    h._hjSettings={hjid:YOUR_HOTJAR_ID,hjsv:6};
    a=o.getElementsByTagName('head')[0];
    r=o.createElement('script');r.async=1;
    r.src=t+h._hjSettings.hjid+j+h._hjSettings.hjsv;
    a.appendChild(r)
  })(window,document,'https://static.hotjar.com/c/hotjar-','.js?sv=');
</script>
✓ Keep privacy regulations in mind. Use WPConsent: Many analytics and marketing tools collect visitor data through cookies and tracking scripts. While WPCode handles script insertion, WPConsent can help you manage consent banners and control when tracking scripts are loaded.
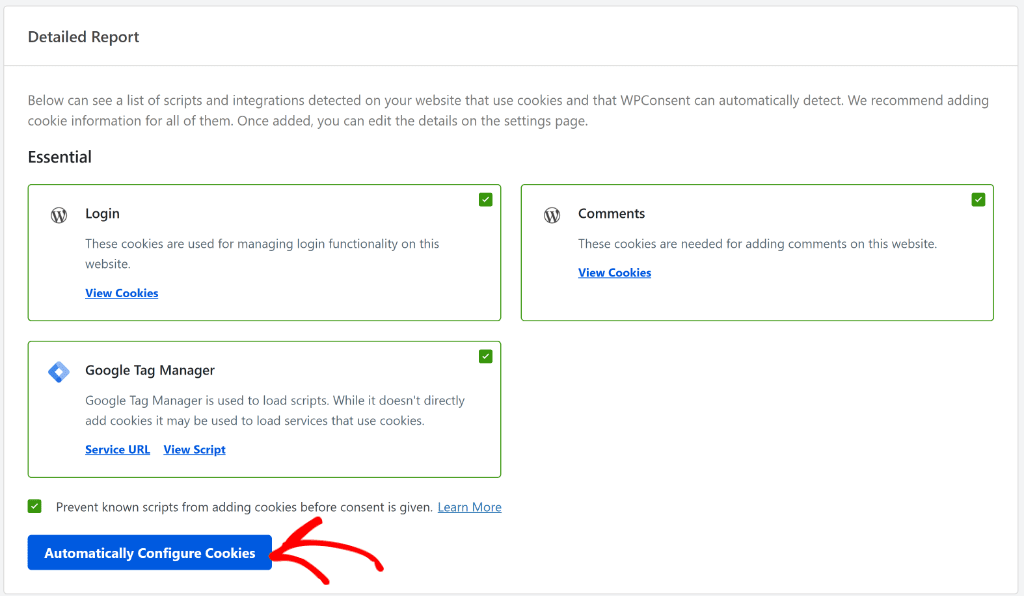
Need more information? Check out how to set up tracking cookies with WPConsent here.
8. Control How Your Pages Look When Shared on Social
Intermediate
Replaces: SEO plugin, Open Graph settings/editing header.php per page
When someone shares your page on Facebook, LinkedIn, or WhatsApp, those platforms read specific <meta> tags from your <head> to build the preview card, including the title, description, and image that appear in the feed.
Without these tags, the platform picks whatever text and image it finds first. That often means the wrong image, a truncated title, or no image at all.
Most SEO plugins handle Open Graph tags automatically.
But if you’re not using one, or you need custom overrides for specific pages, or you want to add Twitter/X card tags that your plugin skips, this snippet covers it.
Without WPCode, you’d edit header.php and write conditional PHP to load different tags per page. That’s not a beginner task. With WPCode, paste the tags as an HTML snippet in the Site Wide Header. For per-page overrides, scope it with conditional logic.
<!-- Open Graph — controls Facebook, LinkedIn, WhatsApp previews -->
<!-- Replace all YOUR_... values. Image should be at least 1200x630px. -->
<meta property="og:title" content="YOUR PAGE TITLE" />
<meta property="og:description" content="YOUR PAGE DESCRIPTION (150 chars max)" />
<meta property="og:image" content="https://yoursite.com/your-share-image.jpg" />
<meta property="og:url" content="https://yoursite.com/your-page/" />
<meta property="og:type" content="website" />

<!-- Twitter/X Card -->
<meta name="twitter:card" content="summary_large_image" />
<meta name="twitter:title" content="YOUR PAGE TITLE" />
<meta name="twitter:description" content="YOUR PAGE DESCRIPTION" />
<meta name="twitter:image" content="https://yoursite.com/your-share-image.jpg" />
9. Add FAQ Schema to Get Rich Results in Google
Intermediate
Replaces: SEO plugin premium addon / manual schema editor
FAQ schema tells Google that a section of your page contains structured question-and-answer content. When Google reads it, your page can show expandable Q&A results directly in search, more space in the results page, and more clicks.

Getting this without WPCode usually means upgrading your SEO plugin to a premium tier. Yoast, RankMath, and AIOSEO all offer FAQ schema, but as paid features on most plans.
With WPCode, you write the FAQPage JSON-LD block as an HTML snippet, scope it to the page that has the FAQ section, and activate it. Free.
<!-- Scope this snippet to the specific page containing your FAQ section -->
<!-- Add or remove Question blocks by duplicating the {...} section -->
<script type="application/ld+json">
{
  "@context": "https://schema.org",
  "@type": "FAQPage",
  "mainEntity": [
    {
      "@type": "Question",
      "name": "YOUR FIRST QUESTION?",
      "acceptedAnswer": {
        "@type": "Answer",
        "text": "Your answer here. Keep it factual and complete."
      }
    },
    {
      "@type": "Question",
      "name": "YOUR SECOND QUESTION?",
      "acceptedAnswer": {
        "@type": "Answer",
        "text": "Your second answer here."
      }
    }
  ]
}
</script>
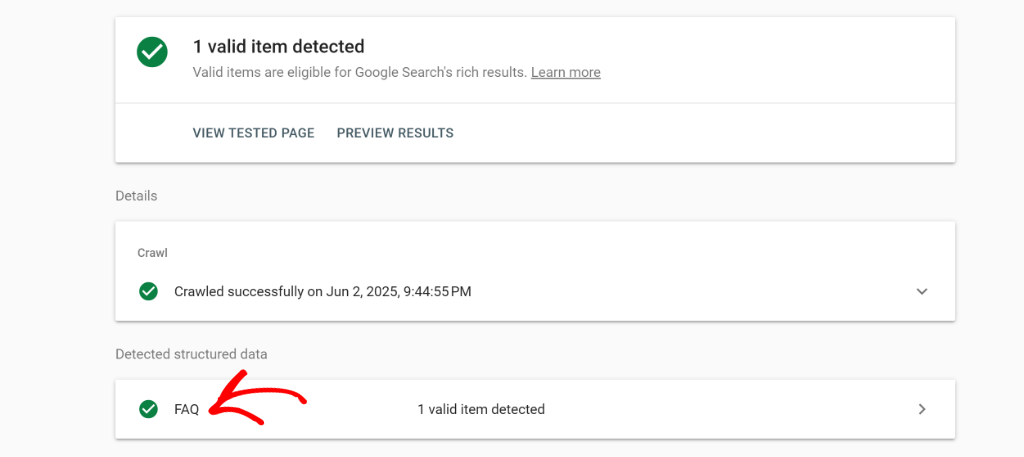
After this you can use Google’s Rick Results Test tool to see if your FAQs show up.
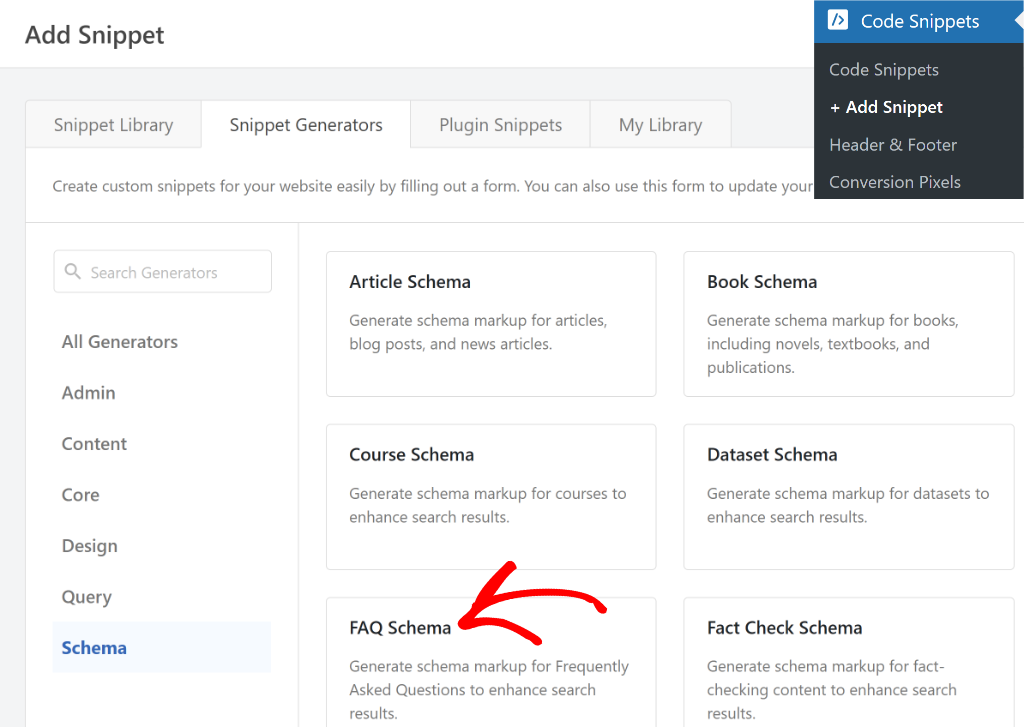
Apart from that, you can generate an FAQ Schema markup natively with WPCode. In your WordPress dashboard, go to Code Snippets » Add Snippet.
Then, simply switch to the Snippet Generators tab and head to ‘Schema’ from the menu in the left panel.
Then, go to the FAQ Details tab. From here, enter the question and answer that you want in the FAQ schema.

For full details, check out our tutorial on how to add FAQ Schema in WordPress with WPCode.
10. Add Organization Schema to Your Homepage
Intermediate
Replaces: Local SEO plugin addon
Organization schema markup is how you tell Google’s parser who you are: your business name, website, logo, contact number, and social profiles. It’s separate from your Google Business Profile. It’s the data your site feeds directly to Google’s knowledge graph.
Without it, Google has to guess at your entity information from whatever it finds on the page. Getting this from an SEO plugin usually requires a Local SEO addon, which is paid for on most SEO plugins.
The alternative is editing header.php to add the JSON-LD block manually.
With WPCode, you write the JSON-LD as an HTML snippet scoped to your homepage using conditional logic. It runs once per page load and feeds Google exactly what you want it to know.
<!-- Scope this snippet to Homepage only via WPCode conditional logic -->
<!-- Replace all YOUR_... values with your real business information -->
<script type="application/ld+json">
{
  "@context": "https://schema.org",
  "@type": "Organization",
  "name": "YOUR BUSINESS NAME",
  "url": "https://yoursite.com",
  "logo": "https://yoursite.com/wp-content/uploads/your-logo.png",
  "contactPoint": {
    "@type": "ContactPoint",
    "telephone": "+1-555-000-0000",
    "contactType": "customer service"
  },
  "sameAs": [
    "https://www.facebook.com/yourbusiness",
    "https://www.linkedin.com/company/yourbusiness",
    "https://twitter.com/yourbusiness"
  ]
}
</script>
11. Replace Bloated SEO Plugin Schema With One Clean Snippet
Advanced
Replaces: Multiple SEO plugin schema addons
SEO plugins are useful. Their schema addons, less so. Each addon adds its own JSON-LD block to every page from Local Business, Reviews, FAQ, and Breadcrumbs. They all fire at once, even on pages that don’t need them.
The result is a <head> section with four or five separate schema blocks, some with placeholder values that didn’t get filled in, some conflicting with each other.
WPCode’s approach is the opposite.
You write exactly the schema you want, in exactly the format you want, scoped to exactly the pages that need it. One snippet. One block. No addon required.
<!-- Clean WebSite schema — scope sitewide or to Homepage -->
<!-- Add additional schema types as separate snippets for other page types -->
<script type="application/ld+json">
{
  "@context": "https://schema.org",
  "@type": "WebSite",
  "name": "YOUR SITE NAME",
  "url": "https://yoursite.com",
  "potentialAction": {
    "@type": "SearchAction",
    "target": {
      "@type": "EntryPoint",
      "urlTemplate": "https://yoursite.com/?s={search_term_string}"
    },
    "query-input": "required name=search_term_string"
  }
}
</script>
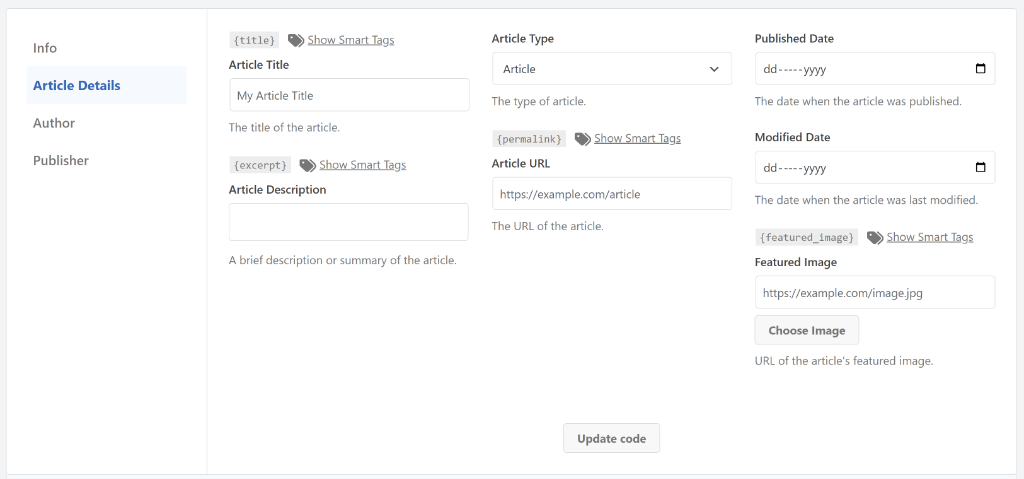
The screenshot below is an example of an article Schema you can build with WPCode.
For a deeper look at every schema type you can build this way, see our complete guide to schema markup in WordPress.
That’s it for the best HTML snippets you can use on your WordPress site as a beginner. If anything is unclear, check out the commonly asked questions below.
FAQs: HTML Snippets for WordPress Beginners
Start Adding HTML Snippets to Your WordPress Site
You don’t need to edit a theme file. You don’t need to install a plugin for every small thing.
These 11 snippets cover the most common HTML use cases for WordPress site owners, like tracking, schema, embeds, announcements, and more. Each one is copy-paste ready. Each one is safe to activate and just as easy to undo.
WPCode’s library has thousands more. Search by category, filter by download count, and find community-tested versions for almost anything you need.

