Do you want to add the Facebook Pixel to WordPress?
Imagine pouring money into Facebook ads, hoping they reach the right people, only to have no clue if they’re actually working. Scary, right?
That’s where the Meta Pixel (formerly Facebook Pixel) comes in, acting as your gateway for understanding user behavior on your WordPress websites.
In this guide, we’ll learn why adding the Meta (formerly Facebook) Pixel to your WordPress site is essential, its key benefits, and how to add the Facebook Pixel to WordPress.
What Is The Meta (Facebook) Pixel?
Think of the Meta (Facebook) Pixel as your invisible website detective, gathering intel on how visitors interact with your content.
It is a snippet of code that Facebook provides to install on your website if you’re running Facebook ads. You allow Facebook access to certain website data when you add this code snippet to your website.
With Facebook Pixel, you can track actions like:
- Add to carts: See how many people are interested in your products but haven’t taken the final plunge.
- Purchases: Track conversions and measure your ad campaign’s return on investment (ROI).
- Signups: Gauge the effectiveness of your lead magnets and email capture forms.
- Page views: Understand which website sections resonate most with your audience.
Why It Is Essential To Add The Facebook Pixel To WordPress
Let’s imagine you are running an online clothing store. So, you launch a Facebook ad for a new summer collection, targeting fashion enthusiasts. Without a Pixel, you’re flying blind.
Did the ad drive sales? Did people click through and browse your products? The Pixel answers these questions, allowing you to refine your targeting, optimize your ad copy, and maximize your return on investment (ROI).
Here are 5 reasons why you should add the Facebook Pixel to WordPress immediately:
- Track Conversions: See exactly how many website visitors from your Facebook ads become paying customers, signed-up subscribers, or engaged leads.
- Craft Laser-Targeted Audiences: Retarget website visitors who interacted with specific pages or products, showing them ads that are hyper-relevant to their interests.
- Optimize Campaigns Like a Pro: Analyze which demographics, interests, and ad formats resonate most with your audience, allowing you to fine-tune your campaigns for maximum impact.
- Unlock Powerful Insights: Gain valuable intel on user behavior, like which pages they visit and what actions they take, enabling you to create a website experience that converts.
- Boost ROI & Save Big: By targeting the right people and optimizing your campaigns, you’ll see a significant return on your ad spend, maximizing your marketing budget.
How To Create A Meta (Facebook) Pixel
Creating a Facebook Pixel is very easy to do. If you haven’t created one for yourself already, please follow the following steps.
First, you must have a business account manager account to proceed.
Then, to create a Facebook Pixel, you need to visit Facebook Events Manager. Now, from the sidebar, click “Connect Data Sources.”
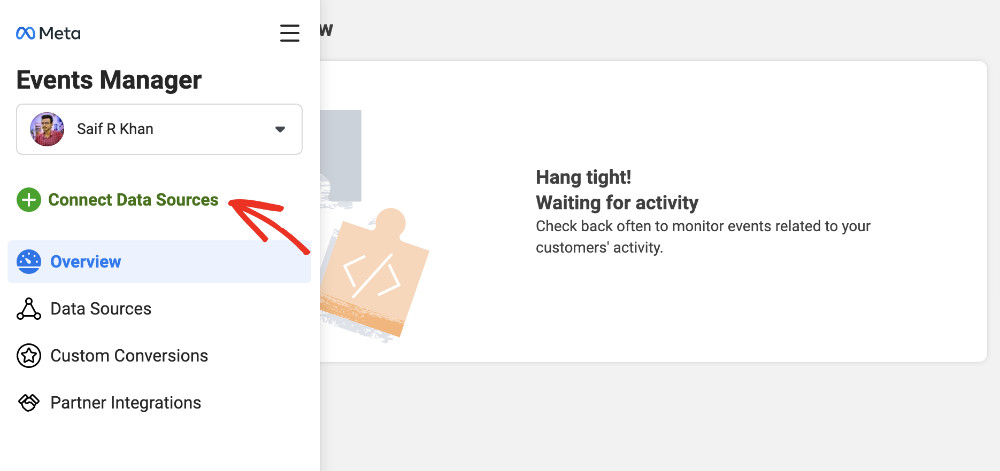
Select “Web” from the pop-up modal, then click “Connect.”
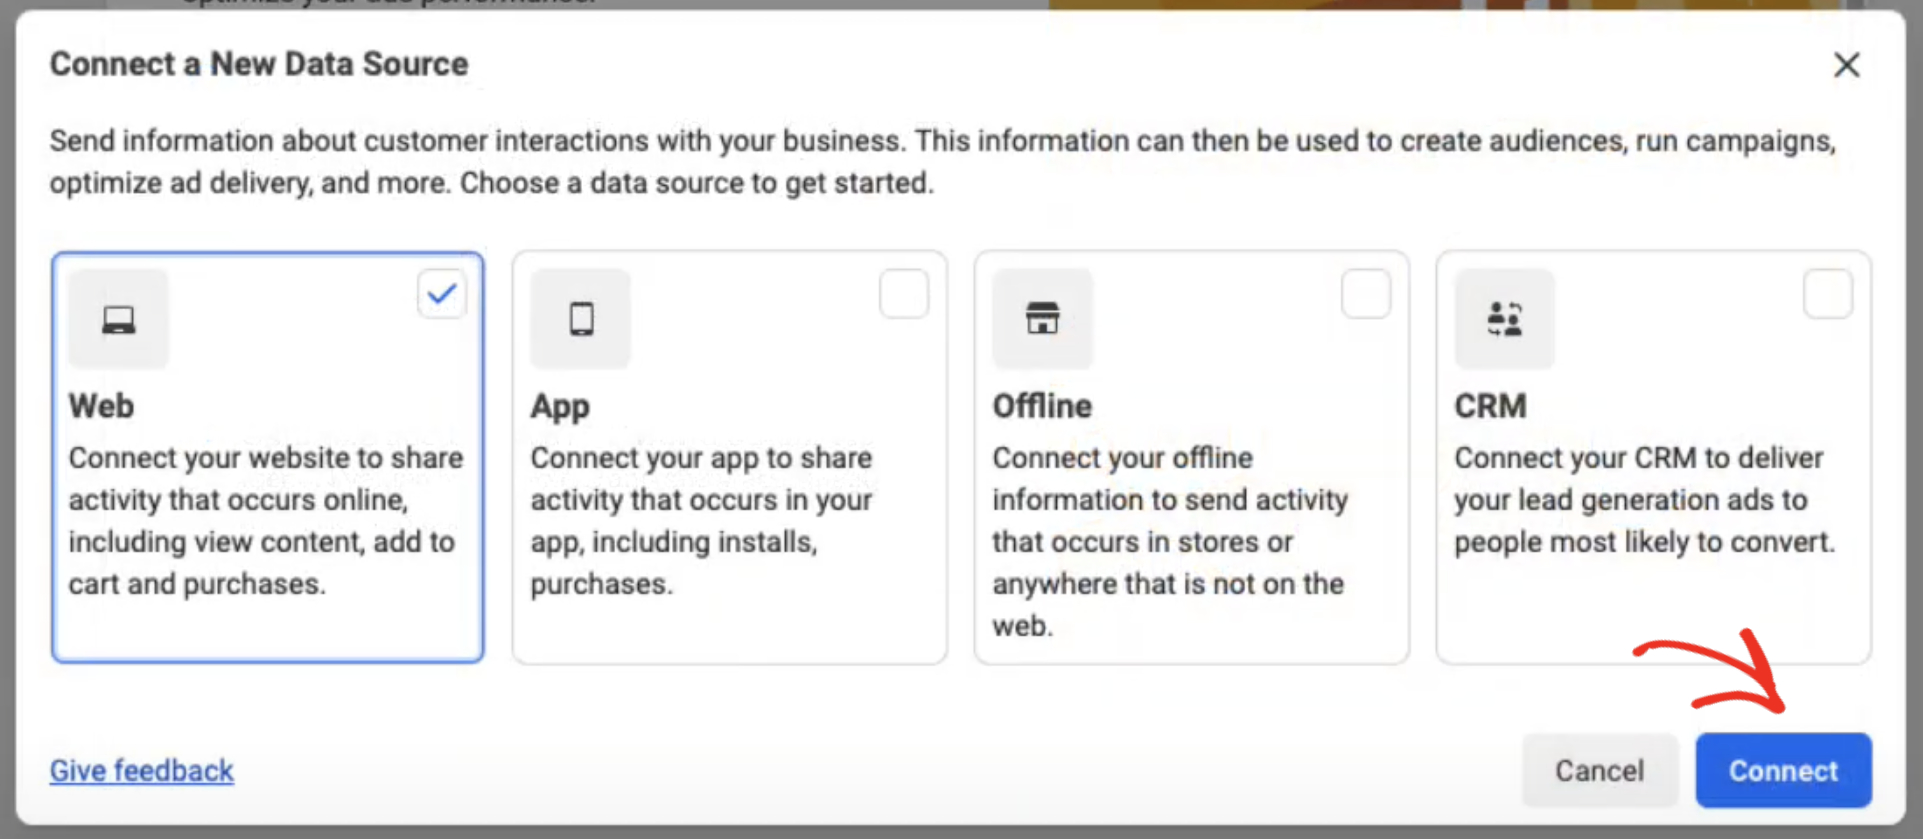
Now give your Pixel a memorable name and click “Create Pixel.”
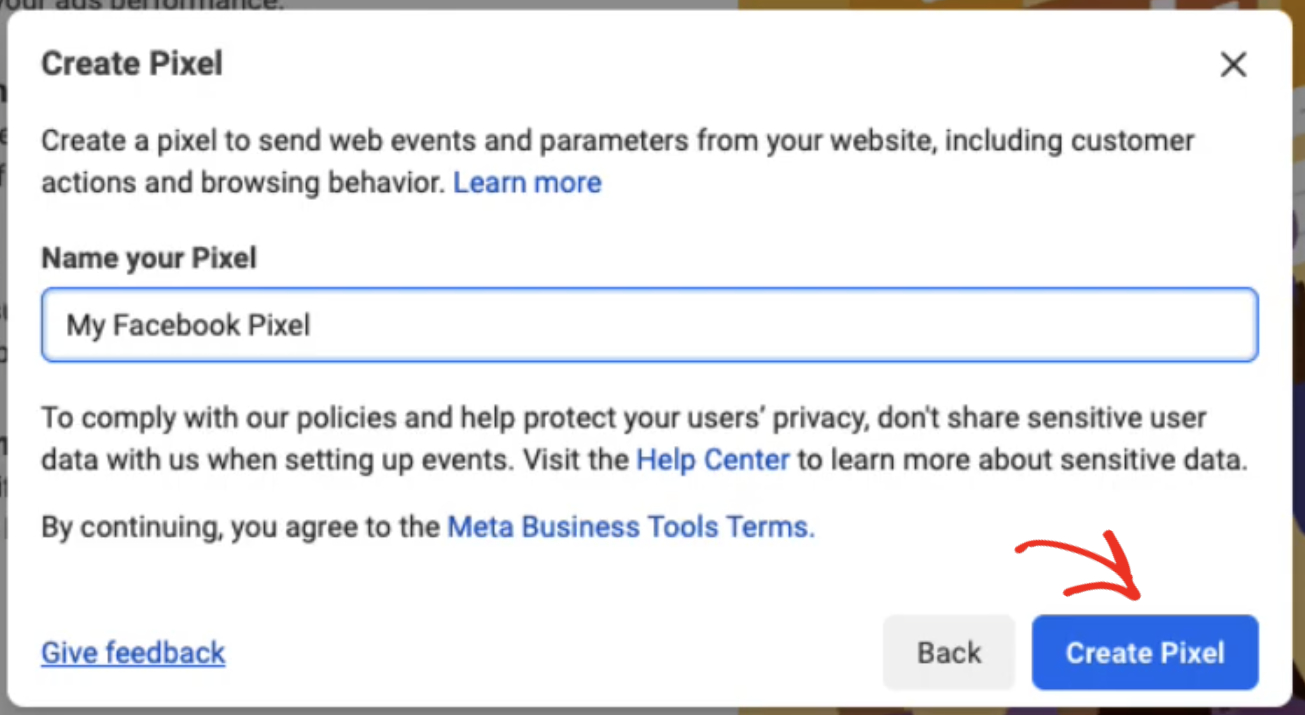
Please provide your website URL in this step and click “Check.”
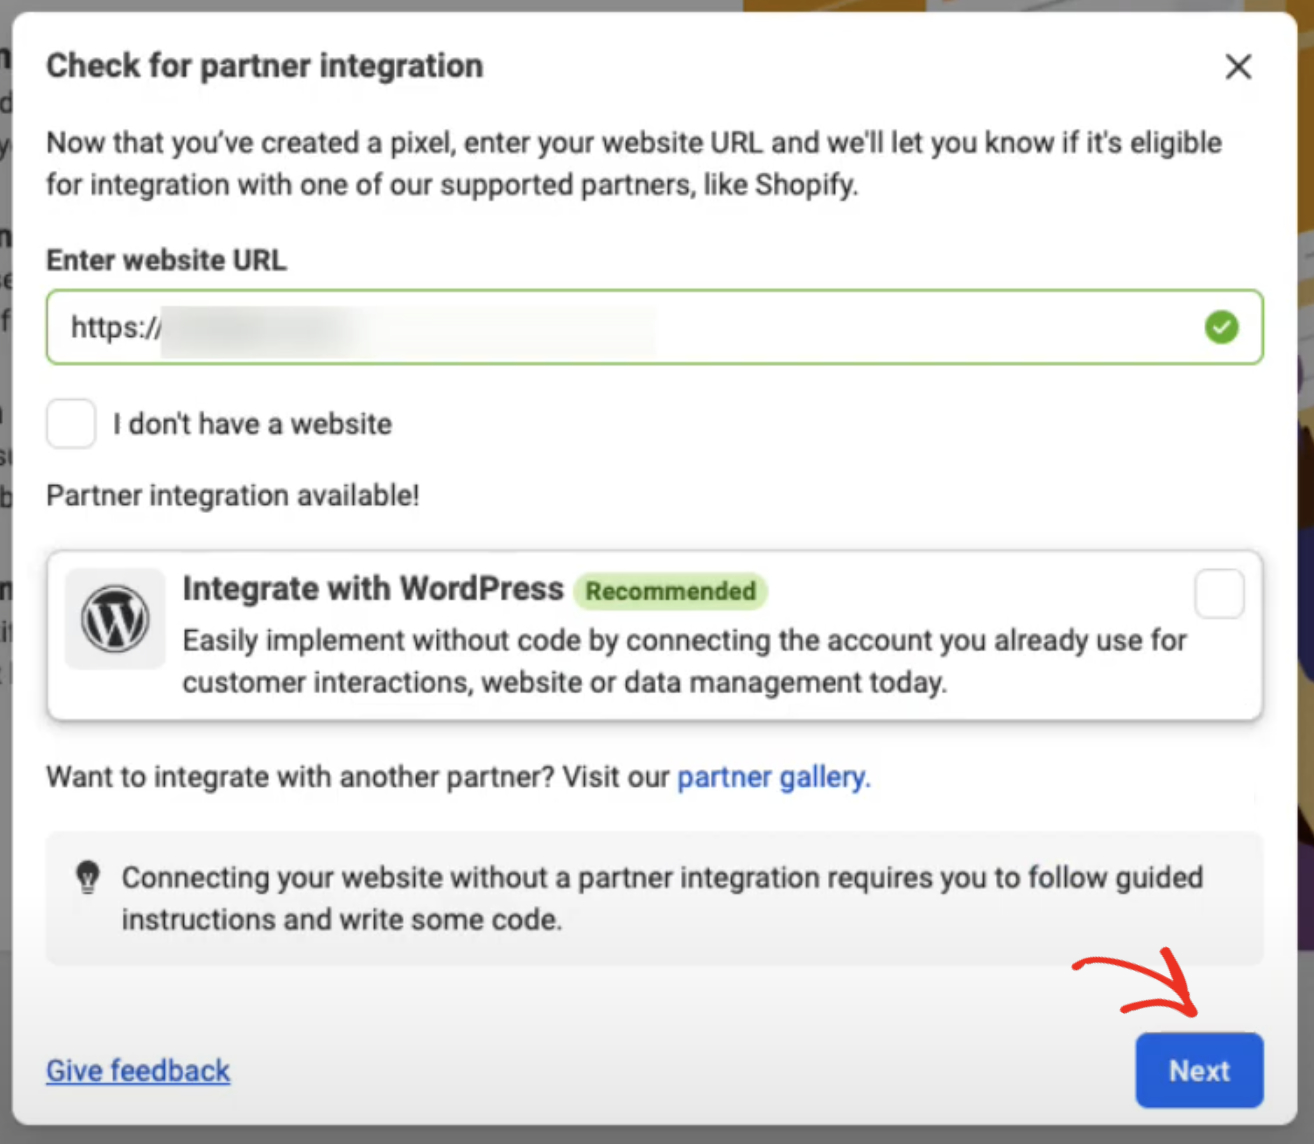
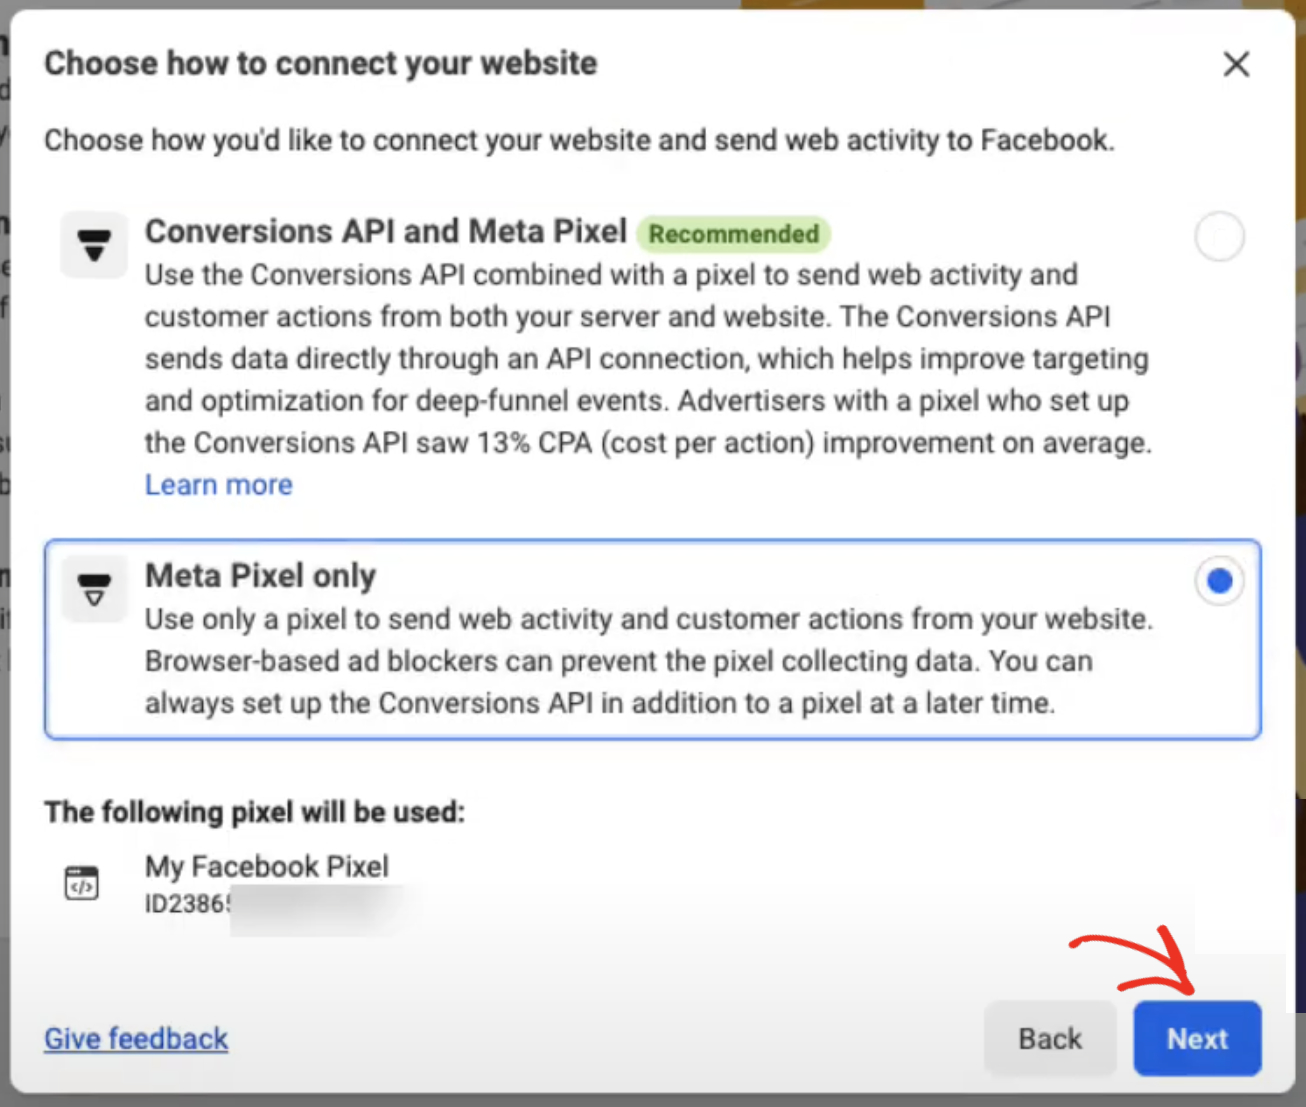
In order to connect the Pixel you just created, choose “Meta Pixel only” from this modal and click “Next.”
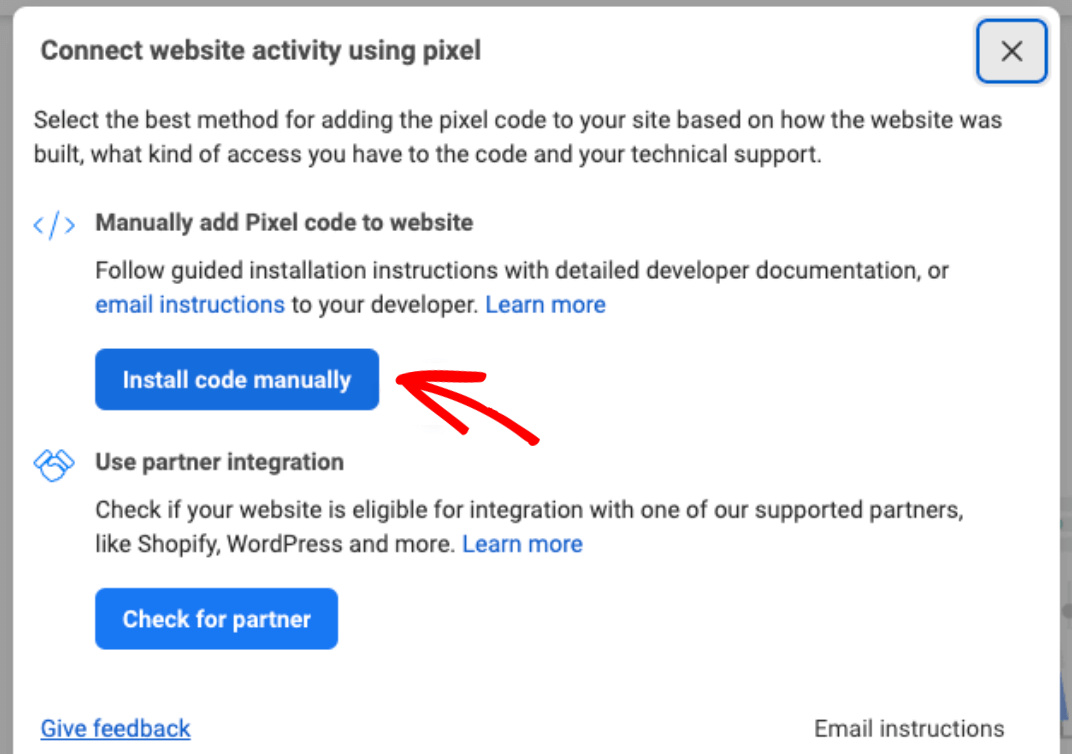
In this step, click on “Install code manually,” this will generate the base code that you need to paste on your website.
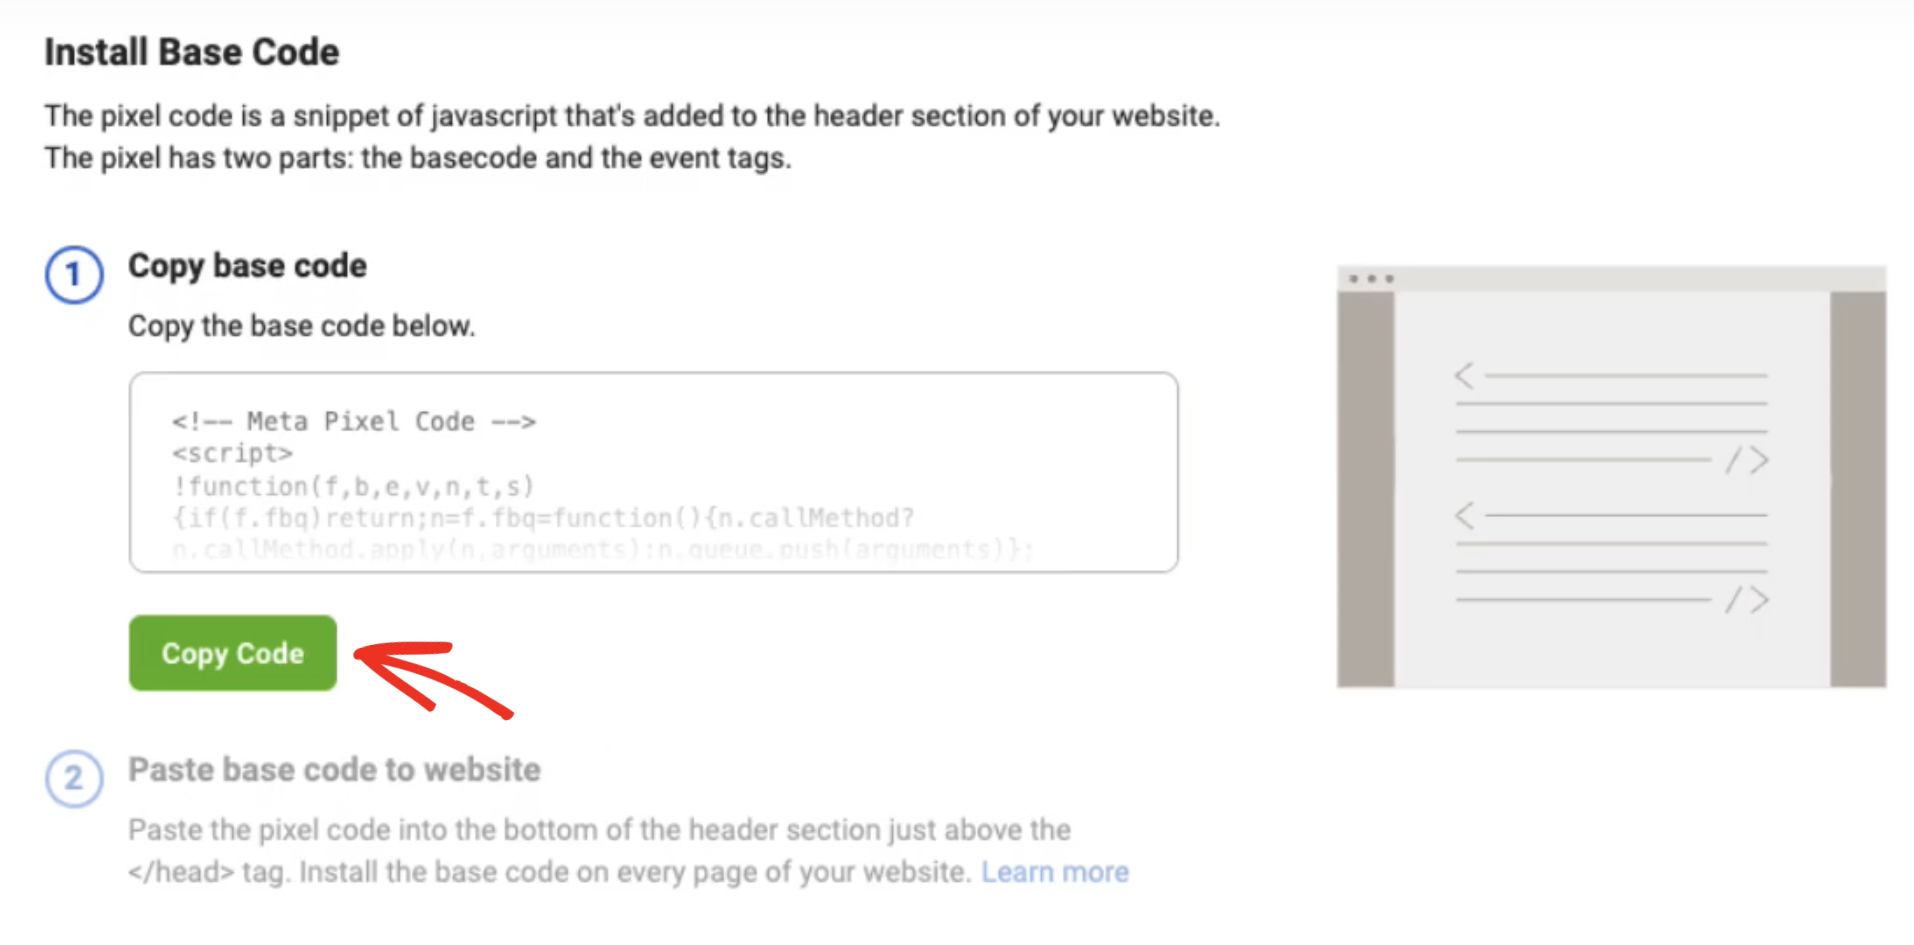
Finally, click Copy Code. You’ll need this code snippet to add to your WordPress website.
How To Add The Facebook Pixel To WordPress For Free
You can easily add any code snippet to WordPress for free with WPCode. It is the most robust WordPress plugin for inserting code snippets and scripts into WordPress sites with ease. No technical skills required.
Here’s why we chose WPCode for adding Facebook Pixel to WordPress:
- Effortless management: Add, edit, and organize your snippets with ease, thanks to the intuitive interface.
- Versatility: Supports JavaScript, HTML, CSS, PHP, and more, making it your one-stop shop for code customization.
- Automation magic: WPCode handles the technical stuff behind the scenes so you can focus on what matters – your website!
- Trusted by millions: Over 2 million websites rely on WPCode to run their business smoothly.
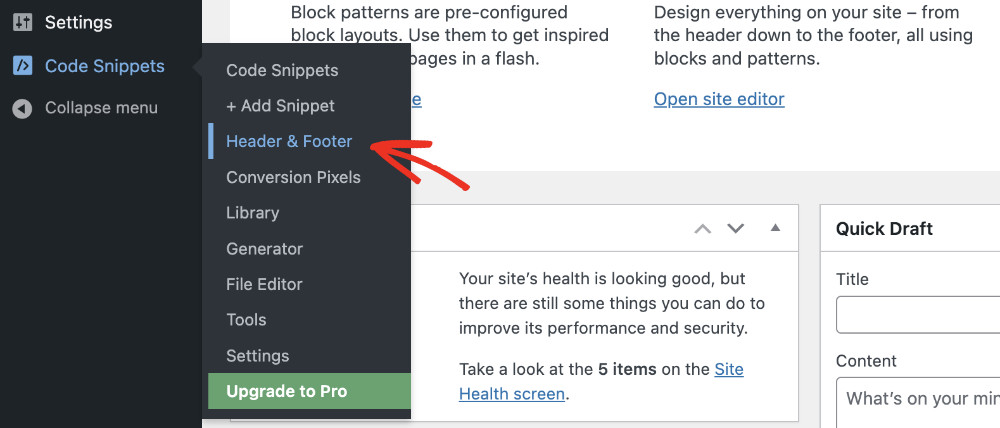
You can install and activate WPCode like any other WordPress plugin. When it is activated successfully, you’ll see a new menu item labeled “Code Snippets” on the left side of your WordPress admin bar. Navigate to Code Snippets > Header & Footer.
You will land on the Global Header and Footer page. Now, paste the Meta (Facebook) Pixel base code you just copied earlier into the Header section and click “Save.”
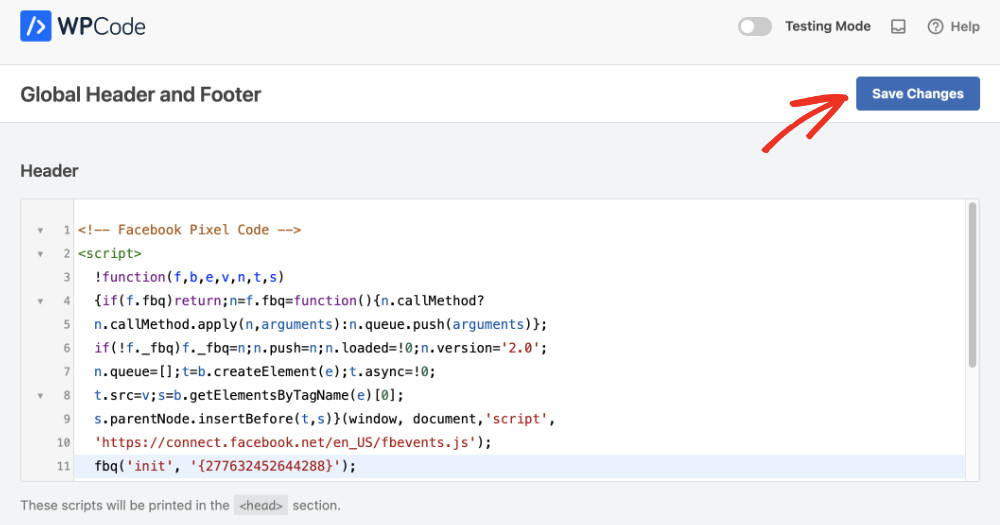
You have successfully added Facebook pixel to your WordPress website.
How To Add The Facebook Pixel To A Specific Page On Your WordPress site
Adding the Pixel to your website’s global header will track actions across your entire website, giving you a holistic view of user behavior.
However, if you are running different ad campaigns, you might want to add a Pixel to a specific page on your website. You can also add events to specific pages, extending the global Pixel code in the header.
WPCode makes adding code snippets or scripts to a specific page much easier by integrating directly with the WordPress page editor. Please follow this detailed step-by-step guide to learn how to add scripts (including Facebook Pixel) to a specific page on your website.
How To Add The Facebook Pixel To WordPress With Conversion Pixels Addon
WPCode Pro (Plus plan and onwards) provides a brilliant solution for placing Pixels and tracking events automatically, not just for Facebook Pixel but also TikTok, Pinterest, Snapchat, and Google Ads. These features are available on the Plus package and onwards.
The WPCode Conversion Pixels Addon makes it much easier to add Facebook Pixel as it takes care of automatically adding the code and also provides advanced eCommerce tracking for WooCommerce, Easy Digital Downloads, and MemberPress.
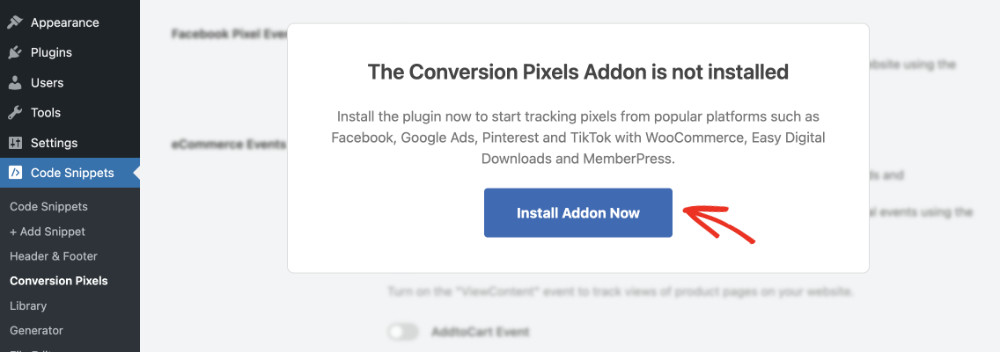
To enable the Conversion Pixels addon, simply go to Code Snippets > Conversion Pixels. Now click on the “Install Addon Now” button and wait a moment. The addon will be installed and activated automatically.
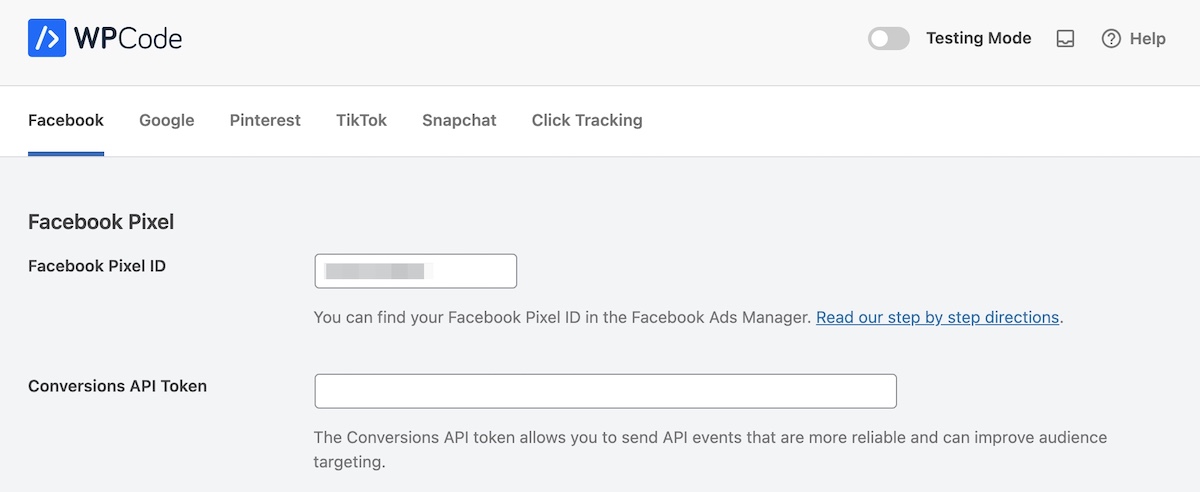
In the Facebook tab, paste your Facebook Pixel ID in its respective field. That’s it! WPCode will take care of the rest.
Additionally, you can leverage Conversions API Token, as sometimes event tracking is configured at the server level, and using API connection makes eCommerce events tracking better and much more reliable.
Please refer to this guide on how to find your Pixel ID and Conversion API Token if you require further assistance.
As mentioned above, if your online store is created with WooCommerce, Easy Digital Downloads, and MemberPress, you can enable advanced eCommerce tracking with WPCode. Just enable what you’d like to track from the “eCommerce Events Tracking” menu, and that’s it.
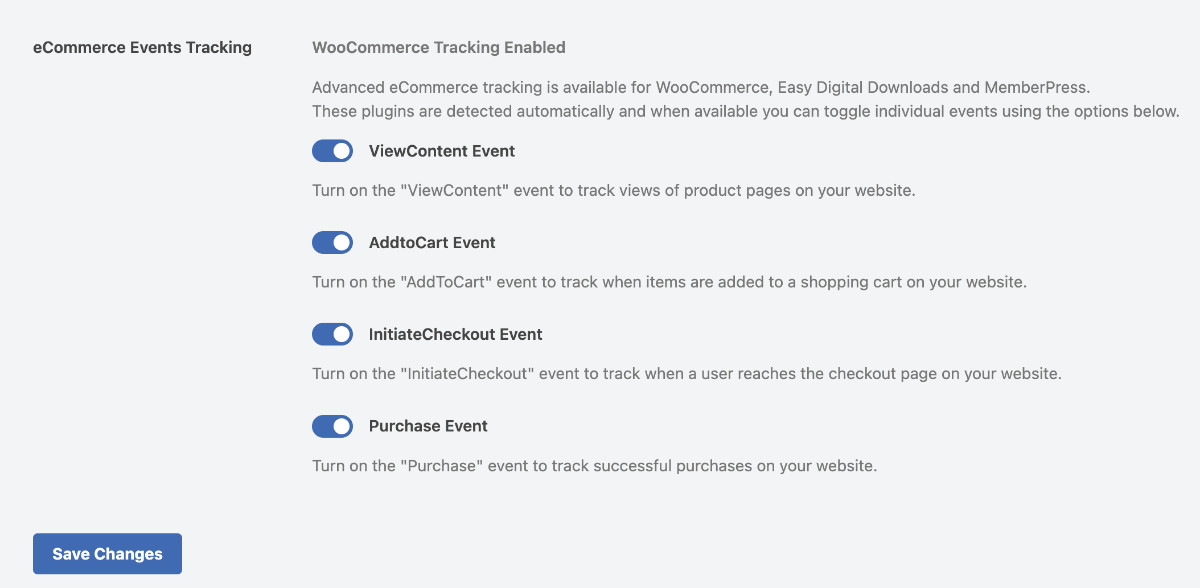
Finally, click “Save Changes” once you’re done!
Conclusion
Don’t leave your Facebook advertising in the dark! With Facebook Pixel, you can gain valuable insights, target the right audience, and get the most out of your advertising budget. We hope you’ll benefit from learning how to add Facebook Pixel to WordPress.
