Typography can make or break your WordPress site’s first impression. When I launched my first website, I stuck with the default fonts, thinking they were good enough. The result was a website that looked generic and forgettable.
Everything changed when I discovered Google Fonts. These free, professionally designed typefaces transformed my bland website into something that actually reflected my brand’s personality.
Google Fonts is a free library of over 1,400 web fonts that you can use on your WordPress website. These fonts load quickly, work across all devices, and give your site a polished, professional appearance that helps you stand out from the crowd.
In this tutorial, I’ll show you how to add Google Fonts to your WordPress site. You’ll learn how to choose the right fonts, implement them correctly, and avoid common mistakes that can slow down your website.
Why Use Google Fonts on Your WordPress Site?
Default WordPress fonts are limiting your website’s potential. Most themes come with basic system fonts like Arial, Times New Roman, or Helvetica. While these fonts are readable, they don’t help your site stand out from millions of other WordPress websites using the exact same fonts.
Typography affects how visitors perceive your brand before they even read your content. For example, a law firm using Comic Sans would instantly lose credibility, just like a creative agency using Times New Roman might appear outdated.
The right fonts communicate professionalism, creativity, trustworthiness, or whatever personality trait matches your brand. Plus, custom fonts make your content more enjoyable to read and help establish a memorable brand identity.
Google Fonts solve this problem without breaking your budget. They’re completely free, load quickly from Google’s servers, and work consistently across all browsers and devices.
That said, let’s look at an easy way to add Google Fonts to WordPress.
Adding Google Fonts in WordPress
When it comes to adding Google Fonts to WordPress, you’ll need to enter code to your site’s theme files. Google Fonts offer an embed code that has to be inserted in theme’s header.php file before the <head> tag.
Now, directly editing the theme files is not recommended. If you make the slightest mistake, then there is a risk of breaking your site’s functionality and appearance. And if you decide to update or change the theme in the future, then you might need to add the custom font again.
This is where I found WPCode to be the most reliable solution. It is the best WordPress code snippets plugin that lets you safely add custom code to your WordPress site without touching your theme files.
The best part is that your Google Fonts will stay active even if you switch themes or update your current one. Besides that, it offers a snippet library from verified experts to add new features to your site. Plus, you can use WPCode to easily add PHP, JavaScript, CSS, HTML, and other custom code snippets safely to your site.
Now, let’s see the steps you can follow to easily use a Google Font on your site.
Step 1: Install and Activate WPCode Plugin
First, you need to install and activate the WPCode plugin on your WordPress site.
For this tutorial, I am using the WPCode Lite version, which is available for free. There is also a WPCode Pro version that offers more advanced features like Page Scripts, AI code generator, Conversion Pixel addon, tracking code revisions and changes, and more.
Simply go to your WordPress dashboard and navigate to Plugins » Add New. In the search box, type ‘WPCode’ and look for the plugin.
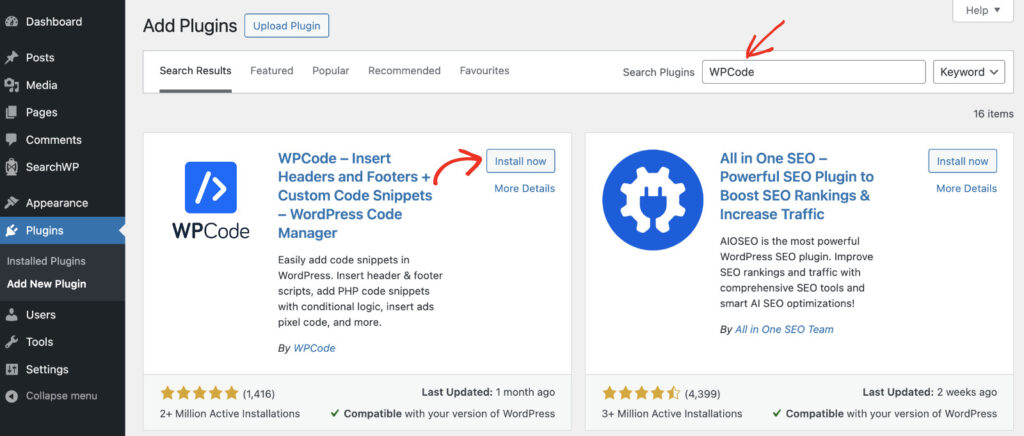
After that, you can click the ‘Install Now’ button and then activate the plugin once the installation completes. For more details, please see this guide on how to install a WordPress plugin.
Once the plugin is ready, the next step is to get the embed code for your Google Font.
Step 2: Get Google Fonts Embed Code
Next, you need to visit the Google Fonts website to select the font you want to use on your WordPress site.
You can simply look for a font using the search bar at the top or browse the font library. There is also an option to add filters and narrow down the font search.
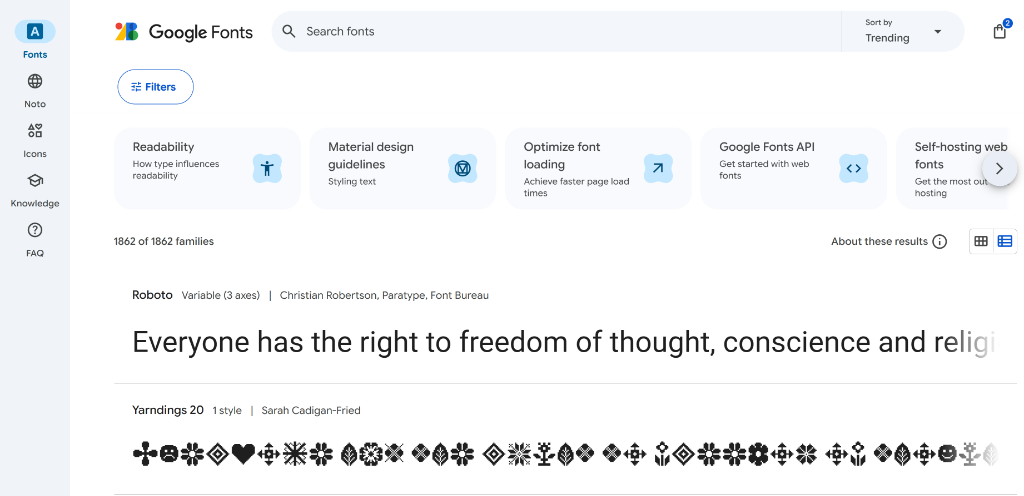
Once you select a font, simply click on it.
On the next screen, you’ll see your selected font and its different styles. From here, simply click the Get font button in the top right corner.
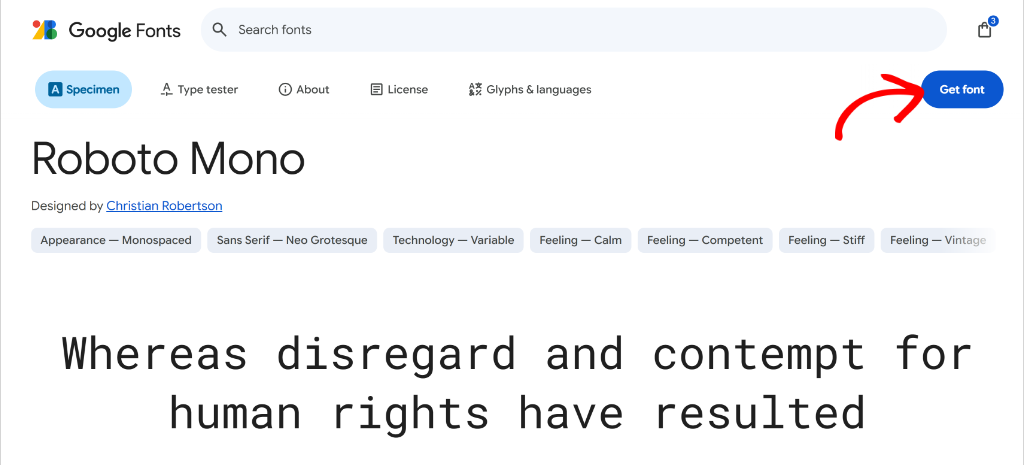
After that, Google will show you different options to get the font.
Go ahead and click the Get embed code button.
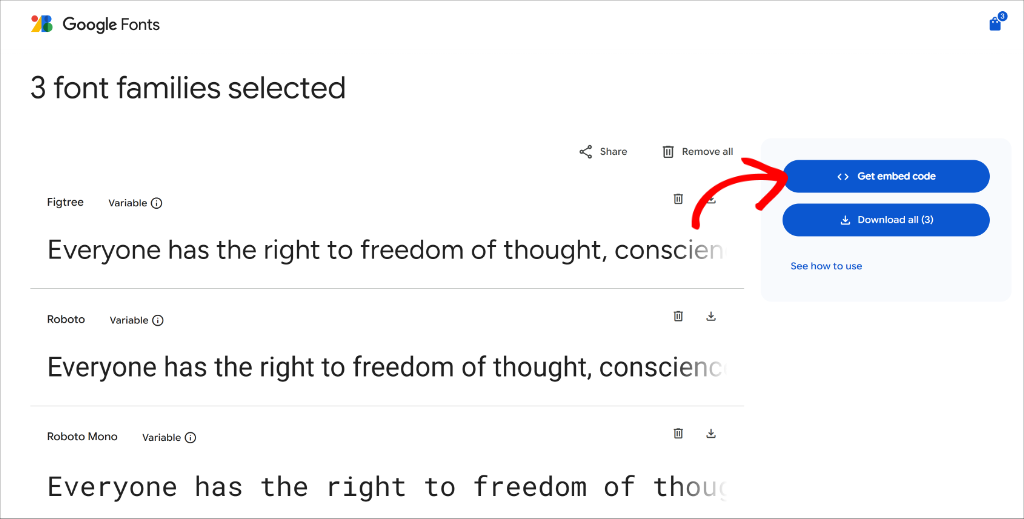
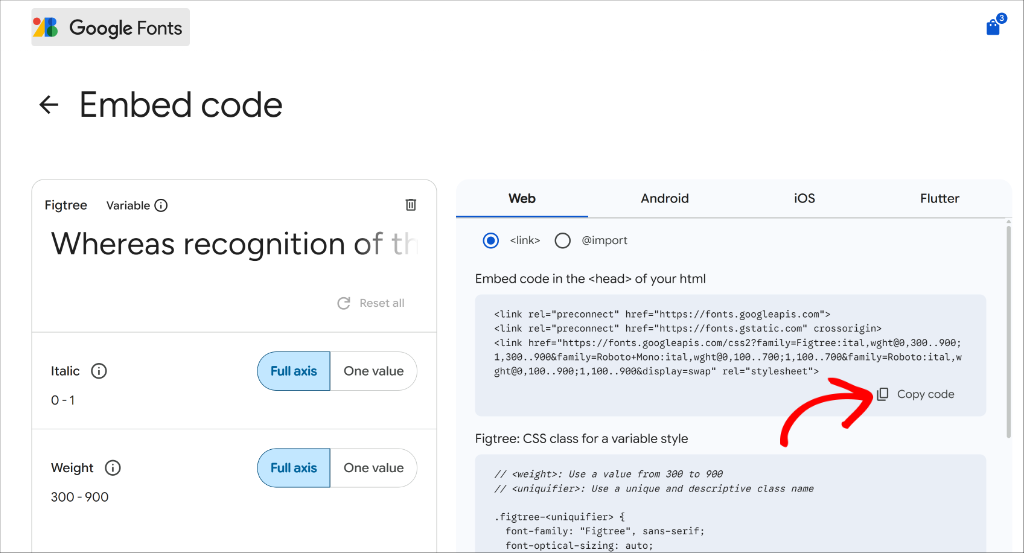
Next, you will see different embed code options for the selected font.
From here, copy the embed code under the ‘Web’ tab that you’ll need to place in the theme files of your WordPress website.
Step 3: Insert Google Fonts Embed Code in WordPress
Now that you’ve copied the Google Fonts embed code, the next step is to insert it in your WordPress website.
Simply head to Code Snippet » Header & Footer from your WordPress dashboard and then enter the embed code under the ‘Header’ section.
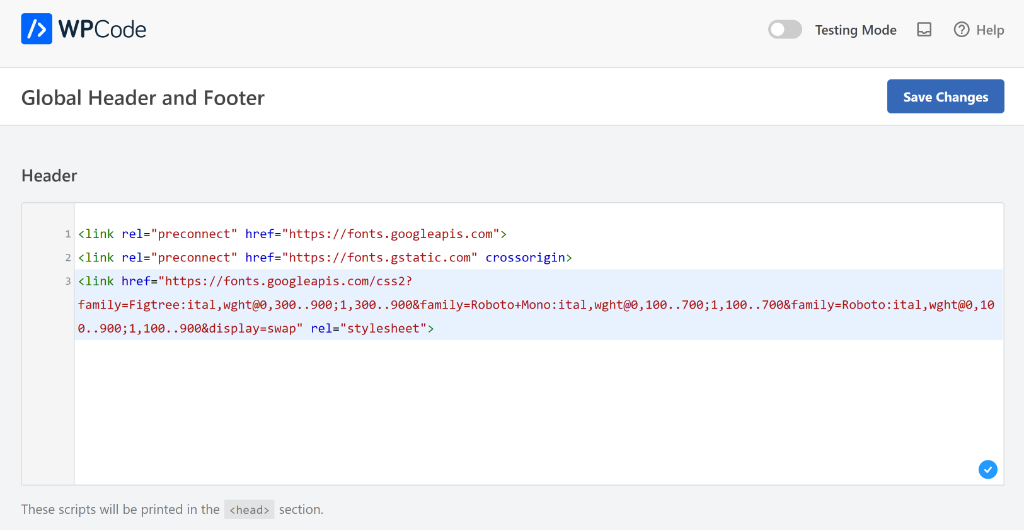
You can learn more by following our guide on how to add header and footer code in WordPress.
When you’re done, click the ‘Save Changes’ button.
Step 4: Add Custom CSS to Change the Font
Next, you’ll need to enter custom CSS codes to change the default font on your site with Google Font.
For this, you can head to Code Snippets » Add Snippet page from the WordPress dashboard and then click ‘Add Your Custom Code (New Snippet)’ option.
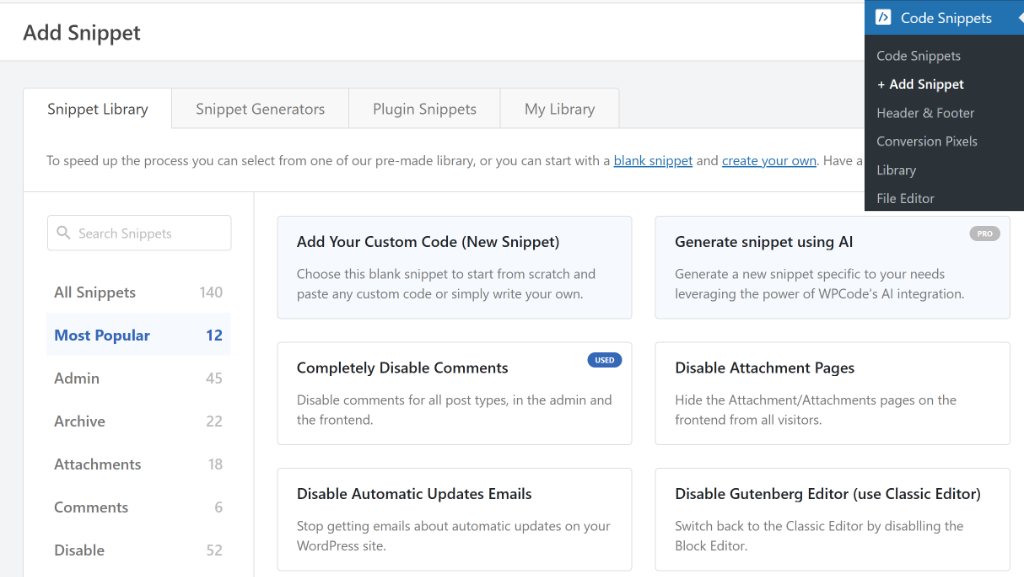
On the next screen, you’ll see the code editor.
However, before entering the code, go ahead and select the CSS Snippet code type.
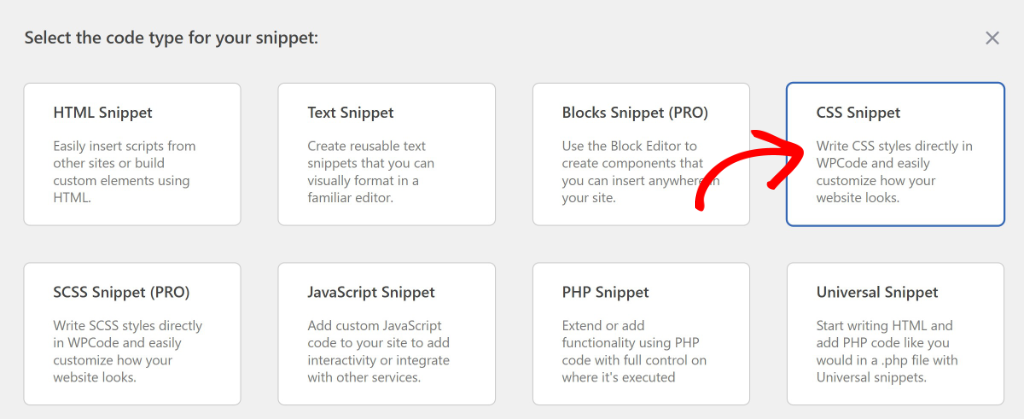
From here, you can enter the CSS code to load the new Google Font on your site.
If you want to apply the Google Font to all text on your website, then use this CSS:
* {
  font-family: "Story Script", sans-serif;
}
On the other hand, if you’re looking to use the new font for a particular section, like body, then you can use this CSS snippet:
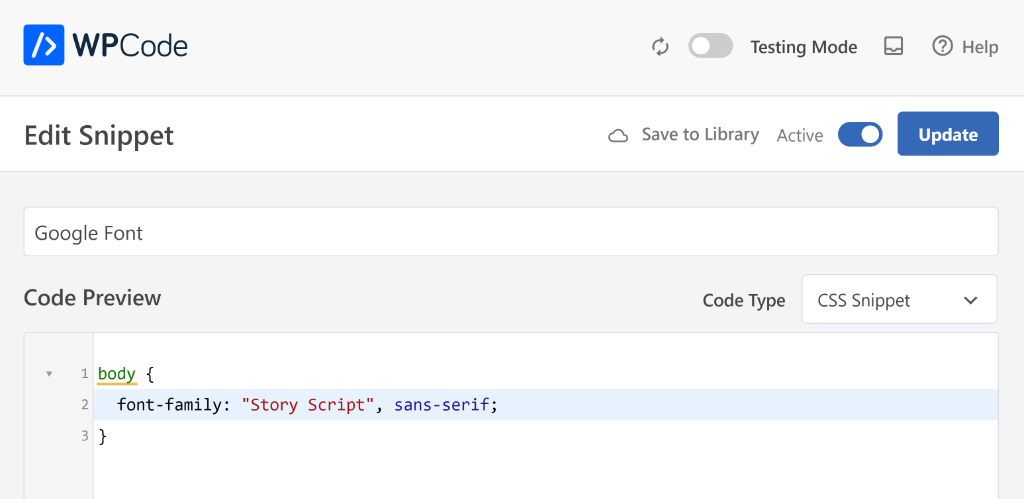
body {
  font-family: "Story Script", sans-serif;
}
Or if you’d like to change the font of headings, then you can use this code:
h1 {
  font-family: "Story Script", sans-serif;
}
In the code above, make sure to replace Story Script with the Google Font you selected earlier.
Here’s how it will look like in the WPCode code editor:
If you need more details, then please see our guide on how to add custom CSS in WordPress.
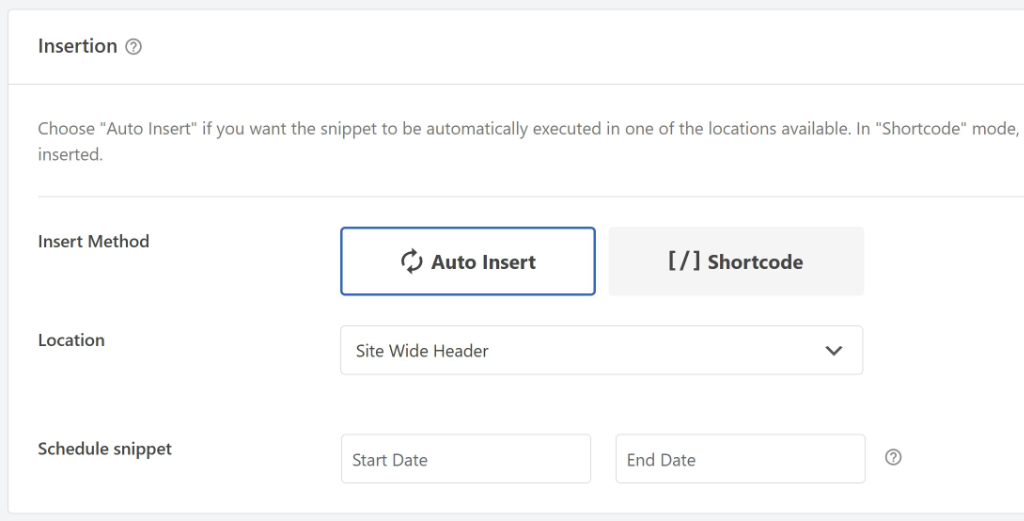
Next, you can scroll down to the ‘Insertion’ section and select how to insert the code on your site.
I recommend using the default settings by WPCode, as it will Auto Insert the snippet in the Site Wide Header of your site.
After that, simply scroll back to the top.
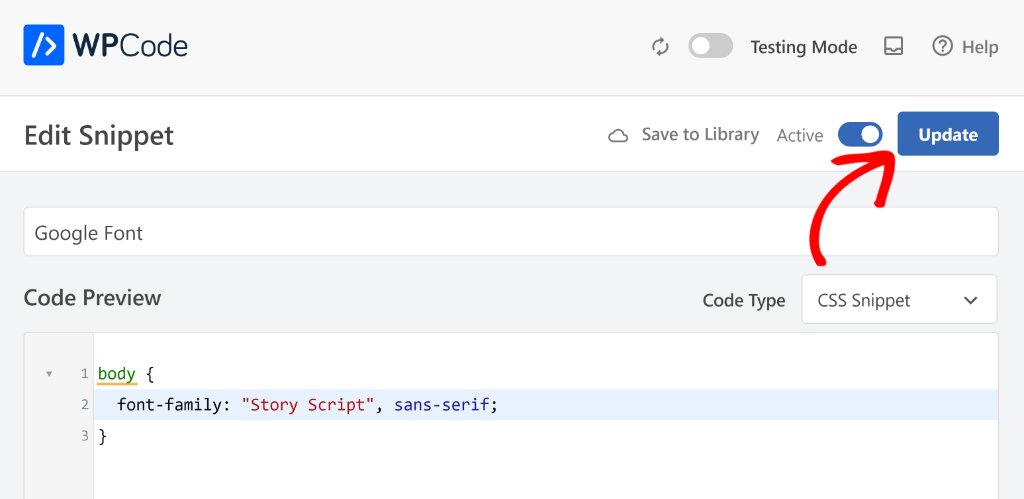
When you’re done, simply click the toggle at the top to make the snippet Active and then click the Update button.
That’s it! You’ve successfully added a Google Font for your WordPress website. Simply visit your website to see the new Google Font in action.
For example, here’s the default font used by the WordPress theme on our demo site:
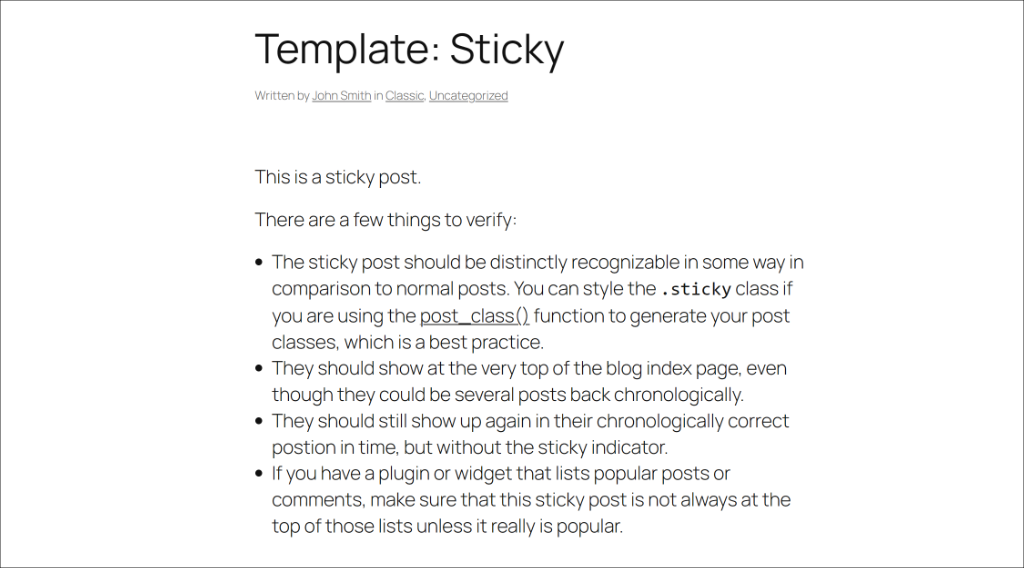
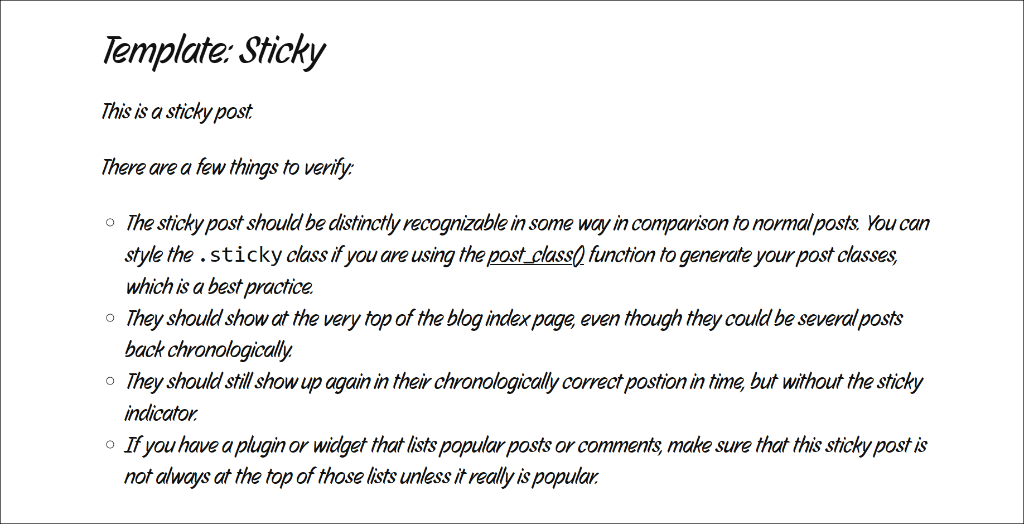
However, using WPCode, I changed the font to ‘Story Script’ and here’s how it looks on our demo site:
Bonus: Best Practices for Using Google Fonts
When it comes to using Google Fonts in WordPress, it’s better to limit the number of font families you use on your website to maintain good performance and visual consistency.
I’ve seen sites load 8-10 different Google Fonts, which creates a chaotic design and significantly slows down page loading times. Stick to 2-3 font families maximum, typically one for headings, one for body text, and optionally one for special elements like quotes or buttons.
Besides that, choose web-safe fallbacks for each Google Font in your CSS declarations. If Google Fonts fails to load for any reason, your visitors will still see readable text instead of broken layouts. Add fallback fonts like this: font-family: 'Roboto', Arial, sans-serif; so browsers can fall back to Arial if Roboto doesn’t load.
Consider the loading performance impact of your font choices. Each font weight and style you select adds to your page’s loading time. I recommend choosing only the font you actually need. If you’re only using regular and bold text, don’t load light, medium, and extra-bold variations.
Lastly, test your fonts on different devices and screen sizes before going live. Some Google Fonts that look great on desktop computers can become hard to read on mobile devices, especially at smaller font sizes.
Add Google Fonts in WordPress FAQs
Here are some common question about Google Fonts and how to add them in WordPress.
1. Can I use Google Fonts in WordPress?
Yes, you can use Google Fonts in WordPress. Integrating Google Fonts into your WordPress site can enhance the visual appeal and align the typography with your brand identity. For instance, plugins like WPCode make it easy to add and manage Google Fonts without directly editing any code.
2. What are the methods for adding Google Fonts?
You can add Google Fonts to WordPress using plugins like WPCode. Alternatively, you can manually embed fonts by adding the Google Fonts link to your theme’s header.php file (preferably in a child theme) and updating your CSS with the desired font styles.
3. Does adding Google Fonts affect site performance?
Adding Google Fonts can affect site performance, but the impact is generally minimal if managed properly. Google Fonts are hosted on Google’s servers, which are optimized for fast delivery. However, to minimize any negative impact on performance, it’s important to limit the number of different font families and styles you use.
I hope this article helped you learn how to add Google Fonts in WordPress. You may also want to see our guide on how to properly remove your WordPress version number and how to add SEO-friendly How-to schema in WordPress.
If you need help, then feel free to leave a comment below. And don’t forget to follow us on X (formerly known as Twitter) and subscribe to our newsletter for all the latest updates.


