Ever tried to solve one problem with a snippet, and an hour later, you still haven’t found the right combination?
WPCode’s library is huge: over 3,000 snippets and growing every week. That scale is exactly why finding the four or five that work together is its own job.
We kept hearing a version of the same thing from users: “I know WPCode has what I need, I just don’t know which snippets to grab.”
The challenge isn’t writing snippets. It’s finding the right ones quickly.
So today we’re introducing Snippet Packs. Curated bundles, each built around one outcome, installed as a group in one click.
That same idea, get what you need without building it by hand, carries into this release’s other addition. Conversion Pixels already track your Facebook, Google, TikTok ads, and more from one screen.
Now OpenAI joins that list; no custom tracking code required.
Neither one costs extra. Snippet Packs work in the free and pro versions. The Pixel addon (Plus or higher) works the same way every other pixel here already does.
Why Snippet Packs?
A fast-growing library is a good problem to have. It’s still a problem.
You don’t want to browse 3,000 snippets and guess which four solve your goal. You want to say “I need my dashboard cleaned up” and get exactly that.
This feature makes WPCode even more user-friendly.
What Are Snippet Packs?
A Snippet Pack is a set of snippets already grouped for you and built around one job. Install the whole set at once instead of adding each snippet by hand.
Here’s what makes it work:
1. Browse by Outcome, Not by Tag
Before this, finding a combination meant knowing which tags to search and hoping you didn’t miss one.
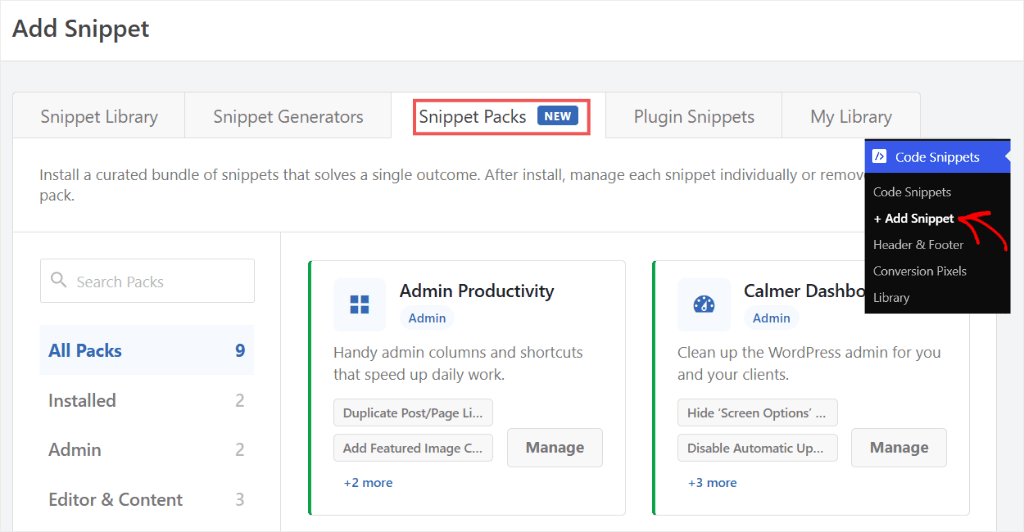
Snippet Packs skip the guessing. Nine packs ship at launch, covering four categories: Admin, Editor & Content, Performance, and Security.
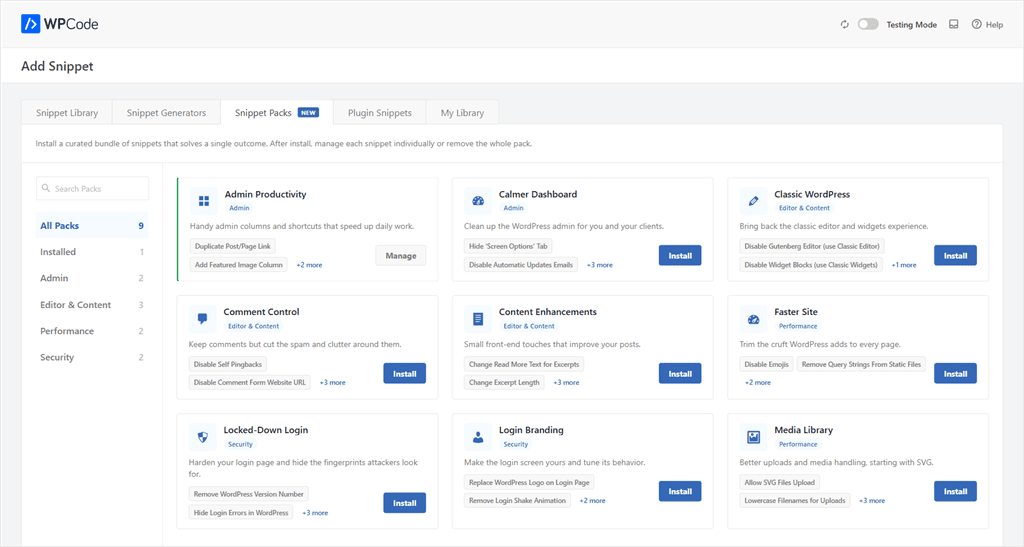
I tested this on the live site. Each pack lists all the snippets in the group, so you know exactly what you are adding, and you do not have to click through.
For example, the Admin Productivity pack lists Duplicate Post/page Link, Add Featured Image Column, Last Login Column, and Add Last Modified Column.
Four snippets, one shared job: surface the post info you’d otherwise dig for in the dashboard.
That means you pick a pack based on what you’re trying to fix. Not by guessing which tag it lives under.
2. Install the Whole Set in One Click
Finding one snippet is easy. Finding four that work together and adding and configuring each one is where people get overwhelmed.
Snippet Packs install everything in the bundle at once, already configured.
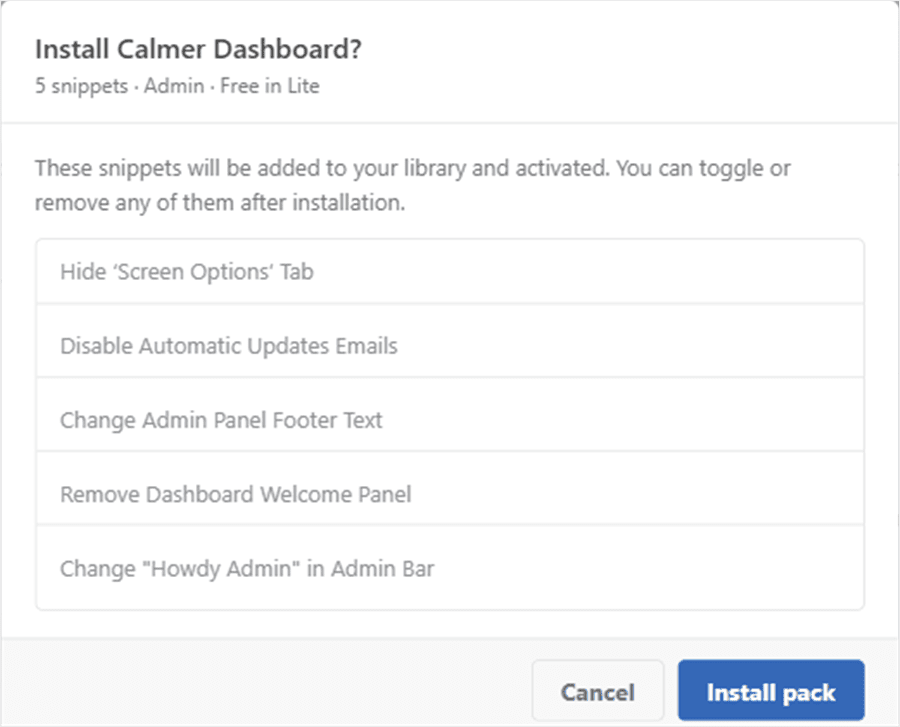
I installed a pack during testing. Just like the preview, the confirmation step listed every snippet by name first, no surprises once I clicked.
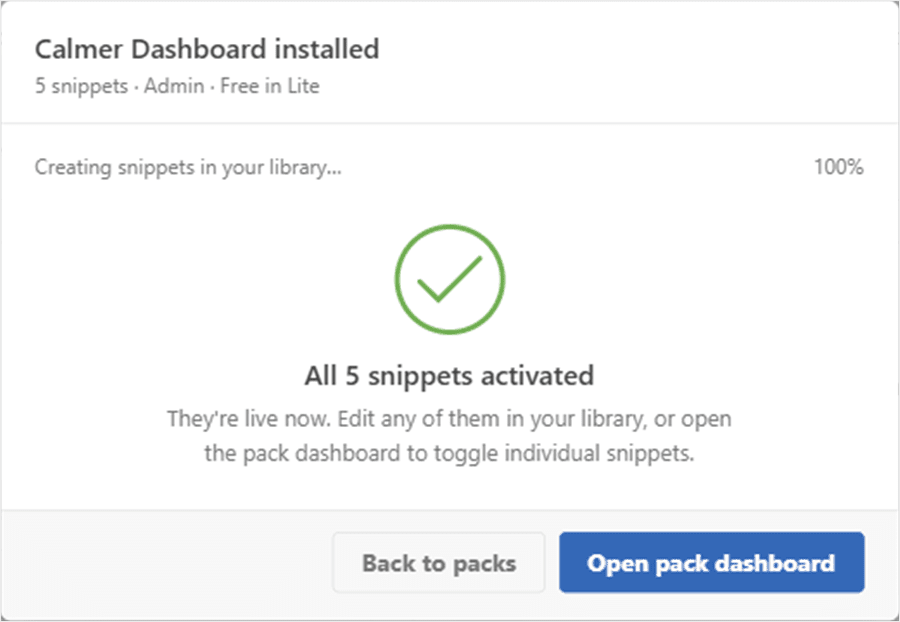
The install itself finished in about two seconds, with a live progress bar. What used to be four separate trips through the library is now one click.
3. Manage Everything From One Dashboard
A bundle you can’t unwind isn’t a shortcut; it’s a liability. If one snippet conflicts with something else on your site, you need a way out.
Every installed pack gets its own dashboard. Toggle any snippet on or off individually, or remove the whole pack in one click.
Each snippet on that dashboard has its own switch and an “Edit snippet” link. There’s a single red “Remove pack” button at the bottom.
Nothing about it hides how to undo it.
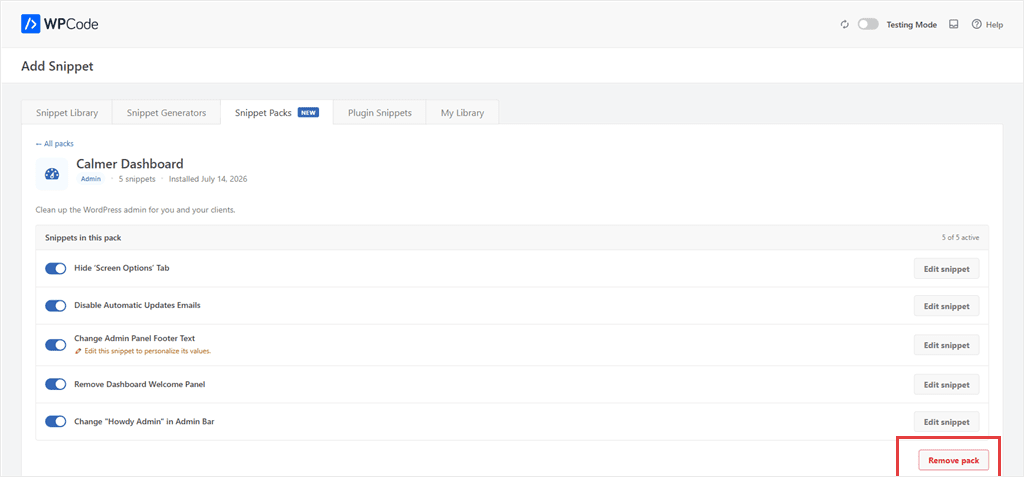
That means you’re never stuck with a bundle. Turn off what you don’t want, or walk away from the whole thing in one click.
⚠️ One thing worth knowing: Snippet Packs currently live under Code Snippets → Add Snippet, not as their own top-level menu item. We’re giving them more prominent placement in an upcoming update.
What’s New in Conversion Pixels: OpenAI
Snippet Packs save you from piecing together snippets by hand. The next update saves you from piecing together tracking code by hand.
If you’re running ads on OpenAI, measuring conversions on WordPress often means writing custom tracking code yourself.
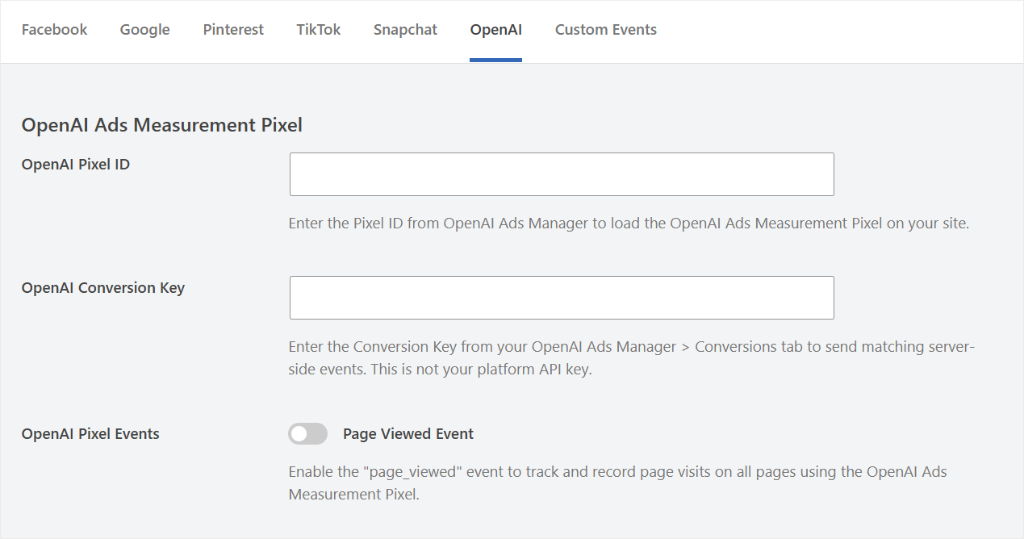
WPCode’s Conversion Pixels now support OpenAI Ads Measurement. It lives in the same Conversion Pixels tab row as every other pixel, like Facebook, Google, Pinterest, TikTok, and Snapchat.
If you’ve added one before, you already know where to look.
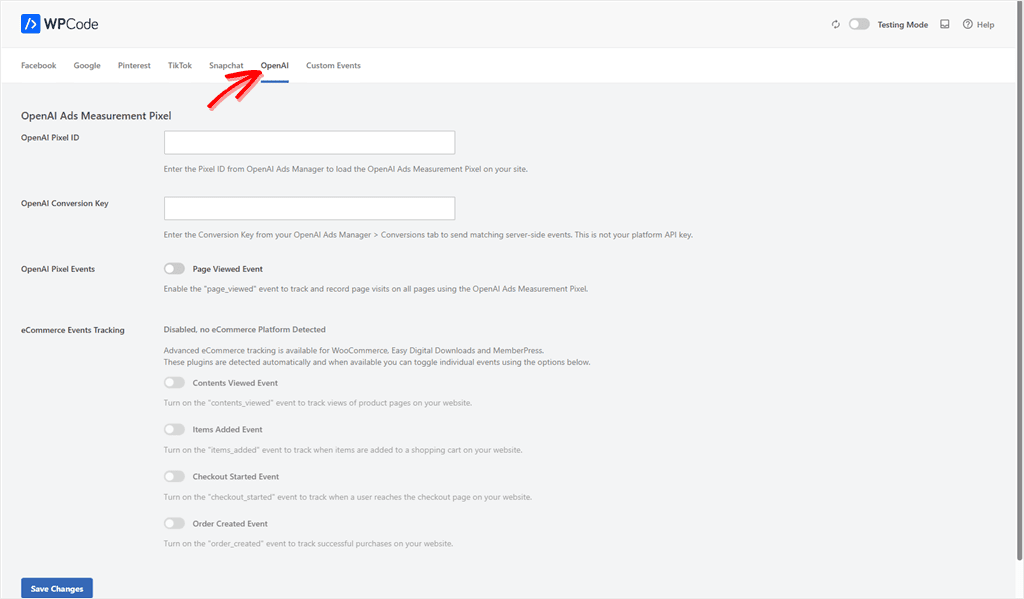
Enter your Pixel ID, pick which events to send, and WPCode handles the rest. One more ad platform covered, using the setup flow you already know.
4. Server-Side Tracking, Not Just Browser-Side
Browser-based tracking misses conversions when ad blockers or privacy settings get in the way. That’s a real gap if you’re trying to measure your ad spend.
The OpenAI Pixel adds server-side tracking through a Conversion Key, separate from your platform API key. Events send directly from your server, so they land even when the browser-side ping doesn’t.
The settings panel spells this out: the Conversion Key is “not your platform API key.” OpenAI has more than one key type. That line heads off confusion early.
5. Built for Your Store’s Existing Events
Setting up tracking for a new ad platform usually means learning its event names yourself, then mapping your store to them.
WPCode auto-detects WooCommerce, Easy Digital Downloads, or MemberPress. It maps your store’s actions, page views, cart adds, checkouts, and purchases to what OpenAI expects.
On my test site, none of those three were active. The panel said so plainly: “Disabled, no eCommerce Platform Detected.” The four event toggles stayed visible, just inert until a store shows up.
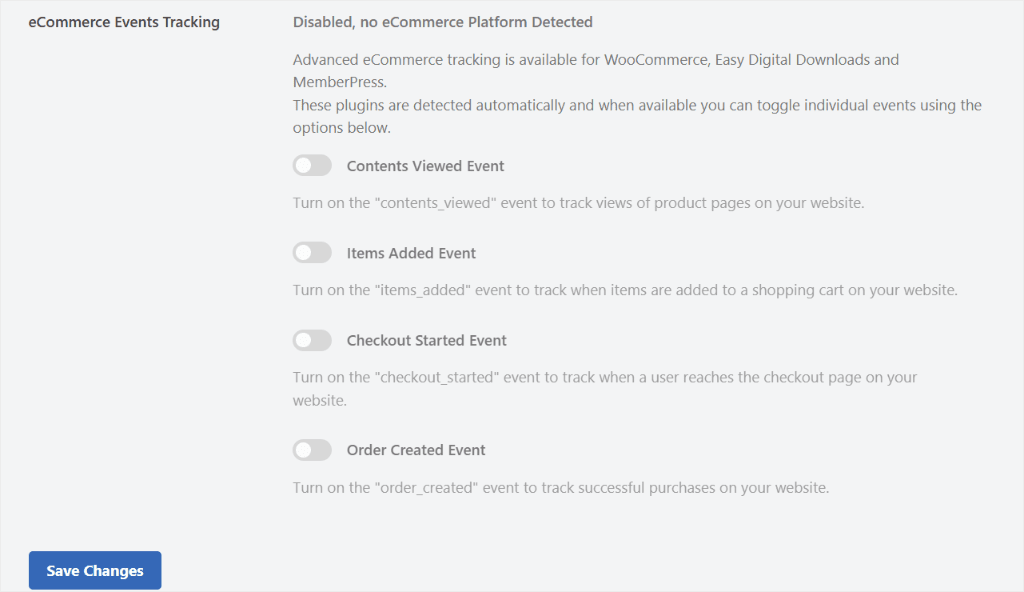
That means no new setup flow to learn. If you’ve configured any other pixel here, this one works the same way.
Pack or Single Snippet? Here’s How to Choose
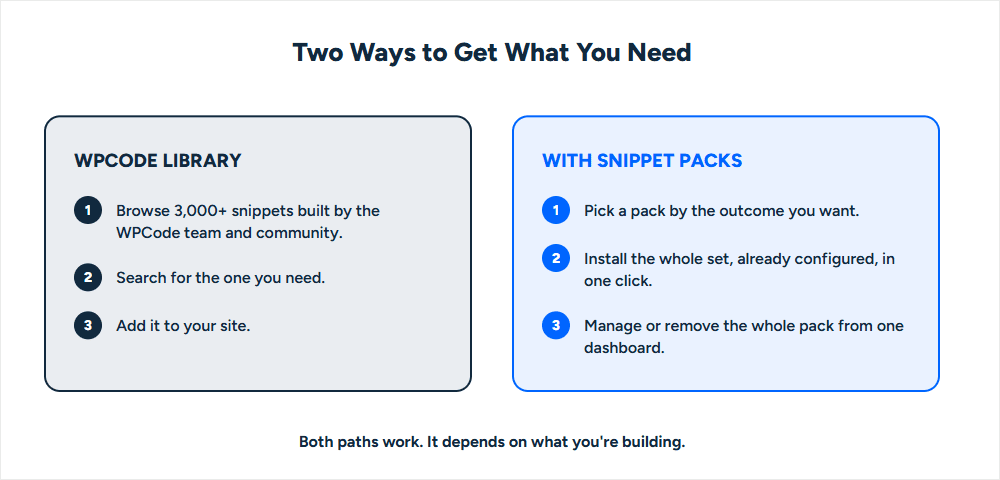
The good thing about WPCode is its flexibility. Already know the one snippet you need? Grab it from the WPCode Library. Solving a whole outcome at once? That’s what a Pack is for. Here’s how to tell which one fits.
| Feature | Snippet Packs | The WPCode Library |
|---|---|---|
| Best for | Solving a whole outcome in one step | Adding one specific snippet you already know you need |
| Scope | A curated set built around one job | Exactly the snippet you picked, nothing more |
| Installing | One click installs the whole set | One click installs the snippet you chose |
| Managing | One dashboard, toggle any snippet in the set | Manage it like any other snippet in your list |
That covers when to use each. Here’s how each path looks at a glance.
Here’s All It Takes to Get Started
All you have to do is:
✅ Go to Code Snippets → Add Snippet → Snippet Packs
✅ Browse by category or search for the outcome you want
✅ Install a pack and review the snippets it added
✅ For OpenAI ads, go to Code Snippets → Conversion Pixels → OpenAI and add your Pixel ID
Running ads on OpenAI with WooCommerce or EDD? The eCommerce events light up once WPCode detects your store.
What’s Coming Next?
This is the first run of Snippet Packs, and more are on the way.
With more than 3,000 snippets already in the library and new ones added regularly by our team and the community, we have plenty to build from. We’ll keep adding new packs around the tasks WordPress users tackle every day.
If there’s a workflow you find yourself repeating, we’d love to hear about it. Your feedback helps shape what we build next.
In the meantime, give Snippet Packs a try and let us know which ones save you the most time. They’re available in both WPCode Lite and WPCode Pro.
Already using WPCode?