
TL;DR:
To find and replace URLs after a WordPress migration, install Search & Replace Everything by WPCode. Enter your old and new URLs, choose which database tables to scan, and preview every change before it runs. The plugin handles serialized database data automatically and lets you undo the entire operation with one click if anything looks wrong.
After you move a WordPress site, things look fine at first. Then you start clicking around, and you realize that images don’t load. To make it worse, internal links send visitors to your old address while your theme settings still point to a URL that no longer exists.
This is because WordPress can store your old URL across hundreds or thousands of database rows. Post content, image paths, site settings, plugin data. All of it. Moving the files doesn’t fix the database. You have to update it separately.
This might sound complicated at first, but with the right approach, even a beginner can migrate their WordPress site without broken links and images. And that is the goal of this tutorial.
We’ll show you three ways to do it. One gives you a visual preview before making any changes and lets you undo in one click. Two others work well but carry more risk if something goes wrong.
Key Takeaways
- Search & Replace Everything by WPCode shows you a preview of every change before it writes to your database.
- Always back up your database before running any search and replace, no matter which method you use.
- The three tables that hold most of your URLs are wp_posts, wp_postmeta, and wp_options.
- We recommend adding –precise when using WP-CLI. It handles serialized PHP data safely. Skip it and arrays can break silently.
- Raw SQL (Method 3) does not unpack serialized data. Use it only for the site URL and home fields, not the full database.
When Would You Need to Replace URLs in WordPress?
Not every situation calls for a full database search and replace. Here is when it does, and when it doesn’t.
| Situation | Replace URLs? |
|---|---|
| Moved from HTTP to HTTPS | Yes |
| Changed domain name (e.g., oldsite.com to newsite.com) | Yes |
| Moved from a staging server to live | Yes |
| Changed subdomain (e.g., staging.site.com to site.com) | Yes |
| Migrated from localhost to a live server | Yes |
| Your domain did not change | No |
| You are testing on staging with no URL change | No |
| You want to update the guid column in wp_posts | No (WordPress convention is to leave this alone) |
Which Database Tables Store Your URLs?
As mentioned, WordPress stores data across many database tables. Not all of them contain URLs. Knowing which ones do, and which to leave alone, is what keeps a search and replace safe.
Here are the three tables that matter most for URL replacement after a migration.
- wp_options stores your site URL, home URL, theme settings, widget data, and plugin configuration. This is where WordPress looks first when loading your site.
- wp_posts holds all your post and page content, including URLs embedded in the body, image links in your content, and menu items.
- wp_postmeta stores custom fields, featured image paths, and SEO plugin data like meta descriptions and Open Graph URLs.
In most cases, running a search and replace on these three tables covers a full migration cleanup.
⚠️ Always back up your database before running any search and replace. Duplicator or your host’s built-in backup tool both work. A backup takes two minutes. Fixing a broken database without one takes much longer.
Before You Start
One thing to check before you start is your table prefix.
By default, WordPress uses wp_. But many sites use something different (set during installation or by a hosting provider). If you run a search and replace with the wrong prefix, it touches the wrong tables entirely.
We will show you what this looks like in the plugin in a moment. Before running a search and replace, take two minutes to cover these:
- Back up your database. Use Duplicator or your host’s backup tool. Every method here writes directly to the database. A backup is your only way back if something breaks.
- Know your old and new URLs exactly. Including protocol (http or https) and whether www is included. Mismatches mean the replacement finds nothing or changes the wrong thing.
- For Method 1: Install Search & Replace Everything from Plugins → Add New for the free version, or activate the WPCode Bundle for the full preview and undo features used in this tutorial.
- For Method 2: You need SSH access to your server and WP-CLI installed.
- For Method 3: You need database access through phpMyAdmin, available in most cPanel or Plesk hosting dashboards.
Here is a table of contents so that you can skill to the exact method you want to use.
Method 1: Search & Replace Everything by WPCode (Recommended)

Search & Replace Everything by WPCode is the safest approach to find and replace your WordPress URLs in your database.
You get a visual preview of every row that will change before anything is written to the database. And if something looks wrong after it runs, you can undo the entire operation with one click.
Search & Replace Everything has a free version available directly from WordPress.org. It handles basic text and URL replacements.
The full preview interface, history log, and undo capability are part of the WPCode Bundle or as a standalone plugin.
Step 1: Get the Plugin
For this tutorial, we will use the premium version of WPCode search and replace so that we can show you everything it can do.
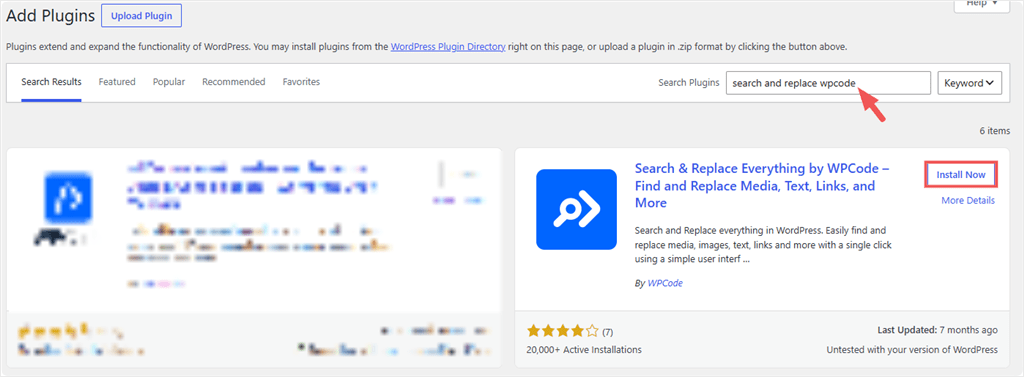
But if you want the free version, go to Plugins → Add New in your WordPress dashboard. Here, search for “search and replace WPCode.” Once you locate it, click Install Now and activate it.
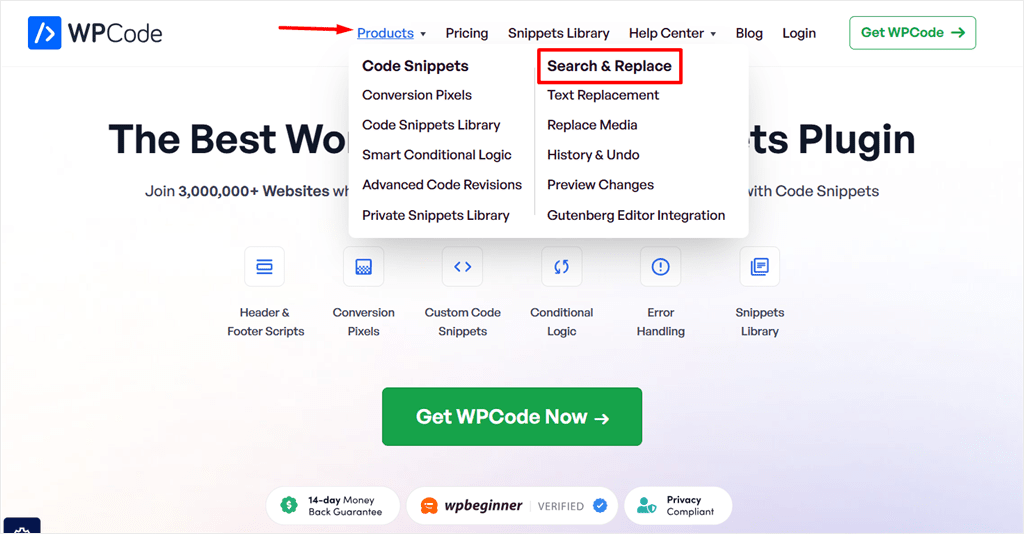
For the Pro version, go to wpcode.com and open the Products menu. You will see Search & Replace listed there. Click it to go to the feature page and pricing options.
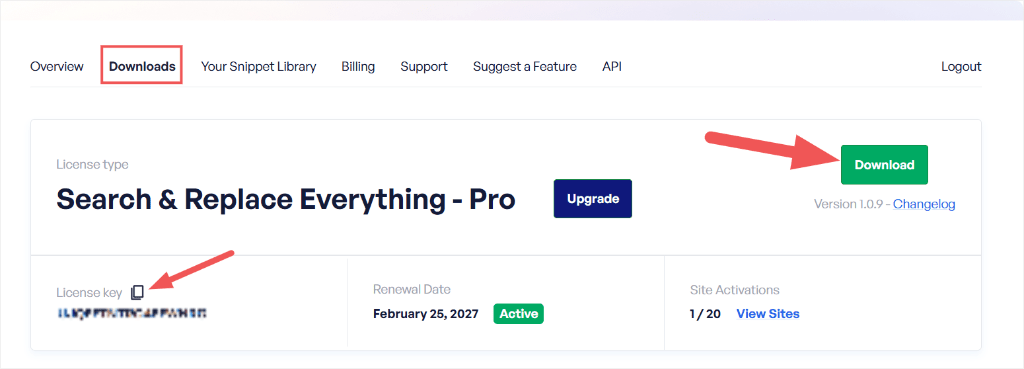
After purchasing, log in to your WPCode account dashboard and go to the Downloads tab. Download the plugin zip file from there. While here, also copy your License Key, which you will use to activate the pro version.
Back in WordPress, go to Plugins → Add New → Upload Plugin. Upload the zip file and activate it. If you need help with this step, we have a full guide on installing WPCode plugins.
Step 2: Activate Your License Key
After activating the plugin, go to Tools → WP Search and Replace in your WordPress admin and click the Settings tab. Remember the code you copied earlier? Paste your license key into the License Key field and click Verify Key.
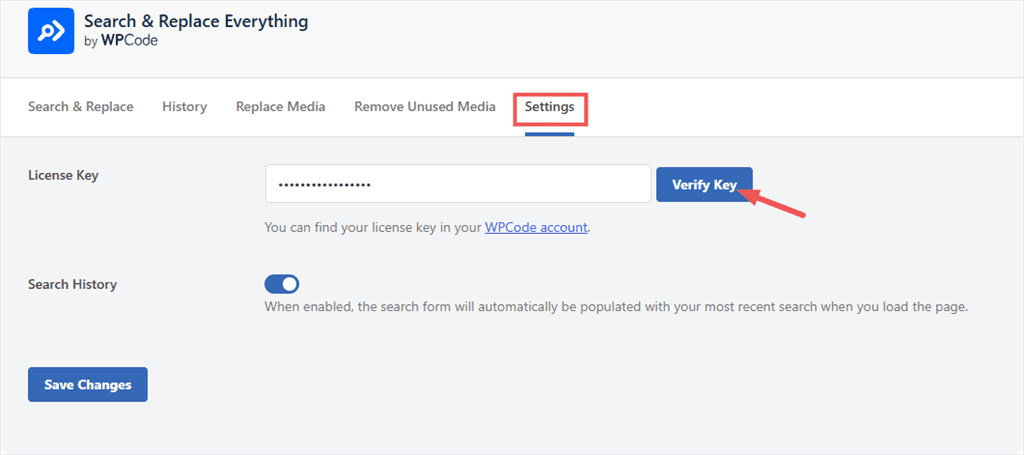
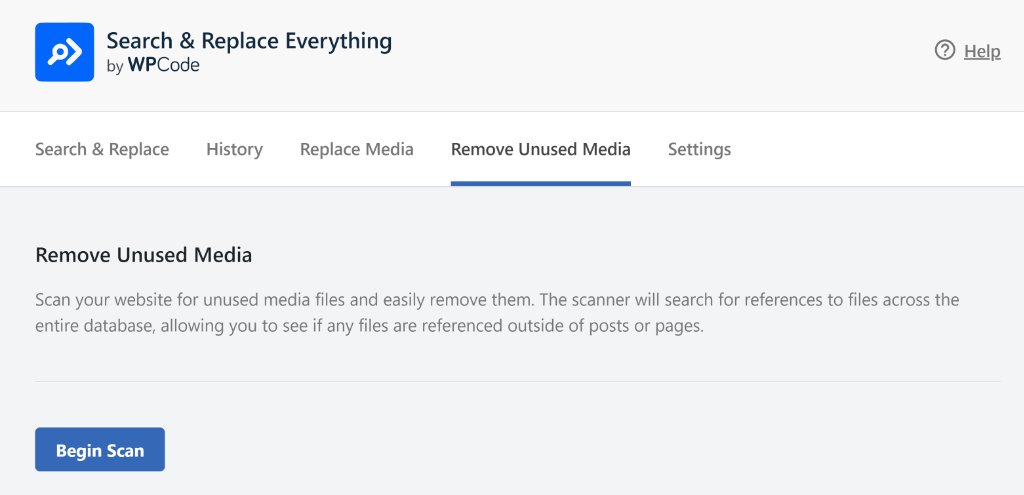
Once verified, you have access to the full plugin interface: Search & Replace, History, Replace Media, Remove Unused Media, and Settings.
You are now ready to replace your URLs after migration.
Step 3: Enter Your Old and New URLs
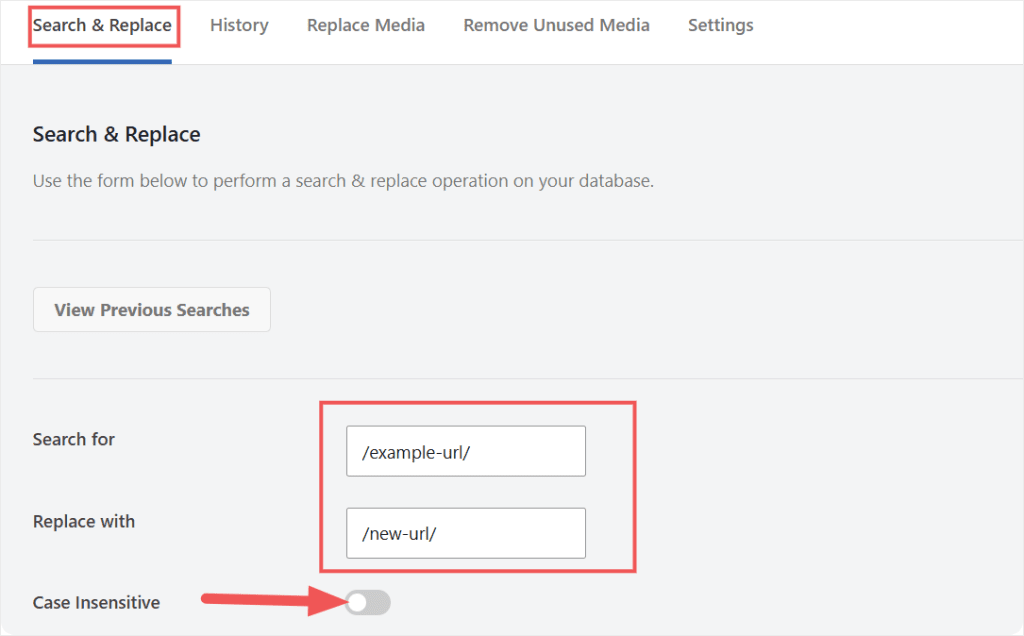
Click the Search & Replace tab. Enter your old URL in the “Search for” field and your new URL in the “Replace with” field.
As mentioned, it is very important to get the format right.
So, if your old site used http://oldsite.com without www, search for exactly that. If there was a trailing slash, include it. A mismatch means the replacement finds nothing, or finds the wrong thing, and replaces more than you intended.
Just below the URL text section, you can make the search case sensitive using a toggle button.
Step 4: Choose Which Tables to Scan
Note on table names: WordPress adds a prefix to every table name. The default is wp_. But many sites use a custom prefix for security. Your tables might be named wp_abc123_posts instead of wp_posts.
🛡️ Search & Replace Everything detects your prefix automatically. You do not need to type it yourself. But it helps to know what your tables are called before you start, so you can confirm you are selecting the right ones.
Want to confirm your WordPress table names before you proceed? Expand to see 👇
Method 1: Check wp-config.php (fastest)
The wp-config.php file holds your site’s core settings. Your table prefix is stored there.
- Log in to your hosting account and open your file manager. Or connect via FTP.
- Open your WordPress root folder. It is usually named
public_html. - Find and open
wp-config.php. - Look for this line around line 65:
$table_prefix = 'wp_';
Whatever is inside the quotes is your prefix. If it reads wp_abc_, your posts table is wp_abc_posts , and your postmeta table is wp_abc_postmeta.
Method 2: Check phpMyAdmin (visual)
- Log in to your hosting account and open phpMyAdmin.
- Click your WordPress database name in the left sidebar.
- Look at the table list.
- Find the entry ending in
_posts. The text before_postsis your prefix.
Once you know your prefix, you will recognize your tables immediately in the plugin’s selector.
Below the search fields, you will see a two-panel table selector. The left panel shows Available Tables. Click any table to move it into the right panel: Tables to Include.
You can also use Select All to add every table at once (we explain when this is and isn’t safe below).
For any URL replacement, select wp_posts, wp_postmeta, and wp_options. wp_options stores your site URL and home URL. Both change whenever your domain or protocol changes.
If you are only moving from HTTP to HTTPS on the same domain, wp_posts and wp_postmeta are usually enough. If these tables are not named like this in your WordPress site, first confirm what they are called before proceeding.
Notice in the screenshot that the table prefix is wpq8_ rather than the default wp_. That is a custom prefix. Whatever yours is, the plugin detects it automatically. You do not need to change anything.
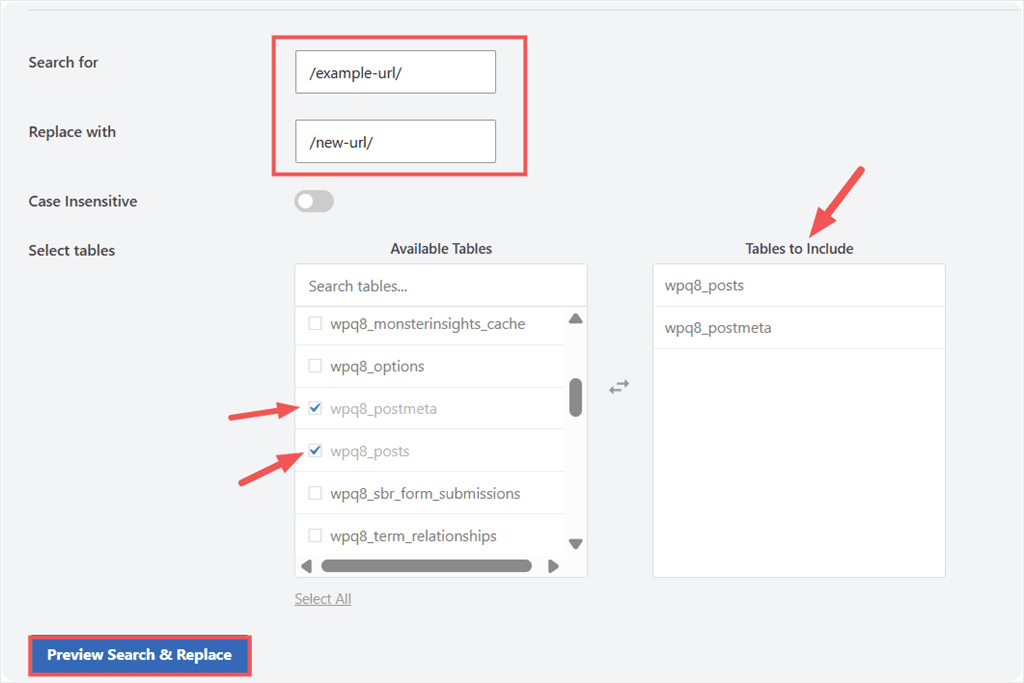
Click Preview Search & Replace when you are ready.
wp_posts and wp_postmeta cover the content of your site. But some migrations need a few additional tables.
⚠️ (For Advanced Users) Here is when to add each one: 👇
wp_options: add this whenever you change your domain
- This table stores your site URL and home URL. These two values tell WordPress where your site lives.
- If you are moving to a new domain and skip this table, WordPress will redirect every page back to the old domain. Your content will be updated. Your site will still point to the wrong place.
🔵If you are changing domains, wp_options is not optional. Include it alongside wp_posts and wp_postmeta.
wp_comments: add this to clean up comment URLs
- This table stores every comment left on your site. If readers left links pointing to your old domain, the references live here.
- In most cases, old comment URLs do not cause visible problems after migration. Your site will still function.
- Add
wp_commentsonly if you want a fully clean database with no traces of the old domain.
wp_usermeta: add this for user profile data
- This table stores information about your registered users. Some themes and plugins save a user’s website URL or avatar link here.
- This is rarely needed for a standard migration. Add
wp_usermetaonly if your authors or users have old domain URLs stored in their profiles.
Why not just select all tables? Plugins like Elementor and Divi store their layouts as serialized data. This is a compressed format where the character count matters. A plain text replacement on a serialized string can corrupt the structure and cause layouts to disappear.
✅ WPCode Search & Replace Everything handles serialized data correctly. The plugin understands WordPress data formats and replaces safely. This is also why selecting all tables is safe with this plugin. It understands serialized data, so no table is off-limits.
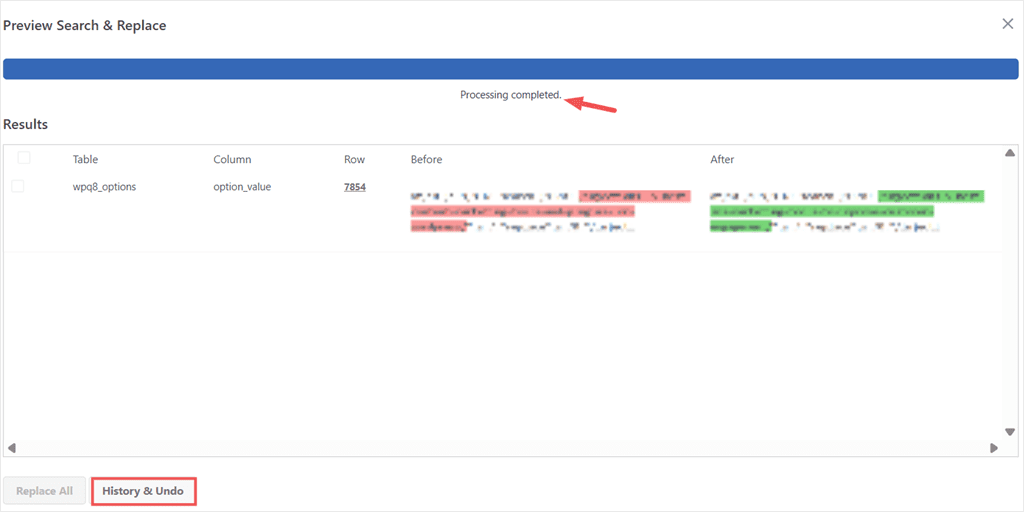
Step 5: Review the Preview
Next, the preview scans your selected tables and shows you every row that will change. For each result, you see the table name, the column, the row number, and a side-by-side view: old URL highlighted in red, new URL in green.
Check every row. If you see a table or column you did not expect, close the preview and adjust your table selection before continuing.
For a faster process, you can also use the checkboxes on the left to deselect individual rows if you want to skip specific entries.

This is the step no other method gives you. WP-CLI shows you a count while SQL shows you nothing. WPCode Search & Replace Everything shows you the actual rows, in plain text, before anything changes.
Step 6: Run the Replacement
Click Replace All, and a confirmation popup appears. Confirm it, and the replacement runs.
When it finishes, you will see “Processing completed” at the top of the preview panel. A History & Undo button appears at the bottom.
Step 7: Undo If Anything Looks Wrong
Click History & Undo to open the History tab. You will see a log of every search and replace you have run: what was searched, what replaced it, who ran it, and the exact timestamp.
Each row has a Preview button to view the changes again and an Undo button to reverse the entire operation instantly.
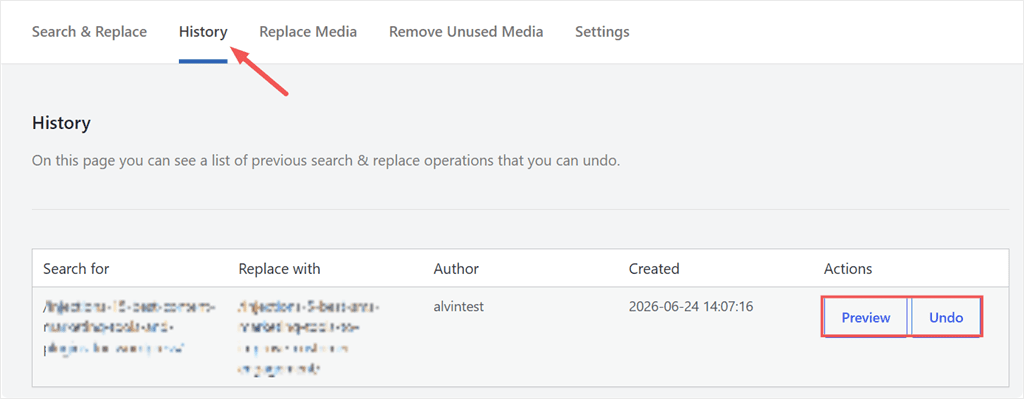
This is very important, especially for beginners. It allows you to rectify any errors you may have made in a visual and easy way.
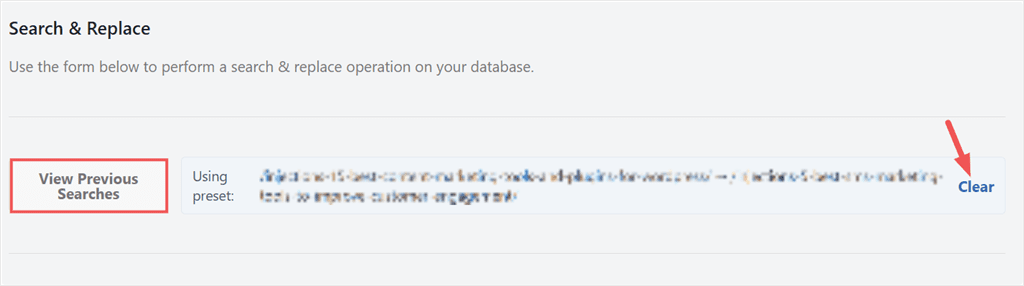
Bonus: View Previous Searches
At the top of the Search & Replace Everything screen, you will see a View Previous Searches section. It shows the last search and replace you ran: what you searched for, what you replaced it with, and which tables were included.
For multi-step migrations, this is genuinely useful. When you are replacing several URL variants across multiple passes, it is easy to lose track of where you are. Previous Searches show your last operation, so you do not duplicate a step or skip one.
What Else Can Search & Replace Everything Do
URL replacement is the most common job after a migration. But this find and replace plugin handles other tasks that come up regularly for WordPress users.
Search & Replace Text:
Fix a company name that changed, update a price across hundreds of posts, or remove a phrase that appears site-wide. We have a full guide on how to search and replace text in your WordPress database.
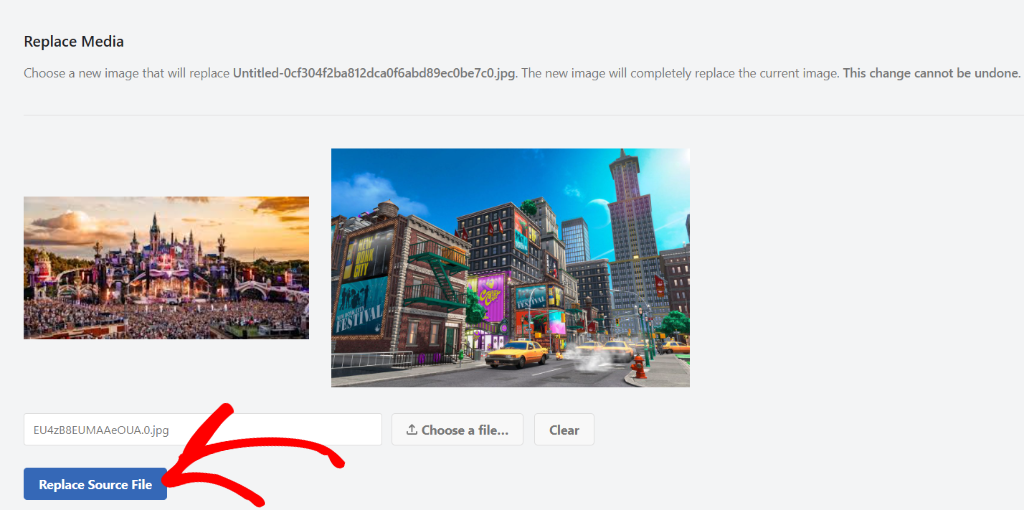
Replace Media:
Swap a logo, product image, or any media file across your entire site without touching every post it appears in. The Replace Media tab handles this directly. See our full guide on replacing images and media files with screenshots.
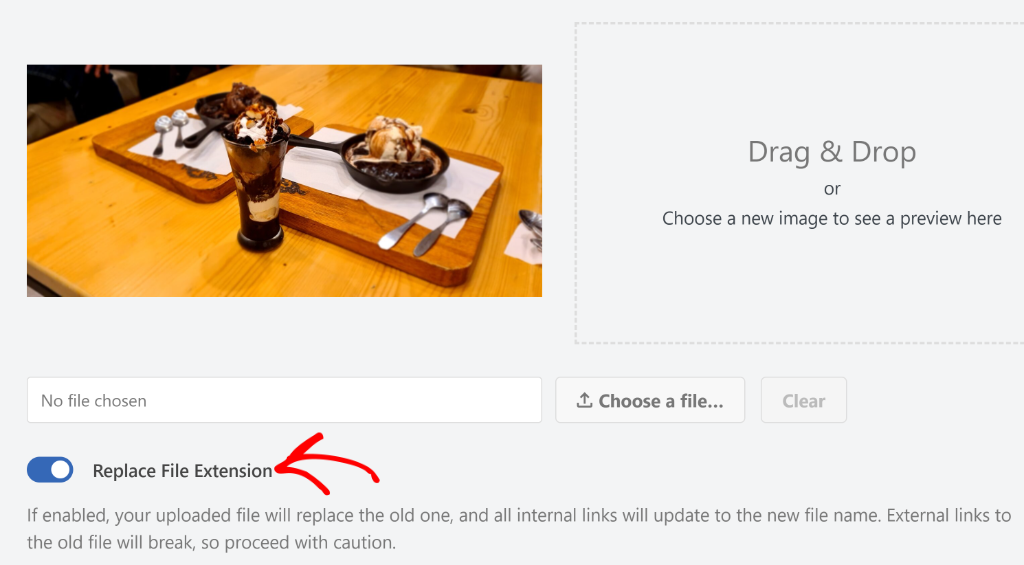
Convert Image File Extensions:
If you have converted your images to WebP for performance, the database still references the old file extensions. The plugin updates every reference in one pass. Here is how to replace image file extensions across your WordPress site.
Remove Unused Media:
Over time, deleted or replaced images stay sitting in your media library, taking up storage. The Remove Unused Media tab scans your database, finds orphaned files, and lets you delete them safely. See our guide on deleting unused images from your media library.
Method 2: WP-CLI (Command Line)
Who this is for: Site owners or developers with SSH access to their server. If you are not sure what SSH means, skip to Method 3 or use Method 1 above.
WP-CLI is a command-line tool for managing WordPress without a browser. Its search-replace command runs directly against the database, with no plugin required. It is fast and handles large databases well.
You can also access WP-CLI through your VPS via SSH, or through your hosting panel’s built-in terminal.
Hostinger, cPanel hosts, and most managed WordPress hosts include a terminal directly in the dashboard. If you are developing locally, tools like Local by Flywheel also include WP-CLI out of the box.
Always start with a dry run. This shows you what would change without writing anything:
wp search-replace 'https://oldsite.com' 'https://newsite.com' --dry-run
Review the output. When you are satisfied, run the actual replacement:
wp search-replace 'https://oldsite.com' 'https://newsite.com' --skip-columns=guid --precise
Two flags matter here:
--preciseunpacks PHP serialized data safely before replacing. Without this, serialized arrays can break.--skip-columns=guidleaves the guid column in wp_posts untouched. WordPress convention is not to change GUIDs after a post is published.
There is no built-in undo. The dry run is your safety check. If you skip it and something breaks, your backup is your only fallback.
Method 3: SQL via phpMyAdmin
Who this is for: Users who have database access through their host’s control panel (cPanel, Plesk) but no SSH and no plugin installed.
⚠️ Read this before running anything.
Standard SQL REPLACE() does not handle PHP serialized data. Widget settings, theme customizer data, and many plugin option rows are stored as serialized PHP arrays. A raw SQL replace on these rows can corrupt them silently.
Your site will not throw an obvious error, but it will just behave strangely.
Back up your database first. Then run these queries in phpMyAdmin’s SQL tab, one at a time:
UPDATE wp_options
SET option_value = replace(option_value, 'https://oldsite.com', 'https://newsite.com')
WHERE option_name = 'home' OR option_name = 'siteurl';
UPDATE wp_posts
SET post_content = replace(post_content, 'https://oldsite.com', 'https://newsite.com');
⚠️ We intentionally leave out a wp_postmeta query here. Elementor, ACF, WooCommerce, and most SEO plugins store serialized data in this table. Raw SQL cannot unpack it safely. If you need to update postmeta values, use Method 1 instead.
Remember to replace wp_ with your actual table prefix before running. If your prefix is wpq8_, the first table becomes wpq8_options, and so on.
There is no preview, and no undo. If something breaks, your backup is the only way back.
Tips and Best Practices
Back up before you start. Every method here writes directly to your database. A backup from Duplicator or your hosting control panel gives you a clean restore point if anything goes wrong.
Match the exact URL format. Search and replace finds what you tell it to find. If your old site used http:// without www and you search for https://www., you will find nothing, or the wrong thing. Run separate passes for each URL variant your site has.
Check wp-config.php after running. If your site has WP_SITEURL or WP_HOME hardcoded in wp-config.php, the database change will not stick. WordPress overrides it on every page load. Remove or update those lines after the replacement.
Flush your cache. Cached pages still show old URLs until the cache clears. Flush it manually from your caching plugin after the replacement runs.
Run a broken link scan after migration. Even after a full replacement, some URLs can slip through, particularly in image attributes or custom field values. A broken link scan catches anything the replacement missed.
Troubleshooting
Images are still broken after the replacement. First, flush your cache. Then check whether your old site used both http:// and https:// versions of the URL. You may need a second pass for the other variant.
The WordPress admin login is broken after migration. Check wp-config.php for hardcoded WP_SITEURL or WP_HOME values pointing to the old domain. Update or remove those lines.
Widget settings or theme options look wrong after using SQL. This is serialized data corruption from Method 3. Restore from your backup and run the replacement again using Search & Replace Everything, which handles serialized data correctly.
I replaced the wrong URL. If you used Search & Replace Everything, go to the History tab and click Undo. The reversal is instant. If you used WP-CLI or SQL, your backup is your restore point.
Some URLs are still pointing to the old domain after running. Run a second pass. Check for URL variants: www vs non-www, http vs https, trailing slash vs no trailing slash. Each counts as a different string and needs its own replacement pass.
Frequently Asked Questions
Do I need to replace URLs if I only moved from HTTP to HTTPS?
Yes. WordPress stores the full URL, including http://, in the database. After moving to HTTPS, old http:// references in post content, images, and settings need updating. Without this, browsers will flag your site for mixed content, and some assets will not load.
What happens if I skip URL replacement after a migration?
Broken images, dead internal links, and, in some cases, a broken login page. Your SEO tools will also encounter URLs that return 404 responses instead of the content they expect, which signals crawl errors to search engines.
Is it safe to select all tables when running a search and replace?
It depends on the tool. Search & Replace Everything handles serialized data correctly, so selecting all tables is safe with that plugin. With raw SQL, selecting all tables is not recommended. The REPLACE() function does not unpack serialized arrays and can corrupt theme and plugin data stored in those formats.
Can I undo a search and replace in WordPress?
With Search & Replace Everything, yes. The History tab logs every operation, and the Undo button reverses it instantly. With WP-CLI or SQL, there is no built-in undo. Your backup is your only fallback.
Do I need to update my .htaccess file after replacing URLs?
Not for the URL replacement itself. But if you moved from HTTP to HTTPS, you will want a redirect rule in .htaccess to send all HTTP traffic to HTTPS automatically. Your host may handle this, or you can add the rule without editing the file directly.
Replace Migration URLs Safely with Search & Replace Everything by WPCode
You now have a clean database. Old URLs are gone. Your images load, your internal links point to the right place, and you have a full history log of every change that ran.
That is the part most migration tutorials skip. They get you moved. But they leave you with a database still pointing at a domain that no longer exists. This is the cleanup step that makes the move permanent.
And if something went sideways, you are not stuck. Search & Replace Everything logs every operation. One click in the History tab, and it is undone. No SQL, no manual rollback, no panic.
Next time you need it (another domain change, a staging-to-live push, or a company rename across 300 posts), the same workflow applies. Run the preview. Confirm the rows. Click Replace All.
Get Search & Replace Everything → | Try Search & Replace Everything for Free →
Additional Resources
Now that your URLs are sorted, here is what to tackle next with WPCode.
- How to Replace Images and Media Files in WordPress: Swap an image across your entire site in one step using the Replace Media tab inside the same plugin.
- Learn how to Delete Unused Images from WordPress Media Library: Clean up leftover media files from the migration with a single scan and one-click removal.
- How to Keep Your Website Customizations Intact with WPCode: Protect your site edits so the next update or migration does not wipe them out.

