
Imagine someone finds your website through a Google search, clicks the link, and lands on a page that just says “404 – Page Not Found.” No explanation, no helpful links, just a dead end. Chances are, they hit the back button and never come back.
I’ve seen this happen on so many WordPress sites, including my own, early on. A blog post gets deleted, a URL changes, or someone just types something wrong in the address bar. Whatever the reason, visitors end up lost, and you lose a potential reader, customer, or subscriber.
The good news is that you can fix this really easily. You can set up redirects for 404 error pages to your homepage, so nobody gets stuck in a dead end on your site.
In this guide, I’ll show you how to automatically redirect 404 error pages to your homepage in WordPress.
What Is a 404 Error Page (and Why Should You Care)?
A 404 error is what happens when someone visits a URL on your website that doesn’t exist. Maybe you deleted an old post, changed a page’s URL, or someone typed your web address incorrectly. WordPress shows them a “404 – Page Not Found” message instead.
By default, that page isn’t very helpful. Most visitors have no idea what to do when they see it. They didn’t come to your site to get an error message, so they leave.
Here’s why that’s a problem worth solving:
- You lose visitors. Someone who hits a 404 page is very likely to leave your site entirely. That’s a missed opportunity, whether they were a potential customer, a new reader, or someone who might have subscribed to your email list.
- It might hurt your SEO. Having broken links and missing pages is a real issue worth addressing, but Google actually recommends leaving genuine 404 pages returning a proper 404 status code if you don’t have a relevant page to send visitors to. Redirecting everything to the homepage can confuse search engines and waste your crawl budget. The best SEO move is to fix the root cause: either by restoring the page, setting up a targeted redirect to a genuinely relevant URL, or simply letting the 404 stand.
- It creates a frustrating experience. Even if your site is great, a confusing error page leaves a bad impression. Redirecting visitors to your homepage at least gives them a starting point to keep exploring.
Redirecting 404 pages to the homepage is a simple fix that makes your site feel more polished and keeps visitors from bouncing the moment something goes wrong.
That said, let’s look at how you can redirect users from a 404 error page to your homepage automatically.
How to Automatically Redirect 404 Pages to Homepage
There are a few ways to handle 404 redirects in WordPress, but most of them involve editing server configuration files or digging into your theme’s code. That’s a lot to ask if you’re not a developer.
The easiest and safest way I’ve found is using WPCode. It’s the best WordPress code snippets plugin out there, and it lets you add custom functionality to your site without touching any theme files or risking breaking something.
WPCode has a built-in library of over 140 ready-to-use code snippets, including one for redirecting 404 pages. Each snippet can be turned on or off with a single toggle, so if you ever want to undo the change, it takes just a second.
It also has a built-in error safety net. If a snippet causes any kind of issue on your site, WPCode automatically deactivates it to prevent any damage. That peace of mind alone makes it worth using.
A quick note before diving into the tutorial: Redirecting all 404s to the homepage is a common practice, but it’s worth knowing that SEO experts, including Google, generally don’t recommend it as a blanket approach.
When crawlers hit a homepage instead of the URL they were looking for, they may classify it as a “soft 404,” which can send confusing signals. If you have specific deleted or moved pages, a targeted redirect to a relevant URL is the better SEO choice. That said, for small blogs and simple sites where you’d rather visitors land somewhere useful than hit a dead end, the homepage redirect is a reasonable fallback.
Now let’s walk through the steps.
Step 1: Install and Activate WPCode
First, you need to install the WPCode plugin on your WordPress site.
For this tutorial, I’ll be using WPCode Lite, which is all you need to redirect 404 pages. There is also a WPCode Pro version with more advanced features like cloud snippet storage, AI code generator, track code changes and restore revisions, and conversion pixels.
To get started, go to your WordPress dashboard and click on Plugins » Add New Plugin in the left menu. In the search bar, type “WPCode” and press enter.
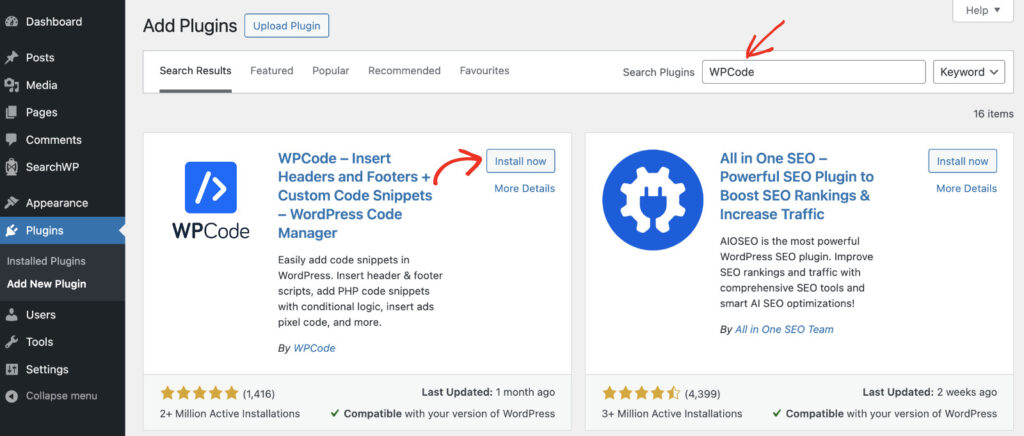
When WPCode shows up in the results, click the Install Now button next to it. Once it finishes installing, click Activate.
If you’ve never installed a plugin before and want a little more guidance, check out this beginner’s guide on how to install a WordPress plugin.
Step 2: Add the 404 Redirect Snippet
Now that WPCode is active, it’s time to set up the redirect.
Go to Code Snippets » Add Snippet in your WordPress dashboard. This will take you to WPCode’s snippet library, where you can browse or search for ready-made code snippets.
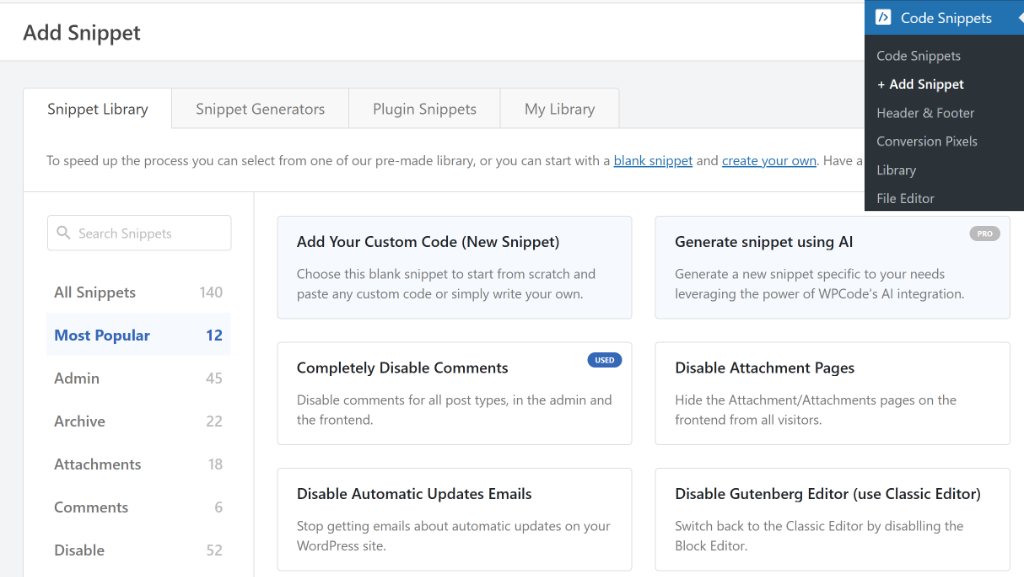
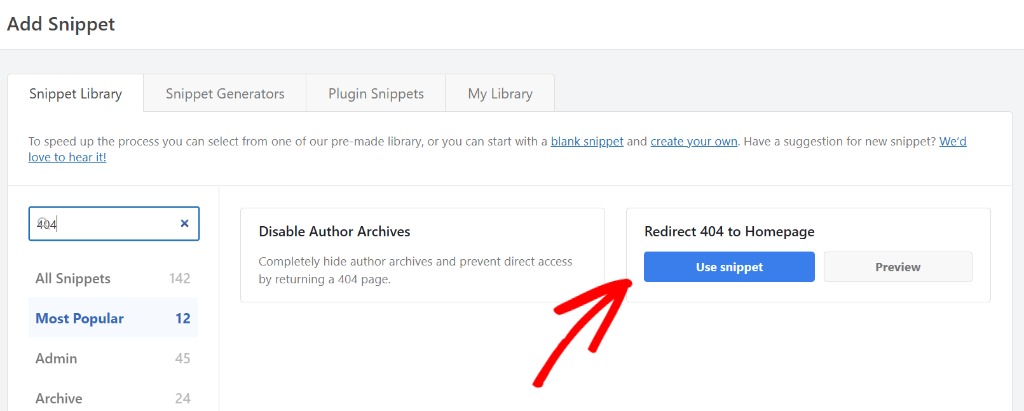
In the search bar on the left, type “404” to find the redirect snippet.
Look for the snippet called “Redirect 404 to Homepage” and click the Use snippet button next to it.
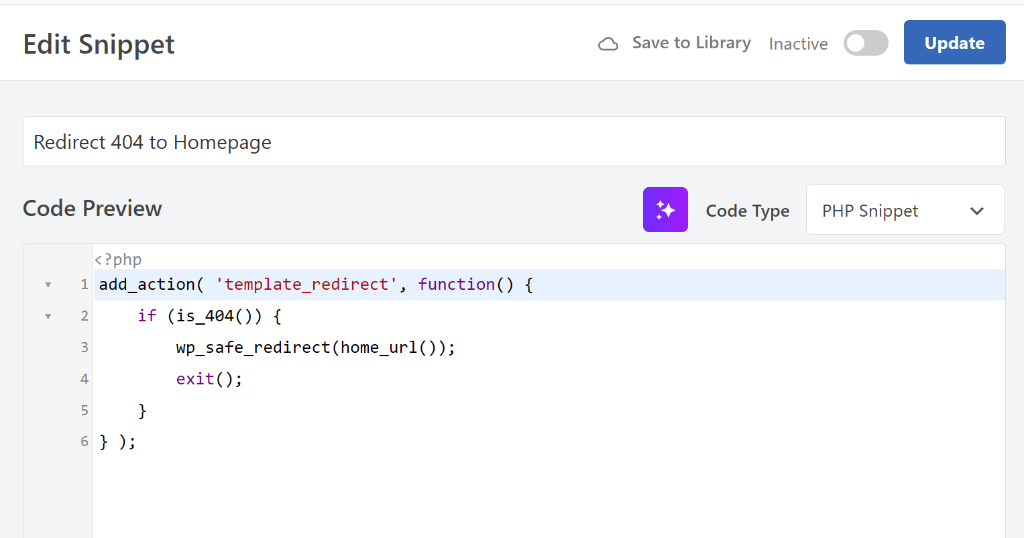
WPCode will load the snippet directly into the code editor. You don’t need to change anything inside the code itself.
It’s already set up to detect when someone hits a 404 error page and automatically send them to your homepage.
Next, you can scroll down a bit to the Insertion section. Here you can see how and where WPCode will run the snippet.
By default, it’s set to Auto Insert and configured to run on the Frontend Only, which is exactly what you want for a 404 redirect.
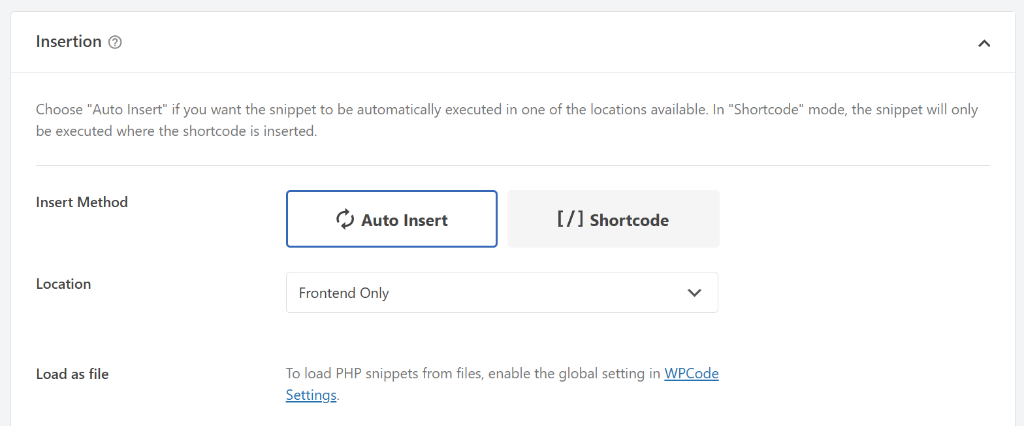
You don’t need to change any of these settings. WPCode handles the placement automatically, so the redirect will work across your entire site without you having to configure anything else.
Step 3: Activate the Snippet and Test It
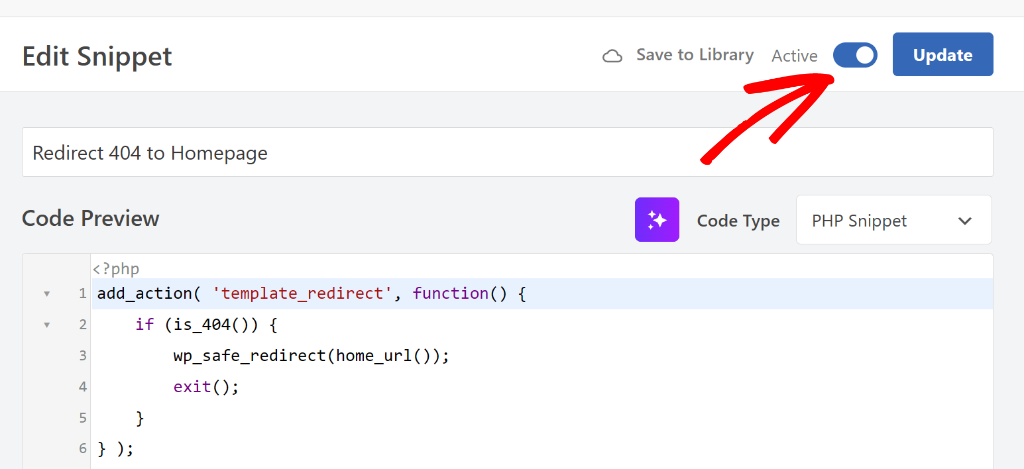
Now scroll back to the top of the page. You’ll see a toggle near the top-right that says “Inactive”. Click it to switch the snippet to Active.
Once you’ve done that, click the Update button to save your changes.
That’s it! The redirect is now live on your site. But let’s make sure everything is working correctly.
To test it, open a new browser tab and visit your website with a URL that doesn’t exist. For example, if your site is yourwebsite.com, try going to something like yourwebsite.com/this-page-does-not-exist.
Instead of seeing a 404 error page, you should land on your homepage. If that’s what happens, the redirect is working perfectly.
Bonus: A Note on When to Use a Custom 404 Page Instead
Redirecting 404 errors to the homepage is a great solution for most WordPress sites, especially smaller blogs and business sites where simplicity matters.
For the best SEO results, targeted redirects to relevant pages, not homepage redirects, are what Google recommends.
That said, if your site has a lot of content, such as a large online store or a publication with hundreds of articles, you might want to consider creating a custom 404 page instead of a redirect.
A well-designed 404 page with a search bar and some popular links gives visitors more options and can actually help them find what they were originally looking for.
You can also use All in One SEO (AIOSEO) to set up more targeted 301 redirects. For example, if you changed the URL of a specific blog post, you can redirect just that old URL to the new one, rather than sending everyone to the homepage. That kind of redirect is more helpful for both visitors and search engines.
But for most beginners, the homepage redirect is a solid starting point that takes less than five minutes to set up. You can always build from there as your site grows.
FAQs About Redirecting 404 Pages in WordPress
1. Will redirecting 404 pages hurt my SEO?
It depends. Showing visitors a working page is better for user experience, but from a pure SEO standpoint, Google actually recommends leaving genuine 404 pages as-is if you don’t have a relevant page to redirect them to. Blanket redirects to the homepage can be treated as “soft 404s” by search engines, which may waste your crawl budget. If SEO is a priority, use targeted 301 redirects from specific old URLs to closely relevant new pages, rather than sending everything to the homepage.
2. What’s the difference between a 301 and a 302 redirect?
A 301 redirect tells search engines that the page has moved permanently to a new location. A 302 redirect signals that the move is temporary. For 404 pages that are gone for good, a 301 is the right choice. It passes along the most “link value” and is what search engines like Google recommend.
3. Can I redirect 404 pages to a specific page instead of the homepage?
Yes. If you’d rather send visitors to a contact page, a sitemap, or a custom 404 page you’ve designed, you can modify the snippet in WPCode to use a different URL. Just update the destination URL in the code from your homepage to whatever page you’d like. If you’re not sure how to do that, you can always leave a comment below for help.
4. What if I only want certain 404 errors to redirect?
WPCode Pro includes a smart conditional logic feature that lets you control when and where a snippet runs. For example, you could set the redirect to only trigger for certain URL patterns. The free version redirects all 404 errors, which works well for most sites.
5. Will this slow down my website?
No. The snippet is a lightweight piece of PHP code that only runs when a 404 error is detected. It has no effect on your site’s performance during normal browsing.
I hope this guide helped you get rid of those frustrating 404 dead ends on your WordPress site. If you found this helpful, you might also want to check out our guide on how to add an author bio to your WordPress posts and how to disable WordPress update notifications.
If you run into any trouble or have questions, feel free to drop a comment below. And don’t forget to follow us on X (formerly known as Twitter) and subscribe to our newsletter for more tips and tutorials.

