
If you’ve already added the Snapchat pixel to your WordPress site, you’re off to a good start. But the base pixel alone only tracks page views. It doesn’t tell you much about what visitors are actually doing once they land on your site.
Custom event tracking fills that gap. It lets you track specific actions like button clicks, form submissions, video plays, and completed purchases. That kind of data is gold when you’re trying to figure out which Snapchat ads are actually driving real results.
The problem is that setting up custom event tracking usually means digging into code. This means that you might have to paste JavaScript snippets directly into your theme files or use Google Tag Manager.
That works, but it’s not exactly beginner-friendly. One wrong move and things can go sideways fast. But what if I told you there’s an easier way of setting up custom event tracking for the Snapchat pixel in WordPress?
In this guide, I will walk you through how to add custom event tracking for Snapchat pixel in WordPress.
Why Snapchat Custom Event Tracking Is Tricky to Set Up
If you’ve ever tried to set up custom event tracking manually, you know it can feel overwhelming.
The base Snapchat pixel does its job well. It fires on every page load and tells Snapchat that someone visited your site. But that’s about it. You have no idea if that visitor clicked your “Buy Now” button, filled out your contact form, or just bounced after two seconds.
Without custom events, your Snapchat ad campaign is basically guessing. You’re spending money without knowing what’s actually working. That makes it really hard to scale what’s working or fix what isn’t.
You’ll also notice that most guides will point you toward editing your theme’s header.php file or footer.php file to add event code.
That approach works, but it comes with real risks. If you make a typo, your site can break. And the moment you update your theme, that code is gone. You’re back to square one.
What Is Snapchat Pixel Event Tracking?
The Snap Pixel is a piece of JavaScript code that you install on your WordPress site. Once it’s running, it communicates with Snapchat’s ad platform whenever a visitor takes an action on your site. Like, whether they came from a Snapchat ad or not.
Snapchat breaks these tracked actions into two categories. Standard events are predefined actions that Snapchat already recognizes, such as purchases, sign-ups, and add-to-cart. These work well for ecommerce flows where the conversion path is fairly predictable.
Custom events are different. They let you define your own triggers based on how people actually interact with your specific site. A scroll to a certain point on the page, a click on a specific element, a form submission, a video view. These are the kinds of signals that tell a richer story about user intent.
That said, let’s look at a quick and easy way of setting up custom event tracking for your Snapchat pixel in WordPress.
Setting Up Snapchat Pixel Custom Event Tracking
Setting up custom event tracking from scratch usually means writing and placing JavaScript code manually, making sure it fires at the right moment, and maintaining it every time your site gets updated. For most WordPress site owners, that’s not a realistic option.
WPCode’s Conversion Pixel Addon takes care of all of that without touching a single line of code. You get a straightforward interface to set up your Snap Pixel, define custom events, and map them to Snapchat’s standard events, all from your WordPress dashboard.
Let’s walk through the steps.
Step 1: Install and Activate WPCode
First, you need to install and activate the WPCode plugin on your WordPress site.
Note: You will need the WPCode Plus plan or higher to access the Conversion Pixel Addon. However, WPCode also has a free version if you want to explore the plugin first.
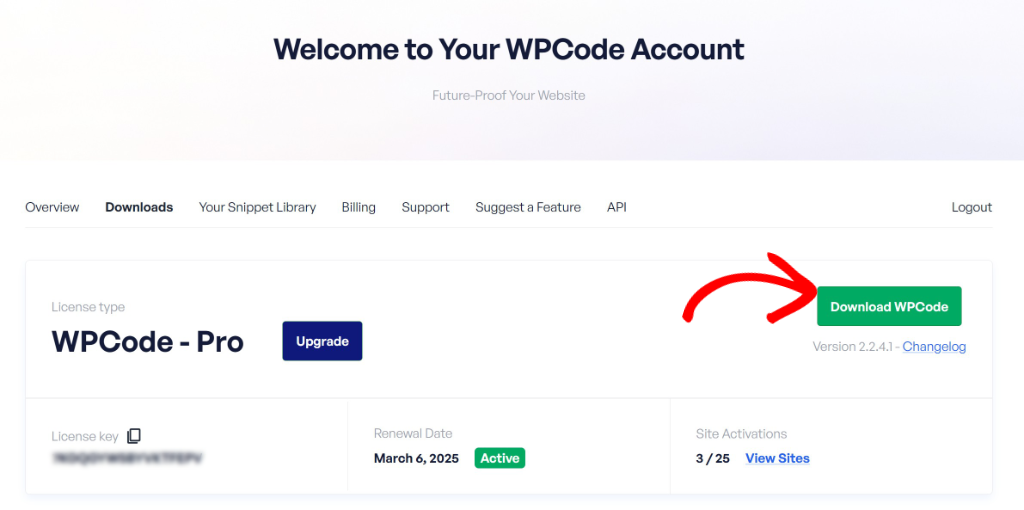
After signing up for an account, head to the ‘Downloads’ tab in your account area and click the Download WPCode button to save the plugin ZIP file to your computer.
Next, you can upload and install the plugin on your WordPress site. If you’ve never done this before, see our guide on how to install a WordPress plugin.
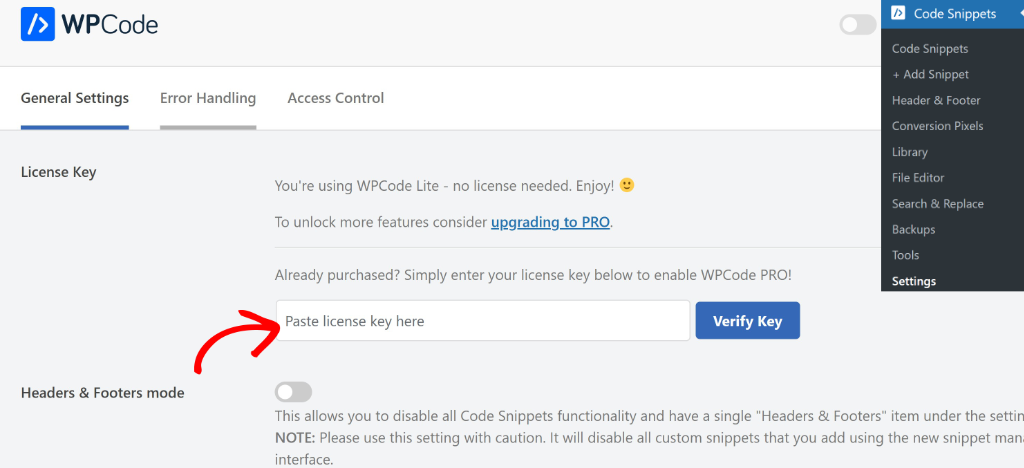
Once activated, you’ll see a new Code Snippets menu item in your WordPress dashboard.
Before you can access the Pro features, you’ll need to verify your license. Head to Code Snippets » Settings and enter your license key there.
Step 2: Install the WPCode Conversion Pixel Addon
With WPCode active, the next step is installing the Conversion Pixel Addon. Simply go to Code Snippets » Conversion Pixels from your WordPress dashboard.
You’ll see a prompt letting you know the addon isn’t installed yet. Go ahead and click the Install Addon Now button, and WPCode will take care of the rest.
Step 3: Connect Your Snapchat Pixel to WPCode
Once the addon is active, navigate to Code Snippets » Conversion Pixels. You’ll see tabs for all the supported platforms, including Facebook, TikTok, Pinterest, Snapchat, and Google.
First, you’ll need to switch to the Snapchat tab.
Here you’ll need to enter your Snap Pixel ID. You can find this inside your Snapchat Ads Manager under Events Manager. Once you’ve entered your Pixel ID, click Save Changes.
If you haven’t set up your Snap Pixel yet, see our guide on how to install the Snapchat Pixel in WordPress, which walks you through the full setup process.
Step 4: Set Up Your Custom Event
Now for the part that makes all the difference. Go ahead and click on the Custom Events tab at the top of the Conversion Pixels page.
This is where you’ll create and manage all your custom tracking events.

Start by giving your event a descriptive name. Something specific, like “Pricing Page Scroll 50%” or “Product Video View,” works better than something generic like “Event 1.”
There’s also an optional value field if you want to assign a monetary or score-based value to the event, which can be useful for measuring return on ad spend.
Next, you can choose a trigger for your event. A trigger is the specific action that causes the event to fire. WPCode gives you several options to work with:
- Home Page — fires the event when a visitor lands on your homepage, useful for tracking top-of-funnel interest from your Snapchat ads.
- Page Scroll Depth — fires the event when a visitor scrolls to a specific percentage of the page, useful for identifying engaged readers on long-form content or sales pages.
- Post Type — fires the event when someone visits a specific post type on your site.
- Click on HTML Link — tracks when a visitor clicks any link on your page, great for monitoring outbound clicks or internal navigation patterns.
- Email Link — fires when someone clicks an email address link on your site.
- Embedded Video View — tracks when someone watches a video embedded on your site, which pairs well with Snapchat’s video-heavy ad formats.
- Filling Out a Form Field — triggers when a visitor starts interacting with a form field, letting you track intent even before a form is fully submitted.
- Mouse Over CSS Selector — triggers when a visitor hovers over a specific element, a good signal of interest even without a click.
- Click on HTML Element — fires when a visitor clicks a specific element on your page, like a button, image, or link.
- WPForms Form Submission — tracks when a visitor successfully submits a WPForms form, ideal for tracking leads.
- Number of Page Visits — fires the event after a visitor has viewed a certain number of pages on your site, a strong signal of high engagement and purchase intent.
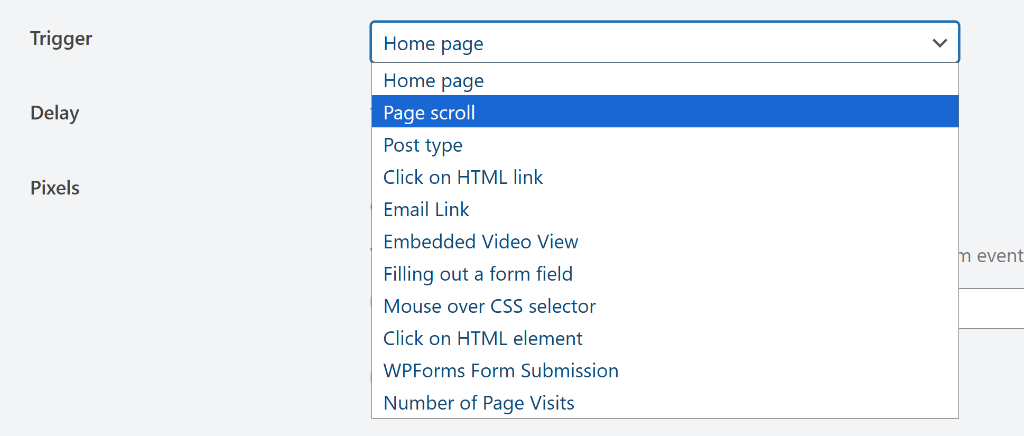
Each trigger reveals its own settings once selected. For example, selecting Page Scroll will ask you to specify a percentage, while WPForms Form Submission will ask you to pick which form to track.
Once you’ve chosen and configured your trigger, scroll down to the pixel selection area.
From here, click the Snapchat toggle to enable this event for your Snap Pixel, then use the dropdown to map it to a Snapchat standard event such as Purchase, Sign Up, Add to Cart, Subscribe, Share, Rate, Save, and more.
Mapping to a standard event is important because it allows Snapchat’s ad platform to understand and act on your custom data. It’s how your tracking integrates with Snapchat’s optimization and audience-building tools.
When you’re done, click Save Changes. That’s it! Your custom Snapchat event is now live and tracking on your WordPress site.
To track more custom events for your Snapchat pixel, you can simply click the ‘Add New Event’ button and repeat these steps.
FAQs About Snapchat Pixel Custom Events
1. Can I track custom events on Snapchat without coding knowledge?
Yes, absolutely. WPCode makes it possible to add custom event tracking code without touching a single theme file.
2. Do I need the Snapchat pixel installed before setting up custom events?
Yes. Custom events won’t work without the base Snapchat pixel already firing on your site. With WPCode, it’s super easy to add the Snapchat pixel to WordPress.
3. What is the difference between a standard event and a custom event in Snapchat?
Standard events are predefined actions that Snapchat already recognizes, such as Purchase, Sign Up, Add to Cart, View Content, and Save. Custom events, on the other hand, are actions that you define yourself based on how people interact with your specific site.
4. Will my event tracking code break when I update my theme?
Not with WPCode. Since the code lives inside WPCode as a snippet, it’s completely independent of your theme. Theme updates won’t affect it at all.
5. Can I use the same custom event for multiple ad platforms at once?
Yes. WPCode’s Conversion Pixel Addon supports multiple platforms, including Facebook, TikTok, Pinterest, Snapchat, and Google. When setting up a custom event, you can enable the toggle for each platform you want to fire the event on, so one trigger can feed data to all your active pixels simultaneously.
I hope this tutorial helped you set up custom event tracking for Snapchat in WordPress. You may also want to check out our guide on how to set up Google Analytics in WordPress and how to set up custom event tracking for Facebook Pixel in WordPress.
If you need help, then feel free to leave a comment below. And don’t forget to follow us on X (formerly known as Twitter) and subscribe to our newsletter for all the latest updates.

