If you’re looking to add interactive features to your WordPress website, then you’ll need to add JavaScript. From simple animations to complex web applications, JavaScript makes it all possible.
However, WordPress doesn’t allow you to simply copy and paste JavaScript directly to your site. You’ll have to manually edit the theme files, which can be tricky for beginners. Not to mention that any mistake can break your site.
An easier way of adding JavaScript is by using a plugin like WPCode. It helps you add code snippets and manage them from a single place. This way, your custom code remains organized, and you don’t have to worry about losing your customization when updating a theme.
In this article, we will show you how to add JavaScript to WordPress pages and posts.
What is JavaScript?
JavaScript is a popular programming language that adds interactivity and dynamic behavior to websites.
Unlike HTML, which structures the content of a page, and CSS, which styles its appearance, JavaScript makes things happen. It helps make changes to the theme to extend your site’s functionality.
Think of image sliders, embed video players, form validations, interactive maps, transition effects, and even complex web applications, they’re often powered by JavaScript.
Why Add JavaScript to WordPress Pages and Posts?
JavaScript is like a magic ingredient that brings interactive features to your WordPress website. Here are a few reasons why you might need to add it to your site.
- Enhance User Experience: JavaScript lets you create interactive elements, animations, and smooth transitions that engage visitors.
- Add Dynamic Functionality: You can implement features like real-time calculations, chatbots, and dynamic content updates.
- Integrate Third Party Plugins and Tools: Using JavaScript, you can also connect with APIs for social media sharing, payment gateways, and other third-party plugins and tools.
- Customize Website Behavior: JavaScript also lets you tailor the functionality of your site to meet your specific needs.
That said, let’s look at how you can add JavaScript to WordPress while keeping your site fast, efficient, and user-friendly.
Adding JavaScript to WordPress Pages and Posts
The best way to add JavaScript to WordPress is by using WPCode. It is the best WordPress code snippets plugin and helps you insert, manage, and control JavaScript from a single place on your site.
You can also manually add JavaScript to WordPress by editing the functions.php file and using hooks. However, this is an advanced method and recommended for developers. If you’re just getting started, then we suggest using a plugin to insert JavaScript, as it is a more safe and easy way.
That said, the best part about using WPCode is that all your custom code doesn’t get removed when you update a theme. Plus, there is a built-in library of expert written snippets that let you add new features to your WordPress site.
For this tutorial, we will be using the WPCode Lite version, as it is free to use and lets you easily add JavaScript to your site. However, there is also a Pro version that offers more features like code revisions, private cloud snippet library, eCommerce integrations, scheduling snippets, and more.
To start, you’ll need to head to Plugins » Add New Plugin from your WordPress dashboard and search ‘WPCode’ in the search bar.
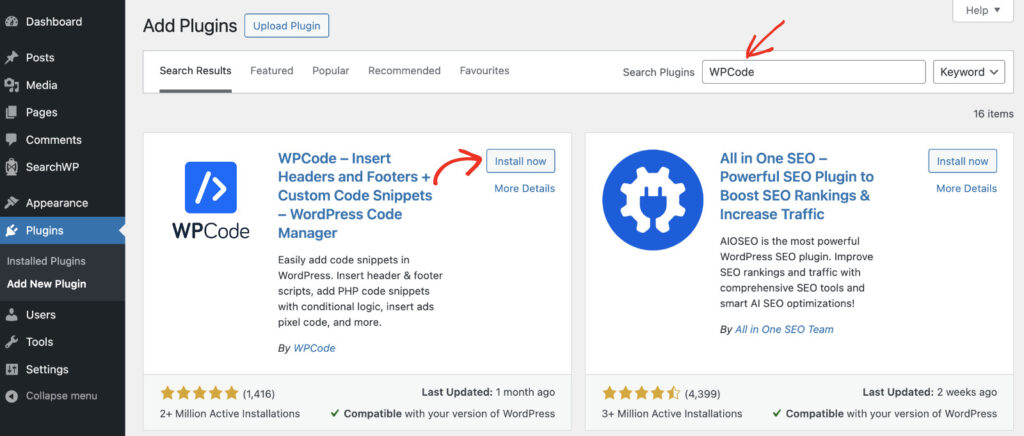
From here, you can click the ‘Install now’ button and then activate the plugin. If you need help, then please see this guide on how to install a WordPress plugin.
Upon activation, you will need to add the custom JavaScript snippet to WordPress.
Simply go to Code Snippets » Add Snippet from the WordPress admin panel and then click the ‘Add Your Custom Code (New Snippet)’ option.
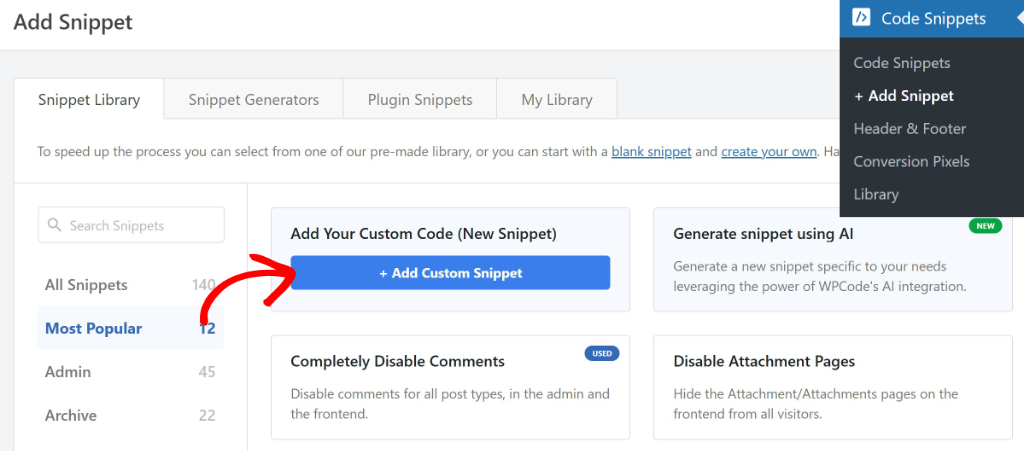
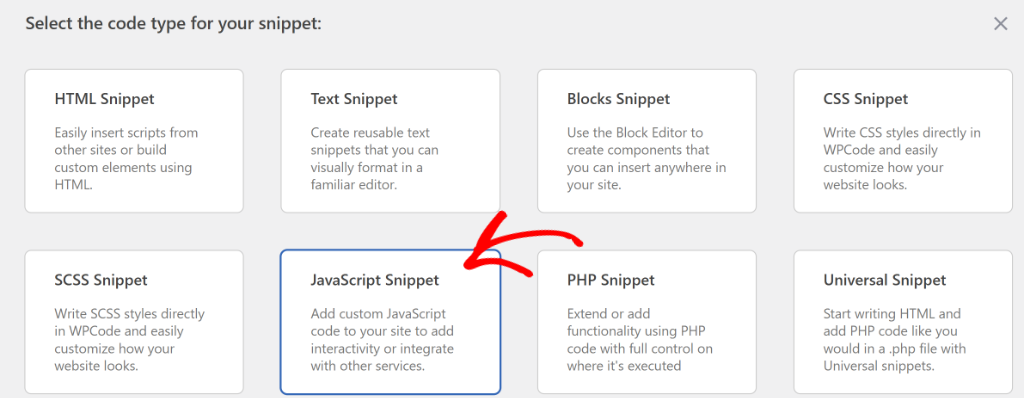
WPCode will now ask you to select a code type for your snippet.
Go ahead and select the ‘JavaScript Snippet’ option.
On the next page, you can enter a title for your custom code snippet.
After that, simply enter the JavaScript in the code editor. For example, let’s say you want to prevent right-clicks and stop visitors from copying the content.
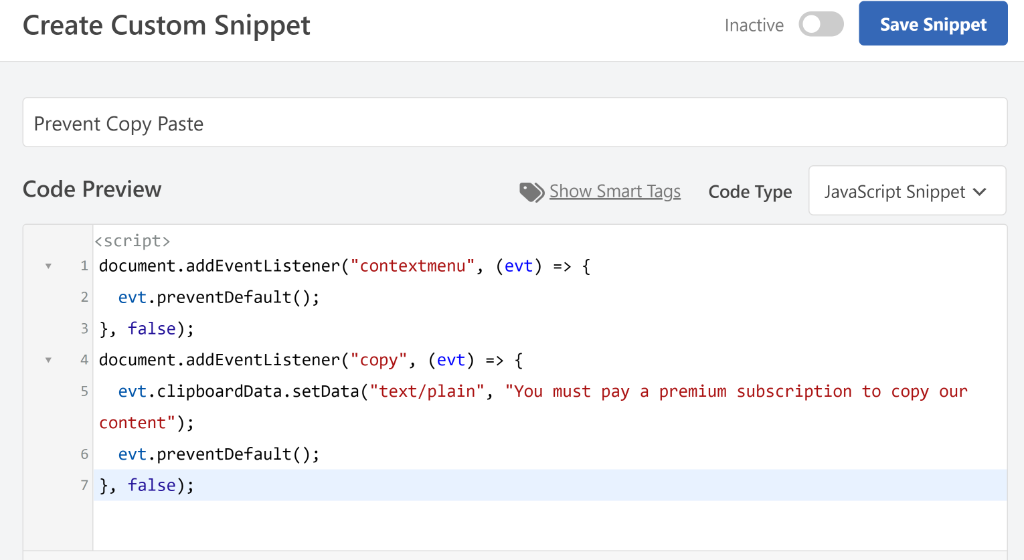
Once you’ve entered the code, don’t forget to click the ‘Save Snippet’ button at the top.
Next, you can scroll down to the ‘Insertion’ section and select where the JavaScript code will be inserted on your site.
WPCode will Auto Insert the JavaScript snippet in the Side Wide Header of your site. For this tutorial, we will use the default settings.
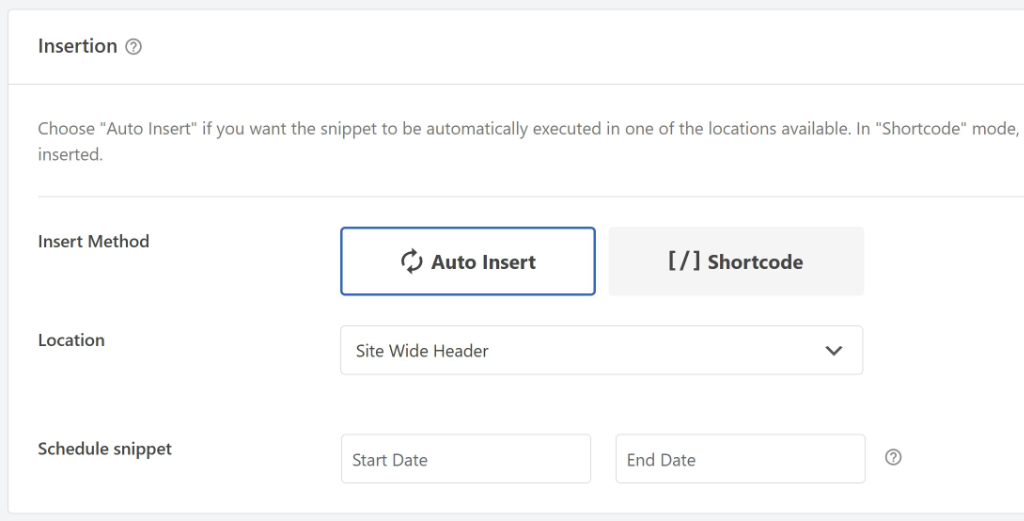
But let’s say you want to insert the code snippet on specific posts and pages. For that, you can click the ‘Location’ dropdown menu and select where you want to insert the code.
If you want to schedule your JavaScript snippet, then you’ll need to upgrade to the WPCode Pro version. This way, you can run your custom code at a specific time period by selecting a start and end date.
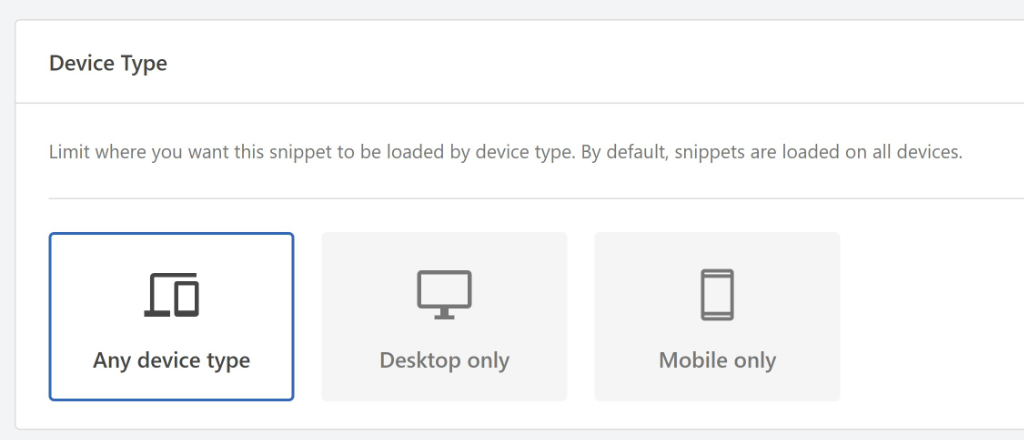
Besides that, you can also pick which devices your JavaScript code will run on. The plugin will load the code on all types of devices, but you can specify whether to run it on desktop or mobile devices.
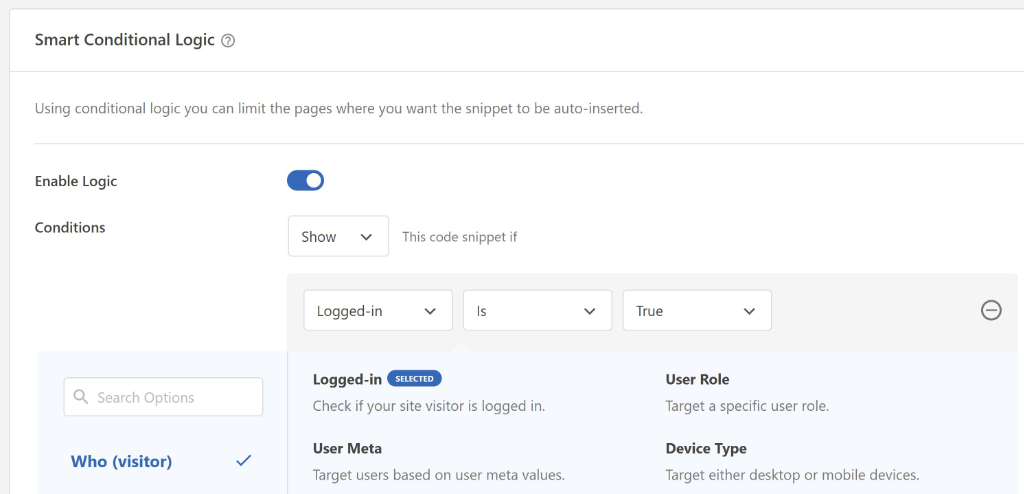
Next, there is also an option to set up smart conditional logic and control where your JavaScript will appear.
Simply scroll down to the ‘Smart Conditional Logic’ section and click the ‘Enable Logic’ toggle.
After that, you can configure the conditional logic and decide whether to hide or show code snippets for a type of page, specific user role, post type, device type, and more.
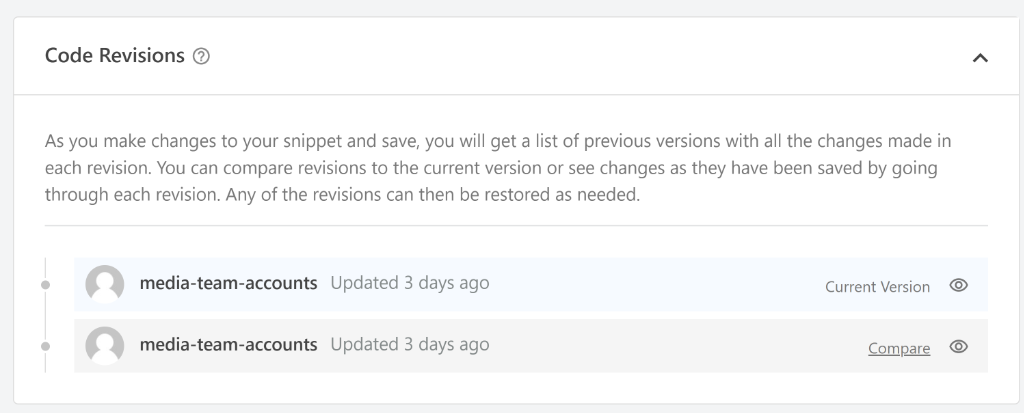
Next, you can scroll down to the Code Revisions section.
Do note that the Code Revisions feature is available in the WPCode Pro version. It helps track changes made to the snippet and lets you restore previous versions in case something goes wrong.
Next, you will need to scroll to the top and activate your JavaScript code.
Go ahead and click the toggle to change it from Inactive to Active. Once you’ve done that, simply click the ‘Update’ button.
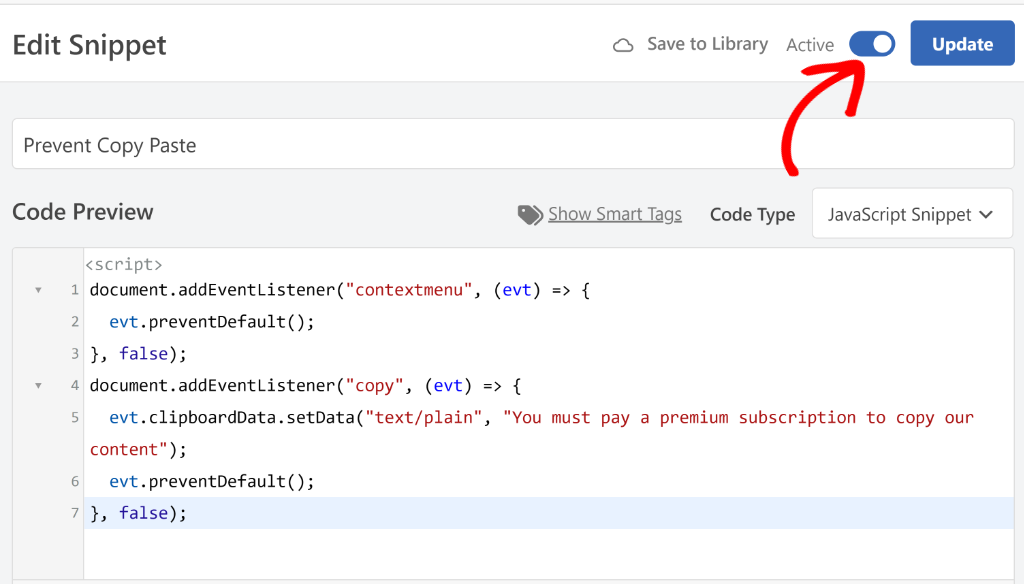
That’s it! Your custom JavaScript snippet will be active, and you can visit your website to see the new feature or functionality.
Bonus: Add Custom Features to WordPress Using JavaScript
Now that you know how to add JavaScript in WordPress, let’s look at some cool features you can add to your website.
The best part, you can find all these code snippets in WPCode Snippets Library.
1. Add Fade Out Page Transitions
Want to add a fading page effect when a user clicks on an internal link on your website?
With JavaScript, you add the animated effect to your site and enhance the overall user experience.
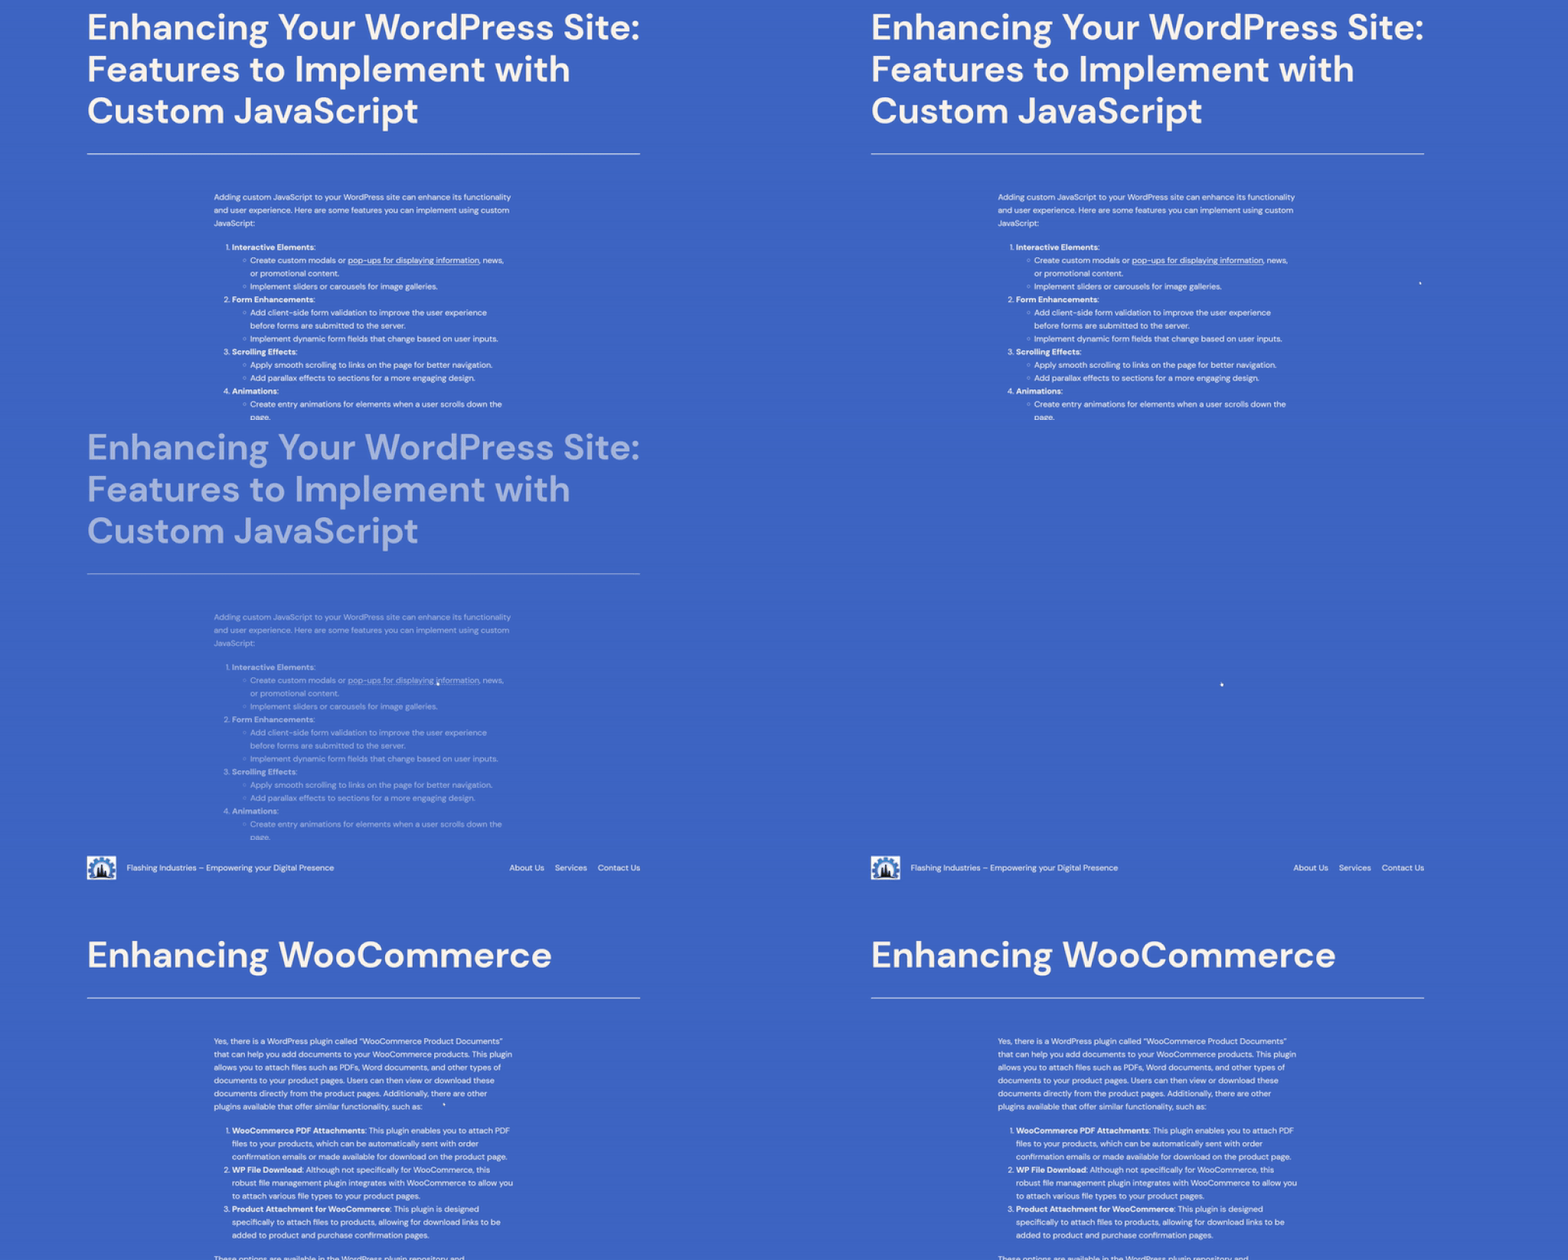
You can find the fading page transition code snippet in our library. With just 1-click, WPCode will deploy it on your site.
2. Stop Visitors from Copying Your Content
If you produce content that’s copyright protected and don’t want others to copy it, then you can disable the right-click option on your site.
Simply enter the following JavaScript code to your website and stop people from copying your content:
document.addEventListener("contextmenu", (evt) => {
  evt.preventDefault();
}, false);
document.addEventListener("copy", (evt) => {
  evt.clipboardData.setData("text/plain", "You must pay a premium subscription to copy our content");
  evt.preventDefault();
}, false);
You can also find the ‘prevent copy and paste’ code in the WPCode snippet library and insert it in your website in just a few clicks.
3. Add Smooth Scrolling for Anchor Links
Smooth scrolling is a web effect that enhances user experience by providing a fluid and visually appealing transition when navigating through a webpage using scroll actions.
Unlike the default scrolling behavior, which can be abrupt and jumpy, smooth scrolling creates a gradual movement as the user scrolls or clicks on links that jump to anchor points within the page.
To learn more, please see our Smooth Scrolling for Anchor Links code snippet page.
Get WPCode Pro now to manage, automate, and enhance your WordPress site effortlessly with JavaScript snippets!
We hope this article helped you learn how to add JavaScript to WordPress pages and posts. You may also want to see our guide on how to disable Gutenberg editor without plugins and how to duplicate a post or page in WordPress.
If you need help, then feel free to contact us or leave a comment below. And don’t forget to follow us on X (formerly known as Twitter) and subscribe to our newsletter for all the latest updates.
