

I used to spend hours promoting my WordPress events on social media and email lists, but always wondered why they weren’t showing up on Google or didn’t have any event details.
While my competitors’ events appeared with eye-catching details like dates, locations, and ticket prices right in the search results, mine just looked like regular blog posts. I was losing potential attendees simply because my events were invisible in search.
The solution turned out to be event schema markup. It’s a special code that helps Google understand your event details and display them as rich results in search. After adding it to my WordPress site, my events started appearing with all the important information front and center.
In this guide, I’ll show you how to add an event schema markup to WordPress using a simple method.
Why Add an Event Schema in WordPress?
Schema markup is like a translator between your website and search engines. It tells Google, Bing, and other engines exactly what type of content you have on your page, whether it’s an event, a recipe, a product, or something else.
Without schema markup, Google has to guess what your content is about by reading through all your text. Sometimes it gets it right, but often it misses important details about your events.
When you add event schema markup to your WordPress site, you’re giving search engines structured information about your event. This includes the event name, date, time, location, ticket prices, and other key details that people search for.

Google then uses this information to display your event as a rich result in search. These rich results stand out with special formatting that shows event details right in the search listings, making them much more clickable than regular results.
I’ve seen my event click-through rates (CTR) double after adding proper schema markup. People can see all the essential information without even visiting my site first, which builds trust and increases registrations.
Event schema also helps your events appear in Google’s event discovery features. This means your event can show up when people search for “events near me” or browse Google’s dedicated event listings.
Without event schema, you’re basically invisible in these features. Your event might have amazing content, but if Google can’t understand it’s an event, you’ll miss out on all this free traffic and exposure.
That said, let’s see how you can easily add an event schema in WordPress.
Adding Event Schema Markup in WordPress
The best way to set up event schema markup in WordPress is by using WPCode. You can use the best code snippet plugin to generate proper structured data for your events without editing code.
WPCode is great for schema because you can add code snippets to specific pages without editing your theme files directly. I’ve found it really helpful for managing all my custom code in one place instead of scattered across different files.
The plugin works with all kinds of code types, including PHP, JavaScript, HTML, and CSS. It even has a library of pre-built snippets that experts have already tested and verified, so you can add new functionality and features to your site quickly.
Note: For this tutorial, I’m using WPCode Pro because it has Smart Tags that automatically pull in dynamic information, and Page Scripts that let me add schema to specific event pages. You can also use the free WPCode Lite version if you’re just getting started with schema markup.
With that, let’s look at the steps for generating an event schema markup.
Step 1: Install and Activate WPCode
To start, you’ll need to visit the WPCode website and signup for a new account.
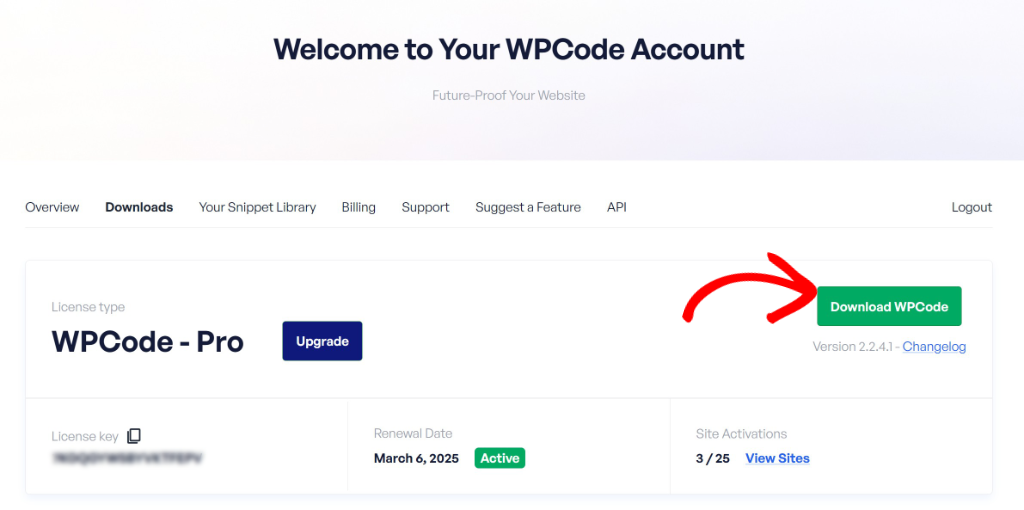
After you sign up, log into your account and go to the ‘Downloads’ tab.
From here, simply click the Download WPCode button there and save the file somewhere you can find it easily.
Now you’ll need to install and activate the plugin on your WordPress site. If you’re not sure how to do this, check out this guide on how to install a WordPress plugin.
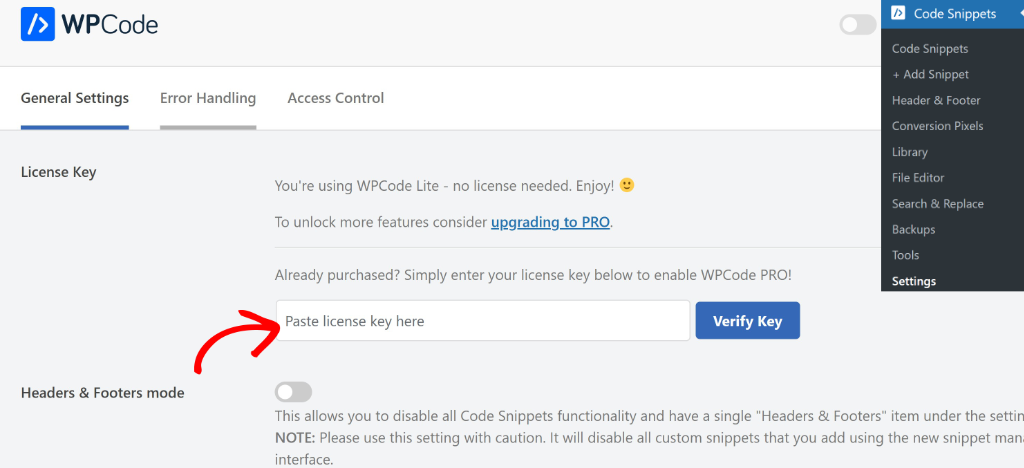
Once the plugin is active, simply navigate to Code Snippets » Settings from your WordPress dashboard. You’ll see a field where you can paste your license key, which you’ll find in your WPCode account area.
Step 2: Generate an Event Schema Markup
Your next step is to navigate to Code Snippets » Add Snippet in your WordPress dashboard.
When you get there, click on the ‘Snippet Generators’ tab at the top of the page.
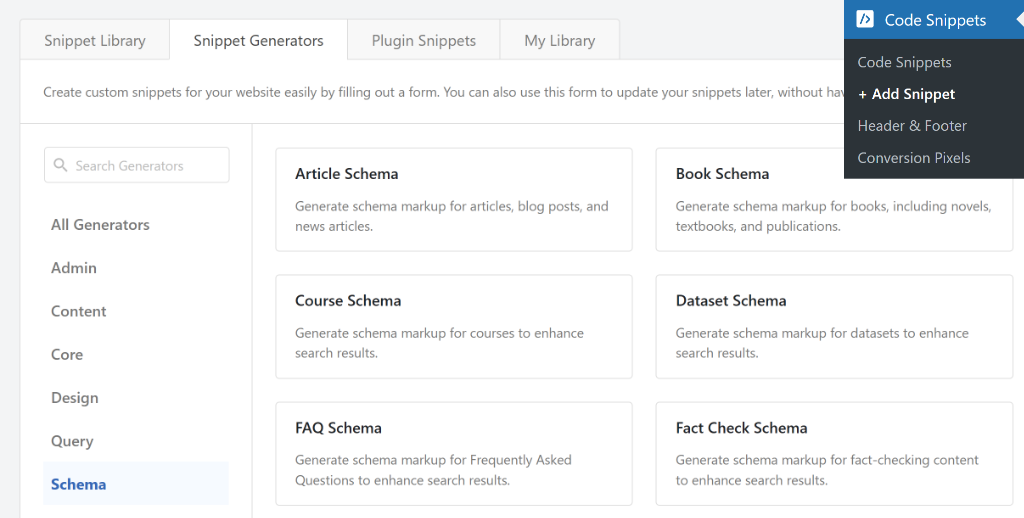
After that, you can find the Event Schema option and click on the ‘Generate’ button.
WPCode also lets you filter snippet generators from the menu on the left by using the search box.

This opens up the Event Schema Generator page.
You’ll land on the ‘Info’ tab first, which explains what the generator does and helps you understand what details you’ll need to have ready.

Step 3: Fill Out Your Event Details
When you’re ready to add your event information, just click over to the Event Details tab.
Here, you’ll need to enter all the important information about your event. For example, you can enter the event name, description, start date and time, end date and time, event image URL, event status, attendance mode, and more.

WPCode makes adding details even easier with Smart Tags that can automatically pull information from your WordPress posts. For example, if your event name is the same as your post title, you can use the {title} tag instead of typing it out manually.
To use a Smart Tag, just click the Show Smart Tags option next to any field. Then pick the tag you want from the dropdown menu, and WPCode will pull that information automatically from your page.

Next, you can switch to the Location tab from the left panel.
Here, you’ll need to enter the location details of your event. This includes the venue name, street address, city, postal code, and country code.

After that, you will need to enter the details of a performer for your event. For example, if it’s a concert, then you can enter the name of the band or singer. Or if it is a standup comedy show, then you can enter the name of the comedian.
To start, switch to the Performer tab from the panel on the left. From here, first select the Performer Type from the dropdown menu and then enter the Performer Name.

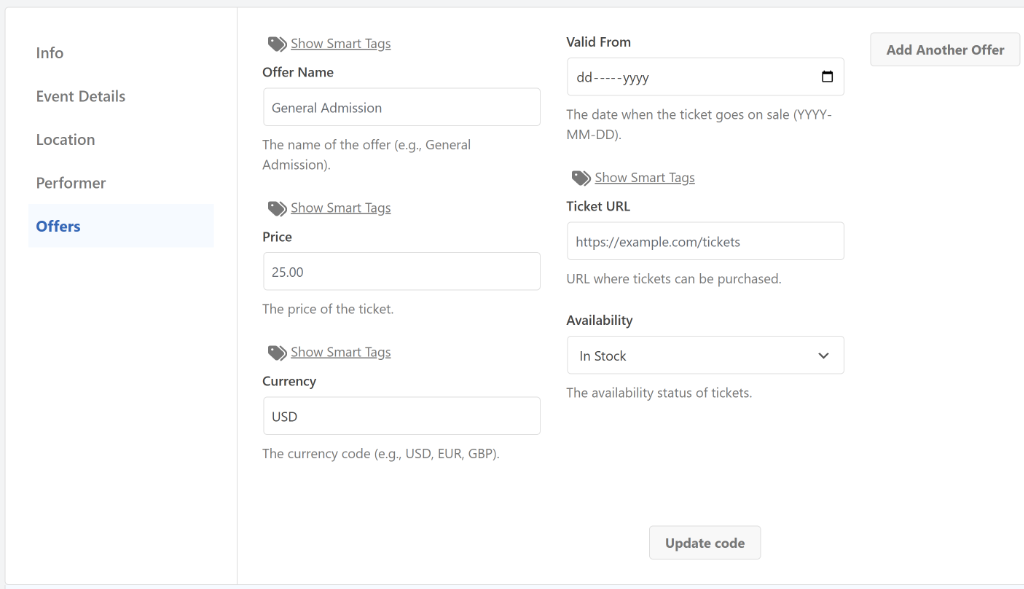
Lastly, you’ll need to switch to the Offers tab to enter ticket details.
For example, you can enter the offer name, price, currency, valid from, ticket URL, and availability.
Once you’ve entered all the details, go ahead and click the Update code button.
WPCode will now generate your schema markup code and display it in the ‘Code Preview’ section below. After reviewing the preview, click the Use Snippet button to move forward.

Step 4: Review and Activate Your Event Schema Snippet
On the next screen, you’ll see your event schema snippet already loaded in the code editor.
The great thing here is that you can still make changes if you notice something that needs adjusting. You can edit the code directly, add more Smart Tags, or fine-tune any of the event details.
If you realize you need to change something major in your event information, WPCode gives you an easy way to go back. Just click the Update Generated Snippet button, and it’ll take you back to the schema generator page, where you can update your details and regenerate the code.

When everything looks good, simply click the toggle switch next to where it says ‘Inactive’ at the top of the page and turn your snippet to Active. Finally, click the ‘Update’ button to save your changes.
Your event schema snippet is now ready to be added to your event pages. In the next step, I’ll show you two different ways to do that.
Step 5: Add Event Schema to Your Event Page
Now, you need to add the event schema to the specific page or post where you’re promoting your event.
WPCode gives you two ways to do this. With WPCode Pro, you can use the ‘Page Scripts’ feature right inside the WordPress editor to add schema to individual pages. Or you can use conditional logic in WPCode to automatically display the schema on the pages you choose.
Let me walk you through both methods so you can pick the one that works best for you.
Method 1: Add Event Schema Using WPCode Page Scripts
WPCode’s Page Scripts feature lets you attach custom snippets directly to any post or page from within the block editor.
First, open the post or page where you want to add your event schema. When you’re in the WordPress content editor, scroll down below your content area until you see the WPCode Page Scripts section.
Once you find it, switch over to the ‘Custom Code Snippet’ tab and click the Choose Snippet button.
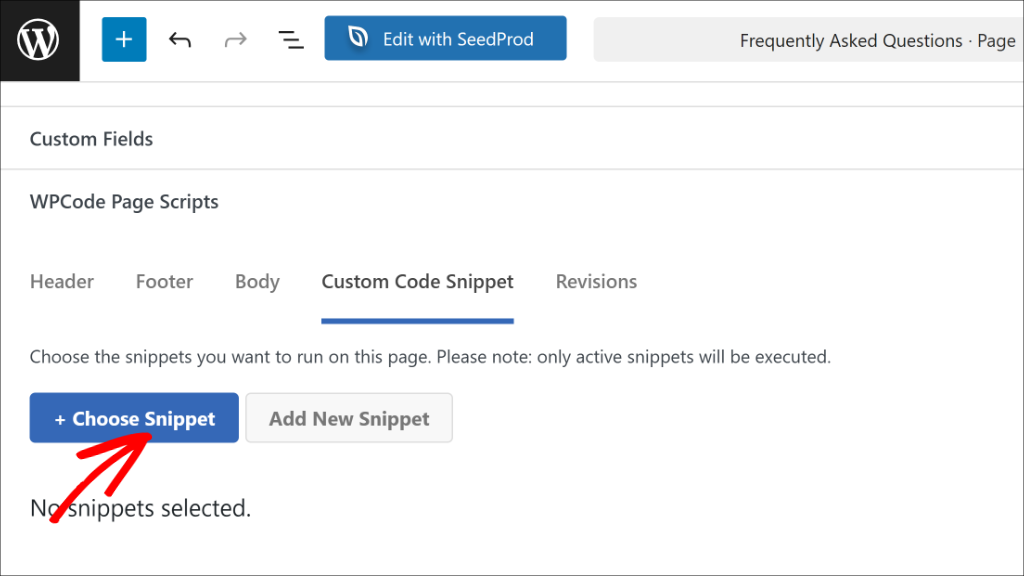
A list of all your WPCode snippets will appear.
Look for your event schema snippet in the list and click the toggle next to it to activate it for this specific page.

That’s it! Now you can publish or update your post or page. The event schema will only appear on this page and nowhere else on your site.
Method 2: Add Event Schema Using Conditional Logic
Another way to add event schema is by setting up conditional logic rules that tell WPCode exactly where to display your snippet.
Start by going back to Code Snippets from your WordPress dashboard and clicking on your event schema snippet to open it.

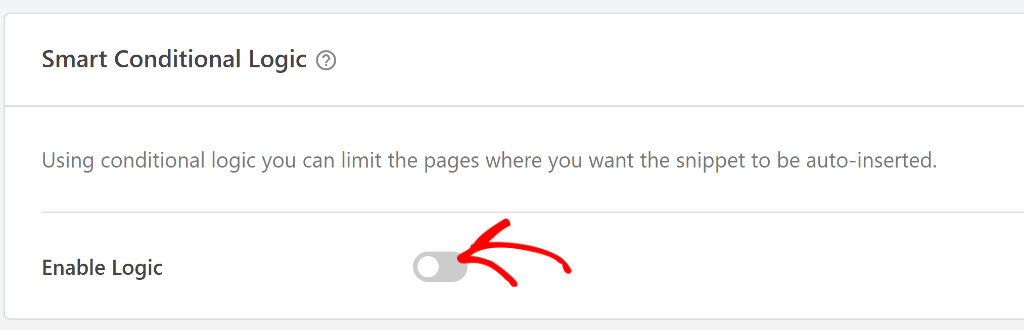
Once you’re in the code editor, scroll down until you find the ‘Smart Conditional Logic’ section.
From here, simply click the toggle to Enable Logic.
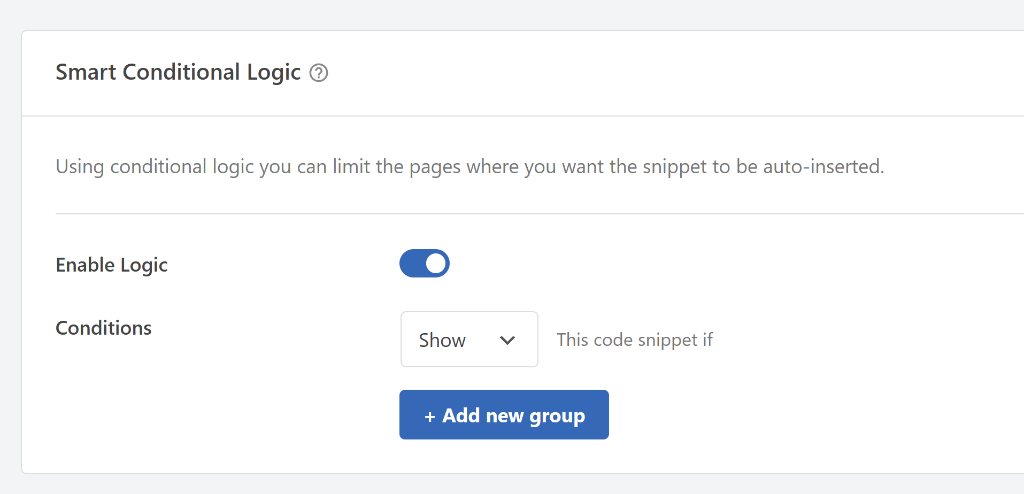
WPCode will ask you whether you want to Hide or Show the snippet.
Select the ‘Show’ option, then click the Add new group button.
By default, WPCode sets a condition for logged-in users, but you need to change this.
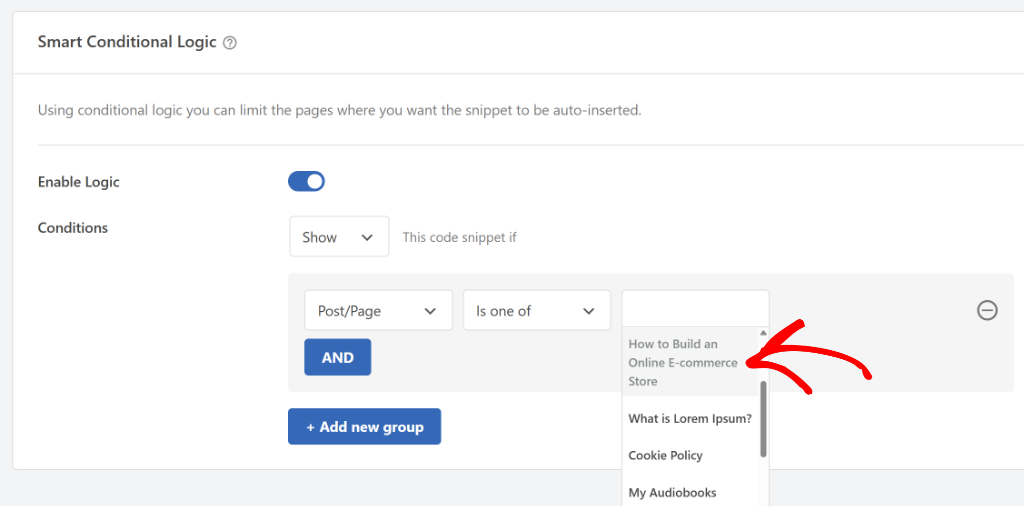
Simply click on the condition dropdown to open the menu, then switch to the Where (page) tab on the left side and select Post/Page.
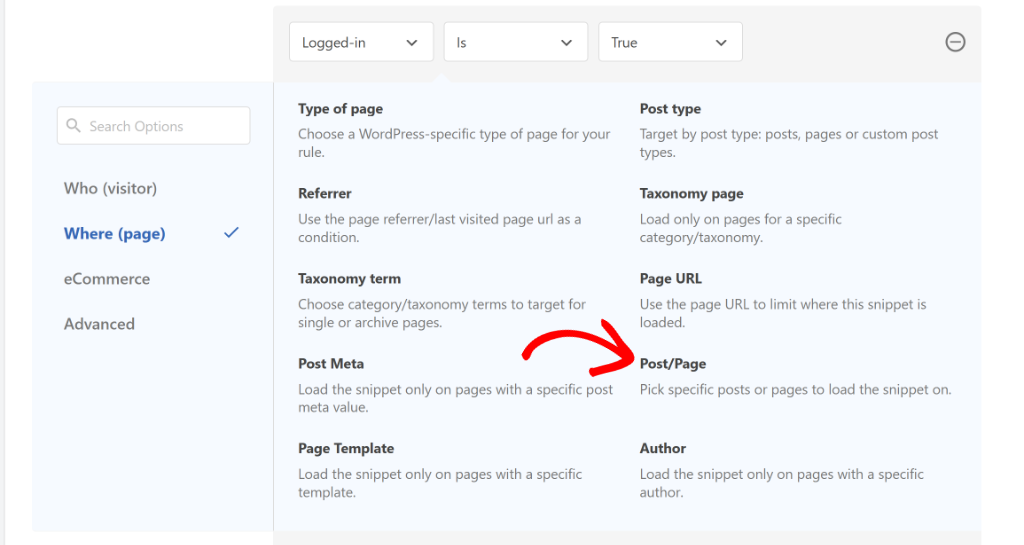
Now, change the condition to ‘Is one of’ and then select the specific page or post where your event is located.
Finally, click on the last field and choose your event page from the dropdown menu.
When you’re done setting up the conditions, scroll back to the top and click Update to save your conditional logic settings.
If you need more help with this, check out our guide on how to add scripts to specific pages in WordPress.
Step 6: Test Your Event Schema Markup
Now that you’ve added event schema to your site, it’s a good idea to check if everything is working correctly before you call it done.
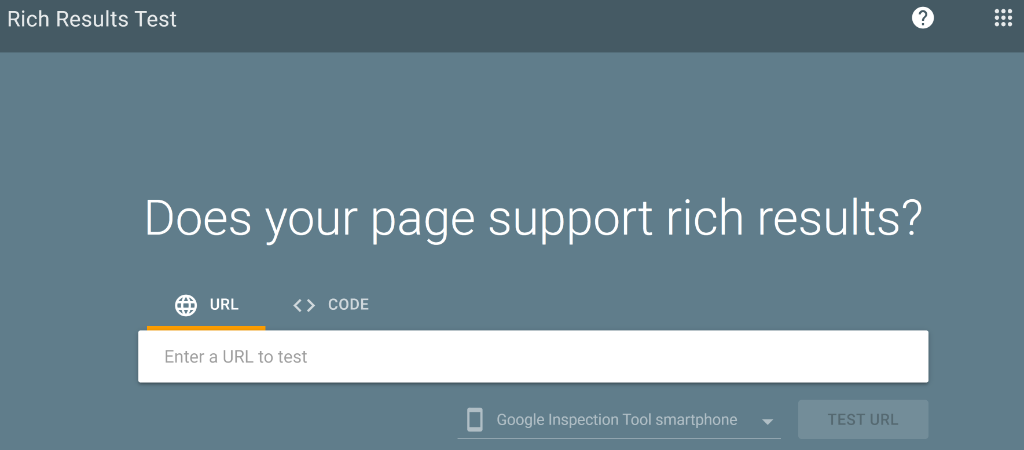
The easiest way to test your schema is by using Google’s Rich Results Test tool. This free tool shows you exactly how Google sees your structured data and catches any errors you need to fix.
Start by visiting the Rich Results Test tool in your browser. You’ll see a field where you can enter the URL of the page where you added your event schema markup.
Paste in your event page URL and click the ‘Test URL’ button. Google will take a moment to analyze your page, so just wait while it does its thing.
Once the scan finishes, you’ll see a section called ‘Detected structured data’ that lists all the schema markup Google found on your page.
Look through this list until you find ‘Events’ listed there.

If you see Events without any error messages next to it, then you’ve successfully added event schema to your WordPress site. Your events should now be eligible to appear as rich results in Google search.
If you do see any errors or warnings, don’t panic. Click on the Events item to see what’s missing or incorrect, then go back to your WPCode snippet and make the necessary adjustments. You can test it again as many times as you need until everything is perfect.
That’s it! You’ve successfully added an event schema to your WordPress website.
I hope this artiicle helped you learn how to add an event schema markup in WordPress. You may also want to see our guides on how to add video schema markup to your WordPress site and how to track code changes and revisions in WordPress.
If you need help, then feel free to leave a comment below. And don’t forget to follow us on X (formerly known as Twitter) and subscribe to our newsletter for all the latest updates.

