
I still remember the first time a client saw my WordPress login page and asked why isn’t their company logo appearing.
That moment made me realize how important it is to maintain brand consistency everywhere on your site. Your login page might seem like a small detail, but it’s often the first thing team members, contributors, and clients see when they access your WordPress dashboard.
The default WordPress logo on the login page works fine, but it doesn’t represent your brand. When you replace it with your own logo, you create a more professional experience that matches your website’s look and feel.
In this article, I will show you how to replace the WordPress login logo.
Why Replace the WordPress Login Logo?
Your login page is like the front door to your website’s backend. When team members or clients log in, they should see your brand, not WordPress’s logo.
I’ve worked with dozens of WordPress sites over the years, and the ones that feel most professional are the ones where every detail matches the brand. Your login page is no exception.
The default WordPress logo might confuse users who aren’t familiar with the platform. They might wonder if they’re on the right website or if something went wrong during the login process.

Custom login logos also help build trust with your users. When they see your familiar logo, they know they’re in the right place and can log in with confidence.
Plus, it’s one of those small touches that shows you pay attention to details. Clients and team members notice these things, even if they don’t mention them directly.
That said, let’s look at how you can easily replace the default logo with your own in WordPress.
Replacing WordPress Logo on Login Page
When it comes to changing the logo on the WordPress login page, you’ll need to add custom code to your site’s theme files. Now, this can be tricky for beginners because the slightest mistake can break your site or mess up it’s appearance and functionality.
An easier way to go about it is by using WPCode. It is the best code snippet plugin for WordPress and comes with a built-in snippet library. You can choose from 140+ verified snippets to add new features and customizations to your site.
In this library, you’ll find a code snippet for replacing the default WordPress logo on the login page. The best part is that you don’t have to hire a developer or write the code yourself. Simply use the snippet in WPCode and you’re all set.
Let’s look at the steps you can follow to get started.
Step 1: Install and Activate WPCode Plugin
First, you’ll need to add the WPCode plugin to your WordPress site. For this tutorial, I’ll be using the WPCode lite version, which is available for free. However, there is also a WPCode Pro version that offers advanced features like Page Scripts, AI code generator, Conversion Pixel addon, tracking code revisions and changes, and more.
To get started, you can go to Plugins » Add New Plugin from the WordPress admin panel and search for ‘WPCode’ in the search bar.
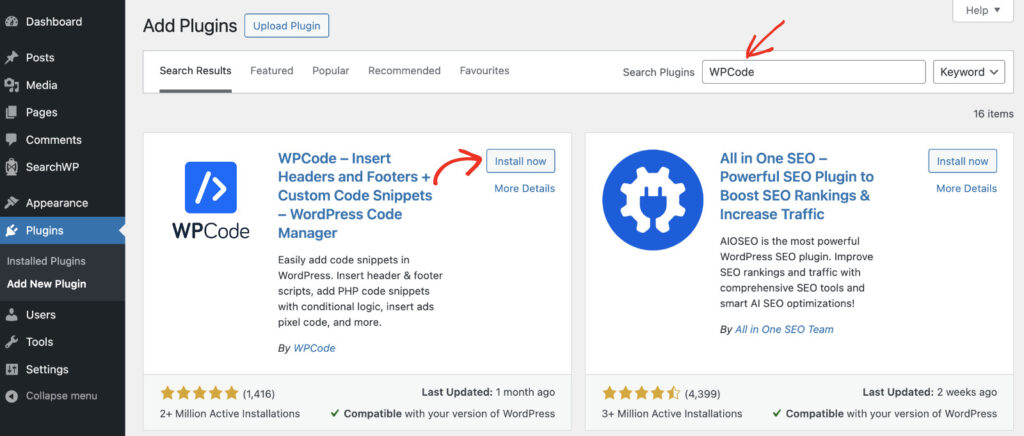
Next, you can click the ‘Install Now’ button and then activate the plugin once the installation completes. If you need help, then please see this guide on how to install a WordPress plugin.
Step 2: Upload Your Custom Logo to WordPress
Now that WPCode is up and running, the next step is to upload your custom logo to the WordPress media library.
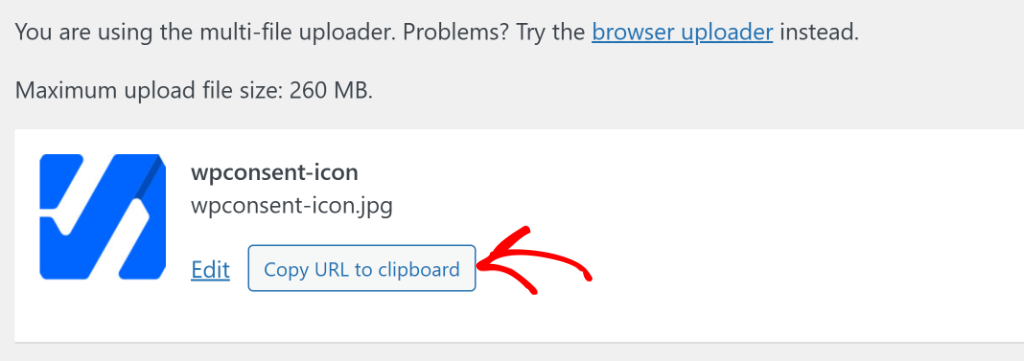
To start, you can head to Media » Add Media File from the WordPress admin panel. From here, simply click the ‘Select Files’ option or drag and drop your image file onto the ‘Drop files to upload’ area.
Once the file is uploaded, you can scroll down.
Next, go ahead and click the ‘Copy URL to clipboard’ button, as you’ll need it in the next step.
Step 3: Insert Custom Code Snippet to Replace Logo
Now, you will need to go to Code Snippets » Add Snippet page from the WordPress dashboard.
This will open the WPCode library, where you can use the search bar in the left panel to find the Replace WordPress Logo on Login Page snippet. Simply hover over it and click the ‘Use snippet’ button.
Next, you’ll see the Code Editor in WPCode with the snippet already loaded.
After that, you will need to update the code snippet and replace the image URL with the custom logo URL you copied in the previous step.
Plus, you can also adjust the width and height of the logo in the code snippet. By default, it will be set to 84 px, but you can change it according to your requirements.
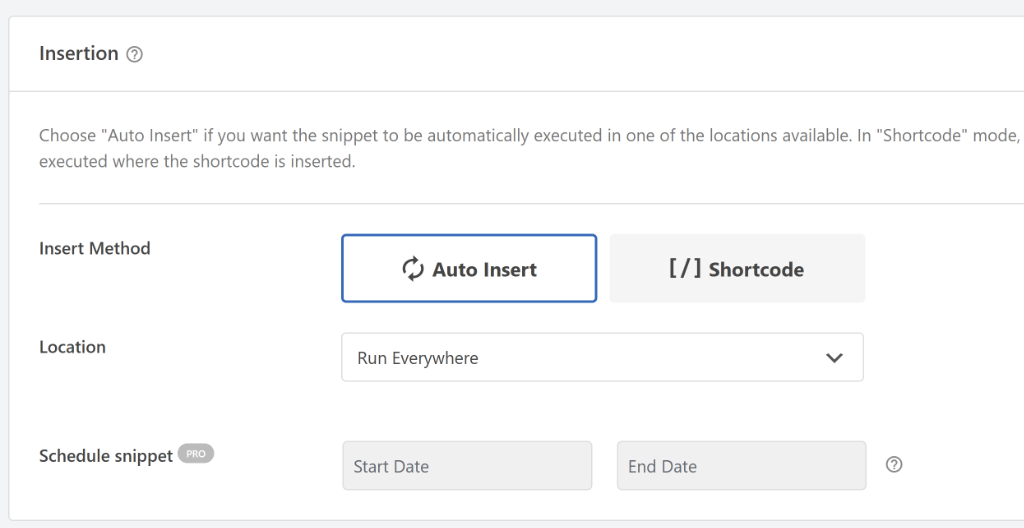
Next, you can scroll down to the Insertion section. WPCode will auto-insert the code and run it everywhere. I suggest using the default settings, as the code will execute in the right place automatically.
From here, you can simply scroll to the top and click the toggle to make the snippet from Inactive to Active.
Once that’s done, go ahead and click the Update button.
Step 4: View New Logo on WordPress Login Page
Now that you’ve activated the code snippet in WordPress, the next step is to check if the default logo is replaced with the new one.
To do that, you’ll first need to log out of your WordPress admin panel. After that, go to the login page and view the new logo.
As you can see from the screenshot, our demo site now has a new logo instead of the WordPress logo.
If you want to adjust the width and height of the logo, then simply head back to the code snippet in WPCode and make the changes.
I hope this article helped you learn how to replace WordPress logo on login page. You may also want to see our guide on how to search and replace images in WordPress and how to allow SVG file upload to WordPress.
If you need help, then feel free to leave a comment below. And don’t forget to follow us on X (formerly known as Twitter) and subscribe to our newsletter for all the latest updates.

