Copyright © 2025 WPCode. WPCode® is a registered trademark of WPCode, LLC
Documentation, Reference Materials, and Tutorials for WPCode
Version 2.0.9 of WPCode introduced a new feature that allows you to insert snippets anywhere on your WordPress site using CSS Selectors to target HTML elements. This makes snippet insertion more flexible than ever before as you no longer depend on your theme or plugin having a hook available for insert.
Cascading Style Sheets (CSS) is a language used to describe the presentation of an HTML document. CSS selectors allow you to target specific HTML elements to apply styles to them.
For the purpose of this article we are not going to use CSS selectors to apply styles to elements like you would usually do but instead use them to insert snippets in specific locations. This is more common when using JavaScript as in most cases JavaScript is applied to the page after the HTML has loaded so using CSS selectors is an easy and precise way to target specific HTML elements.
For performance considerations, WPCode actually inserts the snippets using PHP so that the final result of the page is seamless regardless of using snippets or not instead of apply changes after the page has loaded using JavaScript. This makes the output very easy to cache and thus pages remain performant while your users will not notice the page changing when the snippets are inserted.
Because the insertion is happening server-side the type of CSS selectors we can use is slightly more limited than in a CSS or JS file and advanced selectors like :first-child, :nth-child, or similar are not going to work.
Next we have a list of selectors that you can use, feel free to skip to finding the right CSS Selector if you are just getting started with CSS selectors.
WPCode supports the following CSS selectors – a basic example is listed, for more info please follow the links to the w3.org reference.
*tagname#element-id.classname.class1, .class2, #element.home .title.wp-block > h2h2 + span.iconh1 ~ preinput[name="first_name"]input[name*="value"]Now that you know what CSS Selectors are – how can you easily find them and target elements on your site?
In most modern browsers the easiest way to do that is to use the browser’s developer tools. Don’t get discouraged by the name, you don’t have to be a developer to use them.
To get started just right-click the element that you are trying to target and select “Inspect Element” (if you are using Safari and you can’t see that option you may need to enable Developer Tools first).
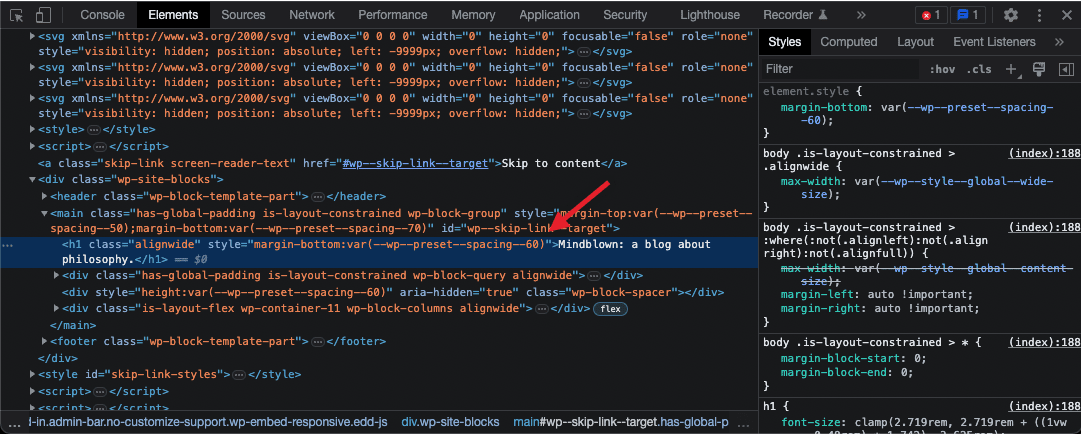
After selecting Inspect Element, a new panel or window will open with the Developer tools and your element will be selected in the HTML structure, something like this:

Hovering over the element will also highlight it on the page so you can make sure the correct element is selected.
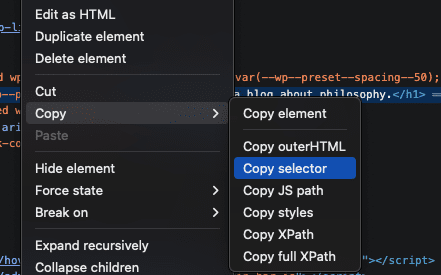
Next you can simply right-click the selected element in the developer tools and go to “Copy > Copy Selector”:

That will copy to your clipboard something like this: #wp--skip-link--target > h1 . You can paste the in the WPCode CSS Selector field:

Things to keep in mind here:
<p> tags but only inside the .main-content div, not across the whole site so you can combine the two into .main-content p.When targeting elements using CSS Selectors, WPCode includes 4 main locations:
The element index is optional and it’s used to target only an element by its index. In regular CSS you can do that using the nth-child selector but that’s not available here so we added an extra field to make it easy to target a specific element. The indexes start at 0 so if you want to only change the first paragraph on a page, for example you can use the selector p with the Element index set to 0.
If left empty, all the elements on the page will be targeted so if you want to add something after all the p tags on a page you would simply leave the Element index field empty.
Now that you found the CSS selectors and you are adding snippets exactly where you want them there are a few things to consider if sometimes maybe the results are not 100% what you expect.
WPCode attempts to add snippets to the output of the page when the page is first loaded but many plugins use AJAX calls to load parts of the page later, or after user interaction – the most common example is how filtering a list of products, for example, will not reload the whole page. We have built-in methods to try to also insert snippets in the HTML added that way but different plugins have different approaches so in some cases the insertion might not work as intended.
Another thing to keep in mind when content is dynamically loaded is that a very specific selector might not work, for example if your selector includes the body class of .home for the homepage, when a fragment of the page is loaded, the new HTML will no longer have the .home selector as that is already loaded so your target element will no longer be changed.
Future-proof your website with WPCode Snippets and improve the way you manage code across all your websites.