
Do you want to add Google ads conversion tracking in WordPress?
Conversion tracking lets you get better insights and more statistics about how your current Google Ads campaign is doing. It also helps you easily understand how users interact with your website.
Hence, in this detailed tutorial, we’ll show you how to add Google Ads conversion tracking in WordPress so you can make data-driven decisions starting today!
Table Of Contents:
- What Is Conversion Tracking & Why It Matters
- How To Create A Conversion Action In Google Ads
- How To Add Google Ads Conversion Tracking In WordPress Sites
- Method 1: Add Google Ads Conversion Tracking Using Conversion Pixel (Recommended)
- Method 2: Add Google Ads Conversion Tracking In WordPress Header (For Free)
What Is Conversion Tracking & Why It Matters
Imagine you’re running a grocery store. You put a lot of effort into creating attractive displays and flyers to draw in customers. But how do you know if these efforts are actually bringing people in and leading to sales? That’s where conversion tracking comes in.
Conversion tracking helps you understand how effective your Google Ads campaigns are. Just like tracking your store foot traffic, it tells you if your ads are convincing people to take the desired action on your website, whether it’s making a purchase, signing up for a newsletter, or downloading an ebook.
In order to succeed in online business, you need to measure if the clicks on your ads are actually making any difference. Implementing conversion tracking helps you unlock valuable insights and optimize your Google Ads campaigns for maximum ROI.
So, in this tutorial, we’ll learn how to add Google ads conversion tracking in WordPress and how it can benefit your business!
What You Need To Get Started
Here are the prerequisites to add Google Ads conversion tracking in WordPress:
- Google Ads Account
- WordPress website
- WPCode plugin
How To Create A Conversion Action In Google Ads
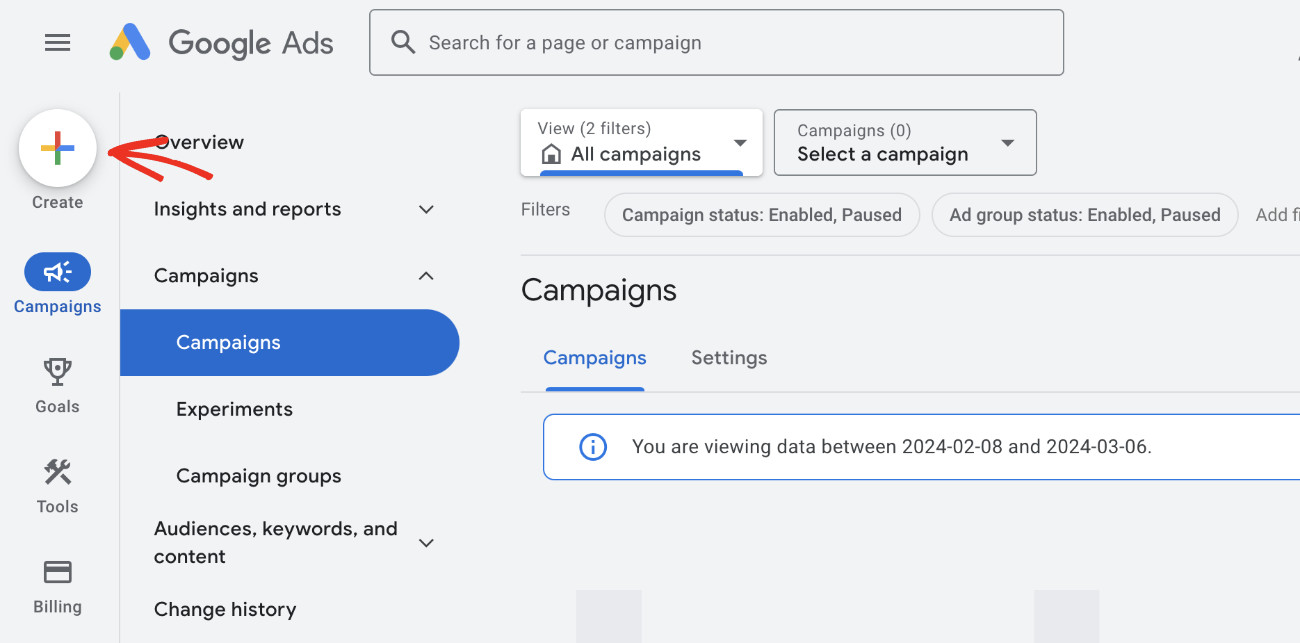
First, you need to log in to your Google Ads account.
Now click the “+” sign on the left sidebar.
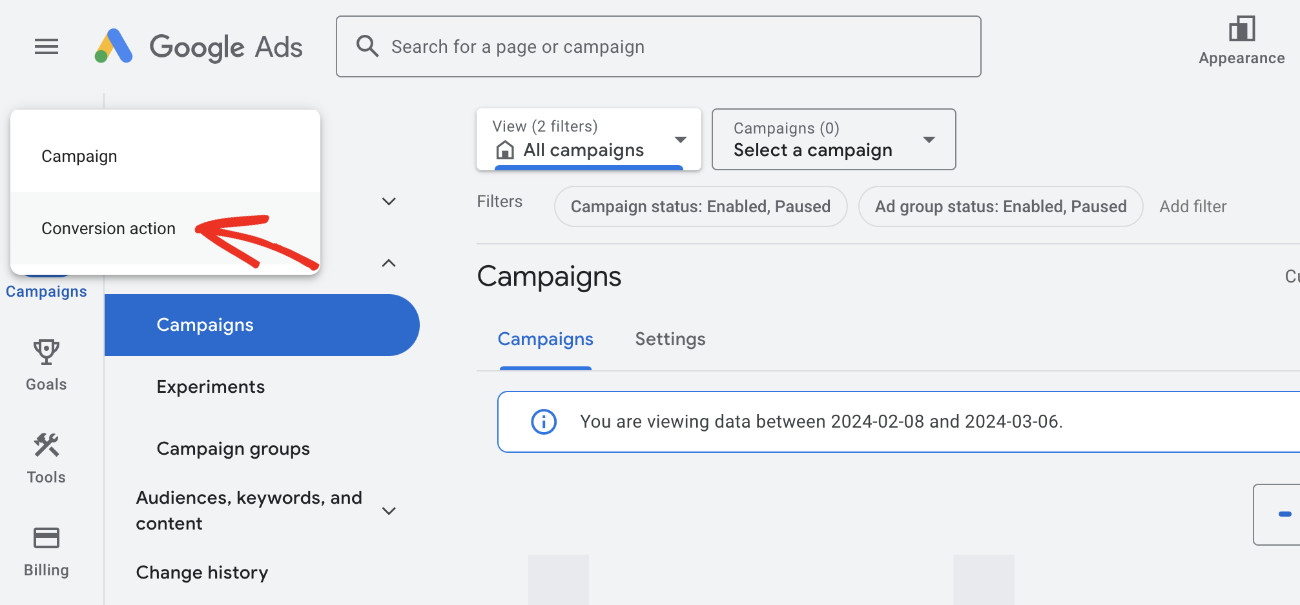
Select “Conversion action” from the list.
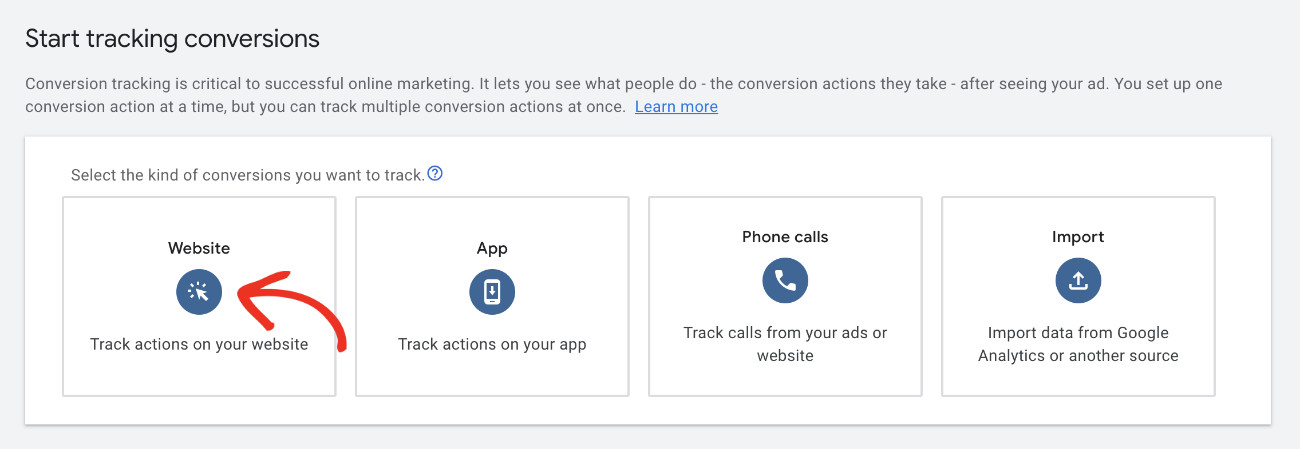
Now, select the type of conversion you want to track. Since we are learning how to add Google Ads conversion tracking in WordPress, select “Website” from the list.
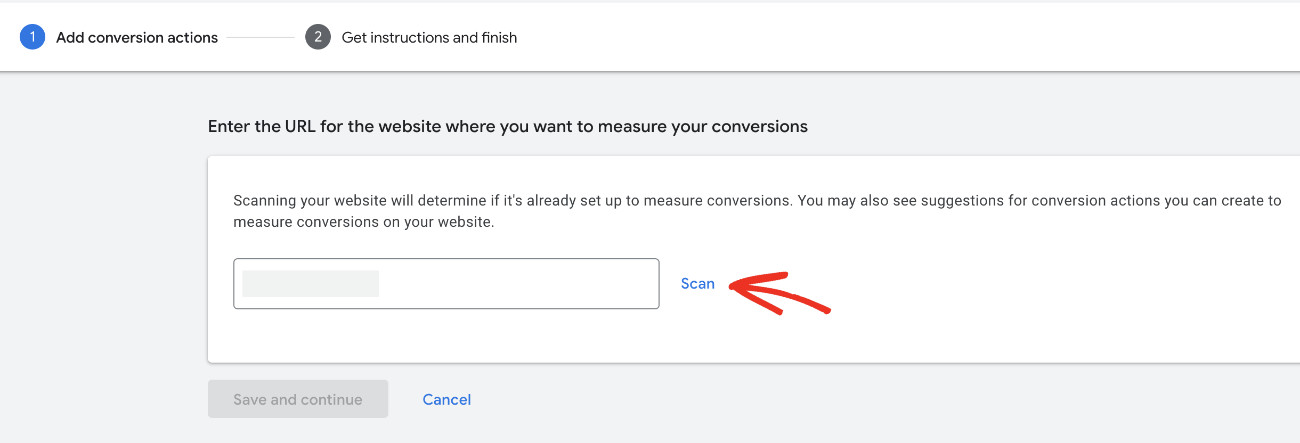
Now please put in your website URL and click the “Scan” button.
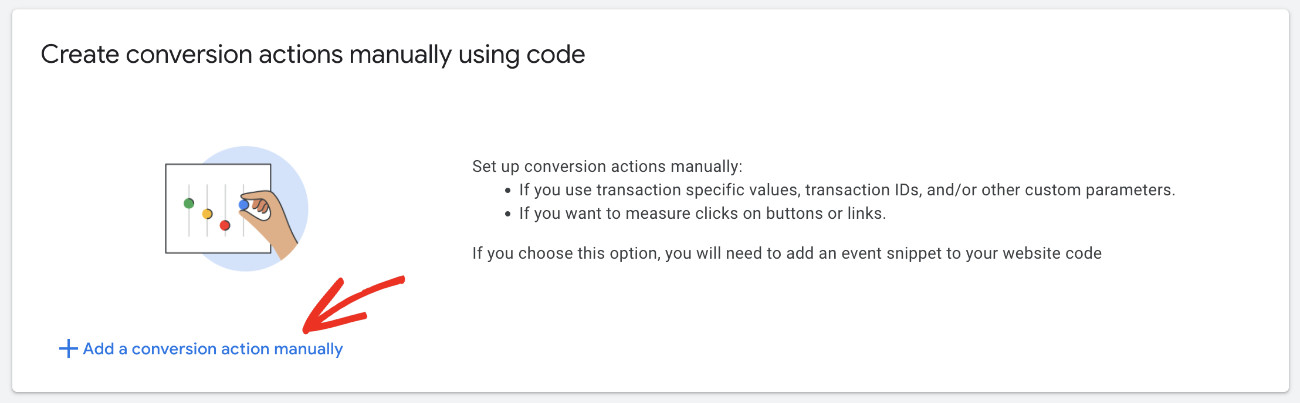
You’ll see two options appear before you for creating conversion actions; one is automatic, and the other is manual. The automatic conversion lets you choose a match type and enter the URL. This is appropriate if you know which events to count as conversions.
However, we’ll proceed with the manual method as it will enable us to define transaction values, measure clicks on buttons or links, and more. So, please click “+ Add a conversion action manually.”
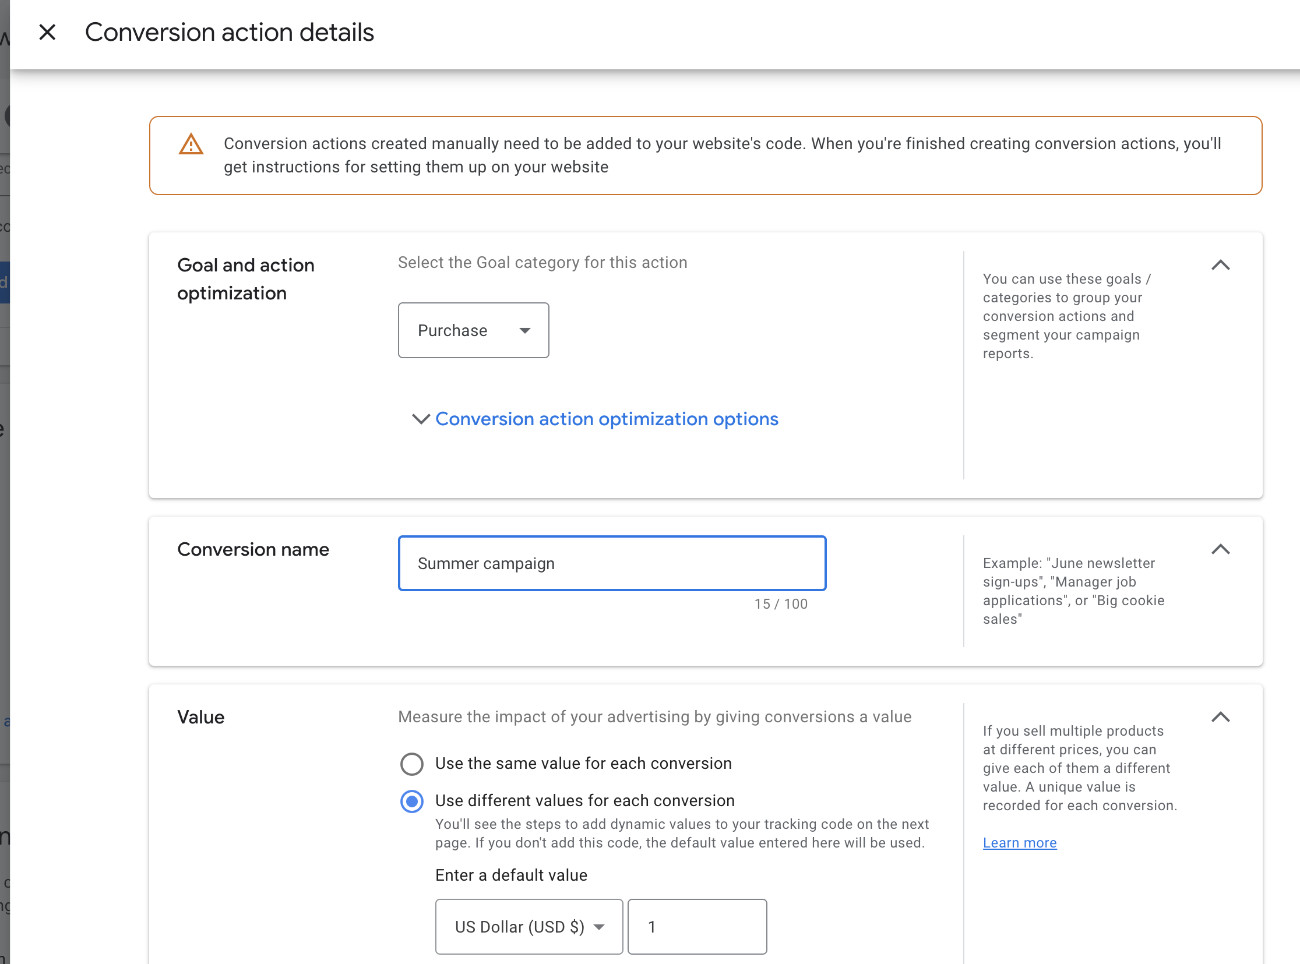
This will open up a modal with options to set the Conversion action details. Now, you need to select the ‘Goal and action optimization’ for your conversion. It is the action that you can track. For example, when someone subscribes to your newsletter, submits a contact form, adds a product to a cart, makes a purchase, and more.
Please select “Purchase” from the list (or anything else according to your need). Then, give the conversion action a name in the “Conversion name” field, and finally, set the “Value.” We recommend choosing “Use different values for each conversion” if you have multiple products on your website and set the default value to 1.
Now, from the Count section, please select “Every,” as this will count every conversion action. Then, click Done to finish configuring the Conversion Action.
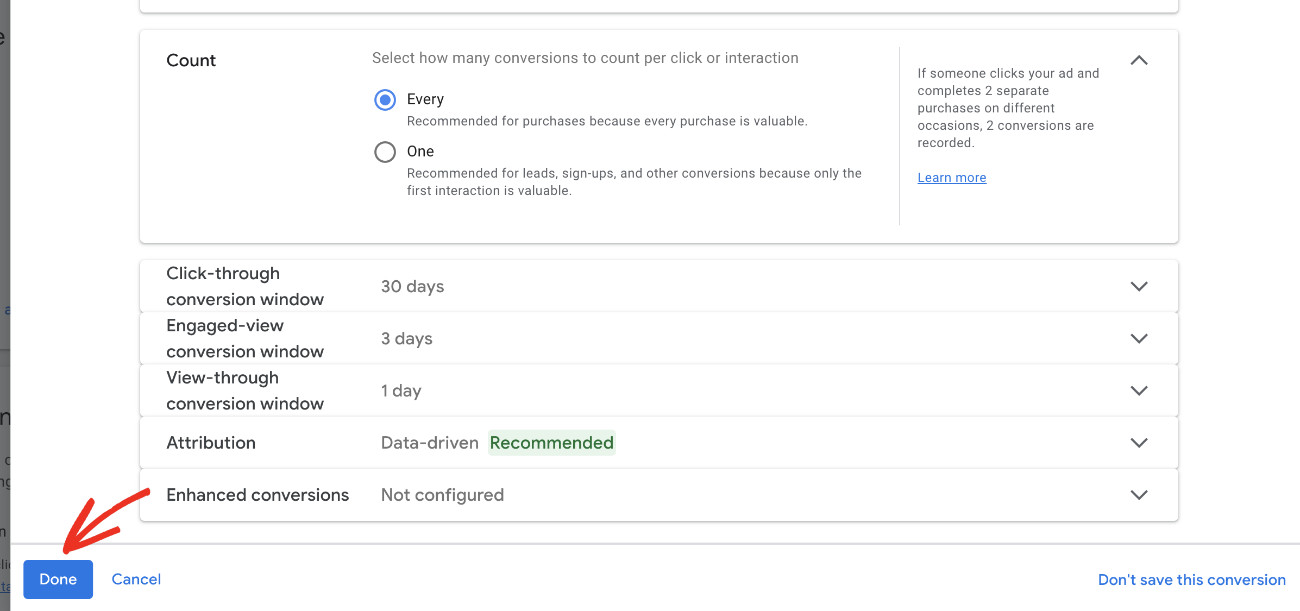
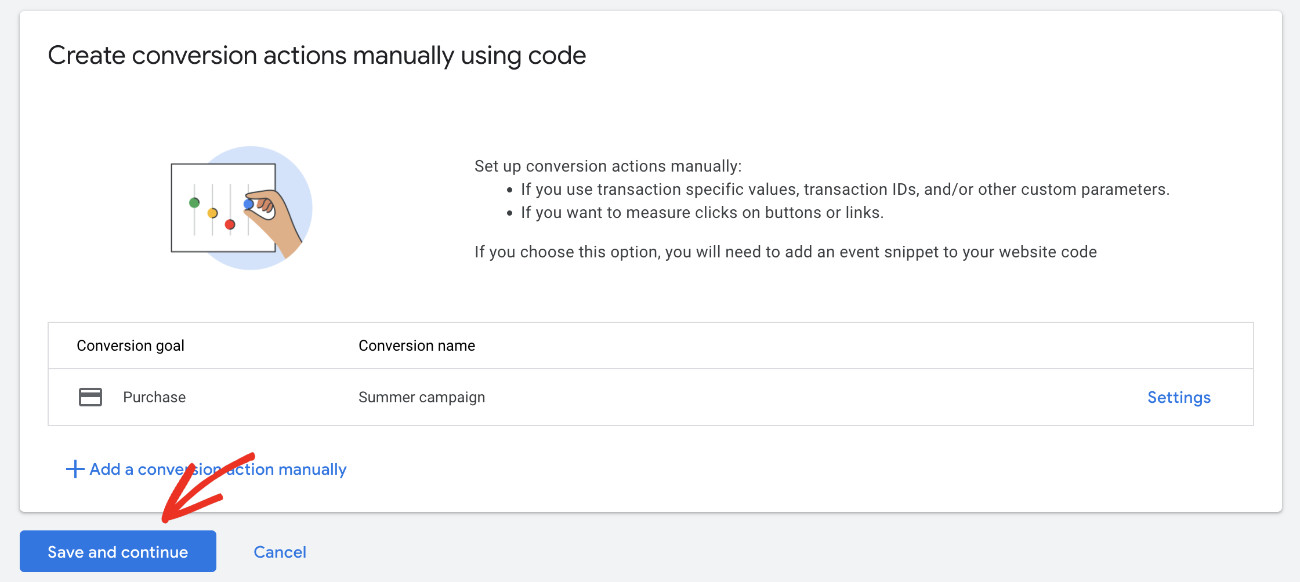
Then, click “Save and continue” to get instructions on how to add Conversion Action.
Now, navigate to the “Use Google Tag Manager” tab, and you’ll find the Conversion label ID. Please copy this Conversion label ID. We’ll use it in the later part of this tutorial.
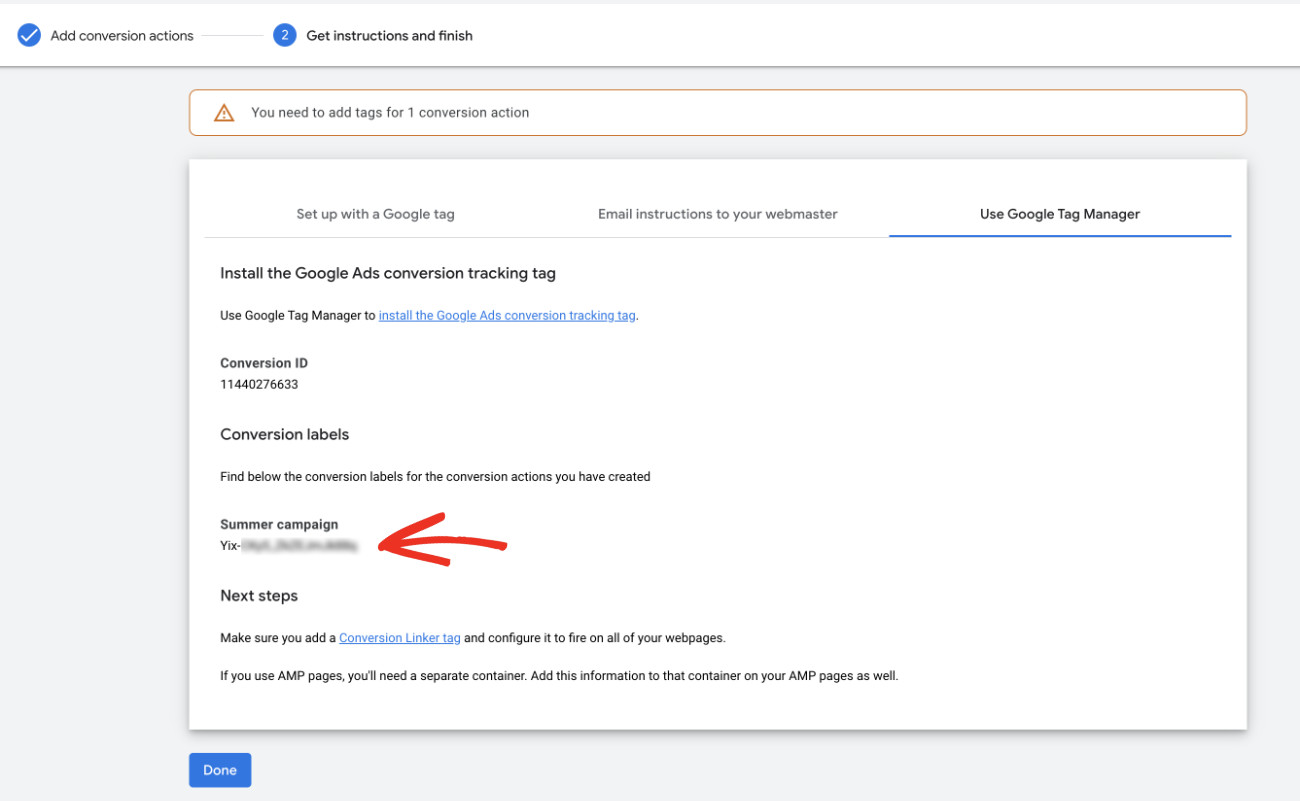
Finally, click “Done” to finish creating the conversion action.
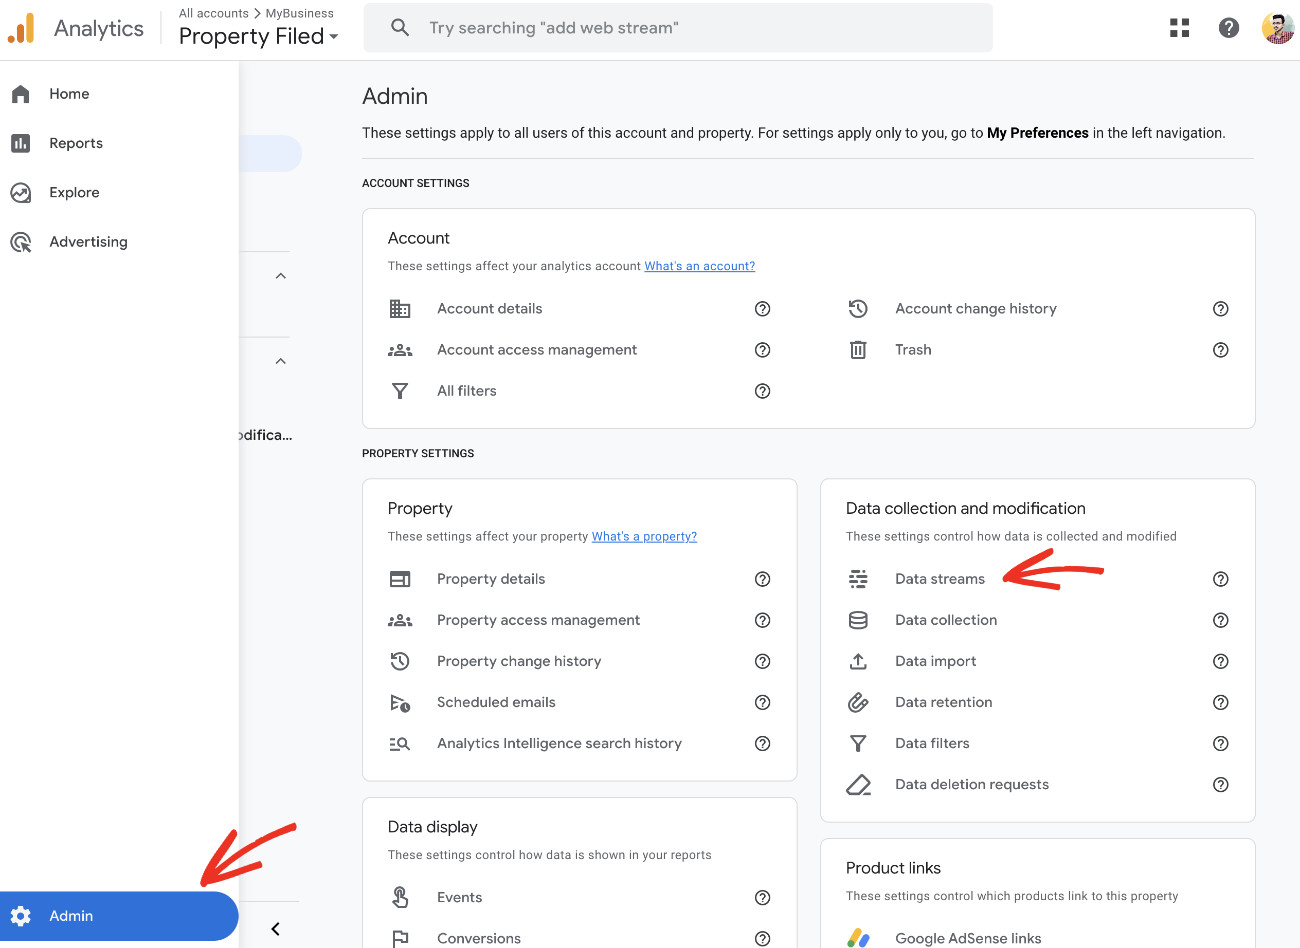
How To Add Google Ads Conversion Tracking In WordPress Sites
Now that you’ve created your first Conversion Action, it’s time to put it to work. You can add any code snippets, including Conversion Actions in WordPress, easily with WPCode. It’s a powerful plugin designed for seamless integration of code snippets and scripts into your website.
Here’s why we recommend using WPCode for adding Google Ads Conversion tracking in WordPress:
- Effortless Management: Seamlessly add, edit, and organize code snippets through its user-friendly interface, eliminating the need for technical skills.
- Versatility: Whether it’s JavaScript, HTML, CSS, PHP, or other languages, WPCode supports a wide array of code types for any customization needs.
- Automation: WPCode handles the technical intricacies behind the scenes, allowing you to concentrate on other important areas of your business!
- Trusted by Millions: With over 2 million websites relying on WPCode, you join a vast community that trusts this plugin to ensure smooth business operations.
You can add Google Ads Conversion tracking in WordPress using the following methods with WPCode:
Method 1: Add Google Ads Conversion Tracking Using Conversion Pixel (Recommended)
If you get the Plus plan of WPCode, you’ll have access to the WPCode Conversion Pixels addon. Using this, you will be able to not only track Google Ads conversion but also TikTok, Pinterest, Snapchat, and Facebook Pixel.
The Conversion Pixels addon takes care of automatically adding the code snippets and scripts. It also provides advanced eCommerce tracking for WooCommerce, Easy Digital Downloads, and MemberPress.
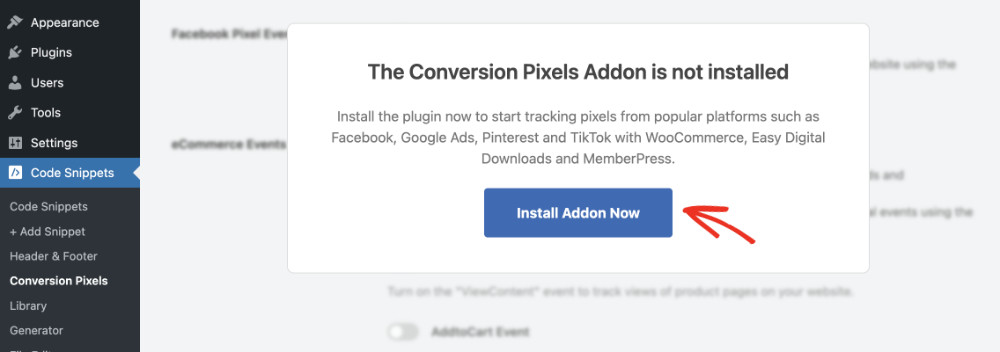
After installing and activating the WPCode, like any other plugins in WordPress, you’ll see a new menu item labeled “Code Snippets” on the left side of your WordPress admin bar.
To enable the Conversion Pixel addon, please navigate to Code Snippets > Conversion Pixels and click on the “Install Addon Now” button. Wait a few moments, and the addon will install and activate automatically.
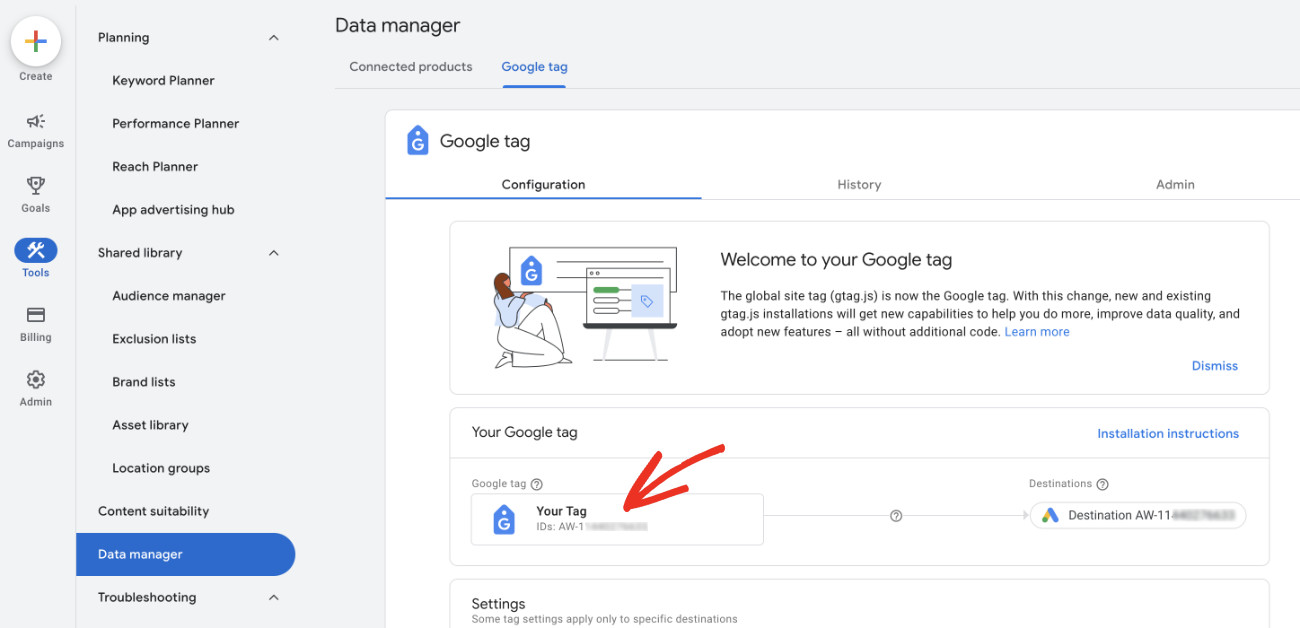
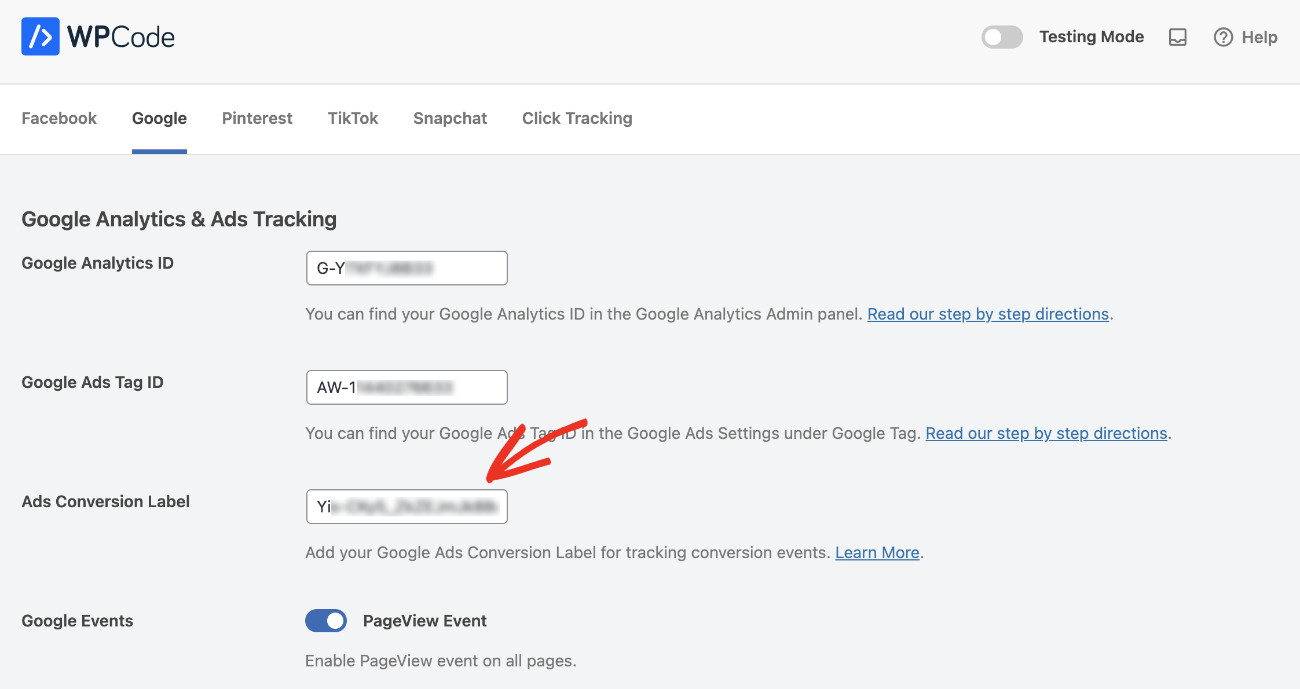
Now, you need to get your Google Ads Tag ID to track conversions. You can get it by visiting your Google Ads account. From the left sidebar, click on Tools > Data Manager, then select the Google Tag tab. Now, copy your Google Tag ID from the “Your Google Tag” section.
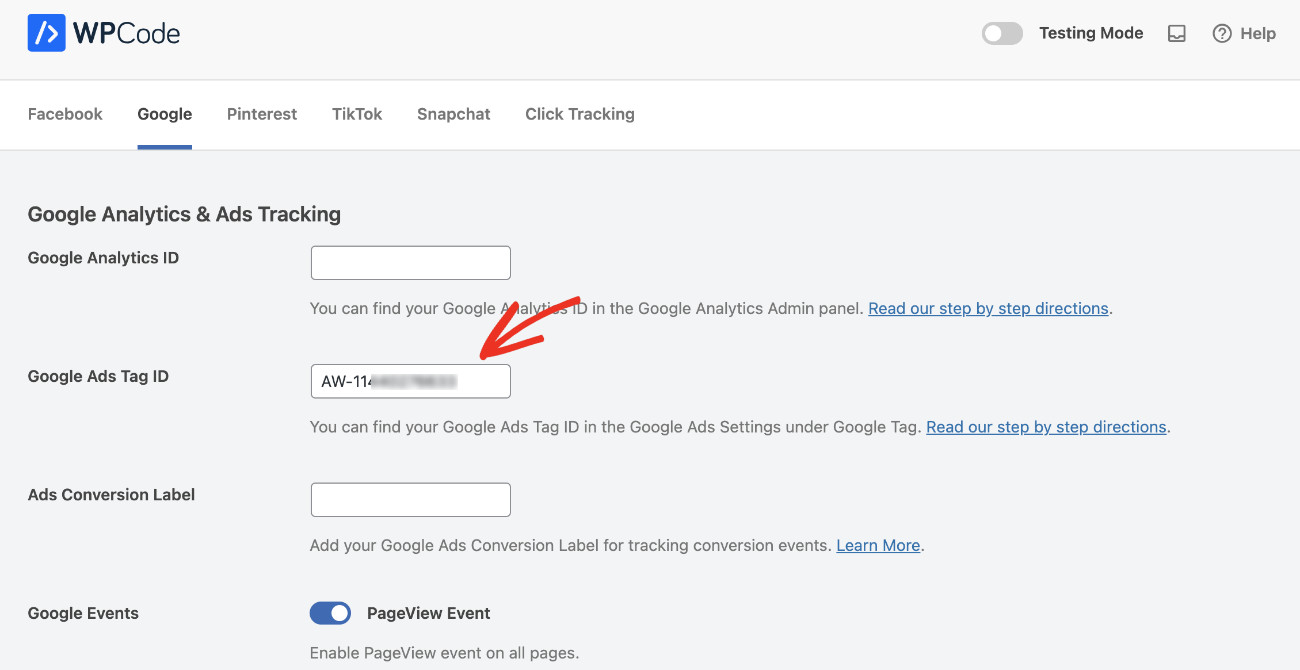
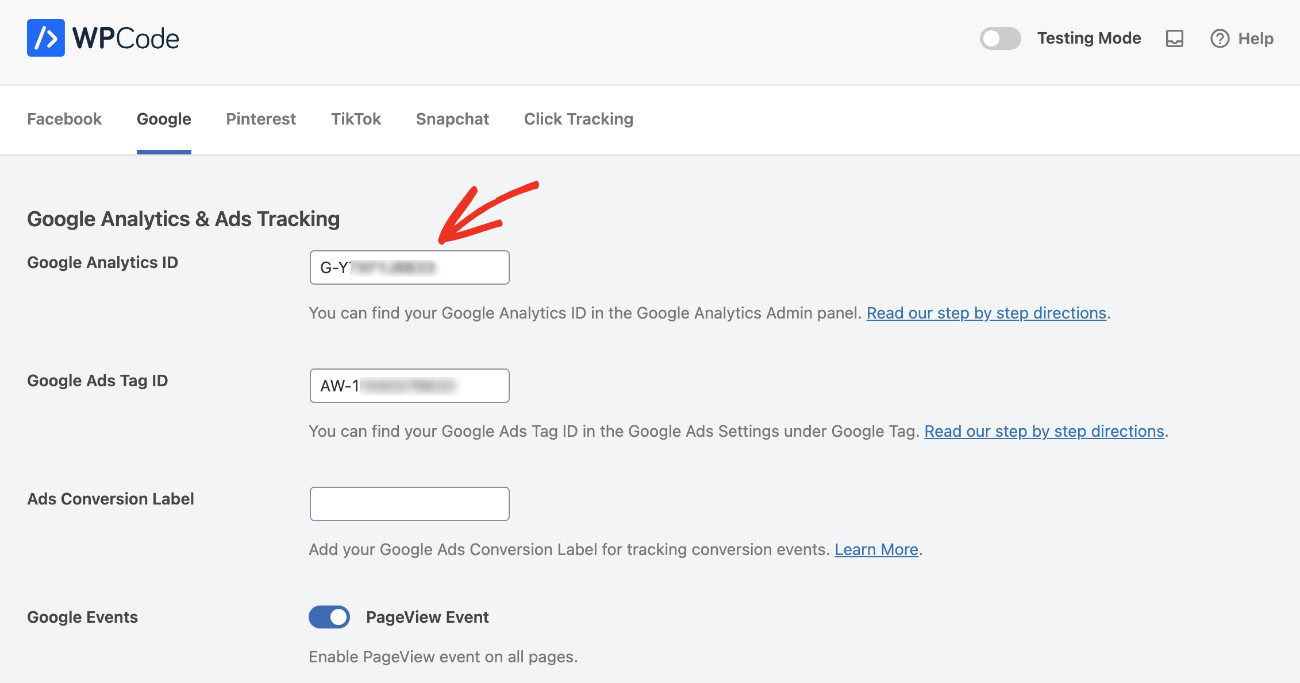
Come back to your website and paste your Google Ads Tag ID in its field.
It’s not mandatory, but you can take your Conversion Action tracking to the next level by coupling Google Ads with Google Analytics. It will enable you to gain a complete view of your ad performance, from clicks to website behavior.
By analyzing metrics like bounce rate and time on site, you can see if your landing pages are engaging. Powerful reports in Google Analytics will reveal which keywords and ad variations drive conversions, allowing you to optimize your campaigns for better results.
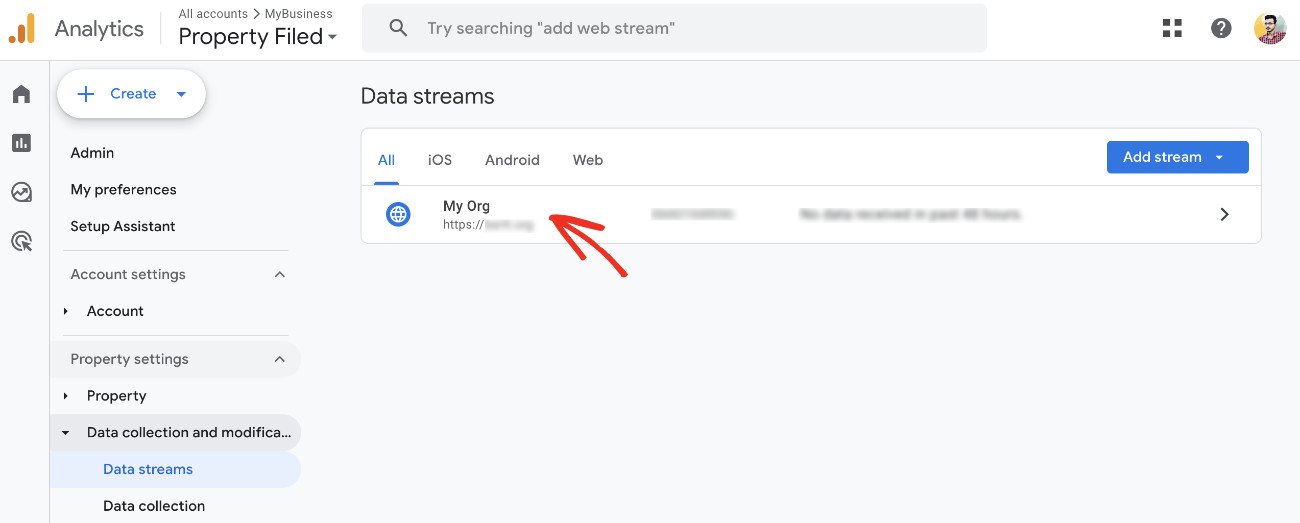
To combine Google Analytics 4 with Google Ads, you just need to paste your Google Analytics ID in its designated field in WPCode. You can get the ID by logging into your Google Analytics account and then visiting Admins > Data streams.
You’ll see all Data streams listed on this page, find and click on your website.
A modal will pop up. Please copy the Measurement ID.
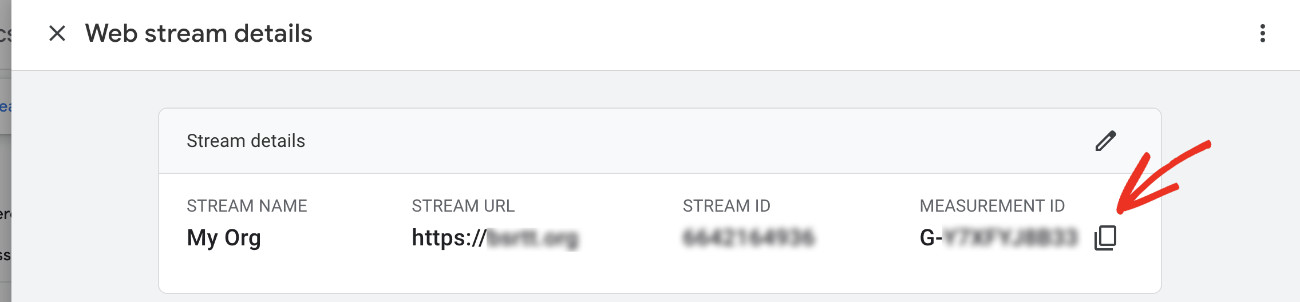
Now, come back to your website and paste the Measurement ID you copied on the Google Analytics ID field in WPCode.
You can track a specific conversion event better and even differentiate between different types of conversions more precisely by using the Ads Conversion Label. It’s very easy to add with WPCode.
At the final step of How To Create A Conversion Action in Google Ads (in the earlier section of this tutorial), you have copied the Conversion Label ID. All you need to do now is to paste it on its respective field in WPCode.
If your online store is created with WooCommerce, Easy Digital Downloads, and MemberPress, you can enable advanced eCommerce tracking with WPCode. Just enable what you’d like to track from the “eCommerce Events Tracking” menu, and that’s it.
Finally, click “Save Changes” to finish adding Google Ads conversion tracking in WordPress!
Method 2: Add Google Ads Conversion Tracking In WordPress Header (For Free)
You can also add Google Ads Conversion tracking to your website by inserting the Google tag on all pages of your website using the free version of WPCode.
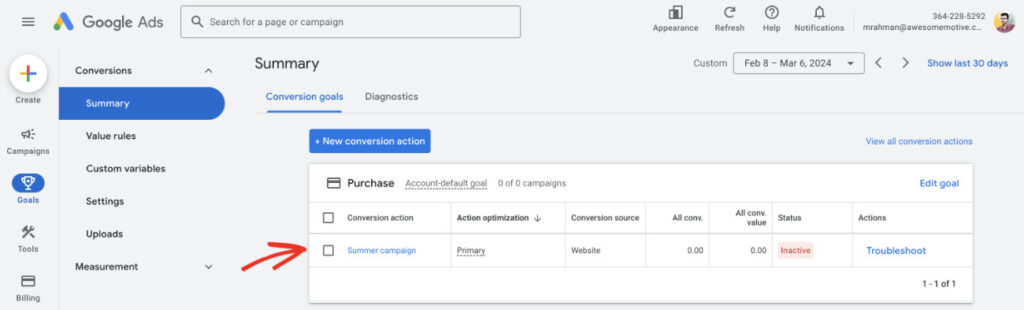
You can find the Google tag for your conversion action by logging into your Google Ads account and then navigating to Goals > Summary. Then, click on the conversion action you created earlier.
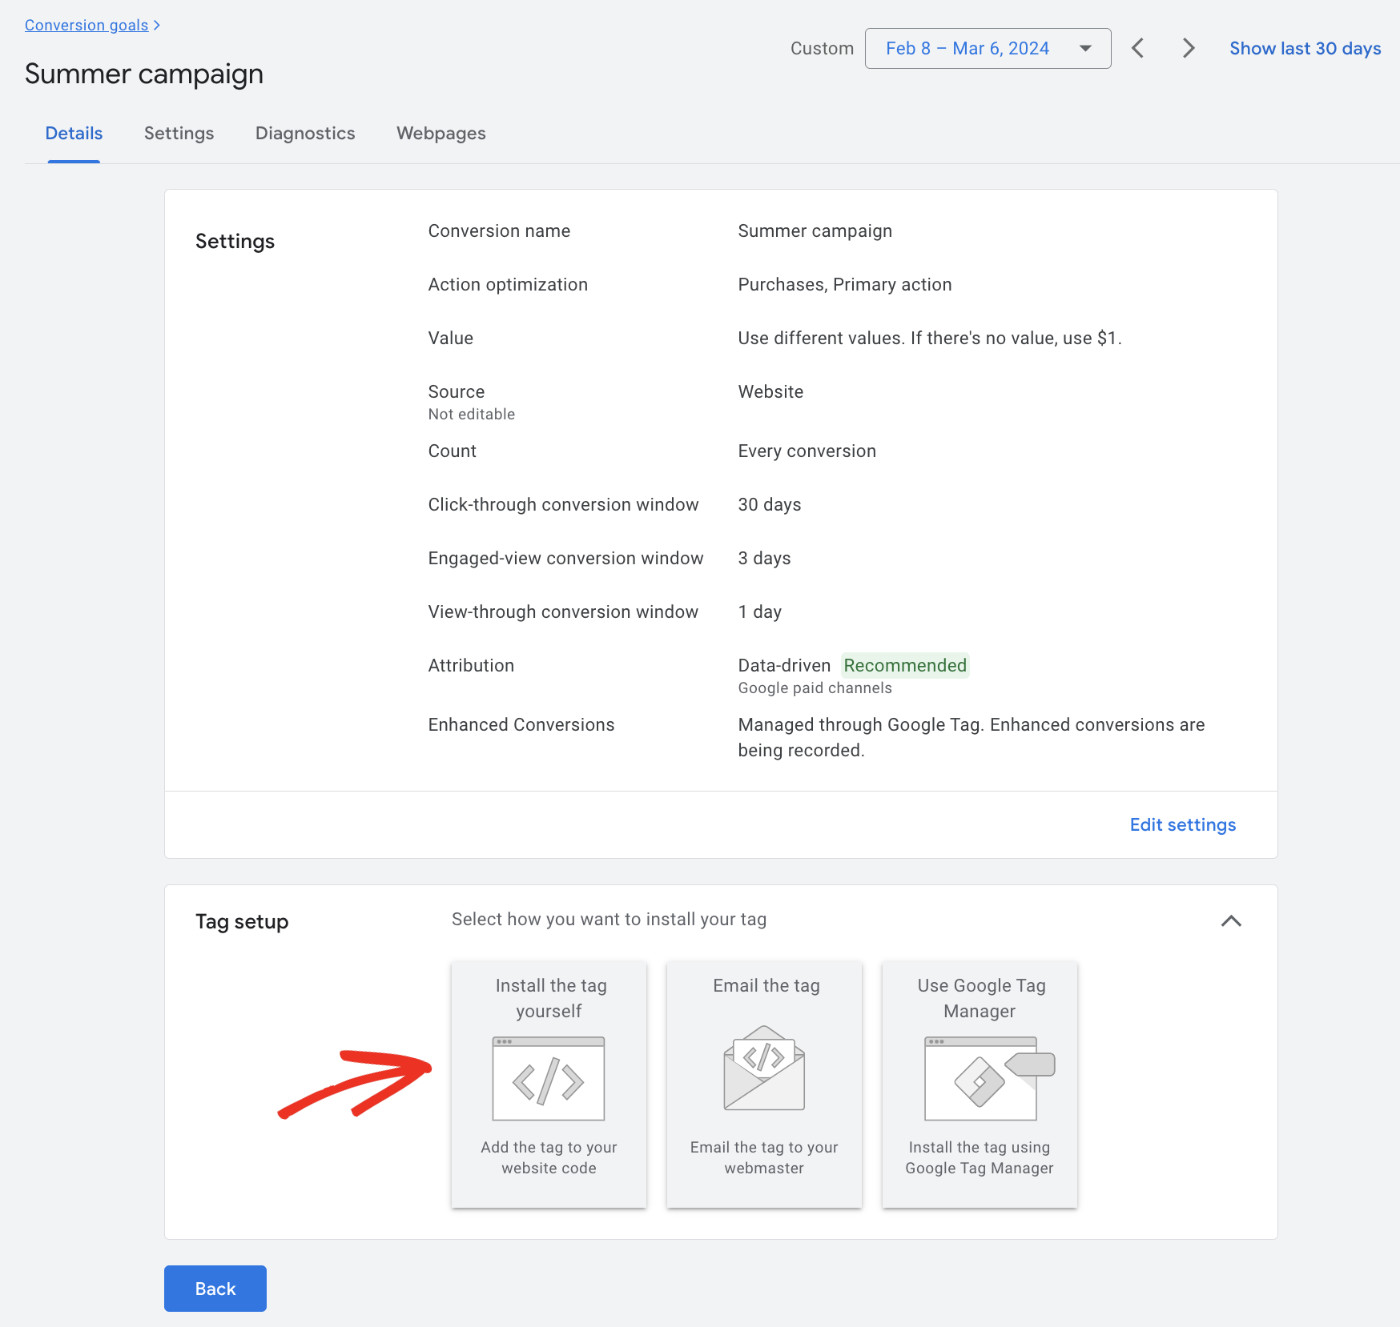
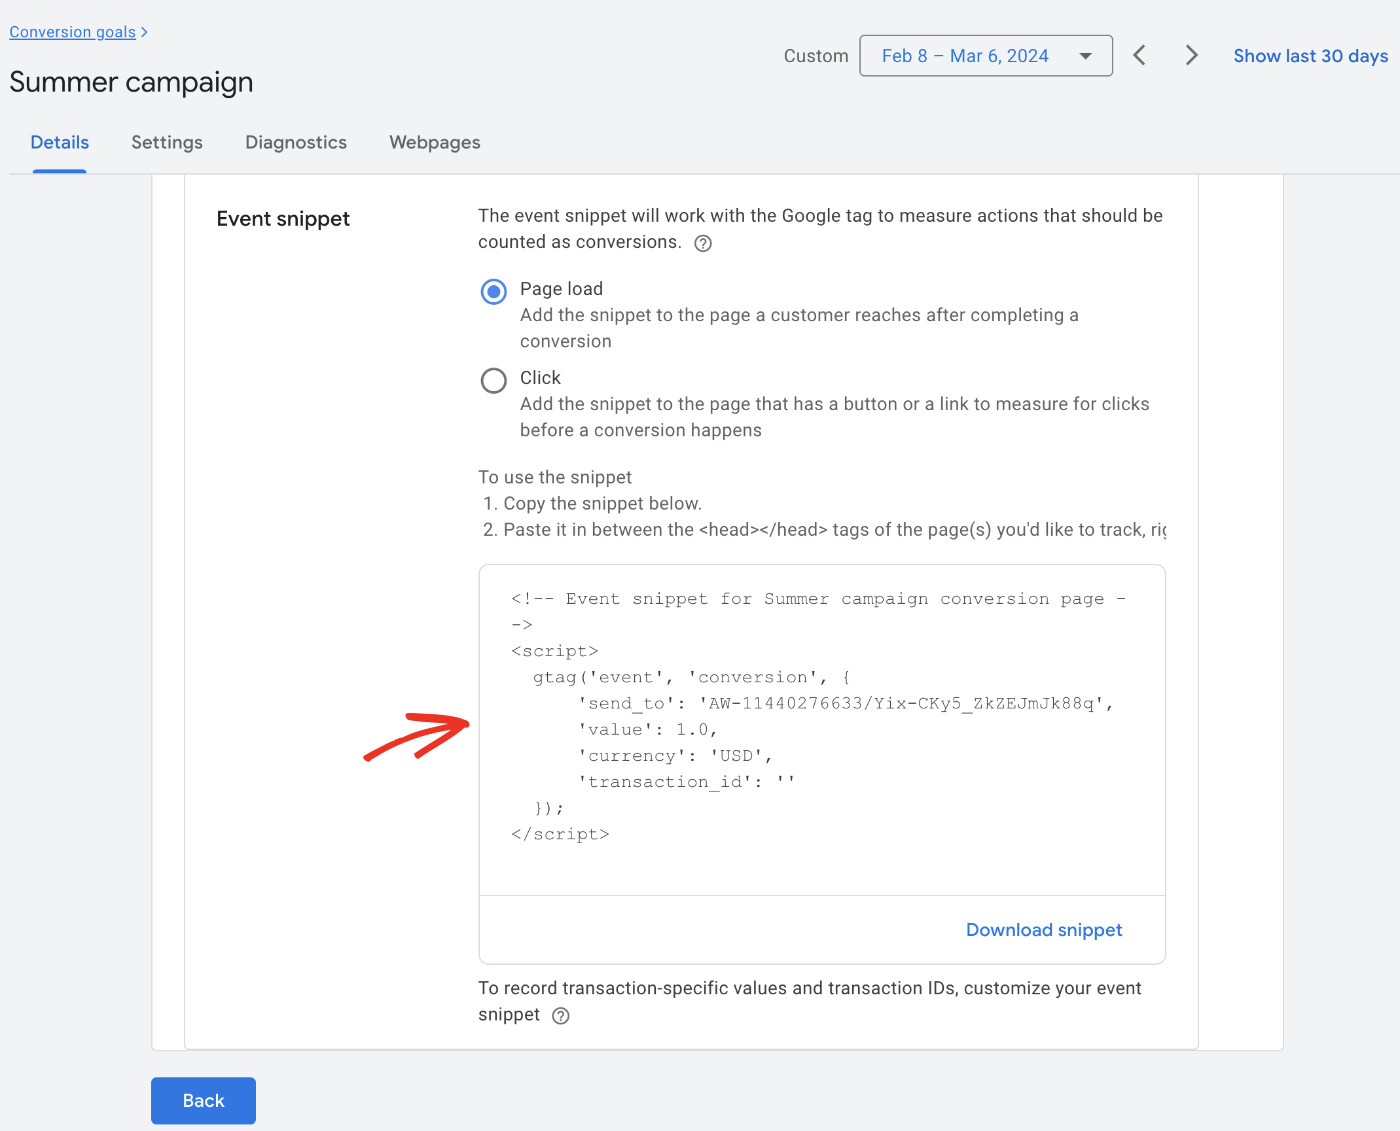
Under the “Details” tab, you’ll see a “Tag Setup” card. Click on “Install the tag yourself”.
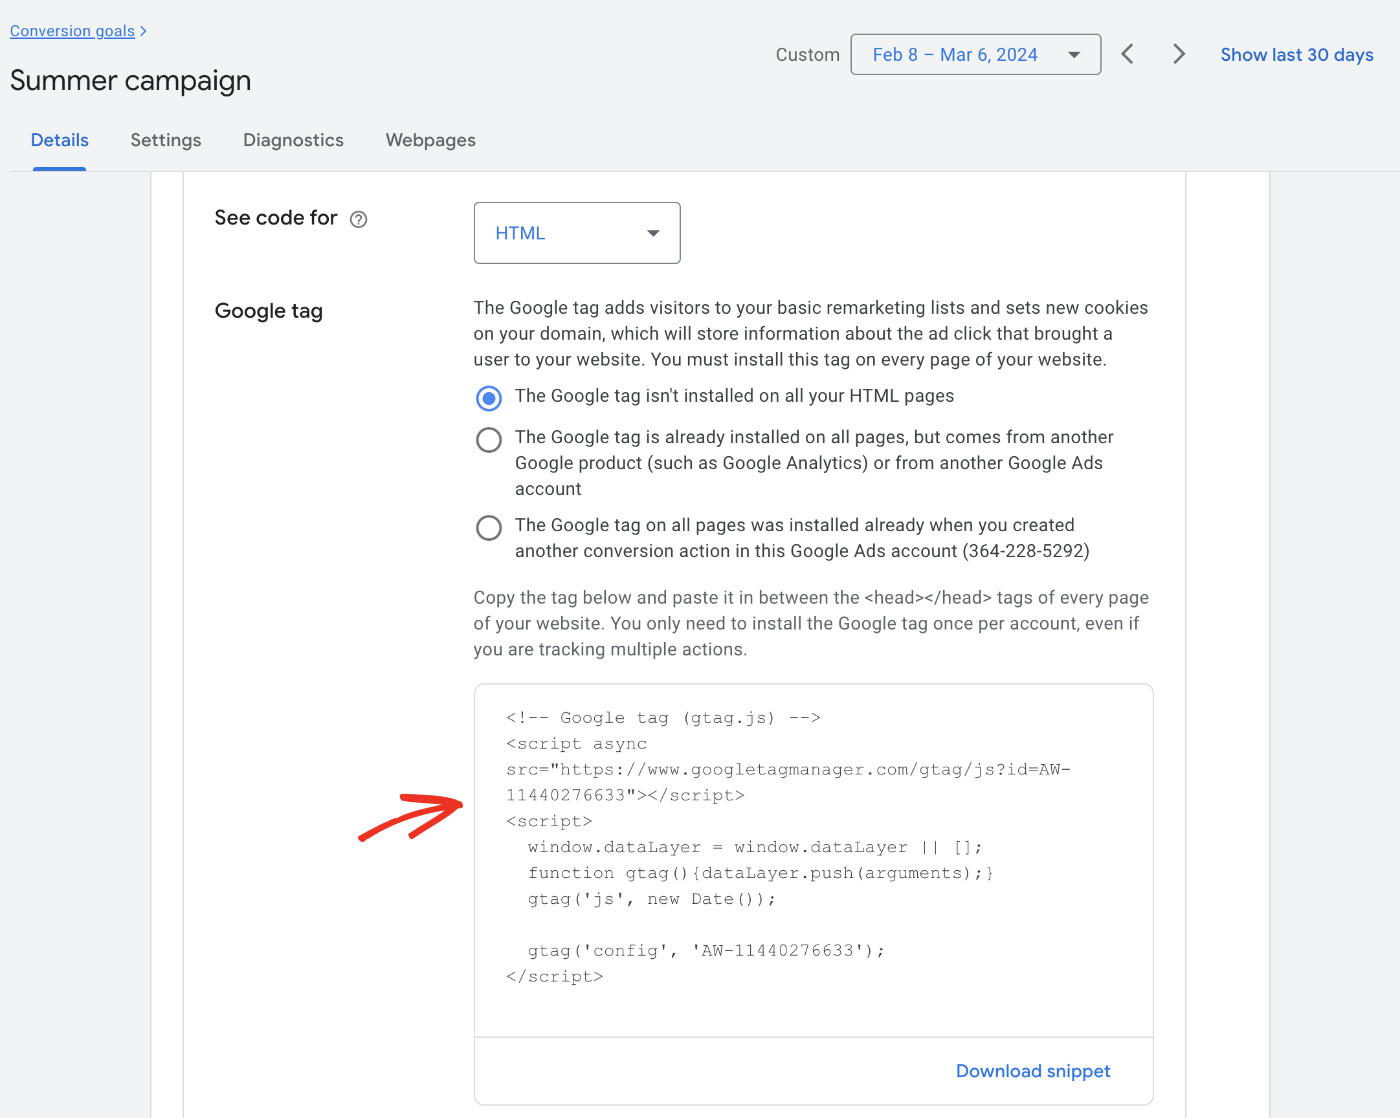
Now, you should see the Google tag and Event snippet. Make sure that HTML is selected on “See the code for,” then copy your Google tag code. (Don’t close this browser tab/window, as we need to return here to copy the Event snippet a bit later.)
Now, come back to your website backend dashboard and navigate to Code Snippets > Headers & Footers. In the Headers section, paste the code you just copied.
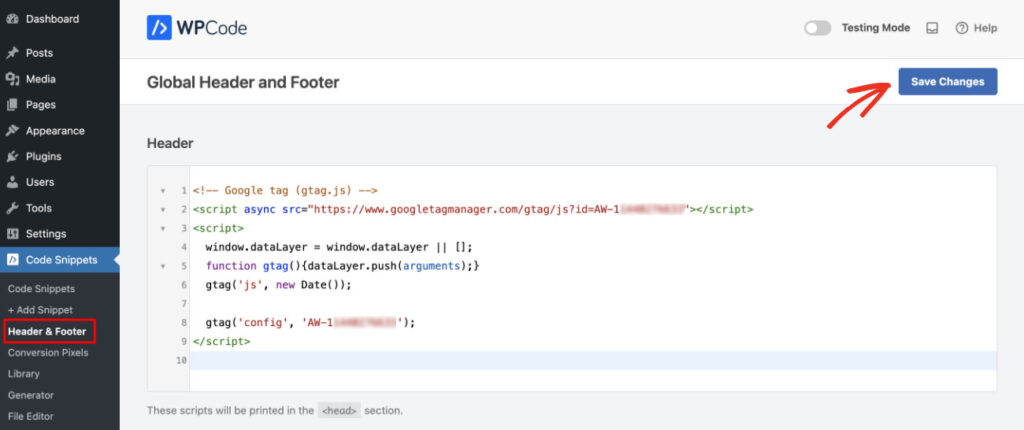
Click “Save Changes” to finish your setup. This will add the Google tag for Conversion action on all pages of your website.
Event snippets work alongside Google tags in order to make sure appropriate actions count as conversions. Therefore, you need to add it to the page where the conversion is located. Please go back to your browser tab/window (from where you copied the Google tag) and copy the Event snippet. (You can find it by navigating to Google Ads > Goals > Summary > select the Conversion action > Tag Setup > Install the tag yourself > Event snippet)
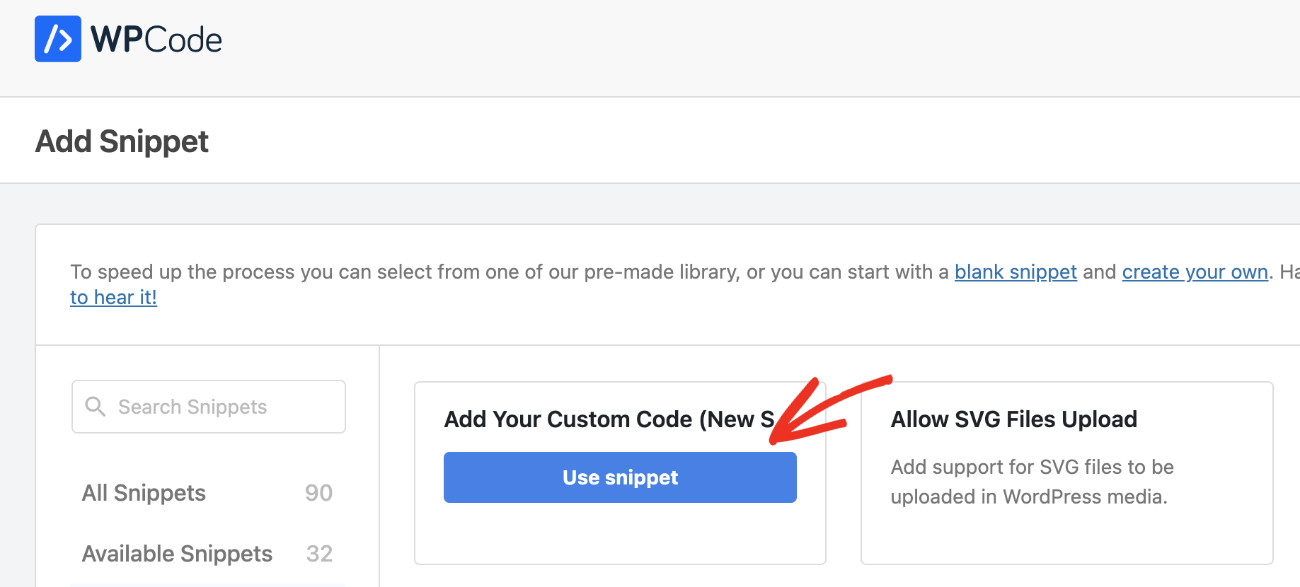
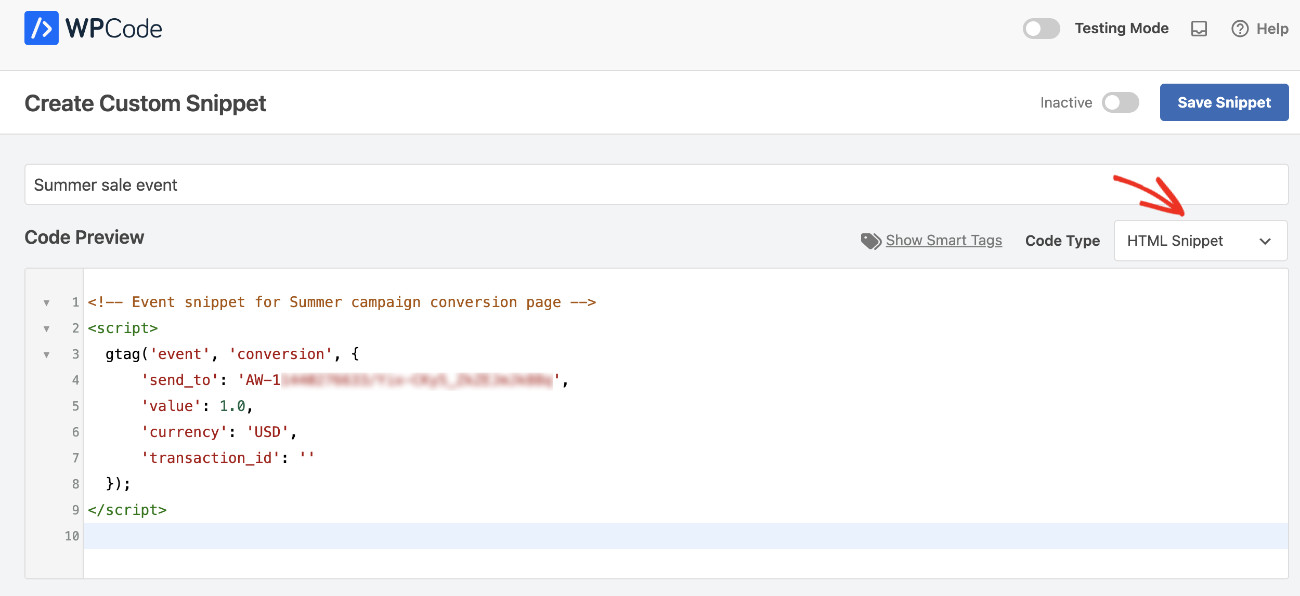
Now, please return to the backend of your website and visit Code Snippets > Add Snippets.
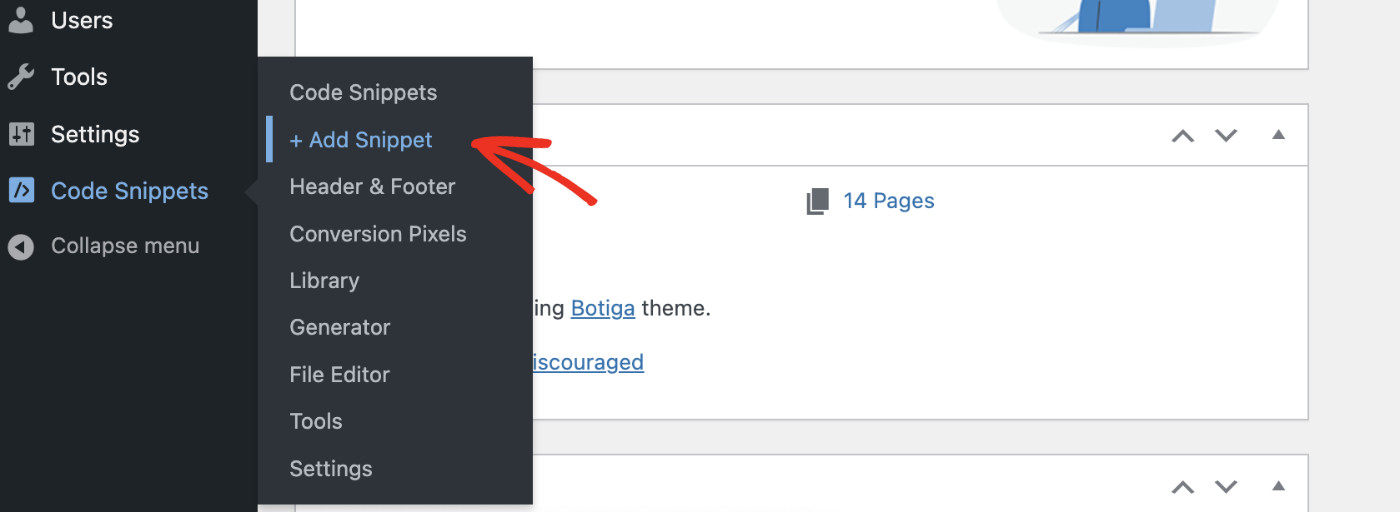
Click on “Use snippet” from the “Add Your Custom Code” card, and you’ll land on the snippet editor.
Give your snippet a meaningful name and make sure that “HTML Snippet” is selected as Code Type then paste the Event snippet you just copied in the Code Preview area.
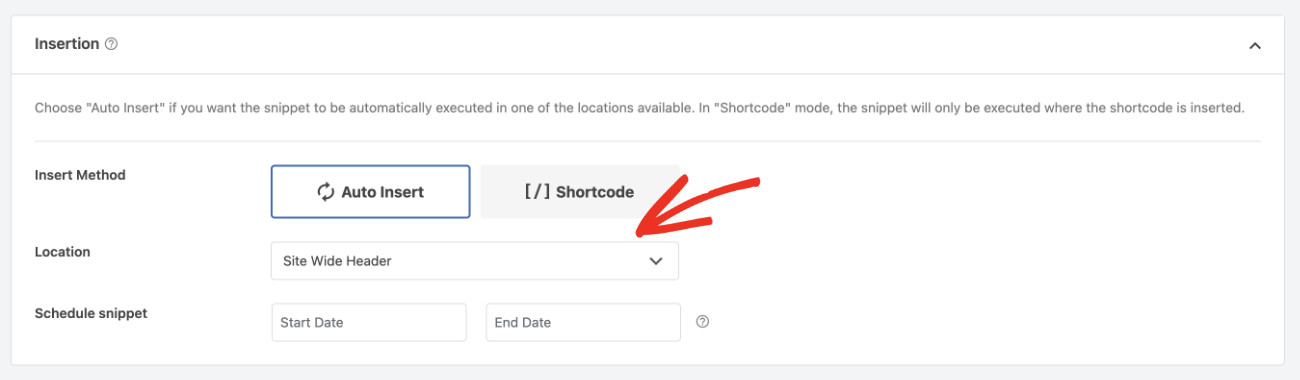
We need to make sure the event is inserted before the content. To do that from the Insertion card, select the Insertion Method as “Auto Insert,” and for Location, select “Site Wide Header” from the dropdown.
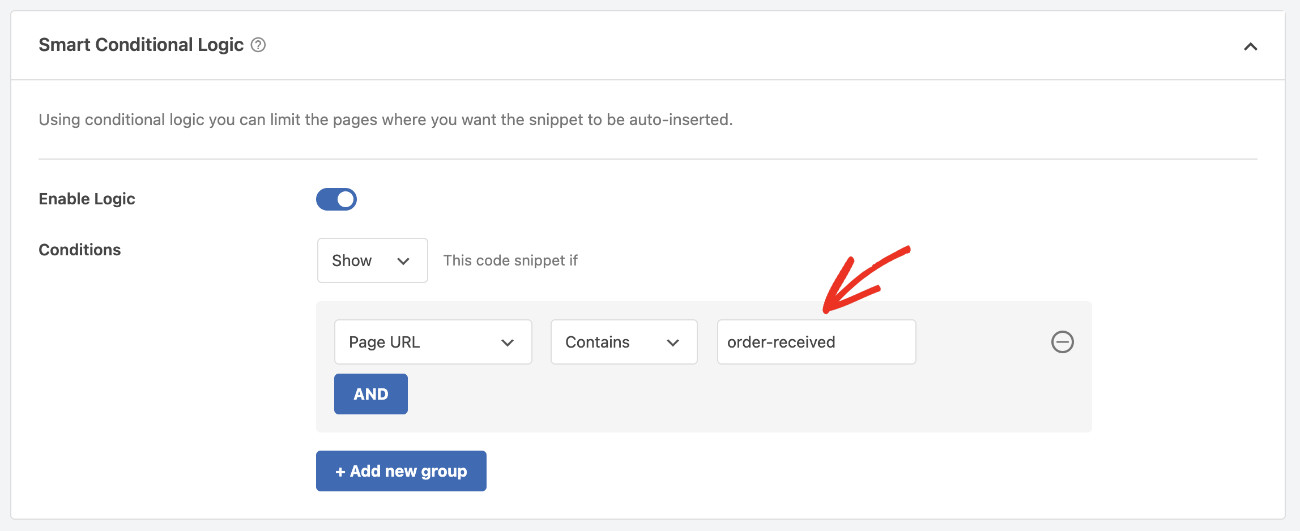
Now, we need to define where to load the event. Since we are counting purchases, a good way to validate that is if the customer is redirected to the Order Received page (or thank you page, depending on your store configuration).
To do that from the Smart Conditional Logic card, turn on Enable Logic, then set the Condition to Show, now click “+ Add new group.” Now, set the first field to “Page URL,” select “Contains” in the second field, and on the third field, put “order-received” (or any other word indicating a successful purchase page URL).
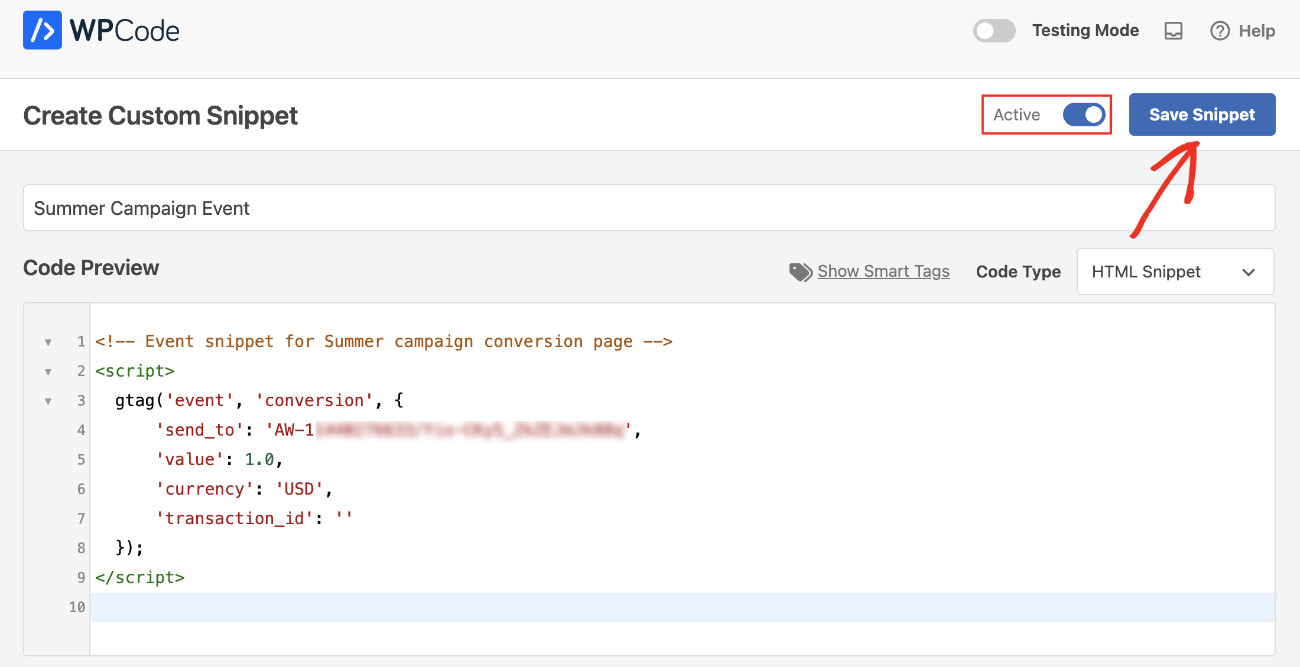
Finally, click the “Save Snippet” button to save the changes and activate the snippet by changing the Activate switcher next to it.
Conclusion
We hope you’re able to learn how to add Google ads conversion tracking in WordPress. By implementing Google Ads conversion tracking, you can unlock the power of measuring the true effectiveness of your online advertising efforts. Don’t leave your marketing to chance; add tracking systems and get the most out of your advertising budget!
Get WPCode Pro to add Google Ads Conversion Tracking as well as TikTok, Pinterest, Snapchat, and Facebook Pixel easily.

