Do you want to add a Pinterest tag to WordPress for free?
Imagine investing in Pinterest campaigns without knowing if they’re effective—It’s like shooting arrows in the dark, hoping to hit a target you can’t see.
That’s where the Pinterest tag comes in. When integrated with your WordPress site, it tracks user actions from purchases to sign-ups, turning guesswork into strategic, data-driven decisions.
Therefore, in this detailed tutorial, we’ll show you how to add a Pinterest tag to WordPress for free so you can make better decisions and maximize your return on investment!
Key Takeaways:
- Pinterest Tag enables you to get the complete picture of your Pinterest campaign.
- Anyone can easily add the Pinterest tag and event code to your WordPress site.
- WPCode even has a Conversion Pixels addon to make the journey seamless.
Quick Access:
What Is The Pinterest Tag & Why It Matters
The Pinterest tag is a piece of code that lets Pinterest track visitors’ actions on your site after seeing your Pinterest ad.
It is designed to empower your marketing team with the necessary data to measure, optimize, and build audiences effectively.
The structure of the Pinterest tag consists of two main parts: the base code and event codes.
- Base Code: This is the foundational script that must be added to every page of your website. It serves as the groundwork that enables the Pinterest tag to function correctly and collect user data. The base code should be implemented before any event codes are added.
- Event Codes: These are specialized scripts placed on specific pages of your website to track particular actions related to your Pinterest ads. These actions reflect the direct impact of your advertising efforts and are vital for dynamically optimized campaigns, such as dynamic retargeting ads.
Event codes are tailored to monitor a variety of user interactions, including:
- Checkout: Tracks users who complete transactions.
- AddToCart: Monitors users by adding items to their shopping carts.
- PageVisit: Observes visits to product or service pages.
- Signup: Captures registrations for product or service use.
- WatchVideo: Tracks users who watch videos.
- Lead: Identifies users showing interest in products or services.
- Search: Monitors search for specific products or locations.
- ViewCategory: Tracks views of category pages.
- Custom: Allows for tracking of bespoke user-defined events.
Why You Should Add A Pinterest Tag To Your WordPress Site
When you incorporate the Pinterest tag into your website, it unlocks several powerful capabilities that are crucial for optimizing your digital marketing efforts:
- Track and Optimize Conversions: The tag allows you to monitor key actions taken by users, such as purchases or sign-ups, directly attributing these conversions to specific Pinterest ads.
- Measure Campaign Performance: By analyzing users’ actions after seeing your ads, you can assess which aspects of your campaigns are working and which may need adjustment, allowing for real-time campaign optimization.
- Build Audiences for Targeting: The data collected can help you create more refined and targeted audiences. This segmentation helps craft more personalized and effective marketing strategies.
- Become a Verified Merchant: Adding the tag contributes to your credentials on Pinterest, aiding in becoming a verified merchant on the platform, which can enhance trust and visibility among users.
- Access Conversion Insights: The tag provides detailed insights into how users interact with your ads and website, offering valuable data that informs your marketing decisions and strategies.
By embedding the Pinterest tag on your site, you ensure that every penny spent on Pinterest ads is measurable, allowing for optimized spend and more effective marketing outcomes.
So, in this tutorial, we’ll show you how to add a Pinterest tag to WordPress and how it can benefit your business!
What You Need To Get Started
Here are the prerequisites to add a Pinterest tag to WordPress:
- A Pinterest business account.
- A Pinterest advertiser account.
- Administrative access to your WordPress site.
- The WPCode plugin facilitates the integration without coding.
How To Create A Pinterest Tag
To use the Pinterest tag, you first need to create a Pinterest business account. You can do that by either converting your personal account or create a new one. Once the business account setup is complete, you need to configure your Pinterest ad account.
You can have up to 50 Pinterest ad accounts at the same time. After completing both, please log in to your Pinterest business account.
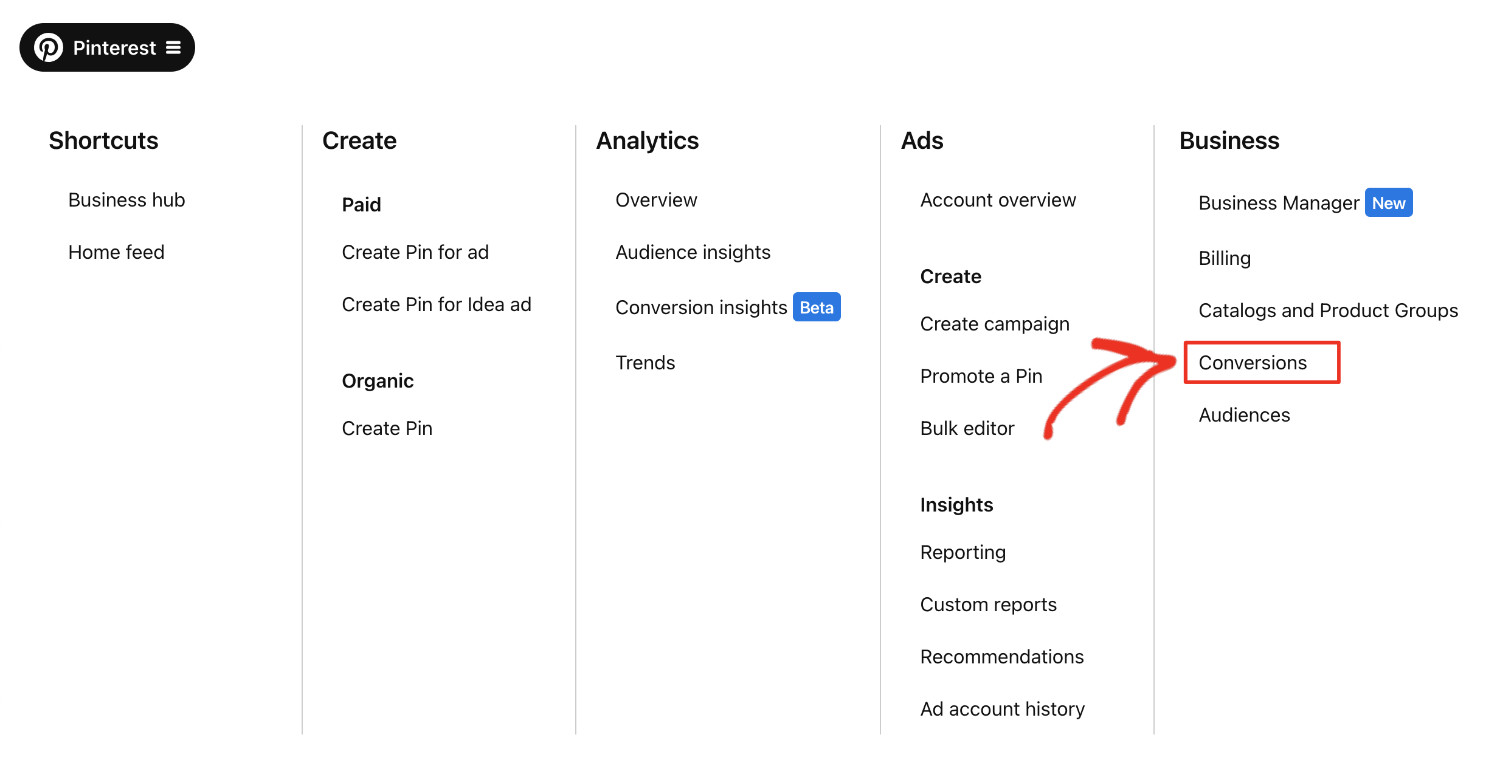
Once logged in, click the hamburger icon at the top left of the page. Then, select Conversions under the Business category.
Select Tag Manager from the left sidebar and click the “Install the Pinterest tag” button.

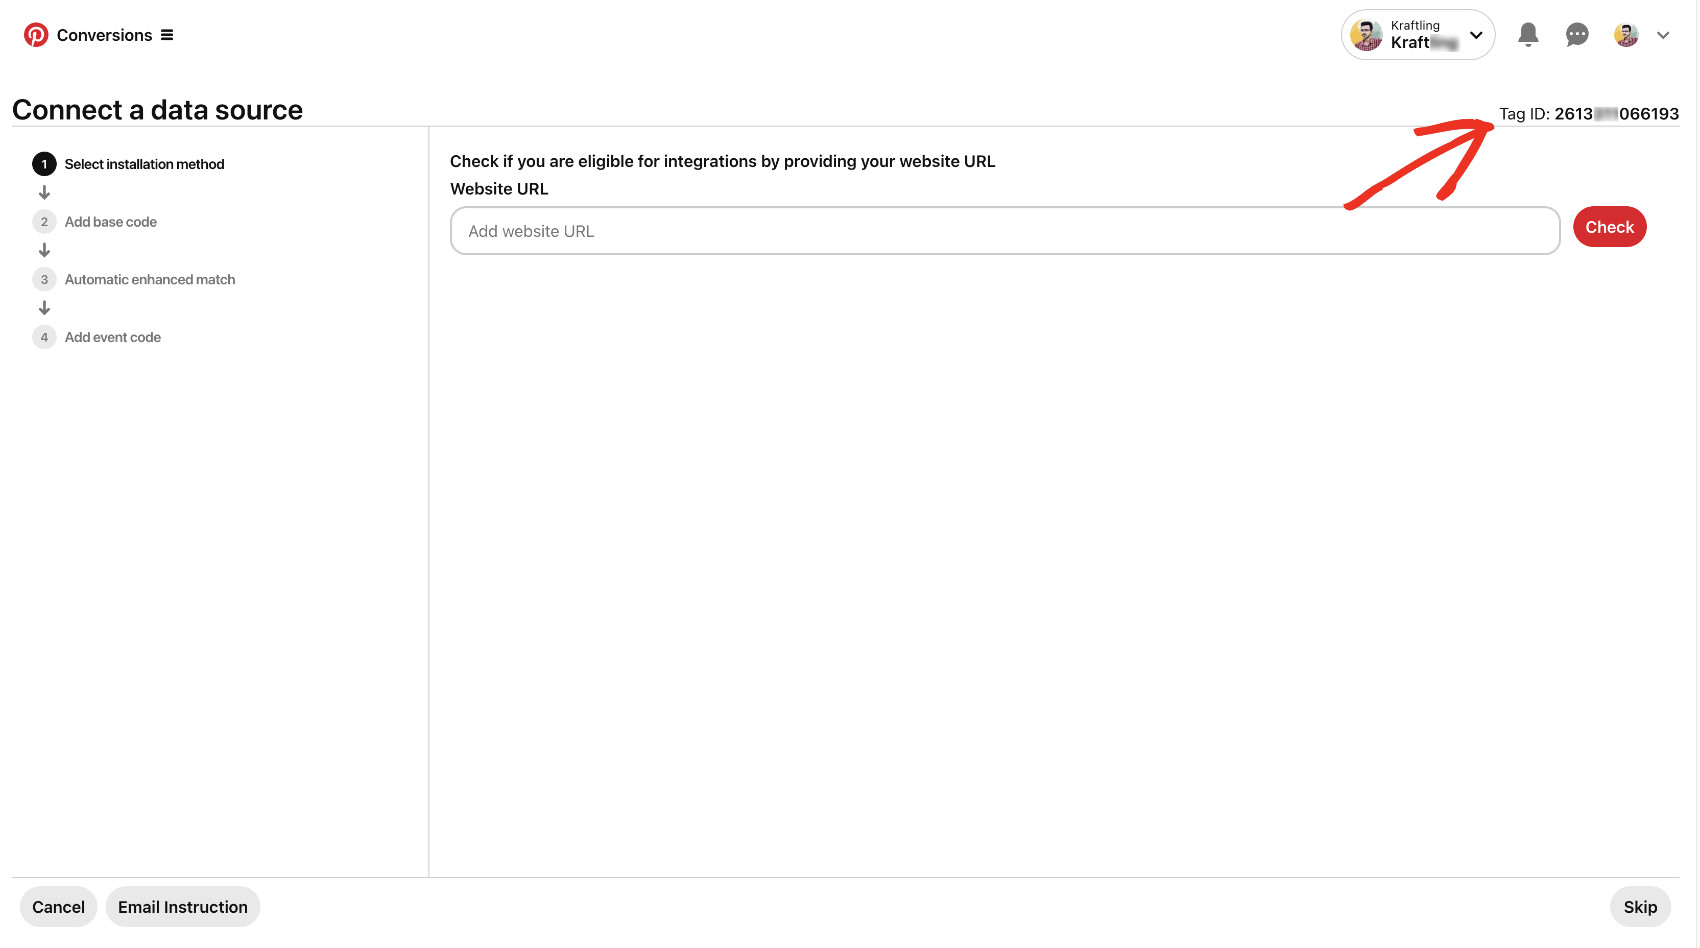
You’ll see your unique Tag ID at the top right corner of the setup wizard. Copy your Tag ID, as it will be required in the following steps.
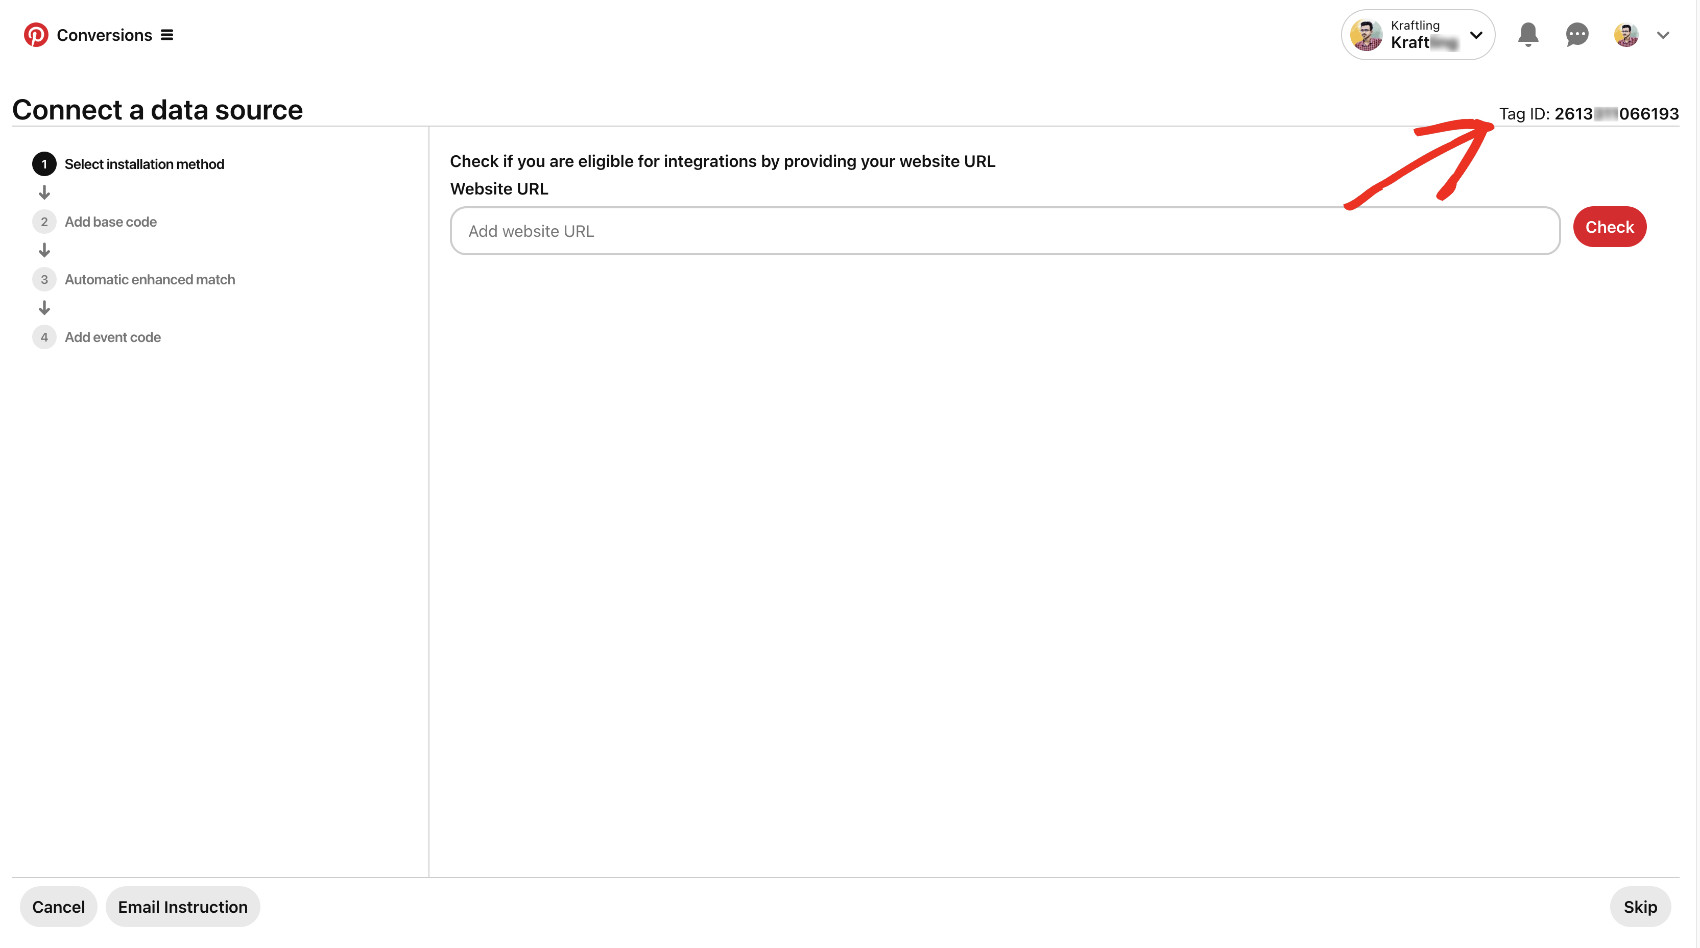
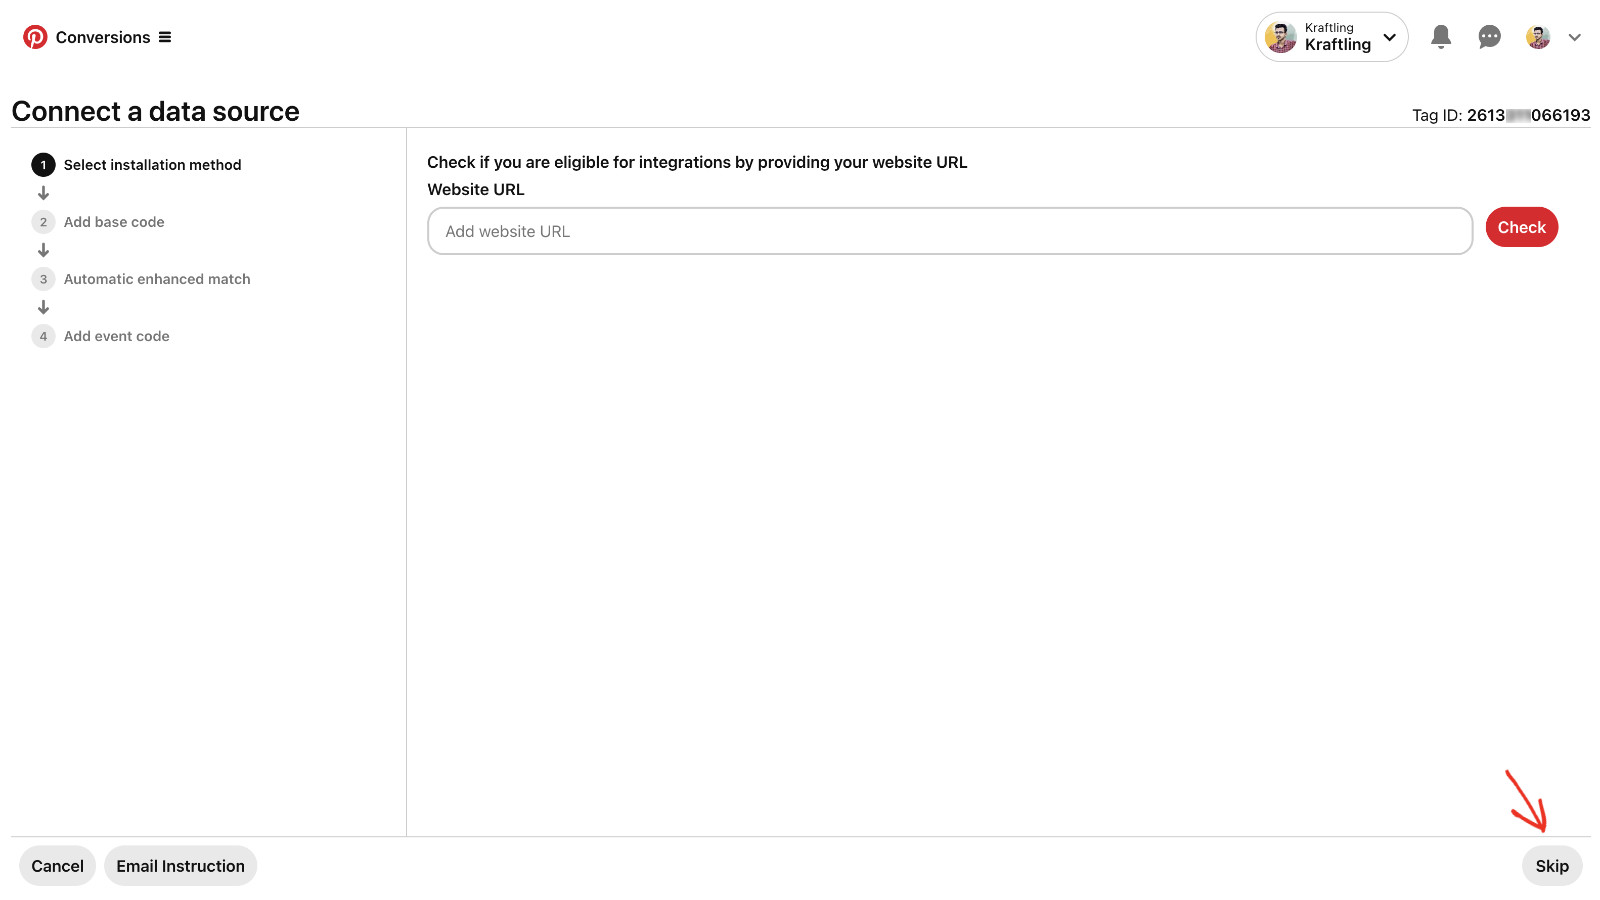
In later steps, you’ll get the base code and event code. Click “Skip” to proceed to the next step.
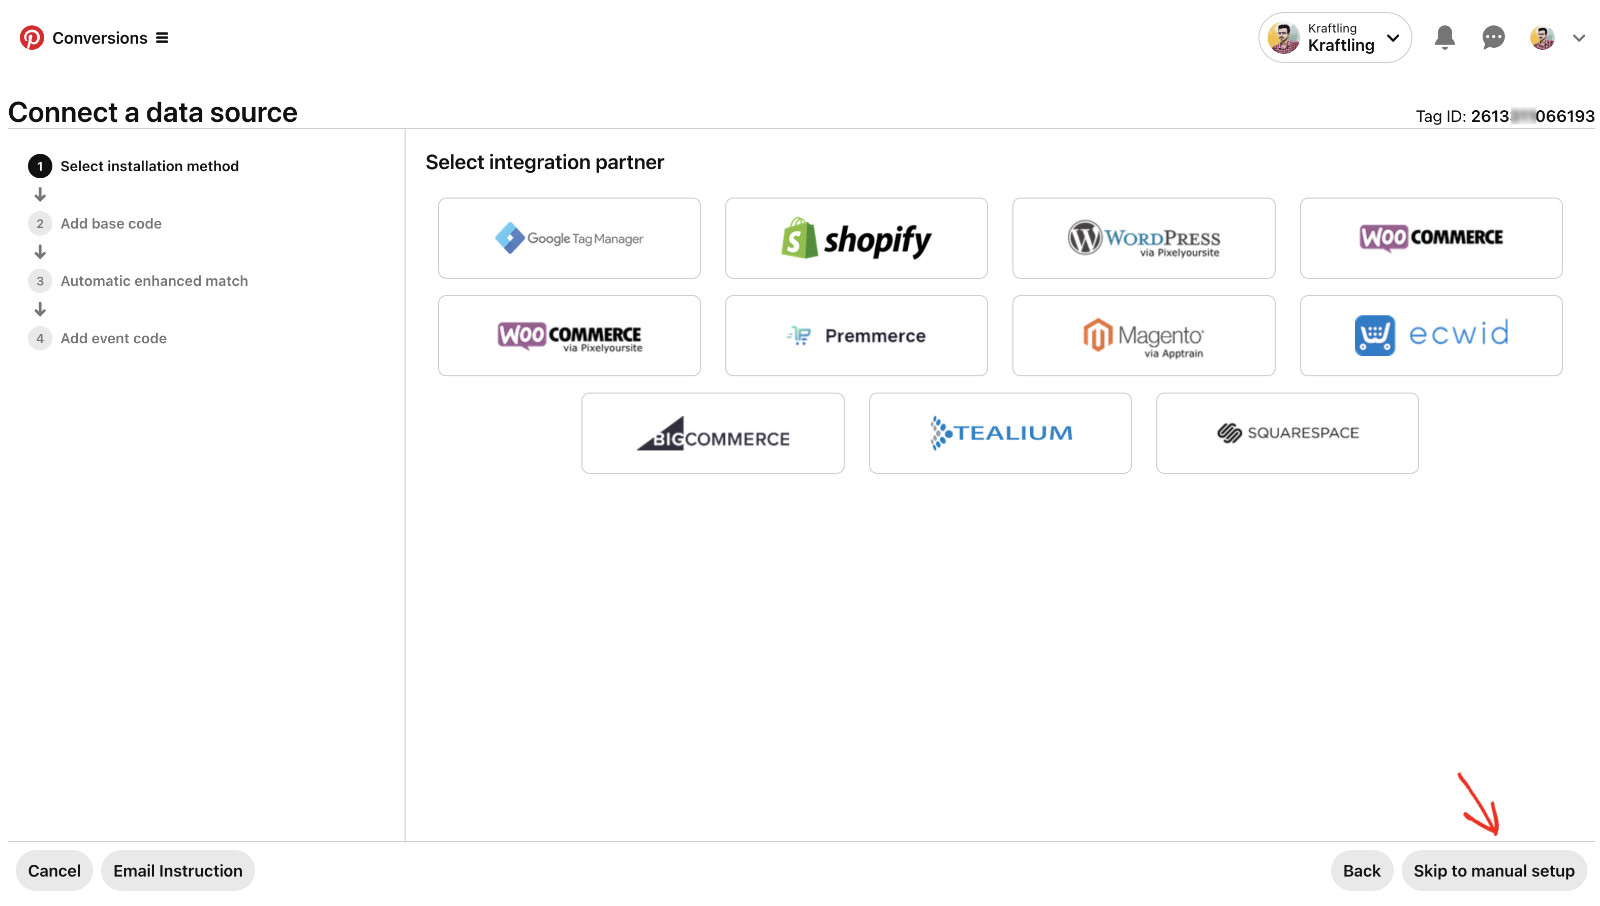
Since we will manually set up the Pinterest tag on WordPress, click “Skip to manual setup.”
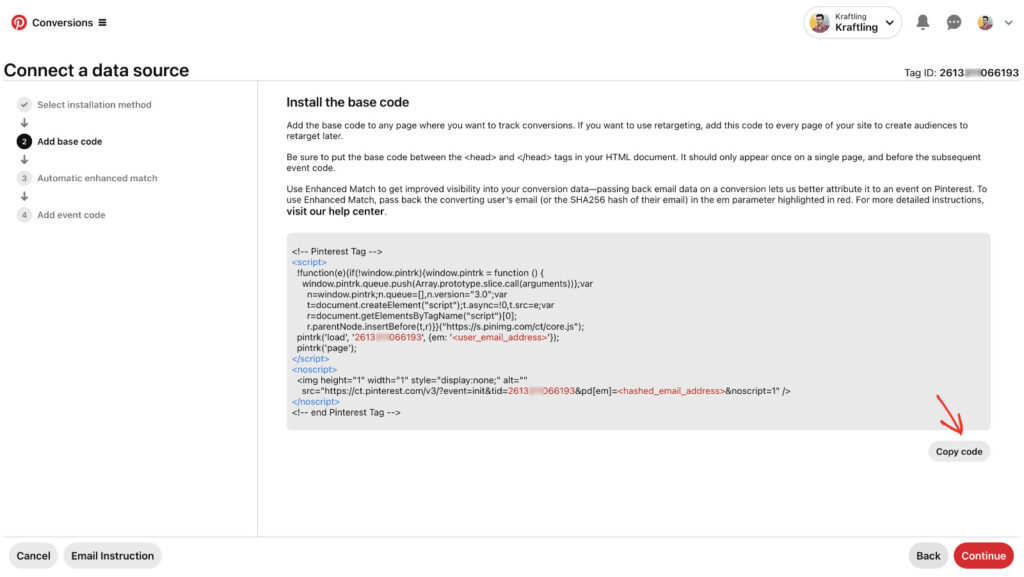
You’ll find the base code here; it contains your unique Tag ID. As we’ll show you different methods to add a Pinterest tag to WordPress, you’ll need to make a copy of the base code if you choose the manual route. It’ll be required later in the next step. You do not need to copy this code if you choose the automatic route, i.e., using WPCode Conversion Pixels.
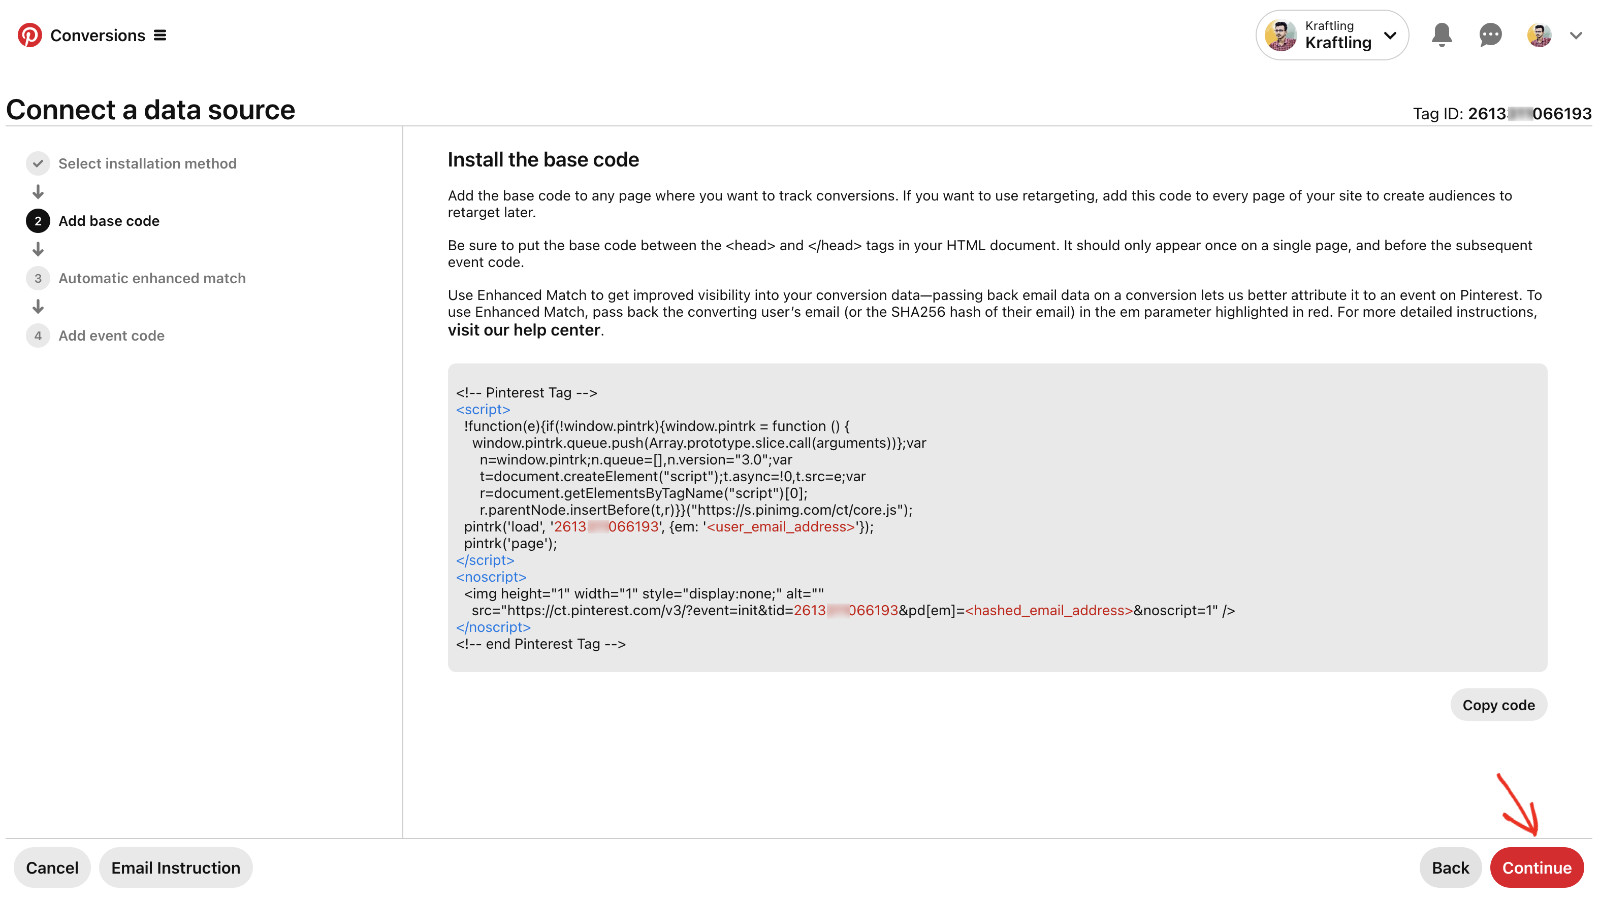
Now click “Continue” to go to the next page.
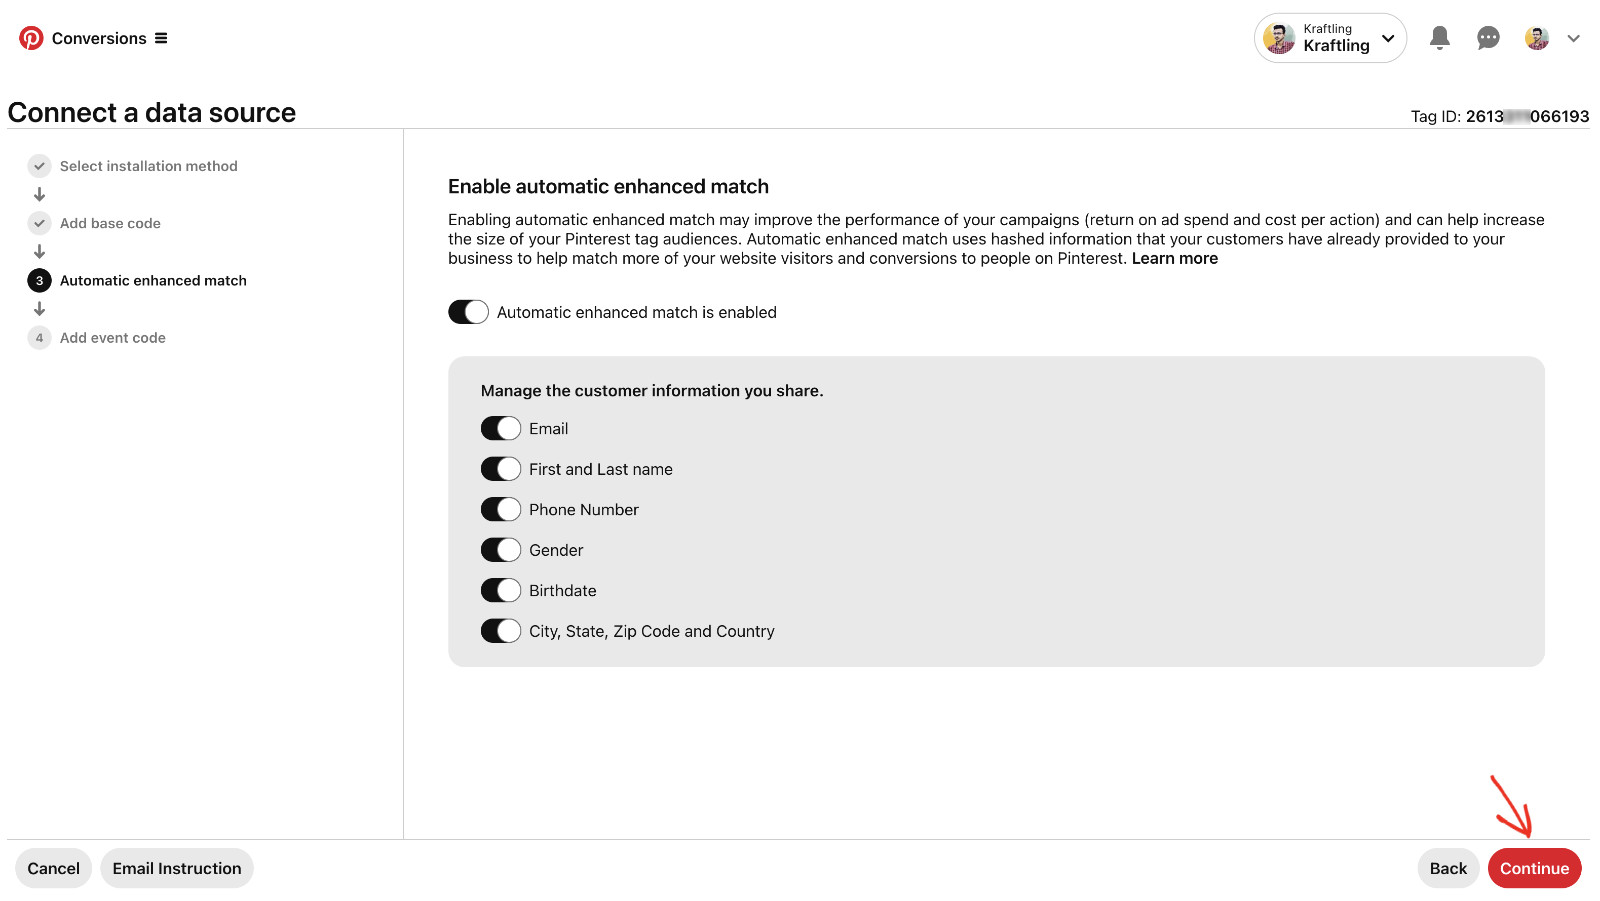
If you wish, you can enable automatically enhanced matches for your desired items from this screen. This improves conversion tracking by automatically adding extra data from your website visitors when they interact with your ads. Click “Continue” to proceed.
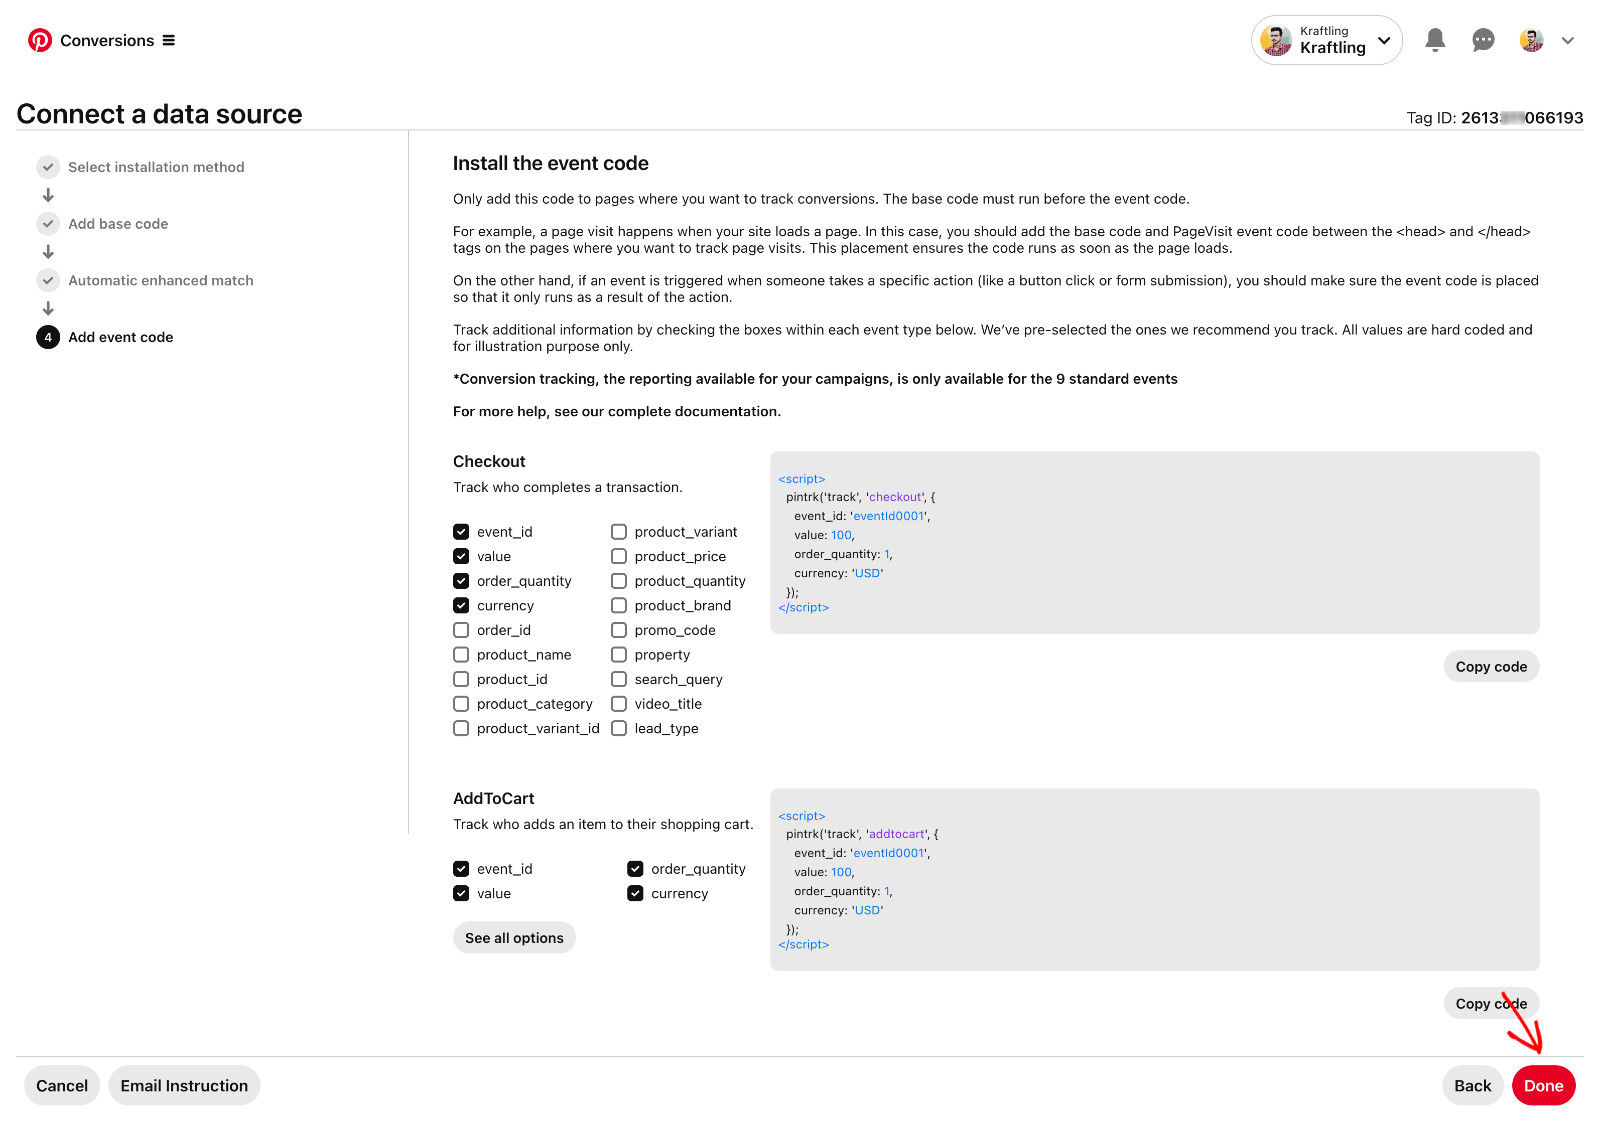
Finally, you’ll be presented with the event code. Scroll down to see all the events that Pinterest provides for tracking.
If you choose to follow the manual route, you need to make a copy of the event codes. Check the options you want to track for each event, then “Copy code” to track the particular events.
You can choose not to copy these codes if you follow the automatic route using WPCode Conversion Pixels.
Click “Done” to finish creating your Pinterest tag.
How To Add A Pinterest Tag To WordPress Sites
Now that you’ve created your Pinterest tag, it’s time to integrate it into your WordPress site. You can easily add a Pinterest tag to WordPress websites using WPCode. It’s crafted specifically to seamlessly integrate code snippets and scripts into your website, including your newly created Pinterest Tag.
Here’s why WPCode is the recommended solution for adding Pinterest Tag tracking in WordPress:
- Effortless Management: WPCode provides a user-friendly interface that simplifies adding, editing, and organizing your Pinterest Tag. This ease of use ensures you don’t need technical knowledge to manage your site’s code effectively.
- Versatility: WPCode supports various code types, including JavaScript, HTML, CSS, and PHP. This compatibility makes it an ideal tool for integrating Pinterest Tags and handling other customization needs across various platforms.
- Automation: WPCode automates the integration of complex codes, enabling you to focus on strategic business goals. This efficiency allows you to dedicate more time to developing your business strategies.
- Trusted by Millions: Over 2 million websites use WPCode, so you can rely on its proven reliability and effectiveness to maintain smooth operations and enhance your online presence.
You can integrate the Pinterest Tag into your WordPress site using WPCode by following one of these simple methods:
Method 1: Add A Pinterest Tag To WordPress Manually (For Free)
To manually add a Pinterest tag to WordPress sites for free, you need the base code and event code, which we learned how to create in the previous section.
Since you have already created and stored the Pinterest base code and event code, you can proceed to add them to your website.
Step 1: Add Pinterest Base Code To WordPress Header
Start by logging in to your WordPress backend, then install and activate the free WPCode plugin the same way you install any other WordPress plugin. Once activated successfully, you’ll notice a new menu item labeled “Code Snippets” in your WordPress admin sidebar.
Now, visit Code Snippets > Header & Footer, and paste the base code in the Header section. Click on the “Save Changes” button to add the base to the header section of every page of your website.
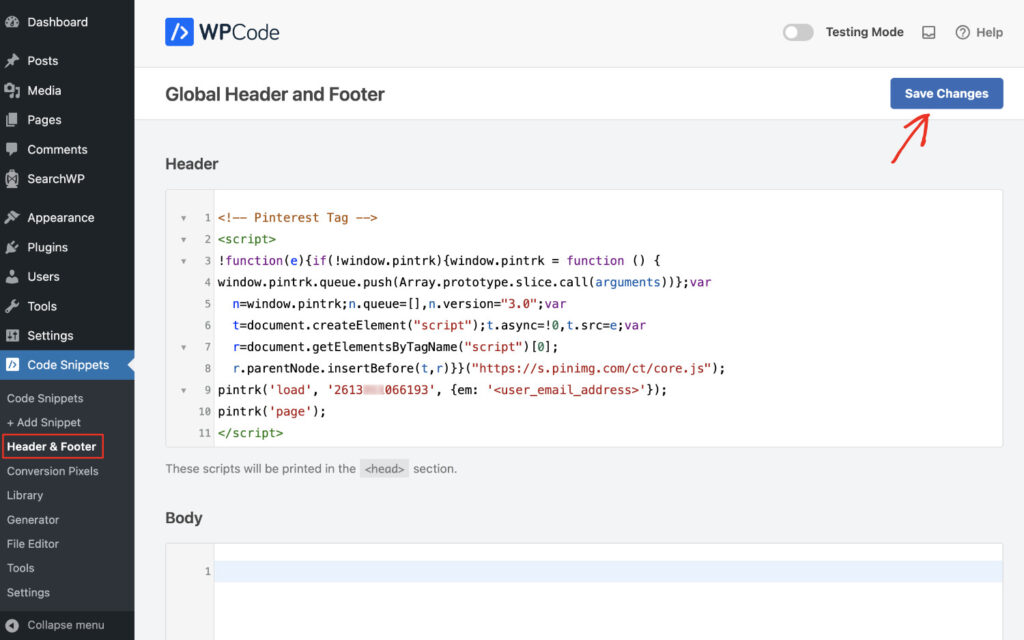
You have successfully added the Pinterest base code to your WordPress website. Now, you need to add event codes to start receiving campaign insights.
Step 2: Add Pinterest Event Code To Specific Pages In WordPress
The base and event codes work together to give you accurate data for your campaign. At this stage, you have already inserted the base code into every page header on your website. All that remains is to add event code to specific pages so that you can get the complete data.
Since you already learned how to get the event codes in the previous step, let’s show you how to add Pinterest event codes to specific pages for free.
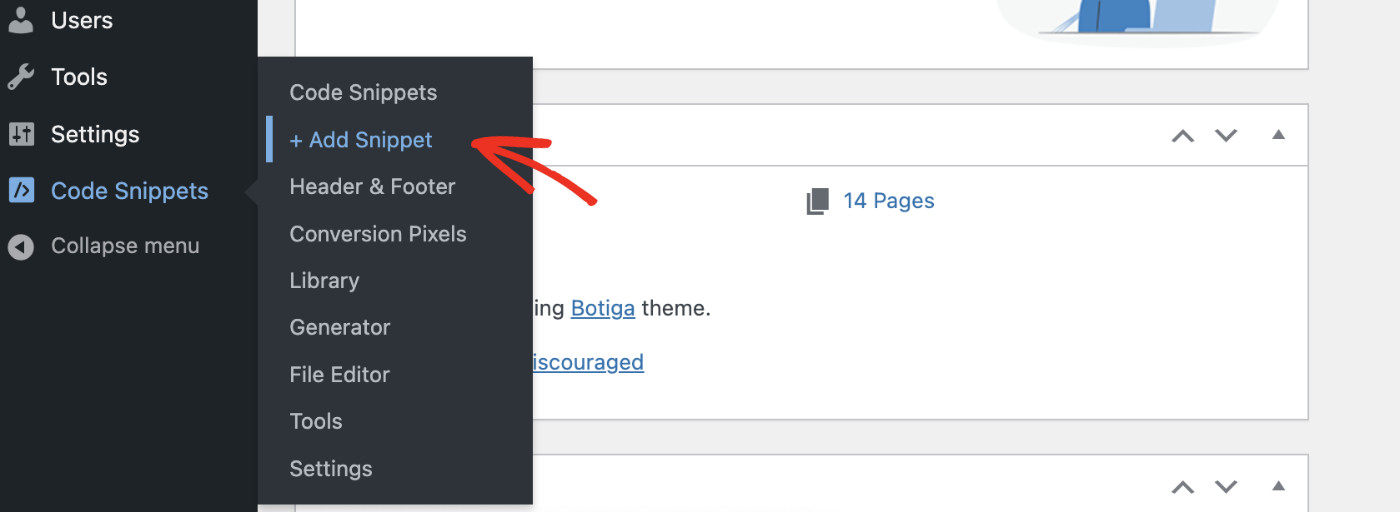
You can add Pinterest events to specific pages using WPCode’s custom code snippet feature. To do that, navigate to Code Snippets > Add Snippet.
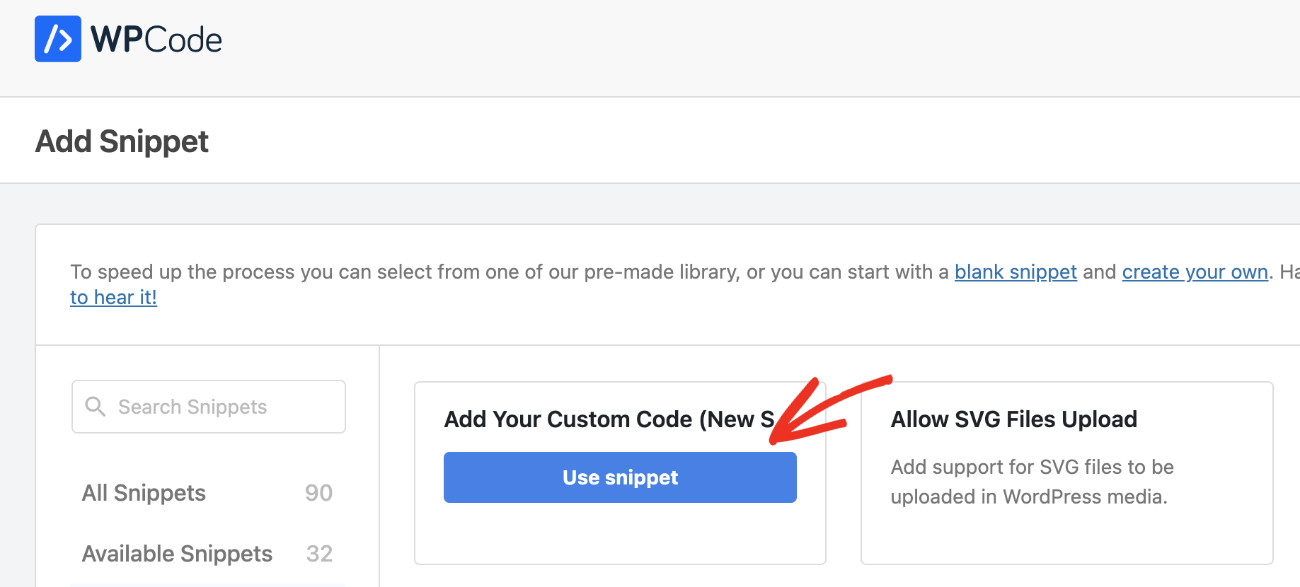
You can create a new snippet by clicking the “Use snippet” button on the “Add Your Custom Code” card in the list.
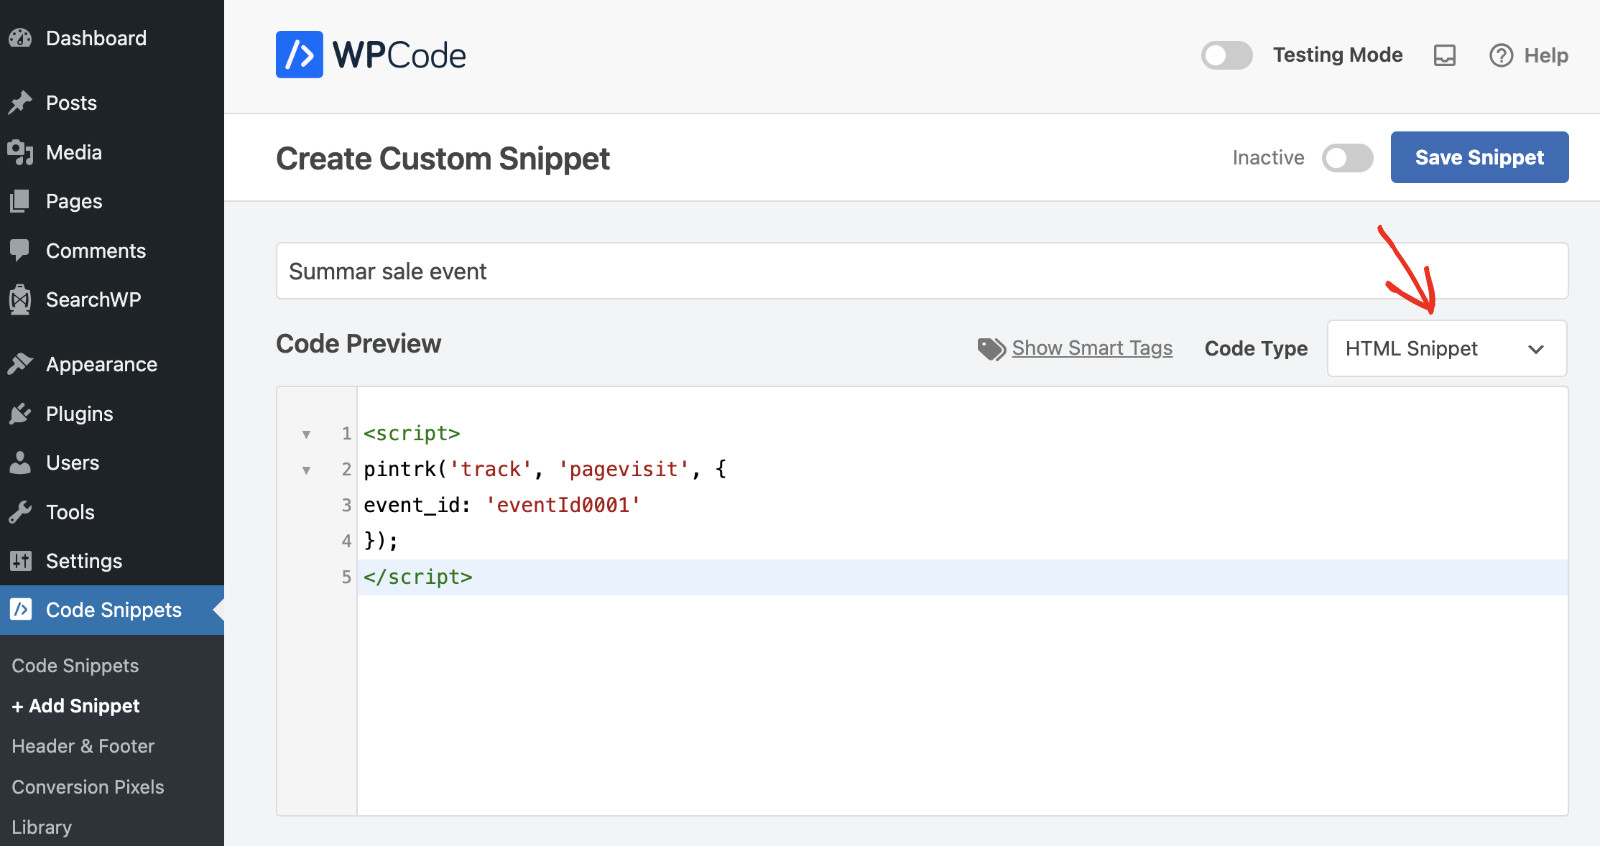
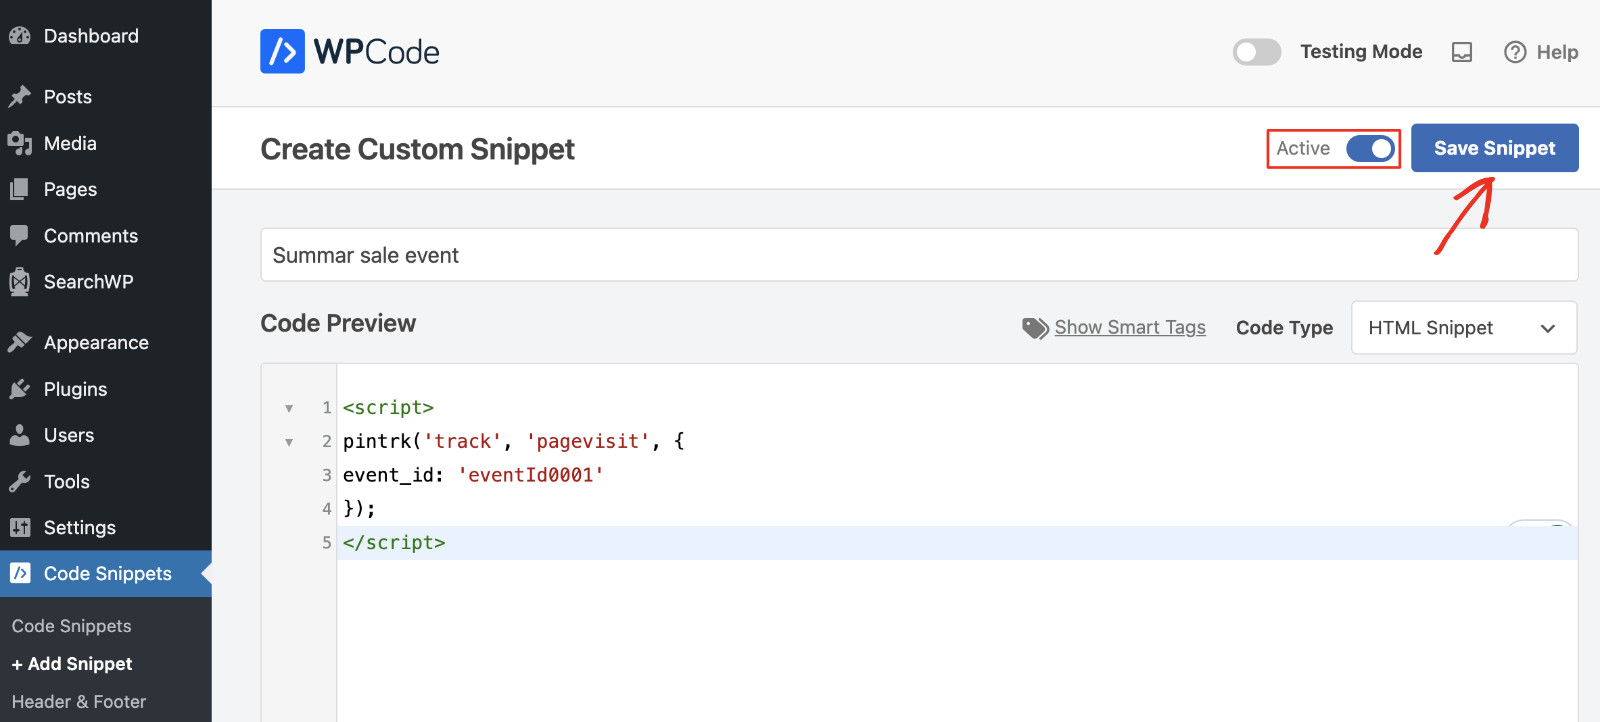
Name your snippet, choose the code type “HTML snippet,” and paste the event code in the Code Preview area.
We need to ensure the event code is inserted in the header. So, from the Insertion section, choose “Site Wide Header” as the Location.

Now, we’ll specify the page. To do that, from the “Smart Conditional Logic” section, turn on “Enable Logic.” Set the “Conditions” to “Show.” Click on “+ Add new group.” Select “Page URL” in the first field, choose “Contains” in the second field, and write the page slug in the third field.

Please make sure to include the forward slash “/” before and after the page name for better results. For instance, if the page URL is https://www.example.com/order-received/, then write “/order-received/” in the field.
Finally, to run the snippet, set the switcher to active mode and click “Save Snippet” to start tracking events.
Congratulations! You have successfully added the Pinterest tag to your WordPress website. Now, you should verify if the Pinterest tag is working properly.
Method 2: Add A Pinterest Tag To WordPress Using WPCode Conversion Pixels (Recommended)
There’s a better, easier, and more reliable way to add a Pinterest tag to WordPress sites. The WPCode Conversion Pixels addon automates the manual insertion and keeps everything up to date.
If you upgrade to the Plus plan of WPCode, you’ll gain access to the WPCode Conversion Pixels addon. This feature is not limited to tracking Pinterest Tags only; it also supports Google Ads, TikTok, Snapchat, and Facebook Pixels.
The Conversion Pixels addon streamlines the process by automatically inserting the necessary code snippets and scripts into your site. It also offers advanced eCommerce tracking capabilities for platforms like WooCommerce, Easy Digital Downloads, and MemberPress.
To activate the Conversion Pixel addon from your WordPress backend, navigate to Code Snippets > Conversion Pixels and click the “Install Addon Now” button. The addon will install and activate automatically, allowing you to start tracking conversions without manually setting up the code.

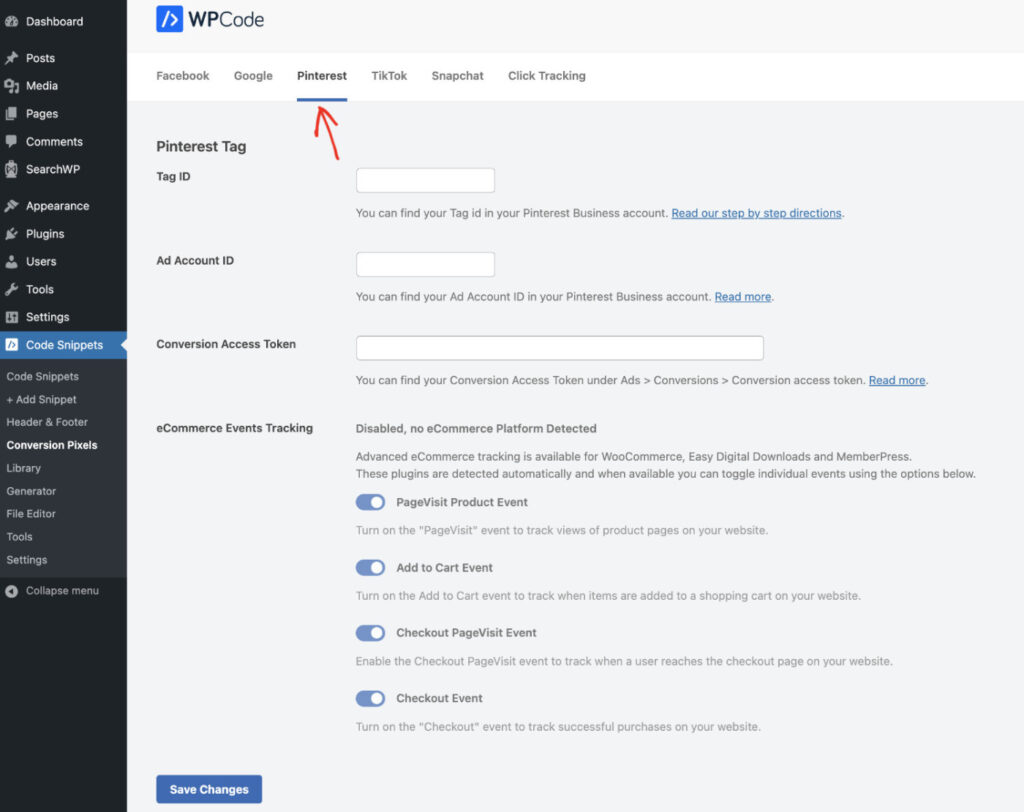
Now, navigate to the Pinterest tab. To use Pinterest tracking automatically, you’ll need to enter three credentials, the first of which is the Tag ID.
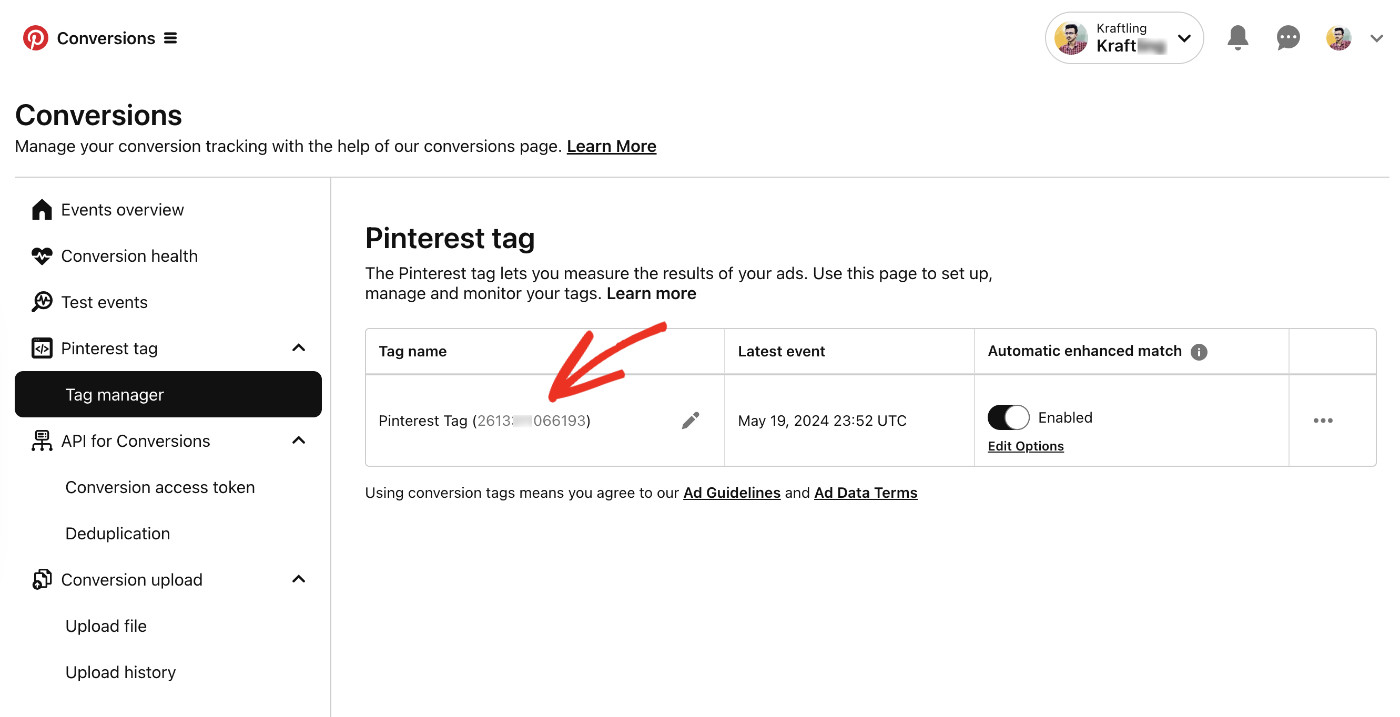
In the previous step, you created and copied your unique Tag ID. To recap, open a new browser tab/window, log in to your Pinterest account, click the hamburger menu at the top left, find Conversions under the Business category, select Tag Manager from the left sidebar, and click the “Install the Pinterest tag” button.
If this is your first time creating the Pinterest tag, you’ll see your unique Tag ID in the new window.
Otherwise, you’ll see your Pinterest tag on the table if you’ve already created your tag before.
Now, return to your website and paste the Pinterest Tag ID in its respective field in WPCode.
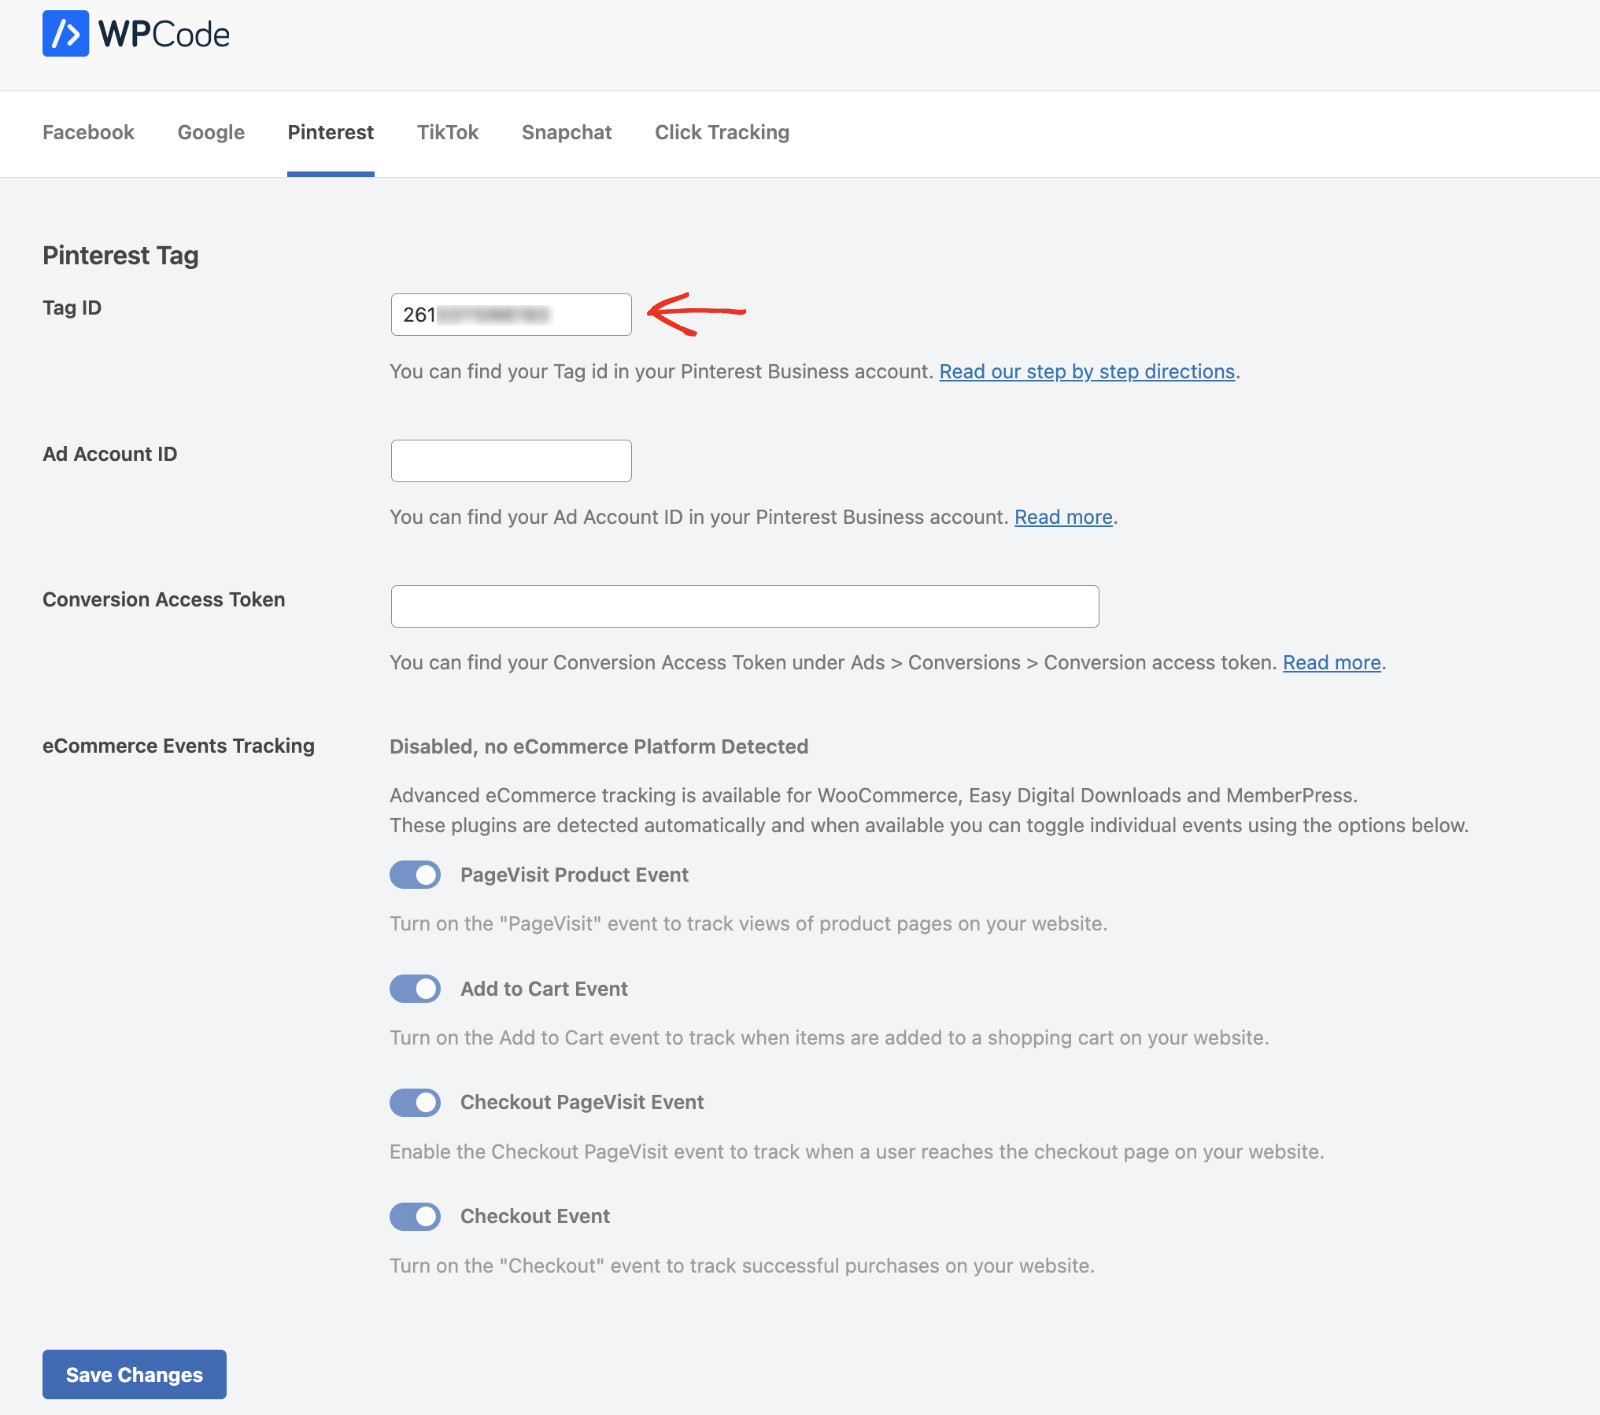
Now, from the same Conversion menu, click “Conversion access token” under “API for Conversions.” Next to your business name, you’ll find a 12-digit number, which is your Ad Account ID. Please copy this number.
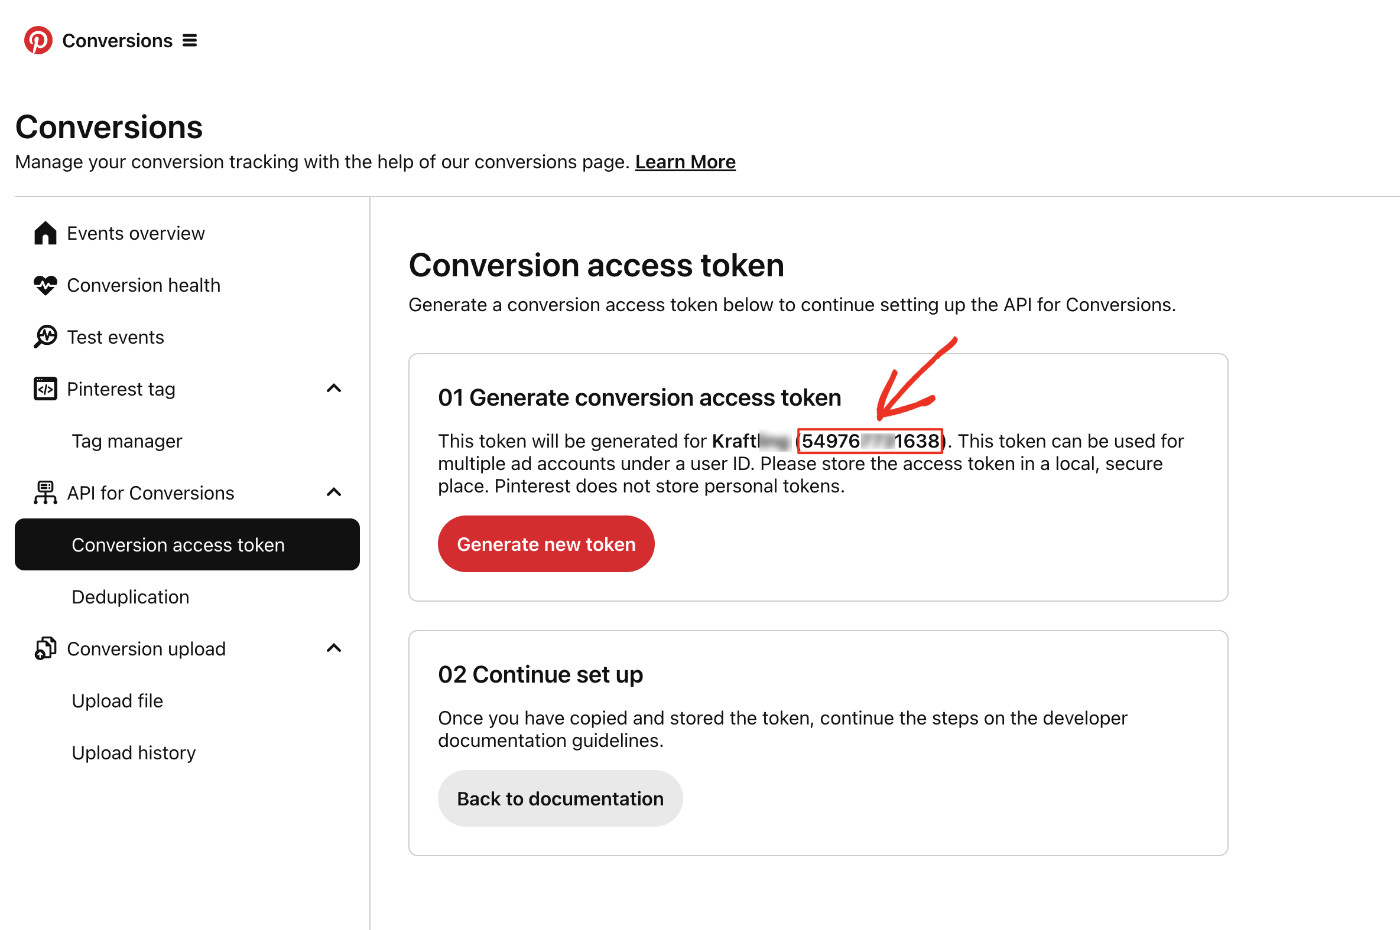
Paste the Ad Account ID to its respective field in WPCode.
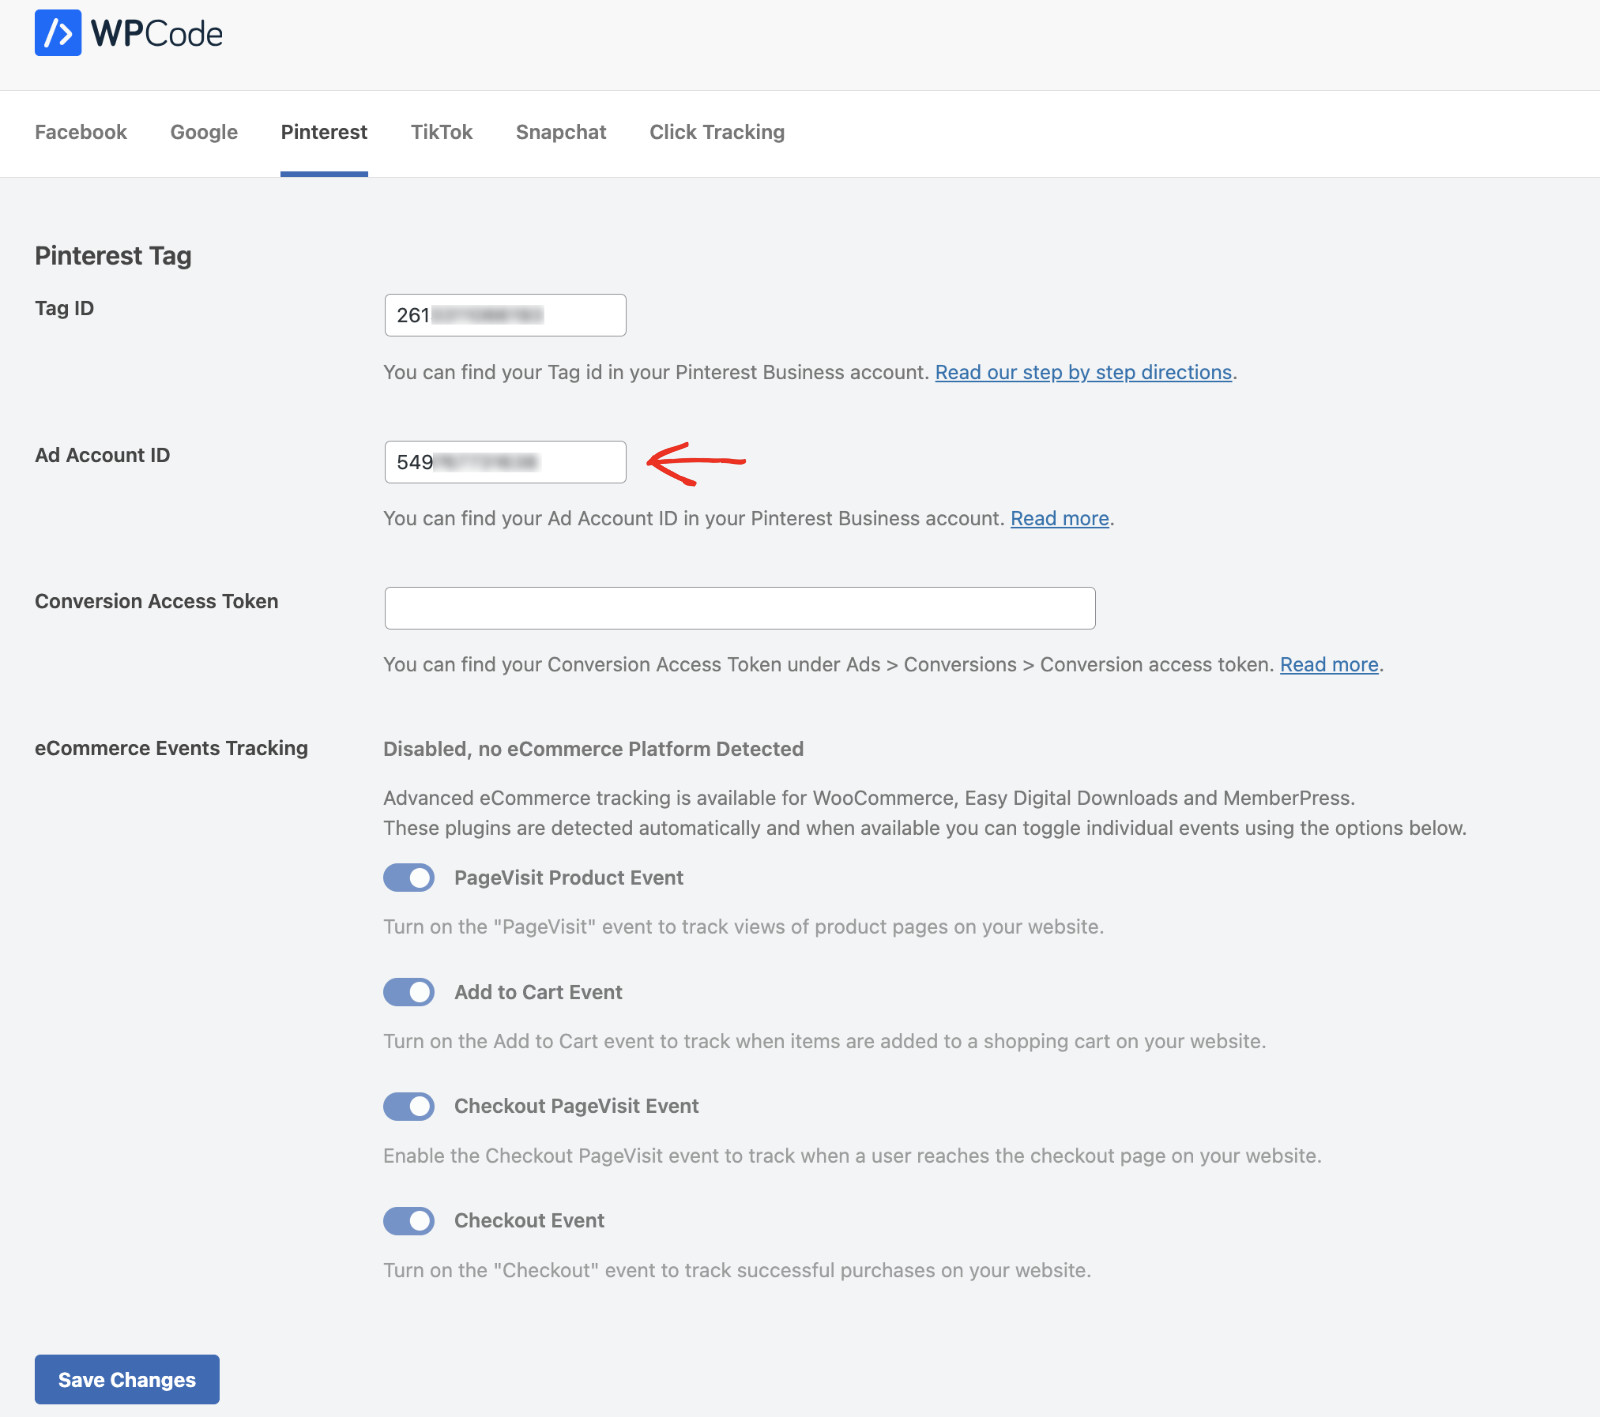
Next, click the “Generate new token” button from the same page. This will create a unique Conversion Access Token for your account.
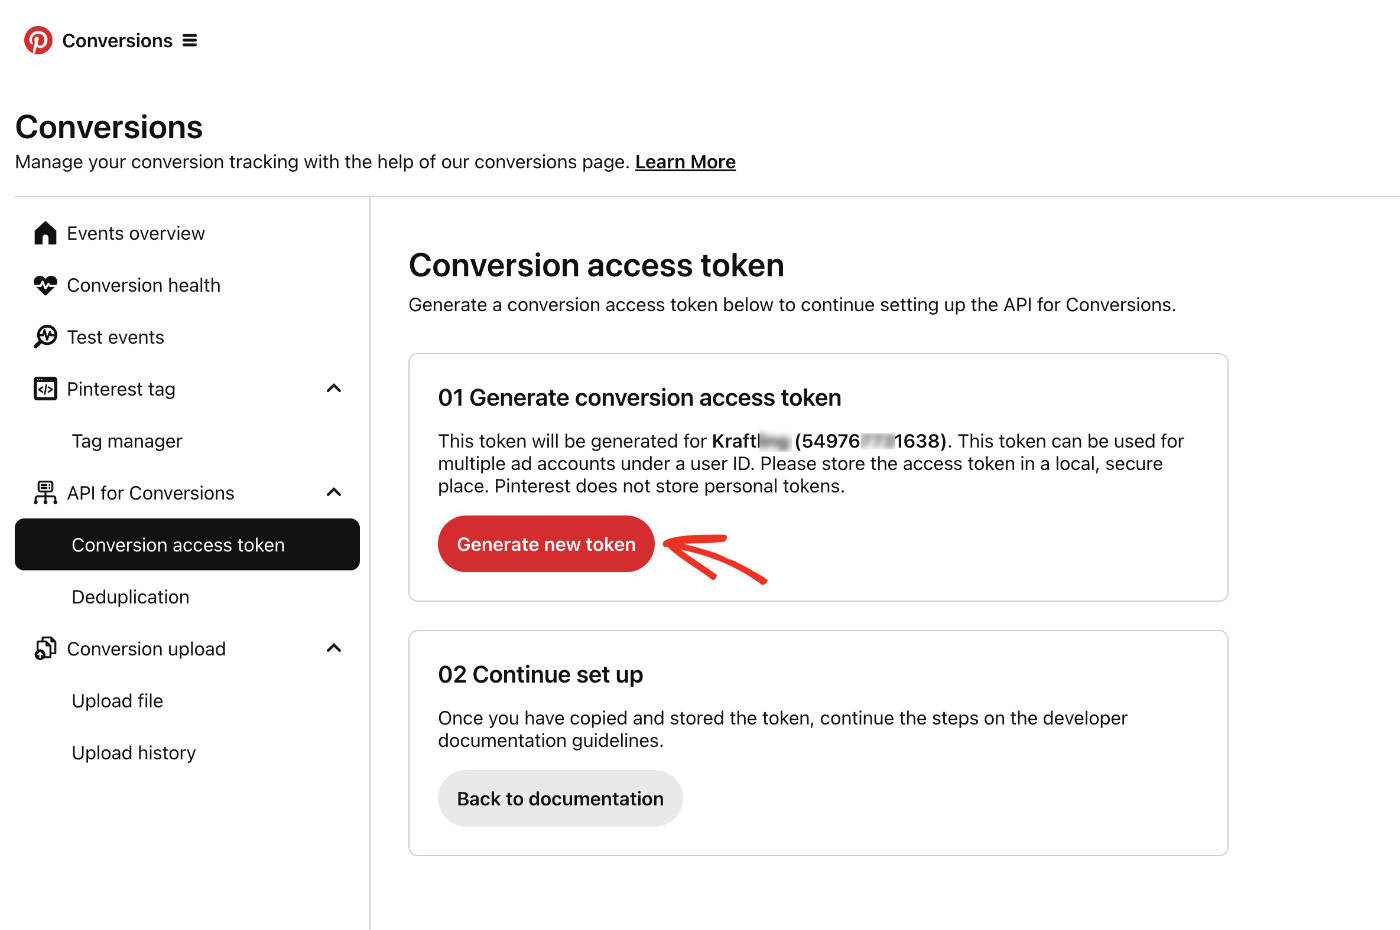
Your unique conversion access token is created. Please copy this number.
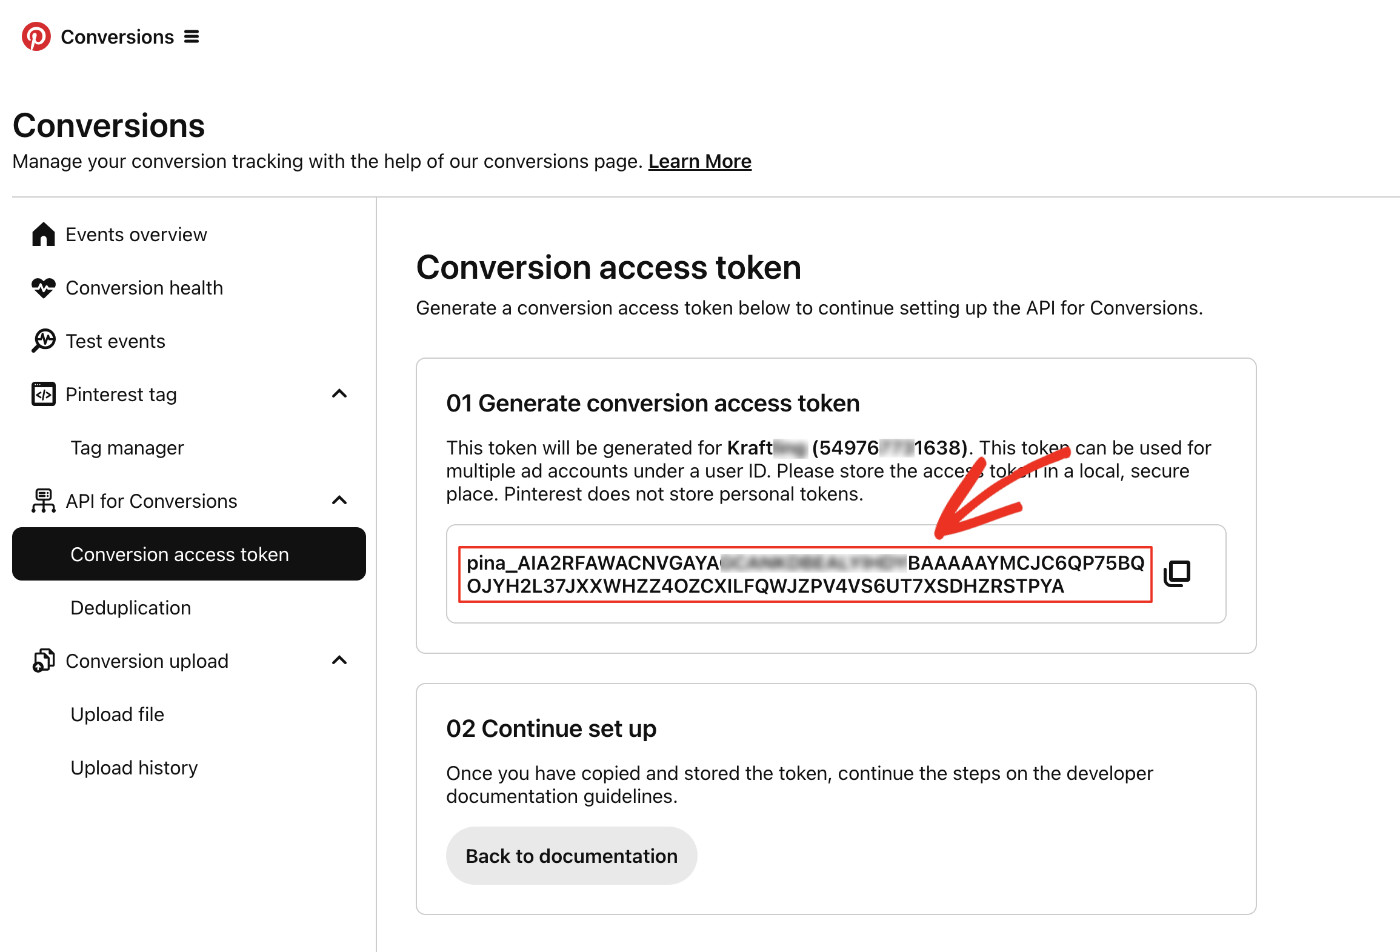
Paste the Conversion Access Token into its respective field in WPCode.
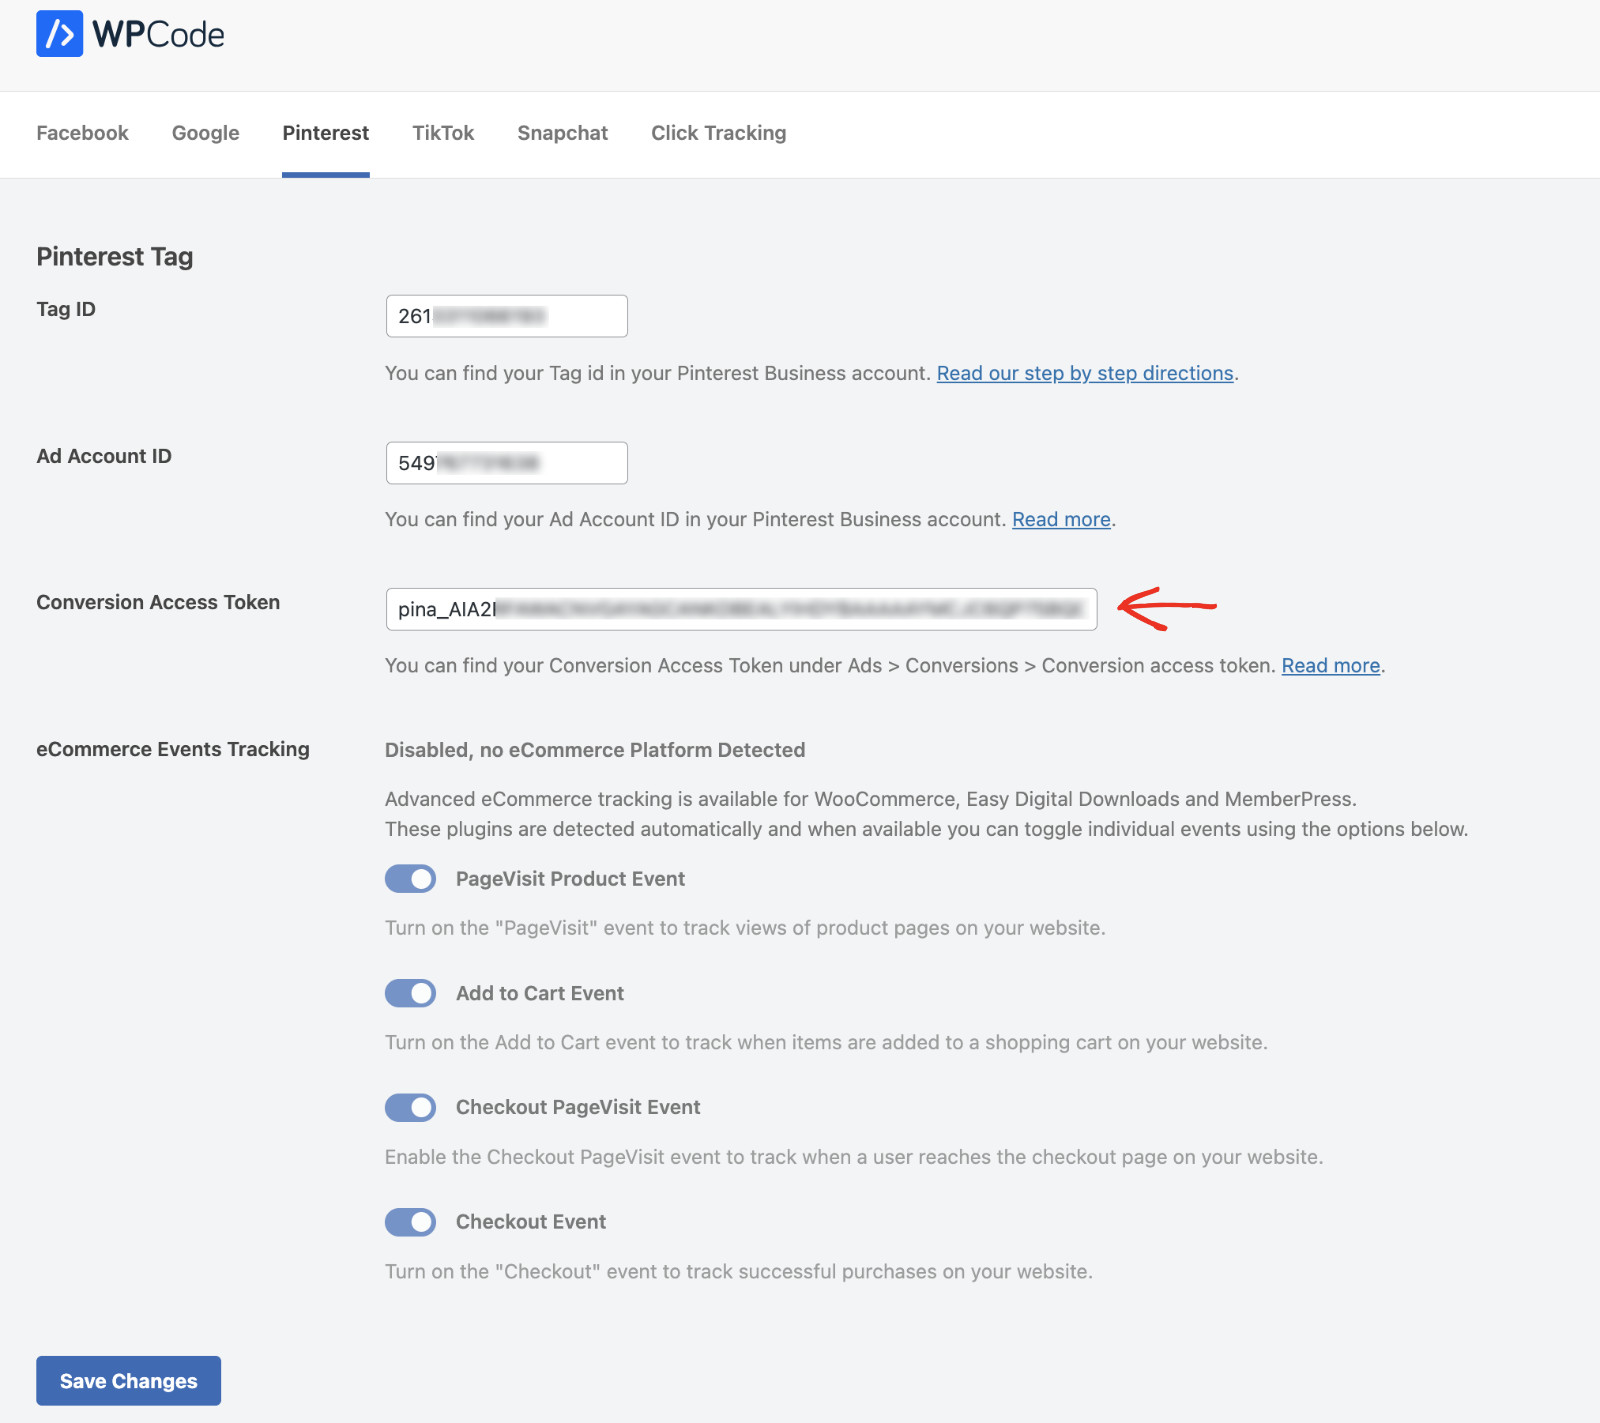
If your online store is created with WooCommerce, Easy Digital Downloads, or MemberPress, you can enable advanced eCommerce tracking with WPCode. Select the events you’d like to track from the “eCommerce Events Tracking” menu, and that’s it. You don’t need to add each event to its specific pages; the WPCode Conversion Pixels addon takes care of it for you.
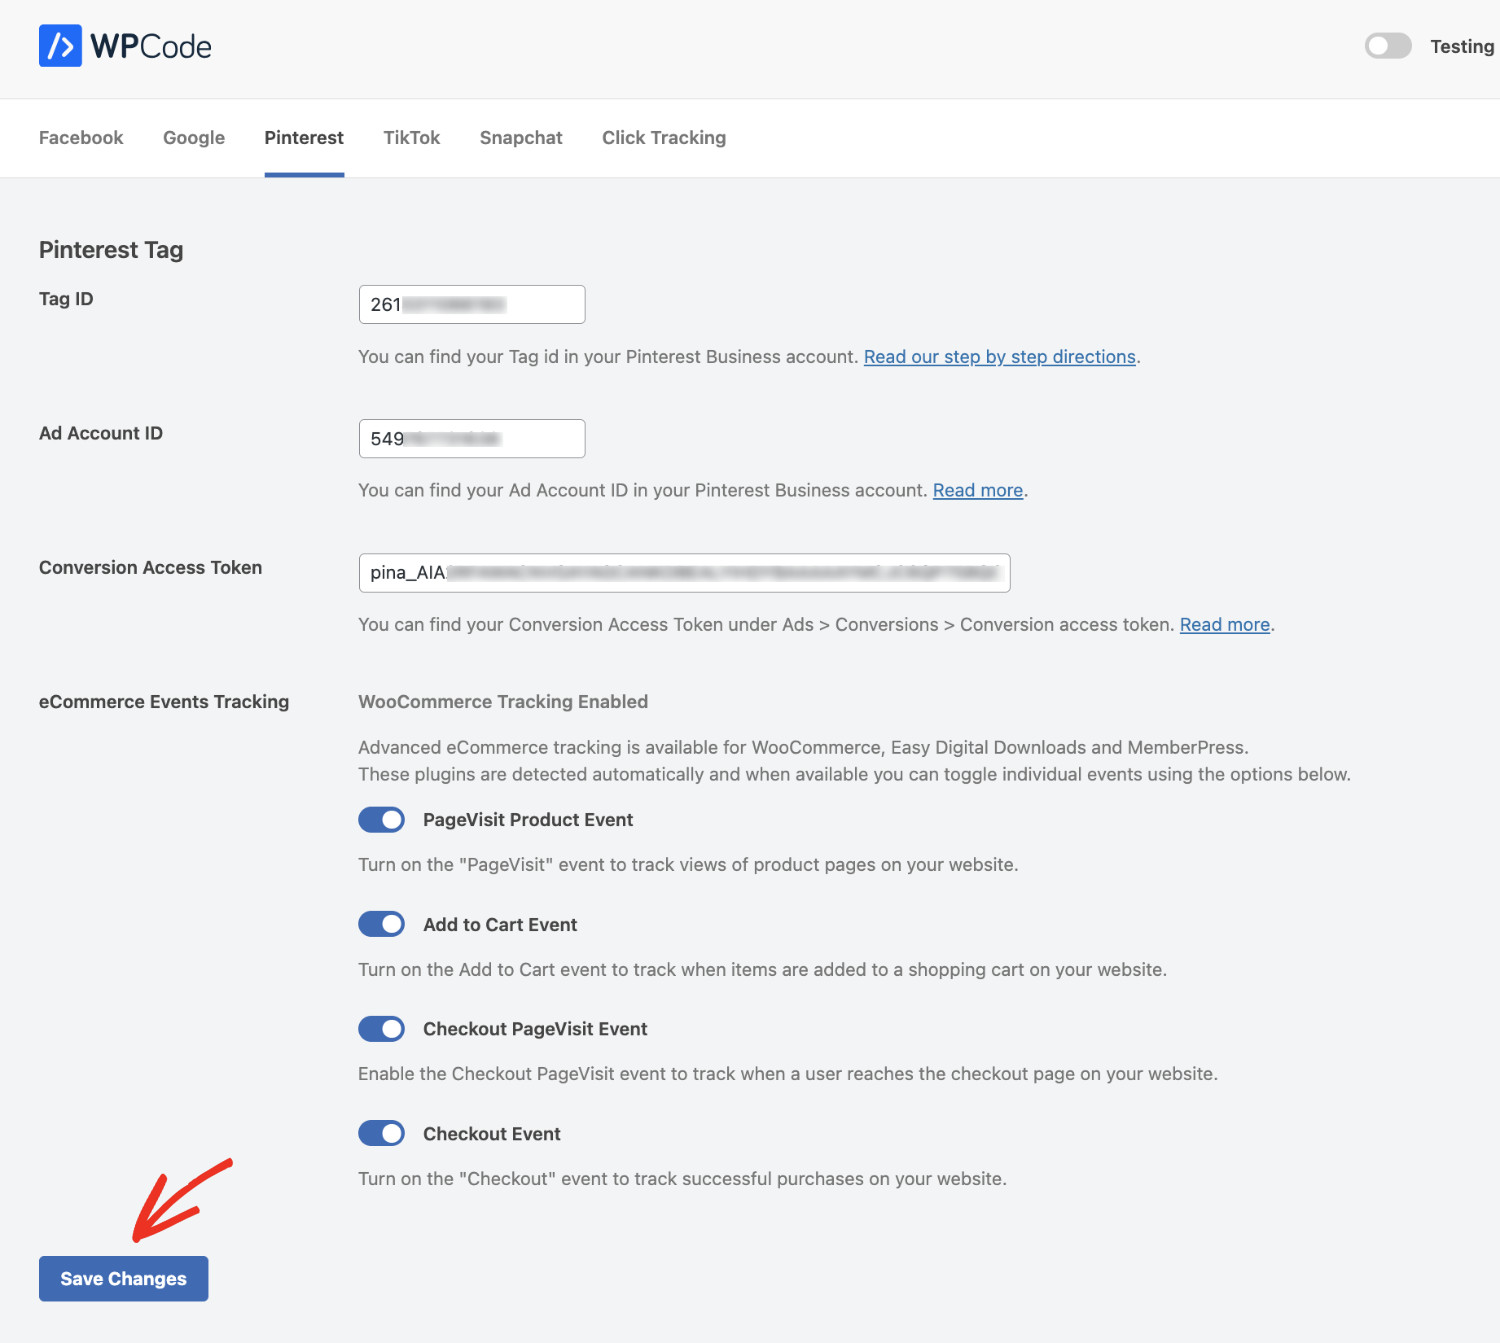
Finally, click “Save Changes”.
Congratulations! You have successfully added a Pinterest tag to WordPress!
How To Verify If The Pinterest Tag Is Working Correctly
Install the Pinterest Tag Helper extension for Google Chrome to check if your Pinterest Tag is working. Click on the extension icon to see a list of events and their statuses. Take a look at the screenshot below for reference.
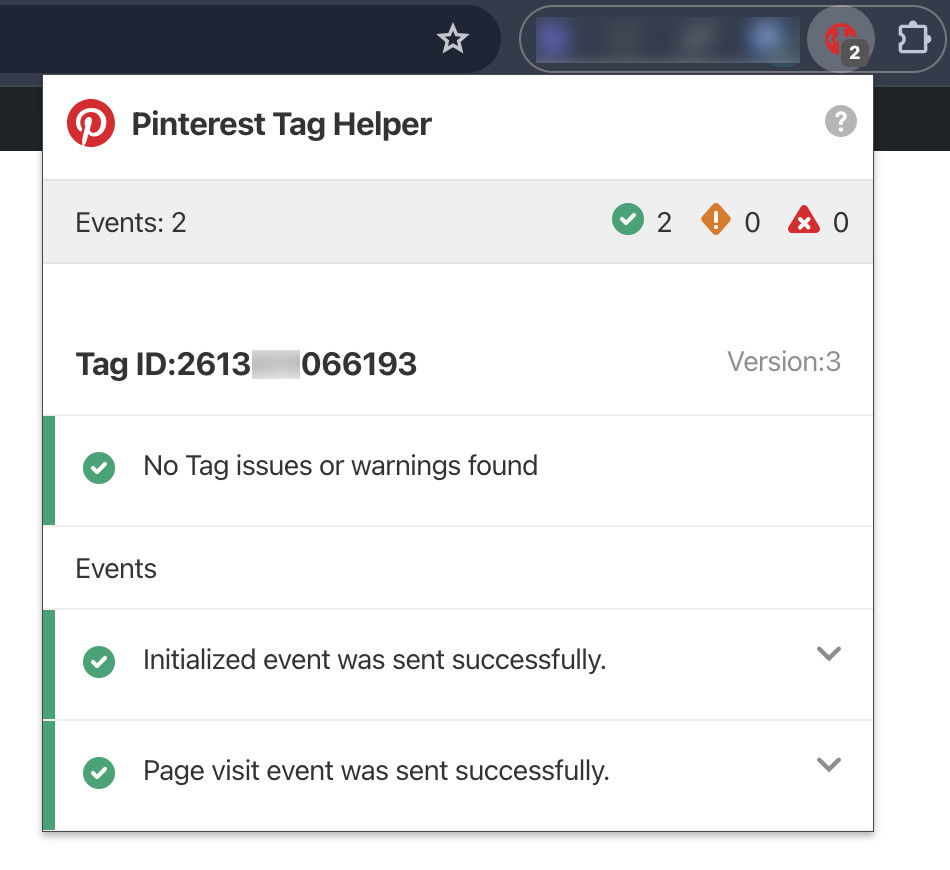
As you can see, all events shown here have been executed successfully. Well done! You have successfully added a Pinterest tag to your website and ran a test to see if it’s working properly.
Conclusion
We hope you learned how to add a Pinterest tag to WordPress easily. Don’t let your Pinterest advertising efforts go unmeasured! With the Pinterest Tag, you can obtain critical insights, target audiences more effectively, and maximize the efficiency of your advertising budget.
WPCode Pro makes it easy for anyone to integrate the Pinterest tag as well as Google Ads, TikTok, Snapchat, and Facebook Pixel tracking into WordPress sites.


