### [How to Add Google Preferred Sources Button in WordPress (No Theme Edits)](https://wpcode.com/how-to-add-google-preferred-sources-button-wordpress/)

**Published:** November 9, 2026
**Author:** Alvin Collin

**Content:**

Short Answer

First, check that your site shows up in Google’s source preferences tool. Then, in WPCode, create an HTML [snippet and paste Google’s two lines of code](https://wpcode.com/free-wordpress-speed-optimization-code-snippets/). Set it to **Auto Insert** at **Insert Before Content**, add the rule “Post type is Posts”, switch it to **Active**, and save it. The button now shows near the top of every post.

Key Takeaways

- Steps 1 to 5 all work with the free version of WPCode.
- Only sites on their own domain or subdomain can be picked as a preferred source. A /blog subfolder does not qualify.
- Where the button appears is a setting you control. You don’t write code for it.
- It helps readers who choose your site find more of your content in Google. Google doesn’t say it changes your rankings for people who haven’t picked you.

Google now lets readers pick their favorite sites. When they do, Google is more likely to show them posts from those sites.

For years, Google’s advice to publishers has been pretty consistent: create good content, and you give yourself a better chance of ranking.

But with AI Overviews changing how people find and consume information, SEO experts have been debating what this means for publishers.

Some of them are even asking if they should continue creating great content at all.

I see Google’s Preferred Sources feature as an olive branch.

If readers like your content, Google gives them a way to tell it they want to see more from you. And this little button makes that choice much easier.

In this guide, I’ll show you how to add it to every WordPress post with one free WPCode snippet, without touching your theme.

---

Use the table of contents below to navigate this article.

- [What the Google Preferred Sources Button Does](#aioseo-what-the-google-preferred-sources-button-does)
- [Before You Start: Check Your Site Is Eligible](#aioseo-before-you-start-check-your-site-is-eligible)
- [How to Add Google Preferred Sources Button in WordPress with WPCode](#aioseo-how-to-add-google-preferred-sources-button-in-wordpress-with-wpcode)
    - [Step 1: Create a New HTML Snippet](#aioseo-step-1-create-a-new-html-snippet)
    - [Step 2: Paste Google's Two Lines](#aioseo-step-2-paste-googles-two-lines)
    - [Step 3: Choose Where the Button Appears](#aioseo-step-3-choose-where-the-button-appears)
    - [Step 4: Show It on Posts Only](#aioseo-step-4-show-it-on-posts-only)
    - [Step 5: Activate It and Check a Live Post](#aioseo-step-5-activate-it-and-check-a-live-post)
        - [Optional: Use the Dark Version or Set a Language](#aioseo-optional-use-the-dark-version-or-set-a-language)
        - [Troubleshooting: "I Don't See the Button on My Post."](#aioseo-troubleshooting-i-dont-see-the-button-on-my-post)
- [More Ways to Place, Hide, and Style the Button](#aioseo-more-ways-to-place-hide-and-style-the-button)
- [WPCode vs Other Ways to Add Google Preferred Sources Button](#aioseo-wpcode-vs-other-ways-to-add-google-preferred-sources-button)
- [FAQs: Add Google Preferred Sources Button](#aioseo-faqs-add-google-preferred-sources-button)
- [Add Google Preferred Sources Button to Your Posts Today](#aioseo-add-google-preferred-sources-button-to-your-posts-today)

## What the Google Preferred Sources Button Does

The button uses two lines of code from Google’s own guide.

According to [Google’s documentation](https://developers.google.com/search/docs/appearance/preferred-sources), when readers add your site as a preferred source, it makes your content more likely to appear in their Top Stories results, with a “preferred” badge.

The badge can also appear in AI Mode and AI Overviews.

Google says people are “twice as likely to click through to a Preferred Source” ([Google, May 27, 2026](https://blog.google/products-and-platforms/products/search/original-high-quality-content-search/)). That’s readers who already chose your site. If many of them add you, that could still mean more visits from Google Search.

The button isn’t required, either.

Readers can find your site in Google’s settings and add it themselves. The button just makes that choice easier, right where they’re already reading.

So placement matters. But first, make sure Google accepts your site.

---

## Before You Start: Check Your Site Is Eligible

It’s worth taking two minutes to check this before you add any code. If your site is not eligible, the button will not help you yet.

### 1. Only Domains and Subdomains Are Accepted

Google only accepts sites on their own domain or subdomain.

Google’s own examples make it clear. `www.example.com` and `code.example.com` are eligible, but `www.example.com/blog` is not. So if your blog lives in a subfolder like /blog, readers can’t pick it as a preferred source yet.

### 2. Check the Source Preferences Tool

To check, open [Google’s source preferences tool](https://www.google.com/preferences/source) and type your site’s address into the search box. If your site lives in a subfolder like /blog, it won’t show up.

![google source preferences tool](https://wpcode.com/wp-content/uploads/2026/11/google-source-preferences-tool.png)Type in your site name or paste the URL to see if your site is eligible.

If your site appears in the list of results, you’re good to go.

### 3. Check Your Search Generative AI Settings

This step only matters if you also want your site to appear as a preferred source in AI Mode and AI Overviews. In Google’s words:

> “To make your site eligible for display as a preferred source in these features, you must make sure your site is included in Search generative AI features in Search Console.”

![search generative ai setting in search console](https://wpcode.com/wp-content/uploads/2026/11/generative-ai-search-console.png)The Search generative AI setting in Search Console. Keep your site included.

To check, open Search Console and go to **Settings » Search generative AI**. Make sure your site is included.

Google includes sites by default, but you can change this setting. If you’ve excluded your site, readers can still choose it as a preferred source for Top Stories.

---

## How to Add Google Preferred Sources Button in WordPress with WPCode

[WPCode](https://wpcode.com/) is the [best WordPress snippet plugin](https://wpcode.com/best-wordpress-code-snippets-plugins/).

It lets you add code to your site without editing theme files. Each piece of code lives in its own snippet, and you can turn any snippet on or off with a toggle.

Everything in this section works on the free version of WPCode.

If you don’t have it yet, install WPCode from the [WordPress plugin directory](https://wordpress.org/plugins/insert-headers-and-footers/) or [get the paid version](https://library.wpcode.com/pricing/).

### Step 1: Create a New HTML Snippet

After you install and activate WPCode, go to **Code Snippets » + Add Snippet** in your WordPress dashboard.

This opens the WPCode snippet library. It has [ready-made snippets for common tasks](https://wpcode.com/how-to-copy-paste-code-snippets-into-wordpress/), but for this, you need a blank one.

Hover your mouse over the **Add Your Custom Code (New Snippet)** card. Click the **+ Add Custom Snippet** button that appears.

![WPCode snippet library with the Add Your Custom Code (New Snippet) card highlighted](https://wpcode.com/wp-content/uploads/2026/11/wpcode-add-custom-snippet.png)*Hover the Add Your Custom Code (New Snippet) card to reveal the + Add Custom Snippet button.*

Next, under Code Type, choose **HTML Snippet**.

![WPCode code type picker with the HTML Snippet card highlighted](https://wpcode.com/wp-content/uploads/2026/11/wpcode-html-snippet-code-type.png)*HTML Snippet is the first code type in the list.*

### Step 2: Paste Google’s Two Lines

Start by giving your snippet a name you will recognize later, like “Google Preferred Sources Button”.

Then copy the code below and paste it into the **Code Preview** box.

```
<script async src="https://news.google.com/swg/js/v1/publisher.js"></script>
<div google-add-preferred-source-btn></div>
```

Hosted with ❤️ by **[WPCode](https://wpcode.com)**

  [1-click Use in WordPress](https://library.wpcode.com/use-snippet/) 

The first line loads Google’s button, and the second line marks the spot where the button appears.

Google suggests [loading the script in your site’s head](https://wpcode.com/insert-scripts-in-wordpress/), but it also works here, right next to the button.

Make sure **Code Type** in the top right still says **HTML Snippet**.

![WPCode snippet editor with Google's two Preferred Sources lines in the Code Preview box and Code Type set to HTML Snippet](https://wpcode.com/wp-content/uploads/2026/11/wpcode-preferred-sources-snippet-code.png)*Both lines go in the Code Preview box, with Code Type set to HTML Snippet.*

By default, Google displays the button in each reader’s browser language. To lock it to one language, add `data-lang="en"` (or your own language code) to the same line.

### Step 3: Choose Where the Button Appears

Scroll down to the **Insertion** section. This is where you tell WPCode where to put the button.

Leave **Insert Method** set to **Auto Insert**.

That means WPCode adds the button for you on every post on your site, including the ones you published years ago. In Step 4, you’ll see how to keep the button off your pages.

![WPCode Insertion section with Auto Insert selected and the Location dropdown](https://wpcode.com/wp-content/uploads/2026/11/wpcode-insert-before-content-location.png)*Keep Auto Insert selected, then open the Location dropdown.*

Then click the **Location** dropdown.

In the panel that opens, click **Page-Specific** **»** **Insert Before Content**. This way, WPCode inserts the button at the beginning of the post content.

On most themes, this puts the button just below the post title, before the article begins.

![WPCode location picker on the Page-Specific tab with Insert Before Content selected](https://wpcode.com/wp-content/uploads/2026/11/wpcode-location-page-post-group.png)*Insert Before Content sits under Page, Post, Custom Post Type on the Page-Specific tab.*

Want it somewhere else?

The same group has five other free spots: **Insert Before Post**, **Insert After Post**, **Insert After Content**, **Insert Before Paragraph**, and **Insert After Paragraph**.

**Insert After Post** puts it at the end of the article, where readers who just finished may want more from you.

### Step 4: Show It on Posts Only

There’s a catch with these locations. They run on single posts, but also on single pages and custom post types.

Without a rule, the button would also show up on your About page or your Contact page. Your About and Contact pages aren’t where readers are deciding whether to follow your stories.

To fix this, scroll down to [**Smart Conditional Logic**](https://wpcode.com/features/smart-conditional-logic/) and turn on **Enable Logic**.

Leave the **Conditions** dropdown on **Show**. In the rule row below it, pick **Post type** in the left dropdown, leave the middle one on **Is**, and choose **Posts** on the right.

The finished rule reads like a sentence: **Show** “This code snippet if” **Post type** **Is** **Posts**.

![WPCode Smart Conditional Logic with Enable Logic on and the rule Post type Is Posts](https://wpcode.com/wp-content/uploads/2026/11/wpcode-post-type-posts-rule.png)*The finished rule shows the snippet only when the post type is Posts.*

From then on, the button only shows on your blog posts.

### Step 5: Activate It and Check a Live Post

Scroll back up to the top of the editor.

Flip the toggle from **Inactive** to **Active**, then click **Save Snippet**. If you’ve saved it before, the button says **Update** instead.

![WPCode snippet editor header with the Active toggle switched on next to the save button](https://wpcode.com/wp-content/uploads/2026/11/wpcode-snippet-active-update.png)*Switch the toggle to Active, then save the snippet.*

Now open any blog post on your site.

I suggest a private browser window, so you see the post exactly the way a visitor does.

You should see the **Add to Preferred Sources** button with the Google “G”, just under the title.

![Add to Preferred Sources button with the Google G shown just below a blog post title](https://wpcode.com/wp-content/uploads/2026/11/preferred-sources-button-on-post.png)*The button appears just below the post title, before the article begins.*

Now click it. Google opens a page for your site where you can add it as a preferred source, then sends you back to your post.

![google add as a preferred source screen](https://wpcode.com/wp-content/uploads/2026/11/google-preffered-source-add-popup.png)Google’s Add as a Preferred Source screen. Click Add to confirm.

In a private window, Google asks you to sign in first. That’s normal. Readers who aren’t signed in will see the same thing.

#### Optional: Use the Dark Version or Set a Language

By default, the button is light, with a thin outline.

If your site has a dark design, the dark version may fit better. To switch, add `data-theme="dark"` to the second line in the snippet:

```
<div google-add-preferred-source-btn data-theme="dark"></div>
```

Hosted with ❤️ by **[WPCode](https://wpcode.com)**

  [1-click Use in WordPress](https://library.wpcode.com/use-snippet/) 

Here’s what the dark version looks like on a live post.

![Dark Add to Preferred Sources button under a blog post title](https://wpcode.com/wp-content/uploads/2026/11/preferred-sources-button-dark-theme.png)*The dark version of the button, using data-theme=”dark”.*

Well done. You just added the Preferred Sources button on your site with WPCode.

#### Troubleshooting: “I Don’t See the Button on My Post.”

Work through these in order:

1. **Clear your cache.** Caching plugins and many hosts save copies of your pages. Until you clear them, visitors may see the old version without the button. Look for a **Clear cache** or **Purge** button in your caching plugin’s settings or your hosting dashboard.
2. **Check that the snippet is Active.** Go to **Code Snippets** and look at the toggle next to your snippet.
3. **Check the rule.** It should say **Post type** **Is** **Posts**.
4. **Check that you’re on a post.** With the Posts rule, the button will not show on pages.
5. **Turn off your ad blocker.** The button loads from Google’s servers, and some ad blockers and privacy tools block it. Try another browser, or pause the blocker for your own site.

---

## More Ways to Place, Hide, and Style the Button

The setup above works for most sites. But you can also move the button, show it only in certain places, or change the space around it.

Most options below are settings on the snippet you already built. So you can try one, look at a post, and switch back if you don’t like it. The others take one extra snippet.

### Place It by Hand With a Shortcode

If you only want the button on certain posts or in your sidebar, use a shortcode instead.

To do that, open your snippet and change **Insert Method** to **Shortcode**. WPCode then gives you a shortcode like `[wpcode id="421"]`, with a **Copy** button next to it.

![WPCode Insertion section set to Shortcode, showing the snippet's shortcode and Copy button](https://wpcode.com/wp-content/uploads/2026/11/wpcode-shortcode-insert-method.png)*With Shortcode selected, WPCode shows the shortcode to copy. Your number will differ.*

Paste the shortcode into a Shortcode block in any post, or into a widget area. The button shows only where you put it.

If you use the shortcode in your sidebar, turn off **Enable Logic** on that snippet, so the button can show on every page.

Switching to **Shortcode** turns off the automatic placement from Step 3.

If you want the button on every post and in your sidebar, keep the original snippet on **Auto Insert** and create a second snippet for the shortcode.

⚠️ One catch

If you type the shortcode in a text editor first, check that the quotes are straight (“), not curly. Curly quotes stop the shortcode from working.

### Show Two Buttons on One Post, With the Script Loaded Once

You may want two buttons. One at the top of each post and one at the end.

Each button needs its own `<div>` line, but both can share one copy of Google’s script. Here’s how to split it up:

1. Go to [**Code Snippets » Header & Footer**](https://wpcode.com/how-to-add-header-and-footer-code-in-wordpress/).
2. Paste the first line (the script) into the **Header** box, then click **Save Changes**.
3. Edit your first snippet so it only contains the second line (the `<div>`).
4. Keep its location on **Insert Before Content** and keep the Posts rule.
5. Create a second HTML snippet with the same `<div>` line, set to **Insert After Post**, with the same Posts rule.
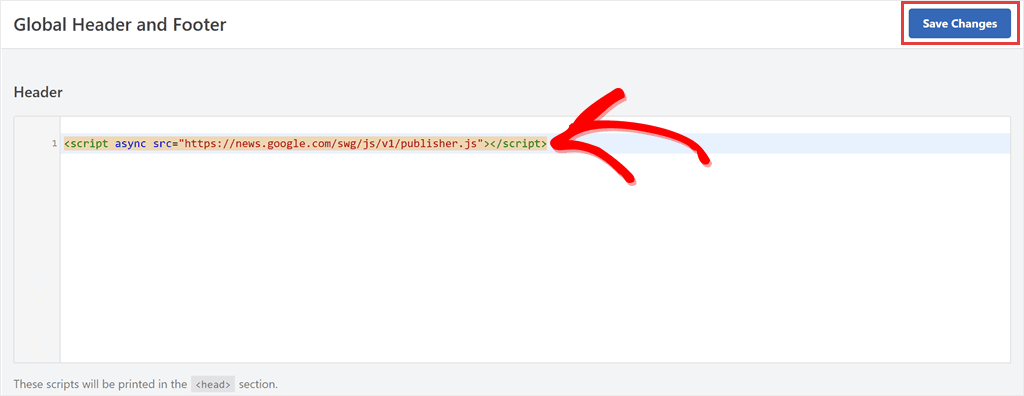
![WPCode Global Header and Footer page with Google's script in the Header box](https://wpcode.com/wp-content/uploads/2026/11/wpcode-header-footer-script.png)*Paste the script into the Header box, then click Save Changes.*

The **Header** box puts the script in your site’s head section, where Google prefers it. It also loads the script on every page of your site.

If you would rather load it only on posts, skip the Header box and put the script in its own [HTML snippet](https://wpcode.com/best-html-snippets-for-wordpress-beginners/) instead.

Set the location to **Site Wide Header** and add two rules: **Post type** **Is** **Posts**, and **Type of page** **Is** **Single post/page**.

### Hide It Where It Doesn’t Belong

The Posts rule is just the start. Smart Conditional Logic has more rules that you can use in the free version of WPCode.

To add one, click **AND** under the Posts rule, then set it up so it leaves the button out, as in each example below.

- **Skip a category.** Add a **Taxonomy term** rule, set it to **Is not**, and pick a category like “Deals” or “Sponsored”.
- **Skip certain URLs.** Use a **Page URL** rule to [leave out a section of your site](https://wpcode.com/how-to-add-scripts-to-specific-pages-in-wordpress/), like your docs.
- **Hide it from your team.** Add a **Logged-in** rule set to **False**, so you and your writers don’t see the button while you work.

Each rule you add becomes another line under the Posts rule.

### Give the Preferred Sources Button Some Space

Want more room above and below the button? Create a new snippet, choose [**CSS Snippet**](https://wpcode.com/how-to-add-custom-css-to-your-wordpress-site/) as the code type, and paste this line:

```
/* Space above and below the Preferred Sources button */
[google-add-preferred-source-btn] { margin: 24px 0; }
```

Hosted with ❤️ by **[WPCode](https://wpcode.com)**

  [1-click Use in WordPress](https://library.wpcode.com/use-snippet/) 

Leave **Insert Method** set to **Auto Insert** and keep the default **Site Wide Header** location. Then activate the snippet.

WPCode [adds the style tags around CSS snippets](https://wpcode.com/best-css-snippets-wordpress/) for you, so you only need to paste the rule itself. Change `24px` to whatever spacing suits your design.

That’s about as far as styling goes.

Google draws the button itself in a sealed-off part of the page, so your CSS cannot change its colors, font, or shape. Your options are the light or dark theme, the language, and the space around it.

### More Placement Options on Paid Plans

Want more control over where the button appears? [WPCode’s paid plans](https://library.wpcode.com/pricing/) (Basic and up) add these options:

- **Inside your byline.** The [**Anywhere (CSS Selector)**](https://wpcode.com/how-to-add-code-snippets-before-html-elements-in-wordpress/) location can put the button next to your author name.
- **After a set number of words.** Place it partway through long articles.
- **On one device type.** Show it only on mobile, for example.
- **During a set time.** [Schedule the snippet](https://wpcode.com/introducing-wpcodes-new-schedule-feature-control-when-your-code-snippets-are-active/) to run for a campaign, then switch off on its own.
- **On specific posts or authors.** Pick exact posts, or only show it on one author’s articles.

Developers can also use Google’s advanced mode to open the same Add to Preferred Sources flow from their own custom button. That’s beyond this guide, but it runs as a regular WPCode snippet too.

---

## WPCode vs Other Ways to Add Google Preferred Sources Button

You’ve now seen what WPCode can do with this button. Here’s how that compares to the other ways people add it to WordPress.

| Method | WPCode | Custom HTML block | Theme code (functions.php) | Single-purpose plugin |
|---|---|---|---|---|
| Shows on every post, including old ones | Yes, with Auto Insert | No, you add it to each post (unless you edit your theme’s post template) | Yes | Yes |
| Touches your theme files | No | No | Yes | No |
| Survives a theme switch | Yes | Yes | No | Yes |
| Placement choices | 6 free in-post spots plus a shortcode, with more on paid plans | Wherever you drop it | Wherever you code it | The spots that plugin offers |
| Hide by category, URL, or login | Yes, free rules | No | Only if you code it | Depends on the plugin |
| Extra plugin to install | WPCode (free), which also runs your other snippets | None | None | One plugin for this one button |
| If something goes wrong | Switch the snippet off | Delete the block | A PHP typo can take your site down | Deactivate the plugin |

A [Custom HTML block](https://wpcode.com/how-to-add-custom-html-code-to-wordpress-site/) is fine for one or two posts, and you might already know how to add one. Theme code works if you’re comfortable with PHP and never plan to change themes.

If you want the button on every post, in the spot you picked, and off the pages where it does not belong, that’s the WPCode column. It’s what you set up in the steps above.

---

## FAQs: Add Google Preferred Sources Button

### My blog is at example.com/blog. Can I still add the button?

No. Google only accepts sites at the domain or subdomain level, like example.com or blog.example.com. A subfolder like example.com/blog is not eligible. Check Google’s source preferences tool to see whether your site shows up.

### Will the Preferred Sources button improve my rankings?

Google doesn’t say it does. It says that once readers pick your site, your content is more likely to appear in Top Stories for them, with a “preferred” badge. Think of it as a way to bring loyal readers back, not a sitewide ranking boost.

### Can I add it without JavaScript?

Yes. Google also offers a plain link: `https://www.google.com/preferences/source?q=yourdomain.com`. Swap in your domain and use it in emails, newsletters, or social posts. The trade-off is that readers tick the box themselves on Google’s page and are not sent back to your post.

### Can I show the button on pages too?

Yes. Open your snippet and change the rule from **Posts** to **Pages**. To show it on both, turn off **Enable Logic**. That also shows it on any custom post types your site has.

### How do I remove the button later?

Go to **Code Snippets**, find your snippet, and switch it to **Inactive**. The button disappears from every post at once. There is nothing to undo in your theme, and you can switch it back on anytime.

---

## Add Google Preferred Sources Button to Your Posts Today

You’ve added Google’s Preferred Sources button without editing your theme. You can now control where it appears and which posts show it.

Start with Steps 1 to 5. The whole setup takes about five minutes, and you can check it in a private window as soon as you’re done.

Want to add the button and manage the rest of your site’s code from one place? 
**[Get WPCode for free →](https://wordpress.org/plugins/insert-headers-and-footers/)**

Want to put the button in your byline, show it only on mobile, or schedule it for a campaign? 
**[See WPCode pricing →](https://wpcode.com/pricing/)**

---

## Additional Resources

These [guides help you get more out of the snippet](https://wpcode.com/what-is-a-code-snippet-wordpress/) you just built.

- **[How to Add Social Share Buttons in WordPress](https://wpcode.com/how-to-add-social-share-buttons-in-wordpress/)**: add more ways for readers to share and follow your posts
- **[9 Tips to Easily Manage Code Snippets in WordPress](https://wpcode.com/tips-to-easily-manage-code-snippets-in-wordpress/)**: keep your snippets organized as you add more
- **[5 Best WordPress Code Snippets Plugins](https://wpcode.com/best-wordpress-code-snippets-plugins/)**: see how WPCode compares to other code plugins

---

**Categories:** Informational

**Tags:** conditional logic, Google Preferred Sources, html snippets, page specific snippet, WordPress SEO

---

